
Join Temitope Soyoye as she takes us on a 30 Days coding challenge.
Tag any aspiring developer and retweet.
Don't forget to follow us as well so that you get to see updates.
Tag any aspiring developer and retweet.
Don't forget to follow us as well so that you get to see updates.
Who is this challenge for?
1. People don't know anything about coding but will love to learn.
2. Intermediate who will love to advance their skill set.
3. Enthusiast.
You will be learning, practicing and implementing at the same time.
1. People don't know anything about coding but will love to learn.
2. Intermediate who will love to advance their skill set.
3. Enthusiast.
You will be learning, practicing and implementing at the same time.
What will be built?
Developer's Profile page.
Developer's Profile page.


Who is ready? Leave a comment let's me you as we kick-start
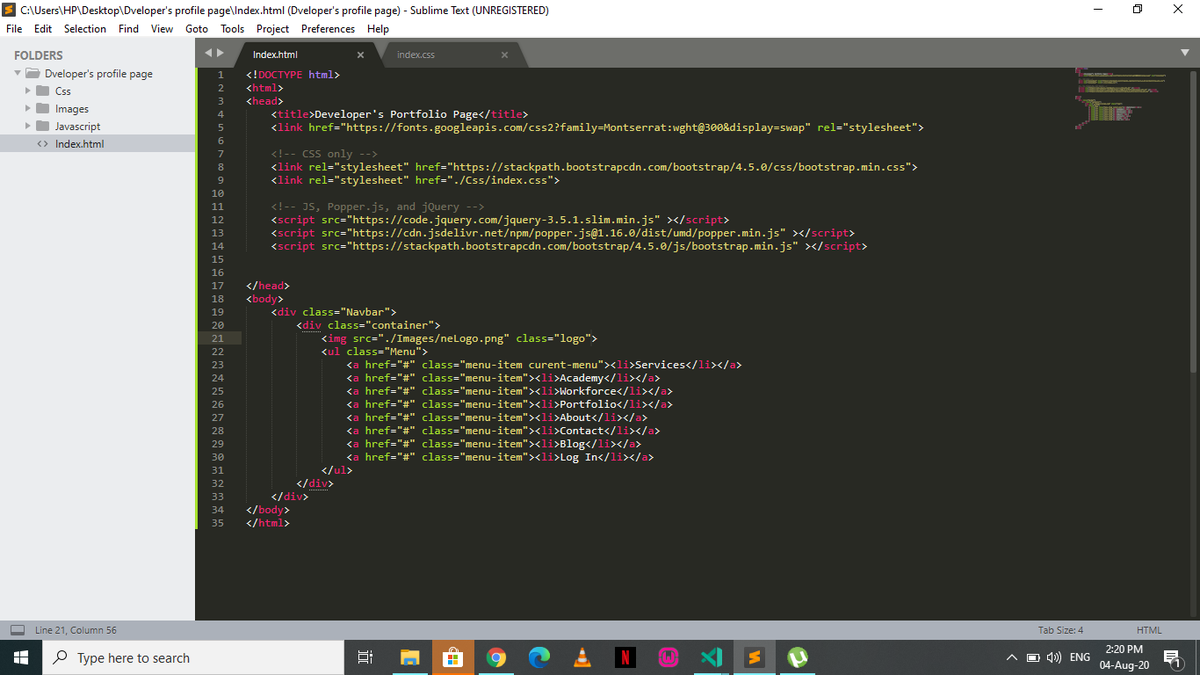
Day 1: Project Set-Up
Follow the steps below to setup your project:
Step 1: Create your project folder on your computer and name it "Developer's Profile Page"
Step 2: Create three folders inside the project folder with the names "Images, Css and Javascript"
Follow the steps below to setup your project:
Step 1: Create your project folder on your computer and name it "Developer's Profile Page"
Step 2: Create three folders inside the project folder with the names "Images, Css and Javascript"

Step 3: Download & install a text editor (Sublime, Notepad, Atom or VS-Code)
Step 4: In your "Developer's Profile Page" create a file and save it as index.html (.html is a file extension for html documents)
Step 5: Copy the code in the screenshot and save it in the file......
Step 4: In your "Developer's Profile Page" create a file and save it as index.html (.html is a file extension for html documents)
Step 5: Copy the code in the screenshot and save it in the file......
By this, you have successfully created your basic structure for our project. Leave a comment below if you're finding it difficult to setup your project. See you tomorrow
#30daysofcode
#30daysofcode
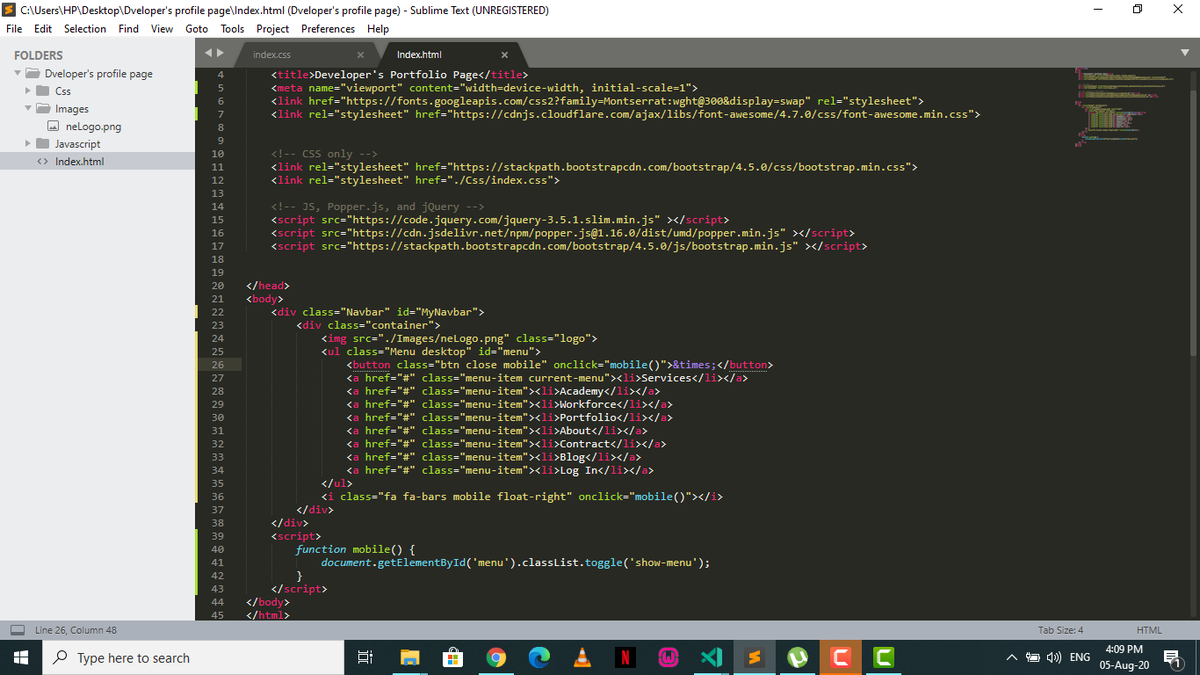
DAY 2
We will be building the Navigation bar today.
Below is the end result using HTML & CSS
#30DaysOfCode #challenge #frontend
We will be building the Navigation bar today.
Below is the end result using HTML & CSS
#30DaysOfCode #challenge #frontend
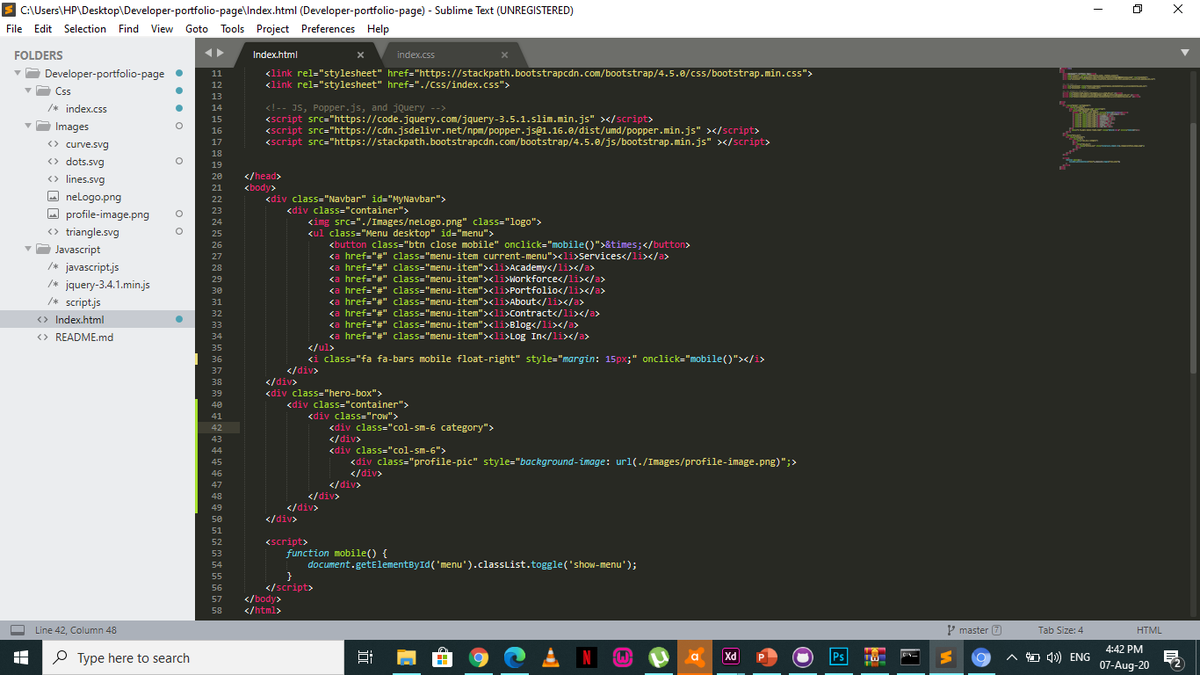
Below is a screenshot of the HTML code.
Written inside the index.html file
Written inside the index.html file
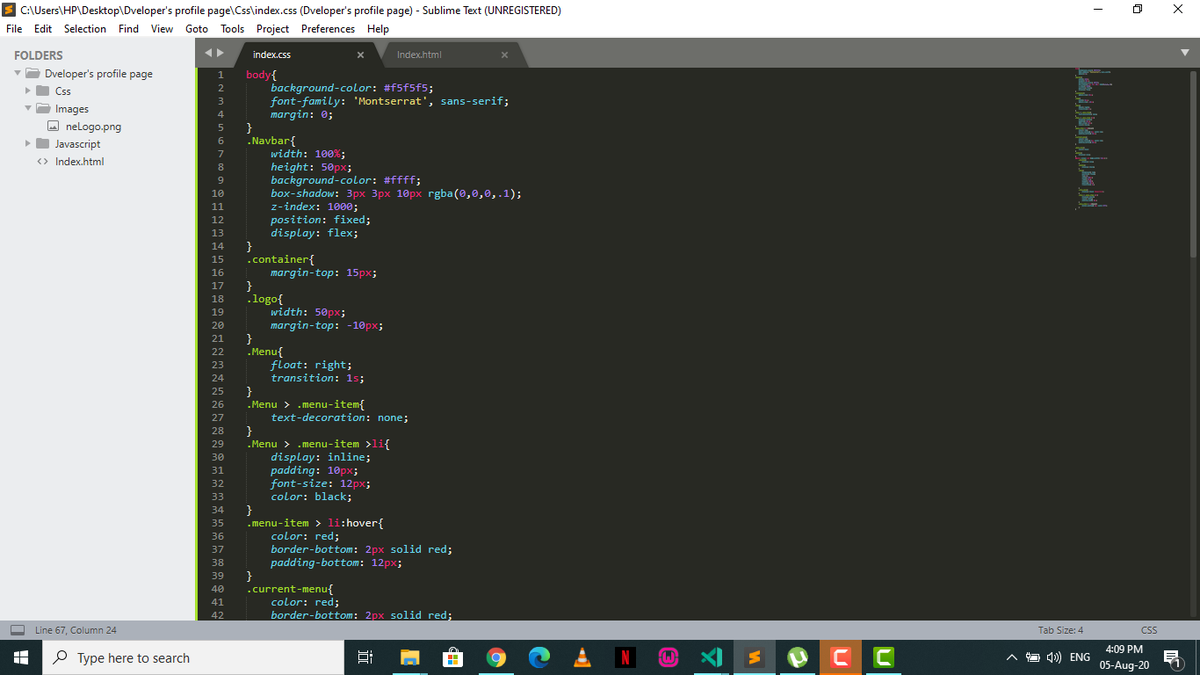
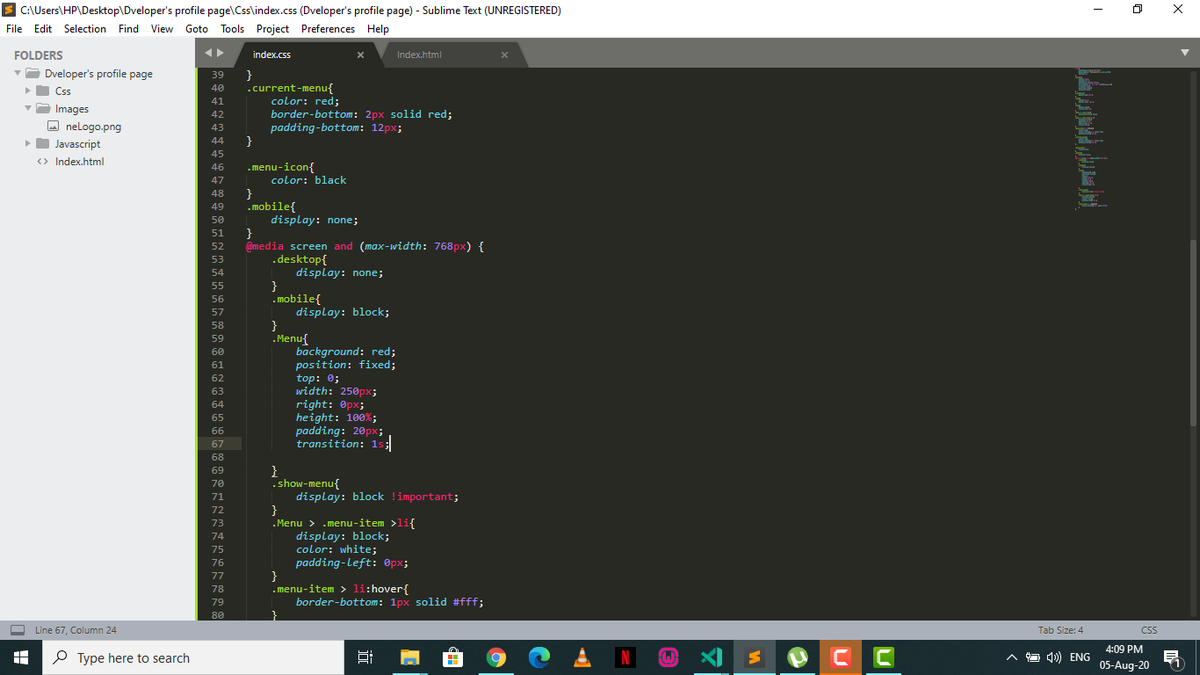
Below is the screenshot of the CSS code.
Added as external CSS and link to the index.html file
Added as external CSS and link to the index.html file

Need more explanation? Click on the link below to watch the video on how I arrived at the finished result.
Don't forget to retweet, follow and turn on post notification so as not miss out on subsequent tweets.
Don't forget to retweet, follow and turn on post notification so as not miss out on subsequent tweets.
DAY 3
Today we will be making the navigation bar we created yesterday responsive( this means the nav responds according to the screen you view from)
Below is what a responsive Navigation bar looks like:
Today we will be making the navigation bar we created yesterday responsive( this means the nav responds according to the screen you view from)
Below is what a responsive Navigation bar looks like:


Below are screenshots of the html and css file of the code.
You can download the code from my Github as well by clicking on this link: github.com/Temitope0610/D…
Don't forget to like, retweet and put on notification so as not to miss out #30Daysofcode
You can download the code from my Github as well by clicking on this link: github.com/Temitope0610/D…
Don't forget to like, retweet and put on notification so as not to miss out #30Daysofcode
DAY 4
Today, we will be creating the hero box using HTML and Css
Below is what the finished result looks like:
Today, we will be creating the hero box using HTML and Css
Below is what the finished result looks like:

Step 1: Create a class and name it "hero-box"
Step 2: Style the "hero-box" in the css file by adding width,height and background-color.
P.s: Remove the background color you gave the body in the css file earlier.
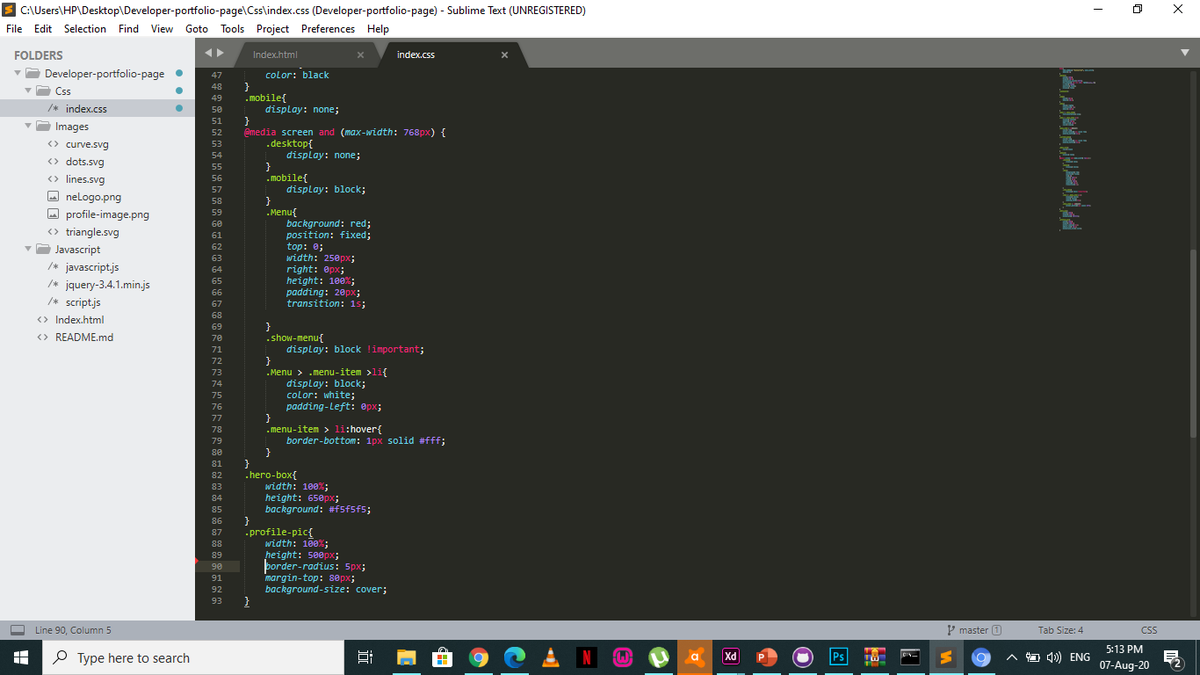
See the screenshots of the HTML and css files below.
Step 2: Style the "hero-box" in the css file by adding width,height and background-color.
P.s: Remove the background color you gave the body in the css file earlier.
See the screenshots of the HTML and css files below.


You can also check and the download the code from the following link: github.com/Temitope0610/D…
#30DaysOfCode
#30DaysOfCode
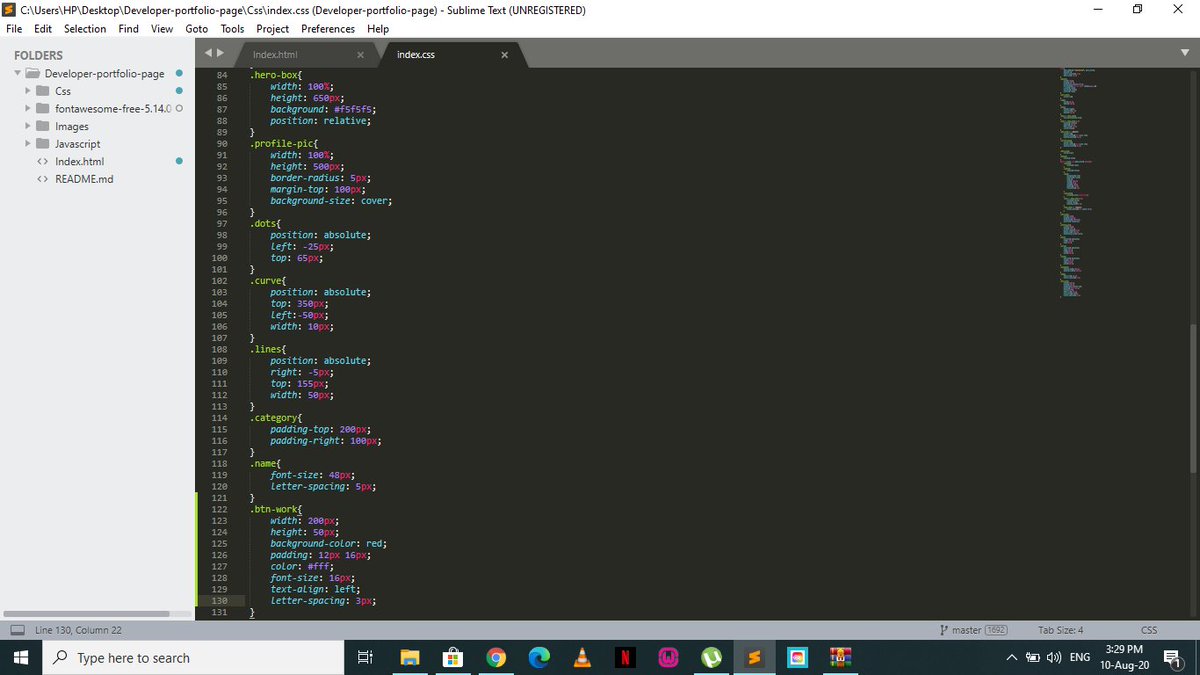
DAY 5
Today, we are adding the Profile image to our portfolio.
Below is a screenshot of what the finished result is:
Today, we are adding the Profile image to our portfolio.
Below is a screenshot of what the finished result is:

Follow the steps below to achieve this:
Step 1: Inside the "hero-box" we created yesterday, create a div, give it a class name "container", in the "container", open another div and give it a class name "row". Divide the row into two columns(two divs)
Step 2: In the second column
Step 1: Inside the "hero-box" we created yesterday, create a div, give it a class name "container", in the "container", open another div and give it a class name "row". Divide the row into two columns(two divs)
Step 2: In the second column
, create an image tag(img), give it a class name "profile-pic" and place the profile image as a background image using inline css.
Step 3: In your css file, style the "profile-pic" by adding width, height, border-radius,margin-top and background size.
Step 3: In your css file, style the "profile-pic" by adding width, height, border-radius,margin-top and background size.
Check below for the screenshots of the HTML and Css files.
Also, you can check and download the code here:github.com/Temitope0610/D…
#30DaysOfCode
Also, you can check and download the code here:github.com/Temitope0610/D…
#30DaysOfCode
DAY 6
Today we are adding SVG (Scalable Vector Graphics)format shapes to our page(as seen in the portfolio page at the beginning of this thread)
See below for screenshot of what the result looks like:
Today we are adding SVG (Scalable Vector Graphics)format shapes to our page(as seen in the portfolio page at the beginning of this thread)
See below for screenshot of what the result looks like:

Here are steps on how to achieve this:
Step 1: Get your svg shapes and save in the images folder
(you can download the shapes i used from the github link pasted at the end of this tweet)
Step 2: Put them in img tags inside both columns created earlier(check code screenshots...
Step 1: Get your svg shapes and save in the images folder
(you can download the shapes i used from the github link pasted at the end of this tweet)
Step 2: Put them in img tags inside both columns created earlier(check code screenshots...
for correct placement)
Step 3: Give each a class name of your choice
Step 4: Style each of them in the css file by adding position, top,left/right, and width.
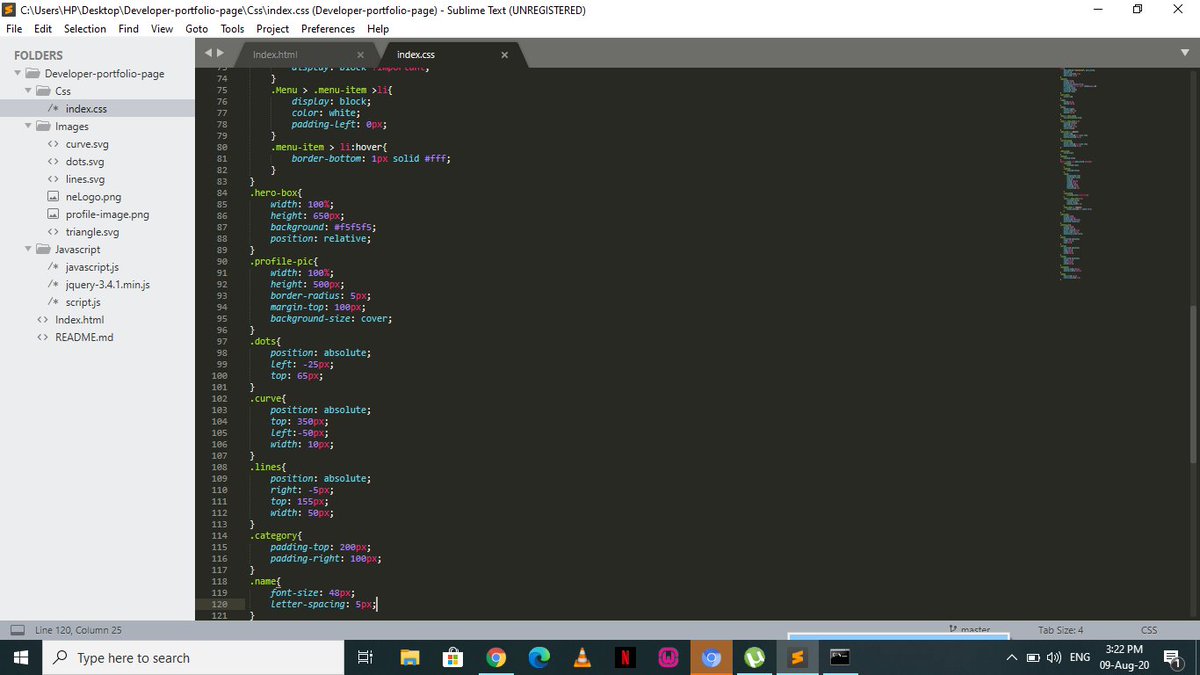
Your shapes should be in the right places by now. Check screenshots of the HTML and css files below for clarity.
Step 3: Give each a class name of your choice
Step 4: Style each of them in the css file by adding position, top,left/right, and width.
Your shapes should be in the right places by now. Check screenshots of the HTML and css files below for clarity.


Also, check and download the code from this link: github.com/Temitope0610/D…
Don't forget to like, retweet and turn on notifications for more.
#30DaysOfCode
Don't forget to like, retweet and turn on notifications for more.
#30DaysOfCode
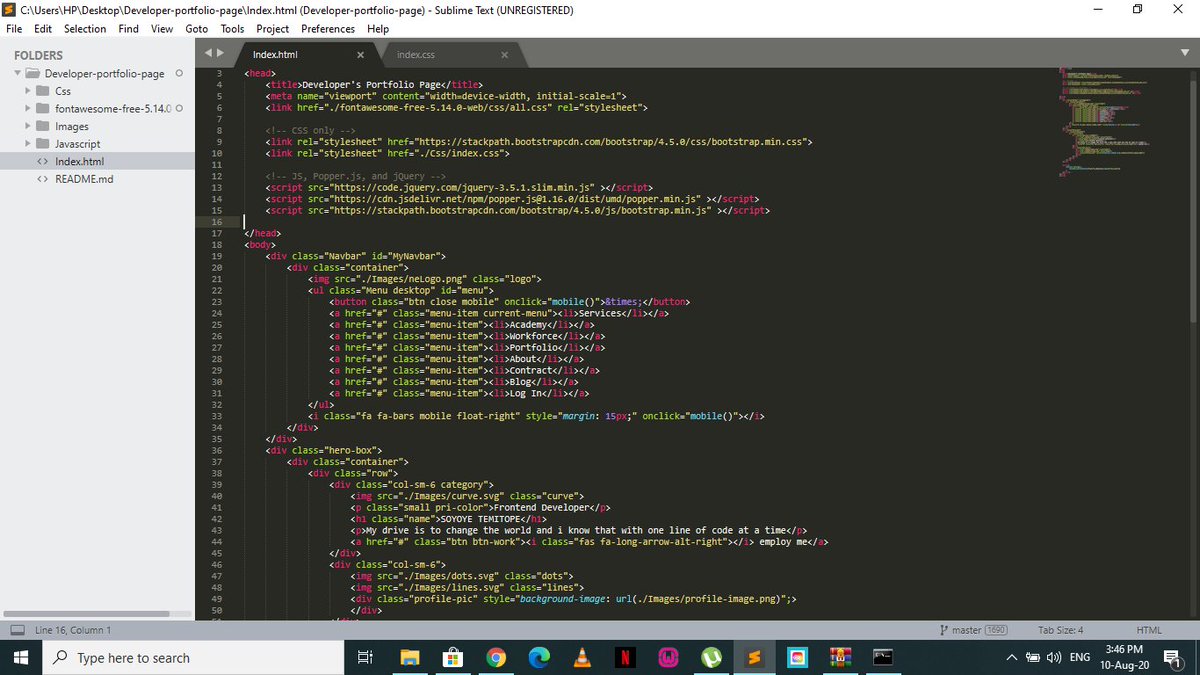
DAY 7
Hi guys, so today we are adding some texts to our page.
Below is what your page should look like at the end of this:
Hi guys, so today we are adding some texts to our page.
Below is what your page should look like at the end of this:

You can achieve this by following the steps below:
Step 1: Give the first column we created earlier a class name of "category"
Step 2: Inside the div, open a paragraph tag(<p>), give it a class "pri-color" and write the first text in it(Frontend Developer) and close the tag
Step 1: Give the first column we created earlier a class name of "category"
Step 2: Inside the div, open a paragraph tag(<p>), give it a class "pri-color" and write the first text in it(Frontend Developer) and close the tag
Step 3: Open an heading tag(<h1>), give it a class name "name", add the next text which is your full name, then close the tag.
Step 4: Open another paragraph tag(<p>) and write the last text in it, close tag.
Step 4: Open another paragraph tag(<p>) and write the last text in it, close tag.
Step 5: In the css file, add letter-spacing and font-size to the body.
Step 6: Style the class name "pri-color" by adding color
Step 7: Style the class name "category" by adding padding-top and padding-right.
Step 8: Lastly, we style the class name "name" by adding font-size and
Step 6: Style the class name "pri-color" by adding color
Step 7: Style the class name "category" by adding padding-top and padding-right.
Step 8: Lastly, we style the class name "name" by adding font-size and
letter-spacing.
Check and download the code from the following link: github.com/Temitope0610/D…
Also, check out screenshots of the HTML and Css files below
Retweet, like and turn on notifications for more updates
#30DaysOfCode
Check and download the code from the following link: github.com/Temitope0610/D…
Also, check out screenshots of the HTML and Css files below
Retweet, like and turn on notifications for more updates
#30DaysOfCode


DAY 8
We will be adding a button to our page today.
Below is what the finished work should look like:
We will be adding a button to our page today.
Below is what the finished work should look like:

The following steps are how i achieved this:
Step 1: Still inside the column we created earlier, open a link tag<a>, give it a class name "btn btn-work",.
Step 2: Go to fontawesome.com(download the file for web inside your work folder,link it in your head tag),
Step 1: Still inside the column we created earlier, open a link tag<a>, give it a class name "btn btn-work",.
Step 2: Go to fontawesome.com(download the file for web inside your work folder,link it in your head tag),
search for "right-arrow", get the Html link and paste inside the link tag...,type a text "employ me" right after it.
Step 3: In your Css files, style the class name "btn-work" by adding width, height, background, padding, color, font-size and letter-spacing.
Step 3: In your Css files, style the class name "btn-work" by adding width, height, background, padding, color, font-size and letter-spacing.
Check below for screenshots of the HTML and Css files for correlation.
Here's the link to also check and download the code:github.com/Temitope0610/D…
Retweet, like and turn on notifications for more updates.
#30DaysOfCode
Here's the link to also check and download the code:github.com/Temitope0610/D…
Retweet, like and turn on notifications for more updates.
#30DaysOfCode
DAY 9
Task for today is for us to add another shape to our portfolio page.
See below for what the result of this should look like:
Task for today is for us to add another shape to our portfolio page.
See below for what the result of this should look like:

We are achieving this in a few steps. Check below:
Step 1: Open a div right after the close of the div that carries the "hero-box", give it a class name "container", inside it, open another div and give it a class name "redbox desktop" and close the divs.
Step 2:......
Step 1: Open a div right after the close of the div that carries the "hero-box", give it a class name "container", inside it, open another div and give it a class name "redbox desktop" and close the divs.
Step 2:......
Open another div after closing the div that carries "container", give it a class name "bio-section".
Step 3: In your css files, style the class names "redbox" and "bio-section" by adding width, height, background-color, border-radius, position and top.
Step 3: In your css files, style the class names "redbox" and "bio-section" by adding width, height, background-color, border-radius, position and top.
Below are screenshots of the HTML and Css files, you can also check and download the code from this link:github.com/Temitope0610/D…
Join me tomorrow as we continue to build our portfolio page. Don't forget to like, retweet and turn notifications on.
#30DaysOfCode
Join me tomorrow as we continue to build our portfolio page. Don't forget to like, retweet and turn notifications on.
#30DaysOfCode
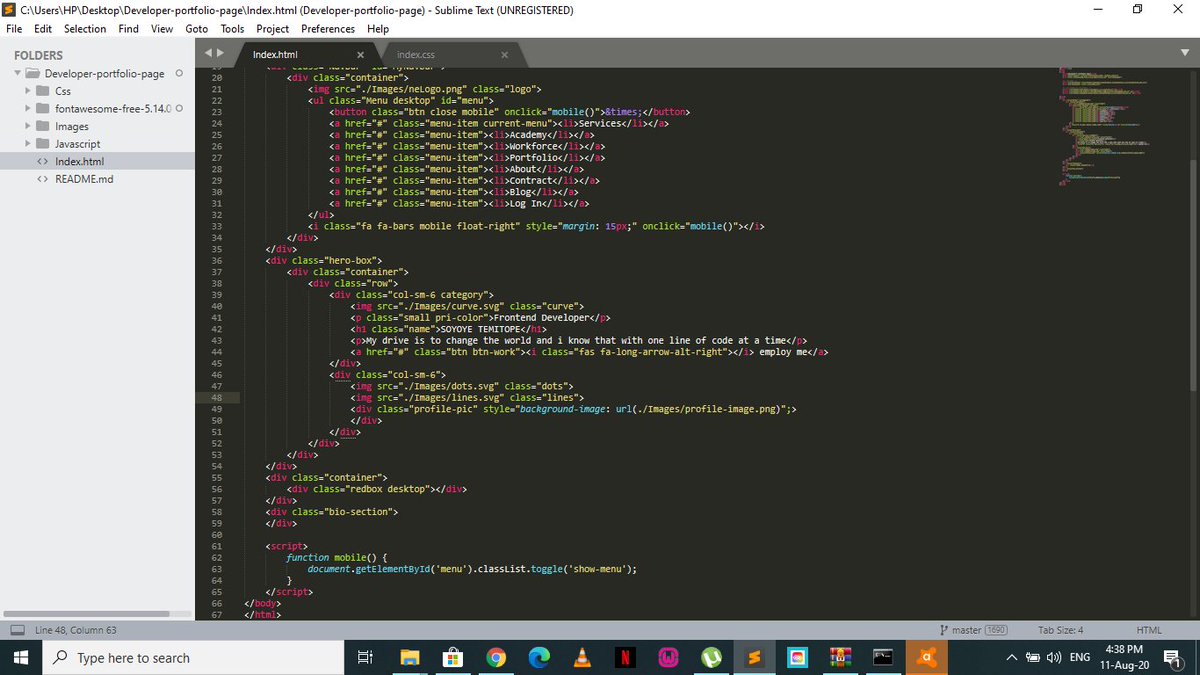
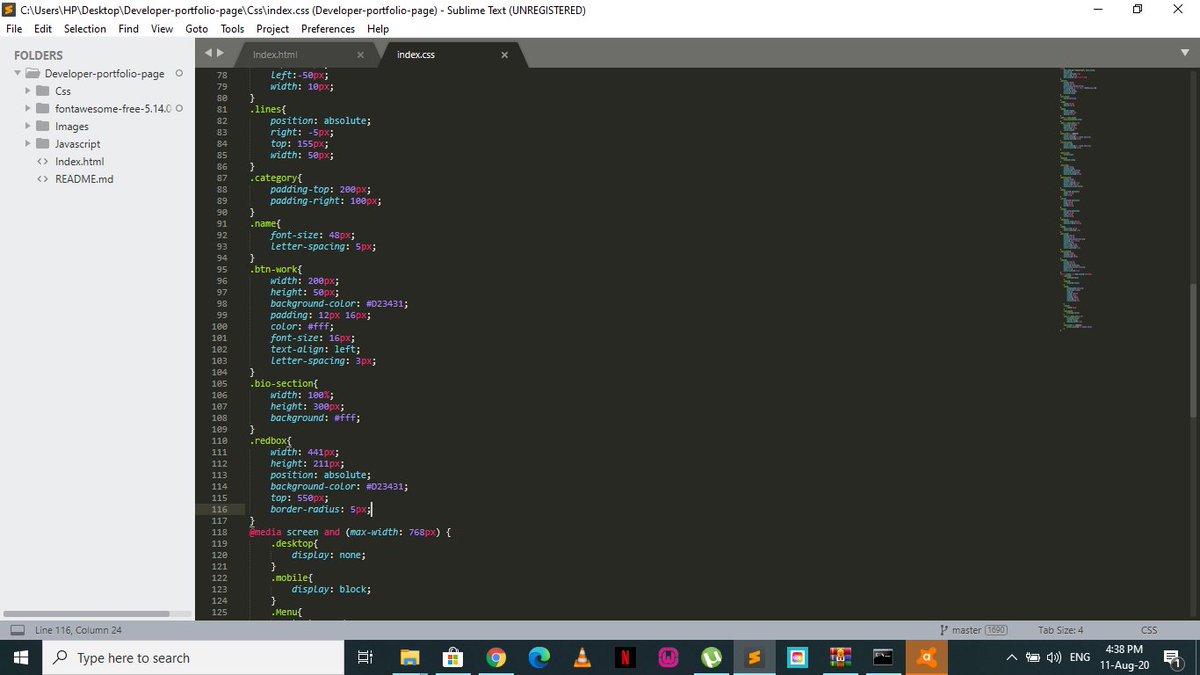
DAY 10
We are creating the bio section today.
See below for what the finished result should look like:
We are creating the bio section today.
See below for what the finished result should look like:

To achieve this, check the following steps:
Step 1: Inside the div named "bio-section" created earlier,open another div and give it a class name "container",create a div in it and give it a class name"row". In the div "row",create two divs and give them "col-sm-4" and "col-sm-8"
Step 1: Inside the div named "bio-section" created earlier,open another div and give it a class name "container",create a div in it and give it a class name"row". In the div "row",create two divs and give them "col-sm-4" and "col-sm-8"
respectively.
Step 2: In the div "col-sm-8" add another class name "bio" and inside it, open the following tags and add the texts as shown in the screenshots below; '<h1> and <p>'.
Step 3: In the css file,style all the class names created as seen in the css file screenshot below
Step 2: In the div "col-sm-8" add another class name "bio" and inside it, open the following tags and add the texts as shown in the screenshots below; '<h1> and <p>'.
Step 3: In the css file,style all the class names created as seen in the css file screenshot below
HTML and Css files are available below for your perusal.
Also, check and download the code from the following link:github.com/Temitope0610/D…
Like, retweet and turn on notifications for more updates.
Also, check and download the code from the following link:github.com/Temitope0610/D…
Like, retweet and turn on notifications for more updates.

