
FURSUIT MEGATHREAD--making Cocoa the fennec fox!
i'm going to be attempting to make a fursuit for myself, and figured it'd be fun to showcase the whole process here. over the next several weeks, i'll be gradually updating this thread as i make more progress. #furry #fursuit
i'm going to be attempting to make a fursuit for myself, and figured it'd be fun to showcase the whole process here. over the next several weeks, i'll be gradually updating this thread as i make more progress. #furry #fursuit
PLEASE KEEP IN MIND--this is not meant to be a tutorial of any kind, and i am not a professional!! i'm just some random person with absolutely no sewing or fursuit making experience, so if i do anything wrong (i will definitely do several things wrong,) don't get too mad at me!
that being said, constructive criticism is certainly appreciated if you do know what you're doing and have any suggestions or tips ❤️
to start off, here's the lovely ref by ScrapTeeth that i'll be using for this project! i really love how they reinterpreted cocoa's design without all of those pesky gradients and splotches that are hard to achieve on real fur. 

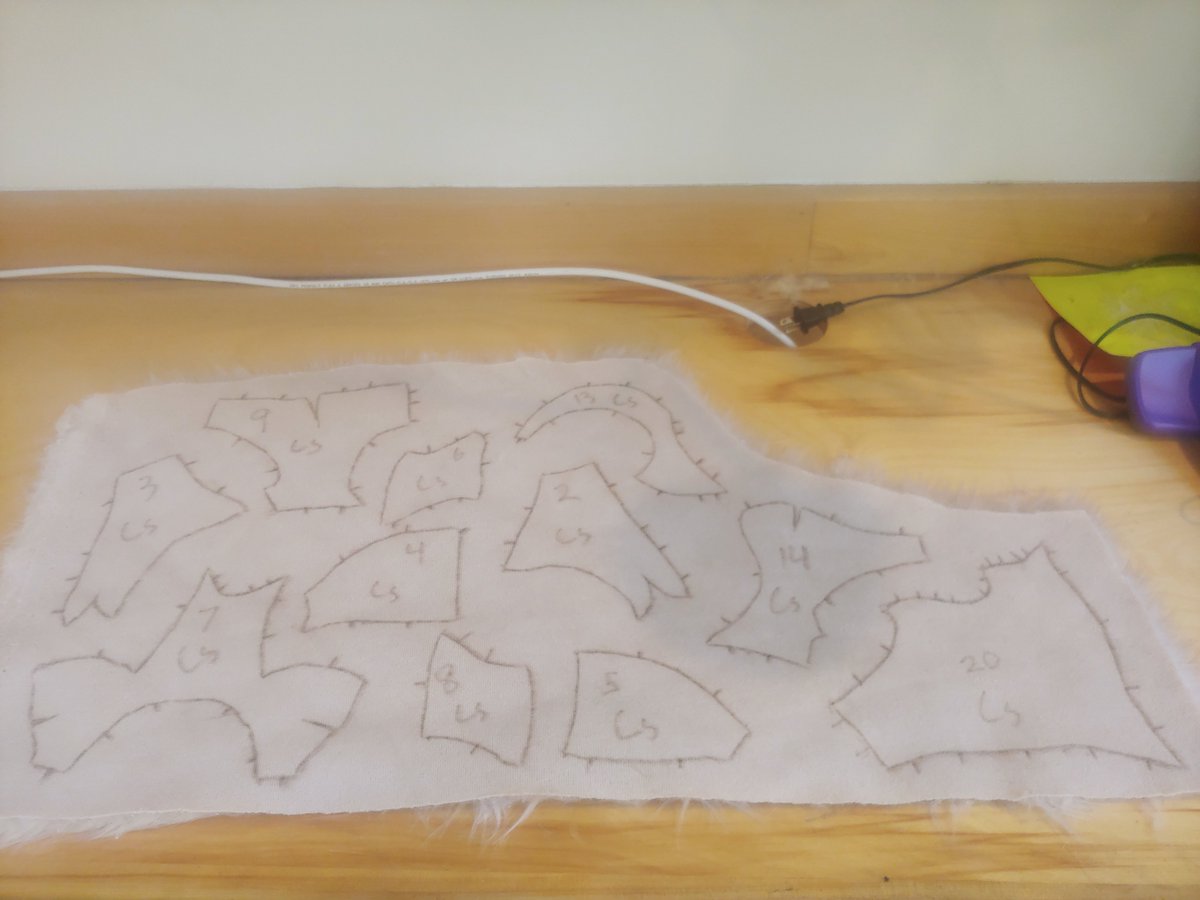
so, first of all, i'm going to be making some hand paws! for these, i'll be using a pattern from the wonderful Kloofsuits--check them out on Etsy! i'll be using BigZFabric's luxury shag in Blonde and Camel, with pink minky for the pawpads and lycra spandex for the liners.


to start, these pattern pieces all need to be traced out onto their appropriate colors of fur. using sewing pins to pin the patterns onto the fur is a bit finnicky, but it worked well enough. this laundry marker is supposedly bleed-resistant... hopefully that's true!


i had to be pretty careful cutting these out to avoid chopping up all the fur... please don't judge my seam allowance, i know it's uneven 😭but now it's time to brush and shave the pieces! this step is so satisfying to me. just look at the after vs before... so nice and smooth!


after repeating this process for each piece and filling my lungs with tiny fur particles, they're all done! time to start turning these scraps into a real set of paws!!


SO! the first step will be to applique on the pawpads. basically, this means pinning a big piece of minky onto the fur, sewing along the outline of the pawpad, and then trimming of all the excess minky around the edges. for me, this step was pretty hard and took quite a while...


but once it's finished, we have some nice looking (if not a bit lopsided) pawpads! i'm sure this is one of those steps where you can really benefit from having sewing experience, but that will come with practice :)


now that the pads are finished, it's time to start sewing these pieces together. i'll start by sewing the wrist onto the palm piece, followed by each finger, one by one. i used a blanket stitch for this to make sure it's nice and secure.


the bottom half of our paw is finished, which means it's time to start on the top half! first of all, i need to sew shut the darts in the tops of each toe. this forces the fur to curve into a nice rounded shape, so our paws don't end up looking flat.


i'll then sew each toe onto the back of the hand, using a blanket stitch just like before... and there we go, both halves of the paw are finished! now you can really start to see how these things will look when they're finished!


alright, you can probably guess what's next... it's time to sew the top and bottom halves of the paw together. these pieces are large and bulky enough that machine sewing them would be very difficult and awkward, so i did the whole thing by hand, using a blanket stitch again.


all done! now, this is a fun step: we'll cut little incisions in the back of each pawpad, stuff in a little bit of poly-fil stuffing, and then sew them shut again. this will make each pawpad extra soft and squishy!


the paws are almost finished now, but before we turn them inside out, we need to install the liner. i'll cut a simple liner shape out of lycra fabric, sew it together, and then sew the whole thing onto the paw. this will make the paws much comfier to wear.


the final step would be to install a cuff at the wrist, but i'll be doing this later on. after very carefully turning the paw inside out... we're finally fini--jk, we still have to go back and redo all these steps for the other paw! i'll be doing that off camera :D


well, we're all done with part one of this little series, but there's still a whole lot of work left ahead of us! i'll continue updating this thread over the next few weeks as i make more progress on the rest of the suit, so stay tuned :) thanks for reading!!
hello again, everyone! it's been a while but i'm finally back, and this time, i'm gonna be working on the tail :D cocoa has a giant stupid fluffy tail that just barely touches the floor--this thing is going to take a LOT of stuffing...
for this, i'll be using a pattern from the incredible Mugiwara Cosplay. we'll trace the pattern pieces once face-up, and then once face-down, so we'll end up with two mirrored sides that fit together.


this top piece here is the biggest, taking up almost half of the length of the tail. as you can see, there are a couple little spots that will be filled with the other colors to give the color transition down the tail more of a dappled look.


last but not least, here's the tip of the tail--it's going to just barely reach the ground, so it's good that it's a darker color! light fur tends to get dirty and stained pretty easily :(


alright, now that all of the pieces are cut out, it's time to sew in those little spots. i found it a bit tricky to pin them in properly, but once i got it right, it was done quickly. they look so smooth and nice after a good brushing with a slicker grooming brush!


it's time to sew the three pieces together! first, i'll sew the two smaller pieces, as they're a bit easier to manage. using a sewing machine on curvy lines like this is still really difficult for me, so i decided to just do it by hand with a blanket stitch.


here's the bigger piece, now... and we're all done! two perfectly mirrored tail halves :) if i ever make a new tail for myself, i might change the design so the splotches aren't symmetrical, but i think this is good enough for now!


here's the biggest step--sewing the two halves of the tail together. doing this by hand would've taken hours, so i decided to just do it with the machine. it was extremely awkward trying to fit this huge bulky tube of fur on my desk, let alone on the machine, but i managed.


now that the tail itself is finished, we've gotta close off the base of it and add loops so it'll attach to a belt. i cut this simple circle pattern for the belt base in half and traced it onto some white felt.


i'm using nylon straps like the kind that come on backpacks to make a couple of belt loops here. first, i pin them onto the bigger half of the circle, sew them at the edge, and then sew the smaller half of the circle on top so they loops end up tucked nicely into the middle.


now it's time to pin the belt base onto the tail and sew it on! easy, right? you'd think!!! turns out, this was actually super difficult, and i did a pretty messy job of it.. but once the tail was flipped inside out again, it looked decent enough.


wait, how did i flip the tail inside out? ... well, that was the second mistake i made, i forgot to leave a hole to flip and stuff the tail! i had to make an incision near the base, carefully stuff the tail full of poly-fil fiber, and then sew it shut again with a ladder stitch.


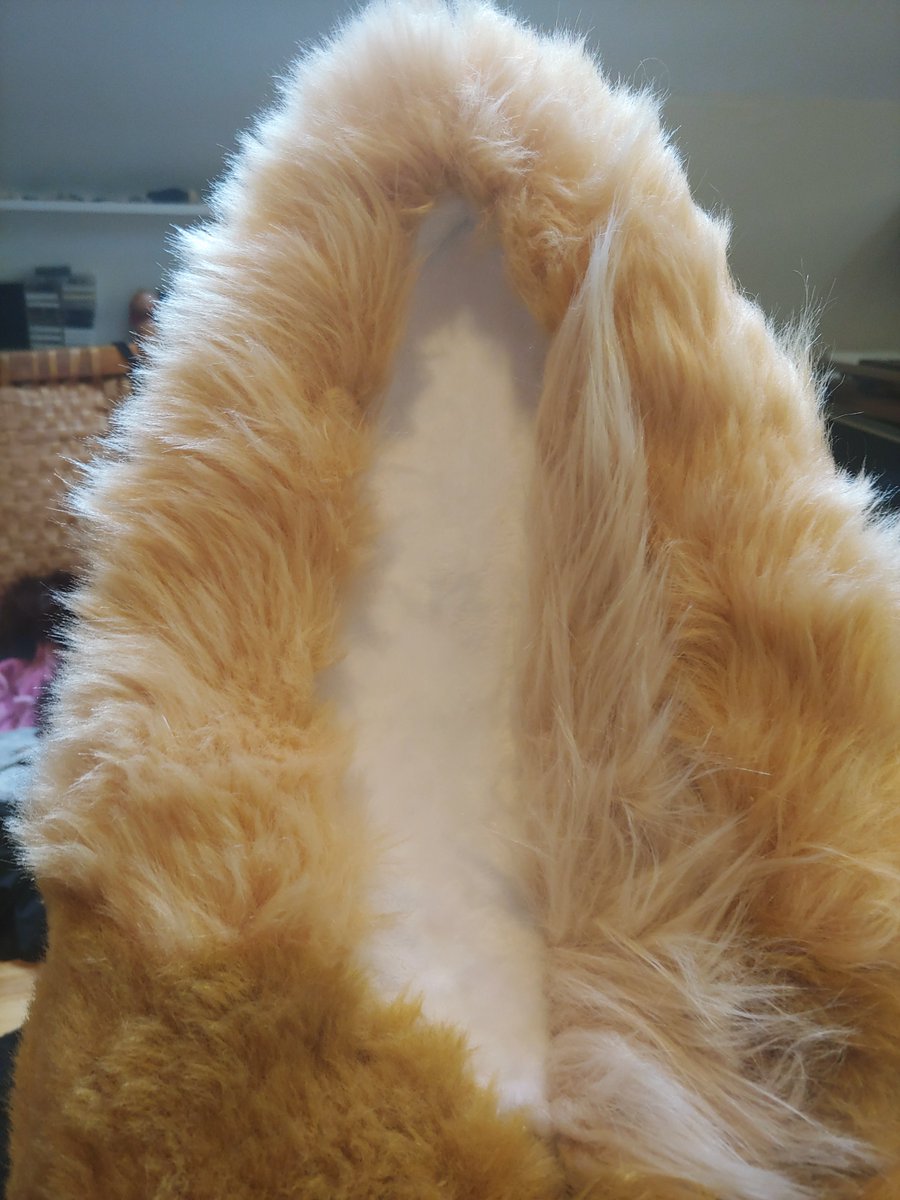
and just like that, here it is, our beautiful fluffy tail!! this thing is huge and awkward, but also super super soft and snuggly, so i'd say it's a worthwhile tradeoff :)

hello for the third time, friends!! finally i'm here with another update, and this time we'll be making our big stompy feet pawbs :D you love to see it!
as per usual, the first step will be tracing all of the pattern pieces onto the fur. i'll be using a pattern from the wonderful Spiltgrapesoda, check them out on etsy! look at all of the little toe pieces--with all the darts, they hardly even look like toes!


next comes the inner lining of the paws, which i'm cutting out of quilted broadcloth so it's extra durable and comfy. after some de-fluffing, shaving, and brushing, they're all done and ready to be sewn!


so the first thing i'll sew are the two biggest pieces, which make up the back of the paw and the ankle--basically, everything other than the toes. this is a relatively easy piece to sew, so it's nice to get out of the way immediately.


once that's done, it's time to sew up all of the little darts in the toe pieces. same as with the hand paws, these darts will allow the toes to rest in a nice 3D curve, so our toes aren't all angular and flat. first up are the outer toes, with two darts to sew.


after those are done, we repeat a similar process to the inner toes, which are a slightly simpler shape and have only one big dart. here they are, all done!


now that we've prepped the toes, it's time to start attaching them to each other! i start by pinning the two inner toes, sewing them up, and then pinning and sewing an outer toe to each side. this sewing takes a long time, so it's great to see them finally start to take shape! :D


next up, we sew the two large ankle pieces together into a cylinder, leaving a little hole open towards the top which we'll use later on to stuff and invert the finished paws.


once the ankles are ready, we need to pin and sew on the toes. this is a really awkward process, since the seam is comprised of multiple tight curves and jagged corners. however, with slow work and patience, it's doable--and, at last, we're almost done with all the sewing.


i was initially planning on making "indoor" paws, which have a base of proper fur and pawpads, but in the end, i decided to opt for "outdoor" paws instead, which have a much more durable base made of solid EVA foam, as they're much more durable for use on rough terrain.
so, unsurprisingly, the next step is to cut out our EVA foam bases. this EVA foam is only 0.5 inches thick, and i'd like it to be 1 inch, so i'm going to be cutting out four bases instead of just two.


now that we've got our bases cut, it's time to glue them together to double the thickness--and for that, we'll be heading outside! ahhh, fresh air... 😌 i paint contact cement onto the pieces, making sure they're firmly attached.


heading back inside, it's time for a very fun step--we can finally release all of our pent up rage by committing manslaughter on these naughty boys. YEAH, THAT'S RIGHT. TAKE IT, YOU PATHETIC LITTLE THING


okay, okay, we're good! we're chill! now we're going to sew together our linings, first attaching each of the two sides and then attaching the bottoms until we've got two weird, ugly socks. thank god these things are going inside of the paws, where no one will ever see them!


now, we'll glue the bottom of the liners onto our foam bases. the hot glue will be able to stick much more firmly due to all of the little scratches and rough spots we made on the foam earlier.

once the bases and liners have had time to fully bond, we simply tuck the base into the bottom of the fur, and very carefully and slowly hot glue all the way around the edges to attach! this is another time-consuming and awkward process, but it's very exciting to have finished.

so now that the base, liner, and fur are all finished, the last step is to make a fleece cuff around the ankle so the paws are easy to put on and take off. the first step is to pin the top of the liner to the top of the fur and sew all the way around with a zigzag stitch.


next, i'll measure the circumference of the top hole and cut out two thin strips of white fleece, which will become the cuffs. i'll then sew each strip together into a little circle, pin it onto the opening of the feet, and sew it on towards the top from the outside.


now, here's probably the most difficult step in the entire process--to give the cuff a nice, clean finish, we flip the fleece circle inside out and sew all the way around from the outside one last time. once this is done, we can simply trim any excess fleece inside of the paw.


the final step before these things are finished is to stuff them up with poly-fil! using the hole we left unsewn earlier on, we'll carefully stuff poly-fil into the toes and around the sides of the paw, making sure it's nice and squishy before sewing the hole shut.


and just like that, our feet paws are finished!! these things are really cute and shockingly comfortable to wear--i've found myself walking around in them just for fun, and despite the foam base, they're still super soft and huggable! i'm so happy with how they turned out :D


hello yet again, friends!! after all these weeks spent on the paws and tail, it's finally time to make the star of the show: the head!! i've actually been working on this on and off at the same time as the other parts over the past month or so, but it's finally finished :D
so, before we can start on the head itself, we need to make a stand to hold it. i don't have an actual mannequin head, so i fashioned this thing out of some styrofoam and towels, made sure it was the correct measurements to fit my head, and covered it in plastic wrap.


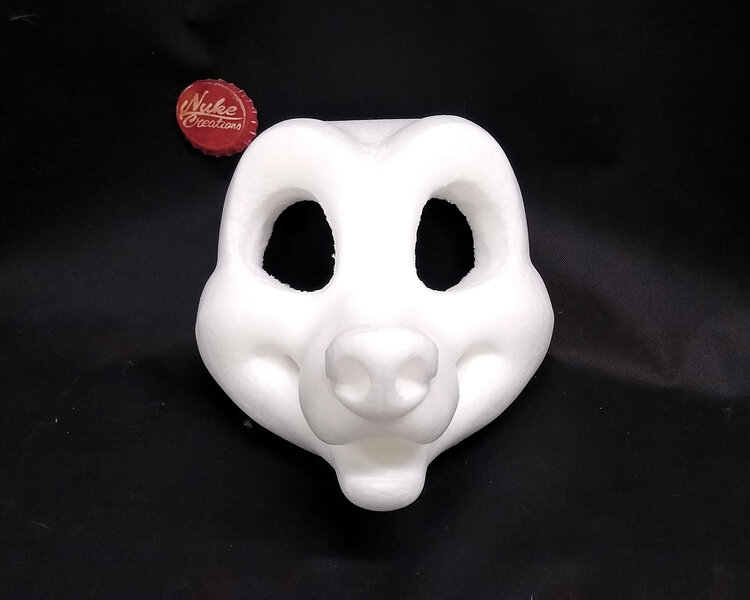
for this project, i'm going to be using a foam head base by Nuke Creations. i originally planned to sculpt the base myself, but ultimately decided not to due to time constraints and limited foam availability. i ended up going with their "small canine" base!
this base comes with only the face, so the first step of the process was to give it sides and a back so that it's actually wearable. i couldn't find a pattern or tutorial for this step, so i just messed around with various shapes until i settled on one that worked well enough.


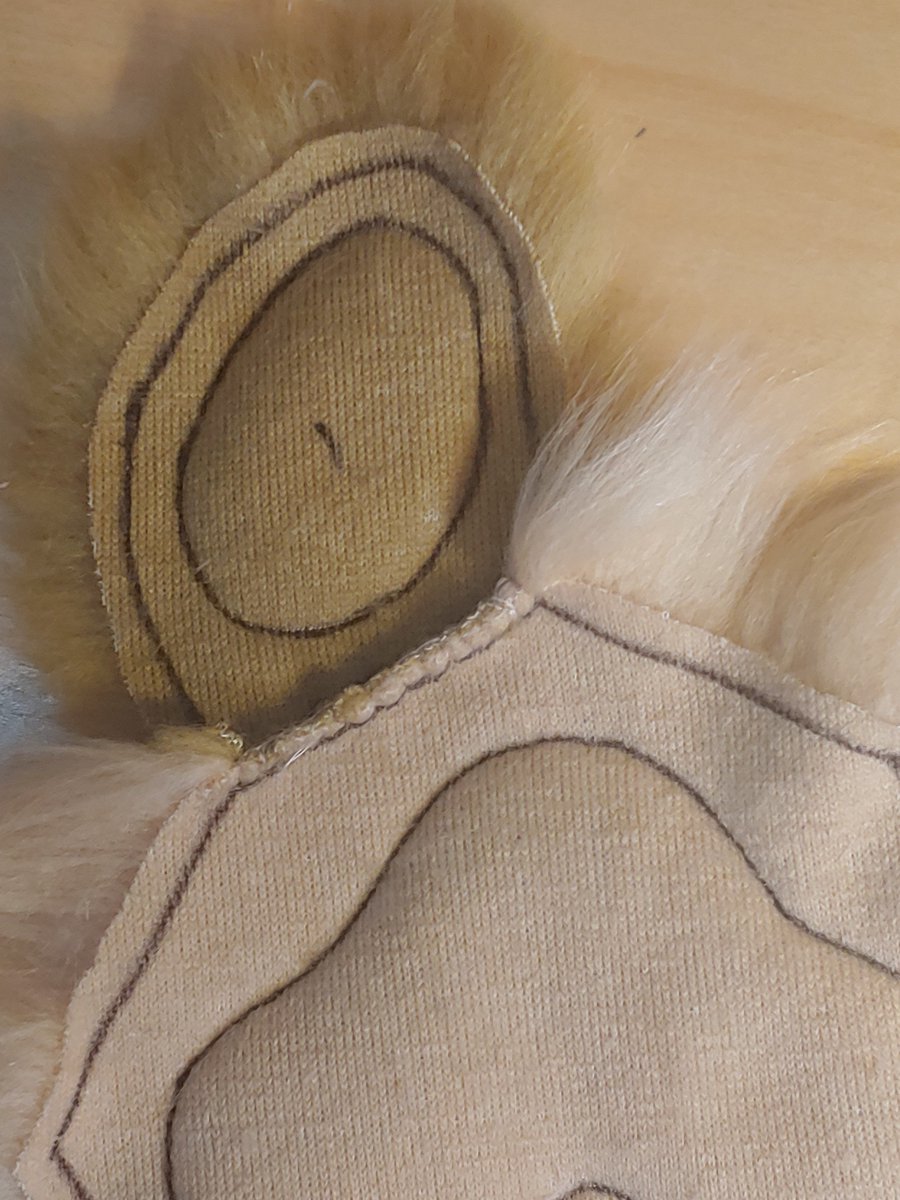
after finishing the back of the foam, i moved onto the ears, which are made out of relatively thin EVA foam for both strength and flexibility. these things are pretty huge... #justfennecthings


i then cut and shaped some half inch upholstery foam to go around the edge of the ears, giving them extra dimensionality and squishiness; after they're furred, this will help to create the illusion of a real three-dimensional ear with an inside and outside.


i then cut out some thin strips of white fleece and glued them around the edges of the ears, which will help make them much more secure and allow them to bend without the risk of accidentally tearing them from the head.


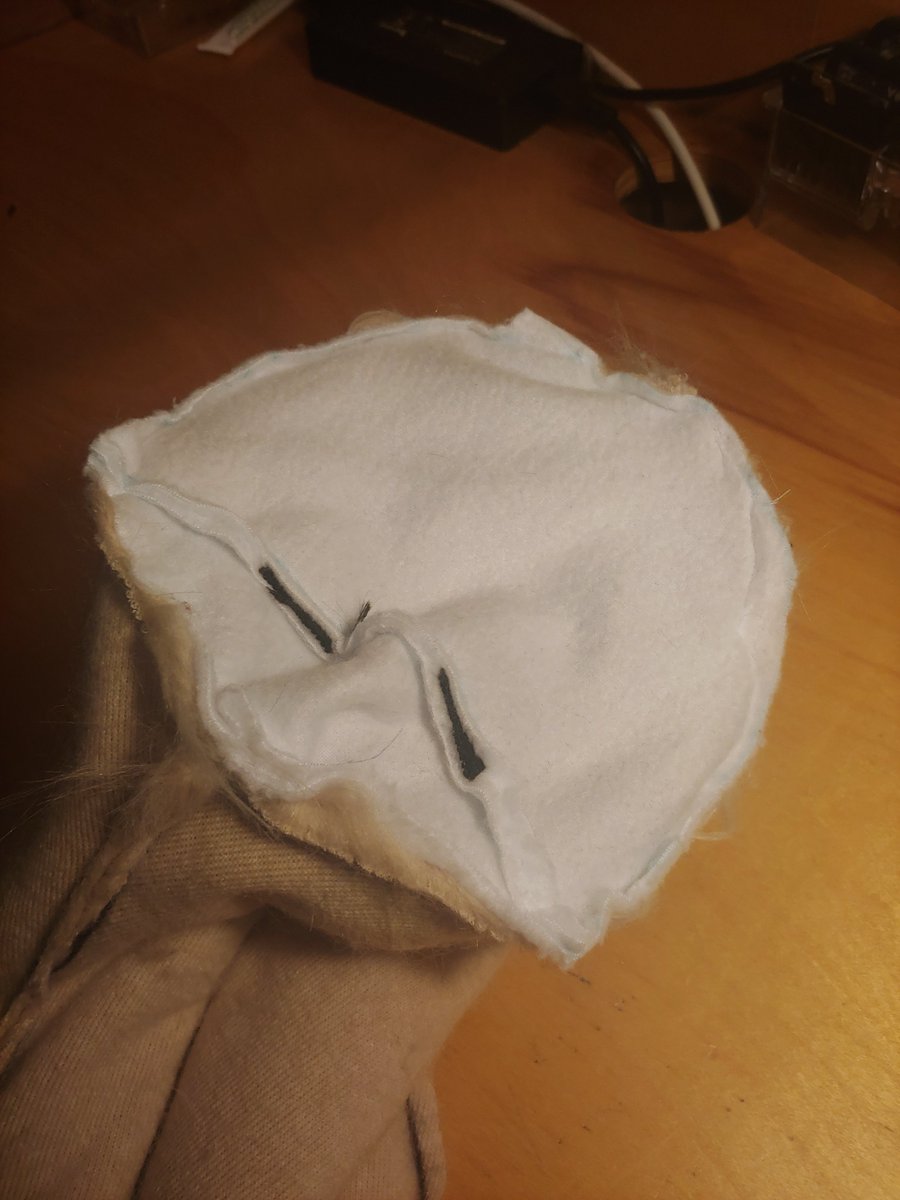
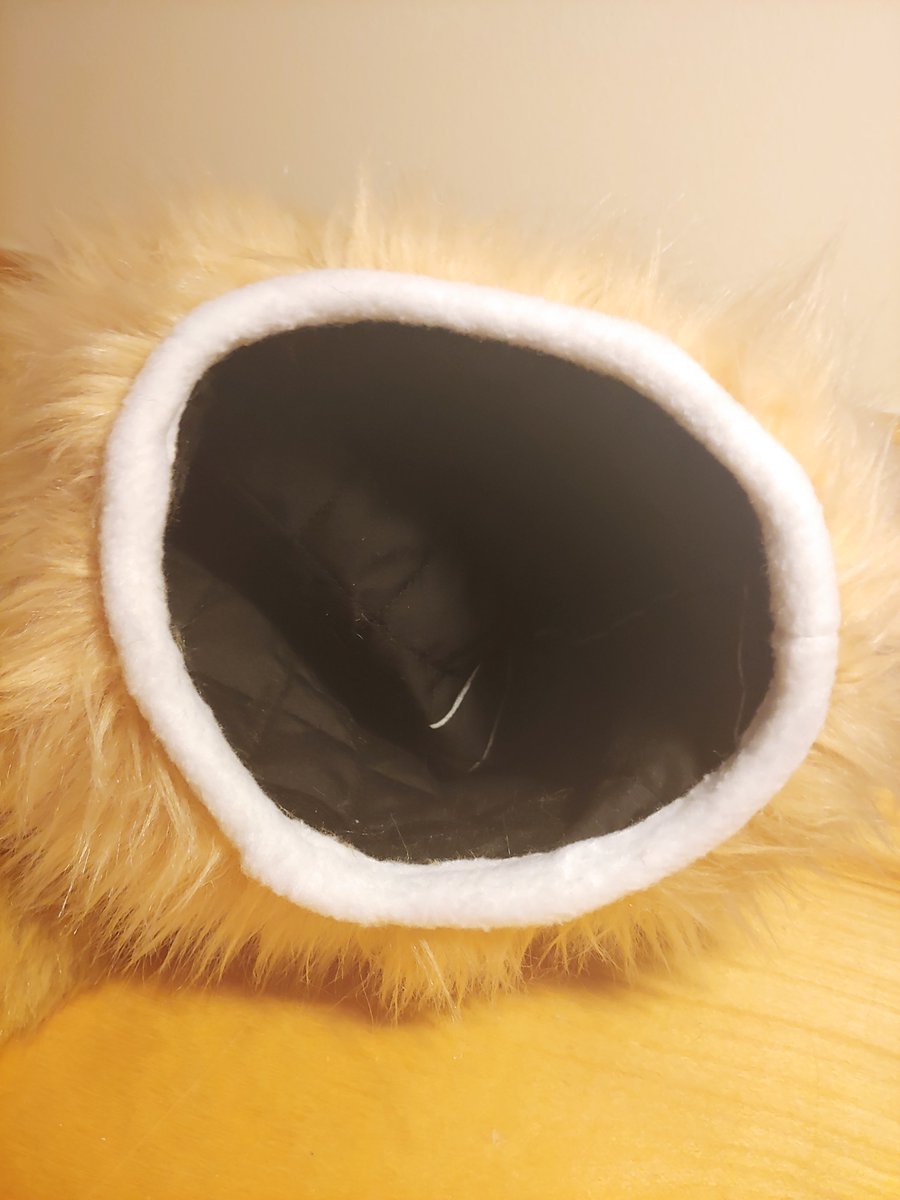
now that we're basically done working with the foam, it's time to create a liner, which will make the whole thing much more comfortable to wear. i cut out an oval shape from lycra fabric, sewed it together, cut holes for the eyes, and glued the whole thing onto the interior foam.


time to work on the eyes! these eye blanks are 3D printed, and i got them from Spiltgrapesoda on etsy. i traced them onto some buckram mesh to create a see-through iris/pupil and cut out some paper templates to help me with painting them.


time to paint!! first, i painted the entire back of the buckram black, which will help increase visibility. then, using the paper templates, i painted the irises brown. all of this was done using acrylic paint which dries fast and is water-resistant.


i used a few different shades of brown to create a simple gradient, added some shading to the top and bottom, painted on the pupil, and finally added some heart-shaped eyeshines to accentuate the heart motif in cocoa's design.


after gluing the buckram onto the back of the eye blanks, i sanded down the sides of the blanks to help the hot glue stick to them better. i then cut out some strips of black fleece and glued them around the sides of the blanks. the eyes are all done! looking cute already 🥺


now it's time for one of the most tedious steps: taping the head. the entire headbase needs to be covered in a thick layer of masking tape, which will be drawn on and then cut out to create our pattern pieces later on. i'm leaving the nose untaped; it'll be dealt with separately.


now it's time to pattern! i start out by drawing lines for cocoa's markings, and then lines to separate out pieces that are too curved to lay flat. i then carefully labeled and marked each piece. finally, i very carefully cut off the nose and left that part flat.


after carefully completing cocoa's de-nosification, i hollowed out the nostrils (which ended up being unnecessary) and taped and patterned the nose. we'll be using brown minky fabric to line the nose, unlike the rest of the head, which will be using fur.


working very, very slowly and carefully, i cut all of the tape off of the head piece by piece, sticking each piece to some random newspaper and then cutting them each out. we ended up with a total of 41 unique pattern pieces in all kinds of shapes and sizes!


these pieces need to be traced onto the fur upside down, which meant it was time to flip each piece over and copy all of the markings and information onto the back... this, again, took forever. i then sorted the pieces by color and length and got ready to trace them onto the fur!


i started out by tracing the tan colored pieces onto the fur, labeling and marking them all appropriately, separating the long fur pieces from the short fur pieces, shaving the short fur pieces down with my clippers, and then carefully cutting each of the pieces out.


i was getting tired of all of this time-consuming work with little visible progress, so i decided to pause and start working on the ears. i cut out some minky fabric to line the inner ear and glued it onto the foam.


cocoa's left ear is all one color, so i decided to go ahead and sew it together. i pinned and sewed the pieces and tried it on for a test fit... looking pretty good! it's a bit too fluffy in the back, which is no surprise; it'll just need to be shaved down more later on.


getting back to work, i traced, labeled, shaved, and cut all of the cream fur pieces in the same way as before. just look at all of that fur...


these two little pieces here are the fluffy interior bits of the ears, so after cutting them out, i just went ahead and sewed one of them onto the ear that we had already started working on.


next up were the golden brown fur pieces, which came in a lot of particularly delicate and awkward shapes, but they turned out fine in the end.


just a few more to go... i then cut out these tiny markings from white and dark brown fur, and at last, we're all done tracing things! my spine is so relieved!!


this means it's finally time for the biggest and most important step of the process: sewing all of these little pieces together into a face. i started out with these little dots on the back of cocoa's right ear.


next up, i attached the bottom half of the back of the ear, sewed together each of the side pieces, and then attached them onto the back.


i then attached the fluffy piece to the side, sewed the two side pieces together at the top, flipped the whole thing inside out, and gave it a test fit on the foam--very nice!!


after this, i began sewing the back of the head together, which, thankfully, consists of just a couple big pieces.


now that both ears and the back of the head are done, i went ahead and started sewing the face, beginning with the muzzle, and then working upwards towards the forehead.


here's the forehead all complete! it's hard to tell what any of this is so far, but once we have more pieces together, the design will quickly start to take shape.


these little white crescent-shaped markings will sit right above each of the eyes.


after sewing the muzzle pieces onto the forehead pieces, it's a lot easier to see what these all are!


i'll continue working outwards from the forehead, moving onto the cheeks.


it's good these pieces are all clearly labeled--these ones that go around the sides of the face just under the ears look an awful lot like the pieces on the outer side of the right ear!


and here's the other cheek! ...this thing is actually a little scary to look at from below...


after adding this little jowl piece that sits on the side of the top muzzle, we can sew the muzzle onto the cheek, leaving the hole where the eye will fit.


the last thing here is the brown crescent marking that goes right under the eye; this piece was particularly tricky to sew as it was so thin and needed to fit perfectly into all of the surrounding pieces.


i then sewed the jowl piece onto the opposite cheek, and sewed the cheek onto the muzzle...


...and after adding the dark brown marking under the eye, this whole section of the face is done! wow, that took a while!


next up, i sewed together these four pieces, which will form cocoa's bottom jaw.


at long last, the pieces are all together, and they fit perfectly!! ...well, it's still looking pretty rough for now, but it'll be a lot better once they've been glued on and given a nice final shave.


it's time to take a short break from sewing and line our mouth. for this, i'm just using some black fleece. i stuff a big piece of fleece into cocoa's muzzle, trim it down until it's a nice fit, and glue it in place.


i then repeat the process to create a piece for the top half of his mouth, carefully hot gluing them both on.


finally, i sew the fur for the top muzzle into a closed loop, making sure it fits well... and with that, it's officially time to start gluing all of this fur onto the base!


this step is super nerve-wracking because if you mess up, there's really no undo button!! it's pretty much impossible to get hot glue off if it drips on the fur. so working super super carefully, i start gluing on the muzzle.


from there, i work outwards, removing the eyes and gluing around their perimeter.


then, i glue the cheeks onto both sides, followed by the top of the muzzle, and all the way up to the forehead.


once the whole front face part has been glued on, i start working on the back, gluing on the back of the ear, flipping it over on top of the foam, and gluing down the sides and inner fluff.


i repeat this process for the other ear, leaving the bottom edge of the back of the head unglued since i'll need to sew on the neck later on.


finally, i glue on the bottom jaw, which was thankfully very easy!


of course, just gluing this stuff down isn't enough... i sew together all of the seams on the head, starting out by sewing the bottom jaw to the top of the face, the top and bottom lips onto the mouth liner, the sides of the face onto the ears, and then this tiny line at the top.


the most difficult step of the whole process was probably sewing the outer fur lining of the ears onto the fleece in the middle. it's an extremely awkward space to get the needle into, and i ended up stabbing myself repeatedly... but eventually, it was done.
anyways, now it's time to work on the nose! using the tape pattern i made before, i cut out these three pieces from brown minky, and sewed them together into a cone shape.


i then glued the minky onto the foam nose, glued the nose back onto its little spot on the head base, and sewed the whole thing together around the perimeter. so boopable!


this is a fun part--it's time to work on the mouth details! first off, i traced a pattern for the tongue by testing some paper until i found a shape that fit well. i traced this out onto some pink minky, sewed it together, and flipped it inside out.


rather than attaching the tongue directly to the mouth lining, i decided to use some velcro strips so that the tongue can be moved and posed a bit; it sits comfortably inside of the mouth by default, but can be adjusted to dangle out from the front or the sides.


next up, i drafted a pattern for some teeth, cut them out of white minky, sewed them together, flipped them inside out, and carefully glued them onto the mouth liner. it may have been possible to sew them in rather than gluing them, but honestly, gluing them works just fine.


okay let's just pause for a moment and appreciate this mouth bc god damn it is cute 🥺


moving on, it's time for the hair poof! i just cut out a little oval shape from paper, traced it onto white fur, and cut out two of them.


i then sewed the two halves together, flipped them inside out, stuffed them with some poly-fil, and sewed the hole shut.


i then cut out a little heart pattern and traced it onto some stiff black felt to create the heart markings for cocoa's ears.


we're almost done!!! i took this opportunity to go back with my clippers and give cocoa a nice final shave, which made a lot of the seams much less visible and gave the head an overall cleaner and more polished look.


for the final head detail, i cut out some little crescent shapes from the black felt and glued them onto the eyes like eyeliner.


now it's time to work on the final piece: the neck! the back of the head currently has a curve cut out of it, so i drafted this little piece of fur and sewed it onto the back so that it's flat all the way around.


then, i started tracing, cutting, and sewing the pattern pieces for the actual neck. this is using a pattern by JILLCOSTUMES on etsy!


i pinned the back of the neck onto the head for a test fit, and then went on and worked on the front of the neck.


as you can see, the pattern didn't fit my head perfectly, and left these two gaps on either side, so i measured and cut some strips of fur to fill the gap.


after sewing them onto the back of the head, it's time to sew it onto the head!


sewing the neck onto the head was a little awkward, especially on the front, since i didn't leave myself as much seam allowance on the bottom jaw pieces as i probably should've, but it ended up being fine.


next, i carefully pinned the front of the neck to the back of the neck from the inside and sewed them together.


guys!!! we're almost there!!! we've nearly done it!!!!! last but not least, the very final step is to pin the lycra liner onto the neck fur, sew it in place, and trim the excess fabric :D

IT'S FINISHED! after more hours of work than i'd like to count, cocoa is all done and ready to say hello to the world! thank you guys so much for coming along with me on this journey! it's been fun, and i can't wait to spam your feeds with fursuit pics for the rest of my days ❤️

on top of all of the amazing artists whose patterns i used, i'd like to give a huge, huge thank you to @Skyehighstudios and @freckledcatcr for their wonderful videos, without which i never would've had the motivation to even start this project in the first place 🥺
• • •
Missing some Tweet in this thread? You can try to
force a refresh


