What is Git?
What is GitHub?
Learn Git in just one thread! 👇
What is GitHub?
Learn Git in just one thread! 👇
What is Git?
Git is a free, open-source distributed version control system. It keeps track of projects and files as they change over time with the help of different contributors.
A very popular tool used for source code management.
Git is a free, open-source distributed version control system. It keeps track of projects and files as they change over time with the help of different contributors.
A very popular tool used for source code management.
What is GitHub ?
GitHub is an online Git repository hosting service. Thought It adds many of its own features. While Git is a command line tool, GitHub provides a Web-based graphical interface.
GitHub is an online Git repository hosting service. Thought It adds many of its own features. While Git is a command line tool, GitHub provides a Web-based graphical interface.
With Git you'll be able to do the following:
1. Keep track of all files in a project
2. Record any changes to project files
3. Restore previous versions of files
4. Compare and analyze code
5. Merge code from different computers and different team members.
1. Keep track of all files in a project
2. Record any changes to project files
3. Restore previous versions of files
4. Compare and analyze code
5. Merge code from different computers and different team members.
Configuring Git:
Git wants you to register with Git before you start using a repository.
$ git config --global user.name "testuser"
$ git config --global user.email "testuser@gmail.com"
In case of a typo you can run the same commands once more.
Git wants you to register with Git before you start using a repository.
$ git config --global user.name "testuser"
$ git config --global user.email "testuser@gmail.com"
In case of a typo you can run the same commands once more.

The option "--global" means that you set your username and email for Git globally on your computer. No matter how many projects with separate local repositories you create, Git will use the same username and email to mark your commits.
View your Git configurations:
git config --list
git config --list

Starting a Local Repository:
Assuming you've already created an empty directory for your project, you need to explicitly ask Git to create a safe deposit box – a repository – in that directory:
git init
Assuming you've already created an empty directory for your project, you need to explicitly ask Git to create a safe deposit box – a repository – in that directory:
git init

The "init" command stands for initialize. Once you run "git init", Git will initialize a hidden directory called ".git" in the project's root directory.
To know the Git status, you'll need to run:
To know the Git status, you'll need to run:

Staging Files with Git:
Staging area is where you actually gather and prepare files for Git before committing them to the local repository.
git add <file_name>
Status has changed! Git knows that there's a newly created file in your staging area,and is ready to commit the file
Staging area is where you actually gather and prepare files for Git before committing them to the local repository.
git add <file_name>
Status has changed! Git knows that there's a newly created file in your staging area,and is ready to commit the file

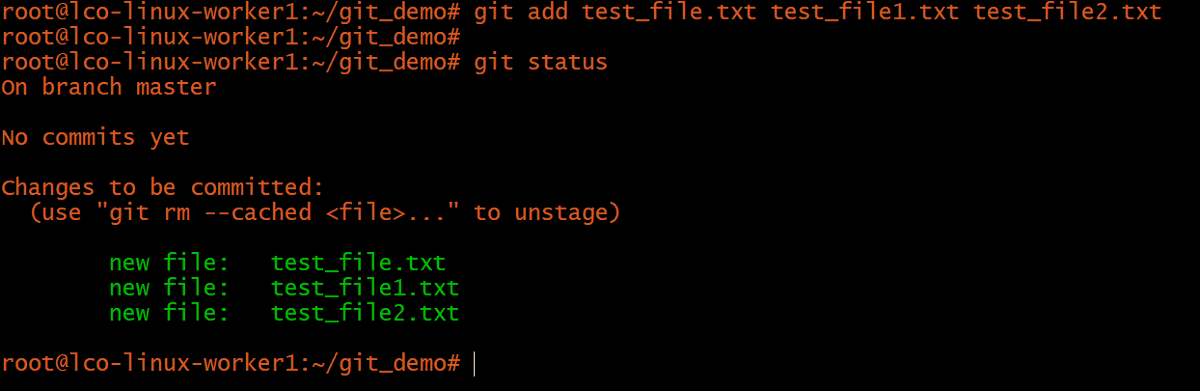
In case you have have multiple files to add, adding them one by one is not convenient instead you pass all of them as an argument to "git add" command.
git add test_file.txt test_file1.txt test_file2.txt
git add test_file.txt test_file1.txt test_file2.txt
What if the project grows enormously and you have to add more than three files? How can we add dozens of files in one go? Git accepts the challenge and offers the following solution:
"git add ."
You can use a simple dot to select all files under the current directory.
"git add ."
You can use a simple dot to select all files under the current directory.

There's a problem with the "git add ." Since we're currently working in the root directory, "git add ." will only add files located in the root directory. But the root directory may contain many other directories with files.
Git offers the command below:
"git add --all"
Git offers the command below:
"git add --all"

The option "--all" tells Git: "Find all new and updated files everywhere throughout the project and add them to the staging area." Note that you can also use the option "-A" instead of "--all".
Remove files from staging area:
Git can also take things out of its basket by removing files from the staging area. To remove files from the staging area, use the following command:
Git can also take things out of its basket by removing files from the staging area. To remove files from the staging area, use the following command:

In our example, we specified the command "rm", which stands for remove. The "--cached" option indicates files in the staging area.

Git is no longer tracking test_dir/test_dir_file1.txt. In this simple way, you can untrack files if necessary. As an alternative to "rm --cached <filename>", you can use the "reset" command:
"git reset <file_name>"
"git reset <file_name>"

Committing Changes to Git:
As we mentioned, tracked files aren't located in the repository yet. We have to commit them.
There's nothing difficult about committing to a repository. Just run the following command:
git commit -m "Add six files"
As we mentioned, tracked files aren't located in the repository yet. We have to commit them.
There's nothing difficult about committing to a repository. Just run the following command:
git commit -m "Add six files"

You should pass the "commit" command the "-m" option, which stands for "message". Lastly, type in your meaningful commit message.
The "create mode 100644" message tells us that these files are regular non-executable files.
The "create mode 100644" message tells us that these files are regular non-executable files.
So, what have we done so far? We added files to a project directory in the first section. Then we added files to the staging area, and now we've committed them.
The basic Git flow:
1. Create a new file in a root directory/subdirectory, or update an existing file.
2. Add files to the staging area by using the "git add" command and passing necessary options.
3. Commit files to the local repository using the "git commit -m <msg>"
Repeat.
1. Create a new file in a root directory/subdirectory, or update an existing file.
2. Add files to the staging area by using the "git add" command and passing necessary options.
3. Commit files to the local repository using the "git commit -m <msg>"
Repeat.
When working on a project, chances are you'll modify some files and commit them many times. Git's flow doesn't really change for adding modified files to a new commit.
But this standard flow is tedious. And why should you have to ask Git to track a file that was tracked before?
But this standard flow is tedious. And why should you have to ask Git to track a file that was tracked before?
The question is how can we add modified files to the staging area and commit them at the same time. Git provides the following super command:
git commit -a -m "Do something once more"
git commit -a -m "Do something once more"

Note the "-a" option, which stands for "add". Git will react to this command like this: "I'll just commit the files immediately. Don't forget to write a commit message, though!" As we can see, this little trick lets us avoid running two commands.
There will be times when you'll regret committing to a repo. Let's say you've modified 10 files, but committed only 9. How can you add the remaining file to the last commit? And how can you modify an already committed file?
There are 2 ways out. First, you can undo the commit:
"git reset --soft HEAD^"
"git reset --soft HEAD^"

As you may recall, the "reset" command is the opposite of the "add" command. This time, "reset" tells Git to undo the commit. What follows "reset" is the "--soft" option. The "--soft" option means that the commit is canceled and moved before HEAD.

What you see in the image is that each dot represents a separate commit, and the latest commit is at the top of the branch (HEAD). In the command "git reset --soft HEAD^" the last character "^" represents the last commit.
Instead of resetting the HEAD and undoing the last commit, we can rectify a commit by using the "--amend" option when committing to a repository. Just add the remaining file to the staging area and then commit:
git add test_file.txt
git commit --amend -m "Add the remaining file"
git add test_file.txt
git commit --amend -m "Add the remaining file"
Push and Pull To and From a Remote Repository:
Typical Workflow:
1. You work on a feature and commit files to a branch (master or any other).
2. Push commits to a remote repository
3. Other developers pull your commits to their computers to have the latest version of the project
Typical Workflow:
1. You work on a feature and commit files to a branch (master or any other).
2. Push commits to a remote repository
3. Other developers pull your commits to their computers to have the latest version of the project
First things first, you need to create a remote repository.
Just start a project and give it a name. You then need to grab the HTTPS link to this new repository.
Just start a project and give it a name. You then need to grab the HTTPS link to this new repository.

Now you need to bind this remote repository to your local repository:
"git remote add origin github.com/DevopsVlogger/…"
We ask Git to "add" a repo. The "origin" option is the default name for the server on which ur remote repo is located. Lastly, there's a link to ur project.
"git remote add origin github.com/DevopsVlogger/…"
We ask Git to "add" a repo. The "origin" option is the default name for the server on which ur remote repo is located. Lastly, there's a link to ur project.

Once you run the command above, Git will connect your local and remote repositories. But what does this liaison actually mean? Can you already access your code online? Unfortunately, not yet.
To copy your code to a remote repo run following command:
git push -u origin master
To copy your code to a remote repo run following command:
git push -u origin master
It's obvious that the command "push" tells Git to push your files to a remote repository. What we also specified is the server our local repo is connected to (origin) and the branch we're pushing, which is master.

There's also that strange "-u" option. What it means is that we're lazy enough not to run a long "git push -u origin master" command each time we push code to the cloud. Thanks to "-u", we can run only "git push" next time!"
Once you've pushed changes to a remote repository, you can develop another feature and commit changes to the local repository. Then you can push all changes to the remote repository once again, but using only the "git push" command this time around.
Is this the happy ending? Not yet. Once you push code to a remote repository, you have to enter your username and password registered with that remote repository.
The current problem with "git push" is that you have to enter your credentials each time you push code to GitHub. That's not convenient. The root of this problem is the HTTPS link you used to connect repositories. Git offers a way out of this inconvenience, however.
Now that you've added a remote repository, you can view the list of repositories by running the following command:
"git remote -v"
"git remote -v"

Git Clone:
Git can clone an entire project from a remote repository. The directory will be created automatically and will have the same project name as the remote repository.
We can pass https/ssh links to the git clone command.
Git can clone an entire project from a remote repository. The directory will be created automatically and will have the same project name as the remote repository.
We can pass https/ssh links to the git clone command.

So far, you've pushed your changes from a local repository to a remote repository and cloned a remote repository. We haven't said anything about the "pull" command, though. Pushing changes to GitHub or BitBucket is great.
But when other developers push their changes to a remote repo, you'll want to see their changes on your computer. That is, you'll want to pull their code to your local repo. To do so, run the following command:
"git pull"
Running "git pull" is enough to update your local repo
"git pull"
Running "git pull" is enough to update your local repo

Git Clone vs Git Pull:
Cloning a repository is very different from pulling from a repository. If you clone a remote repository, Git will:
1. Download the entire project into a specified directory; and
2. Create a remote repository called origin and point it to the URL you pass
Cloning a repository is very different from pulling from a repository. If you clone a remote repository, Git will:
1. Download the entire project into a specified directory; and
2. Create a remote repository called origin and point it to the URL you pass
When you run the "pull" command, Git will:
1. Pull changes in the current branch made by other developers; and
2. Synchronize your local repository with the remote repository.
The "pull" command doesn't create a new directory with the project name.
1. Pull changes in the current branch made by other developers; and
2. Synchronize your local repository with the remote repository.
The "pull" command doesn't create a new directory with the project name.
List of Git Commands for Working with Branches:
You'll use multiple branches for your projects. Branches are, arguably, the greatest feature of Git, and they're very helpful. Thanks to branches, you can actively work on different versions of you projects simultaneously.
You'll use multiple branches for your projects. Branches are, arguably, the greatest feature of Git, and they're very helpful. Thanks to branches, you can actively work on different versions of you projects simultaneously.
Managing branches in Git is simple. Let's first see our current branches:
git branch
git branch

"git branch" will ask Git to list all branches. In our app, we have only one branch-master. But an application under development is far from being complete, and we need to develop new features. To create a feature, create a new branch:
git branch user-profile
git branch user-profile

For switching branches in Git, you won't use a "switch" command, as you might think. Instead, you'll need to use "checkout":
git checkout user-profile
git checkout user-profile

You can now freely change any file, create and delete files, add files to the staging area, commit files, or even push files to a remote repository. Whatever you do under the user-profile branch won't affect the master branch.
The flow when adding new branches:
1. Create a new branch to develop a new feature using "git branch <branch-name>".
2. Switch to the new branch from the main branch using "git checkout <branch-name>".
3. Develop the new feature.
1. Create a new branch to develop a new feature using "git branch <branch-name>".
2. Switch to the new branch from the main branch using "git checkout <branch-name>".
3. Develop the new feature.
You're stuck on the third step. What should you do next? The answer is simple: you need to use the "merge" command. To merge a secondary branch into the main branch (which can be a master, development, or feature branch), first switch back to the main branch.

The current branch is now changed to master, and we can merge the user-profile branch using the command "merge":
git merge user-profile
git merge user-profile

Keep in mind that you're in the main branch and you're merging another branch into the main – not vice versa! Now that the user-profile feature is in the master branch, we don't need the user-profile branch anymore. So let's run the following command:
git branch -d user-profile
git branch -d user-profile

• • •
Missing some Tweet in this thread? You can try to
force a refresh