Simple Bash/ZSH GOD-LIKE History Tricks Every Linux User Should Know!
A thread 🧵
Hello everyone👋. For today's Linux thread🐧, I'll be showing some GOD-LIKE bash/zsh history tricks which will save you plenty of time⏰ and doing your day to day tasks on the Linux terminal.
A thread 🧵
Hello everyone👋. For today's Linux thread🐧, I'll be showing some GOD-LIKE bash/zsh history tricks which will save you plenty of time⏰ and doing your day to day tasks on the Linux terminal.

Effectively using bash history will save you plenty of time in the Linux terminal. Not only this will save you plenty of time, but it will also make your life much easier when you are using the Linux Terminal to perfom day to day tasks as regular user, penterser, dev or sysadmin.
1⃣View the Bash History
The simplest way to view commands you have used earlier is to use the history bash built in command.
The simplest way to view commands you have used earlier is to use the history bash built in command.

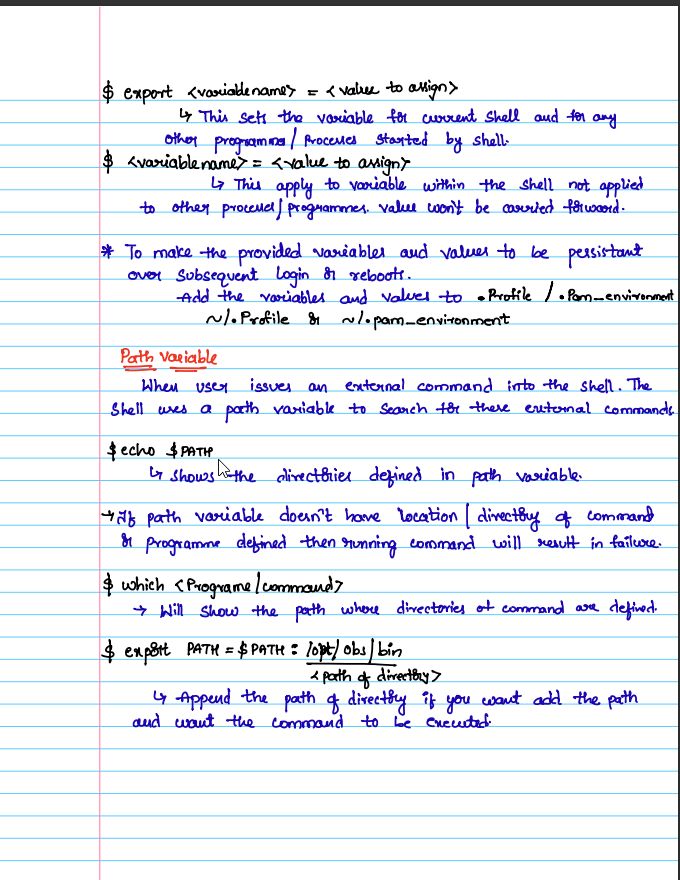
The above command will show you a hundred or perhaps a thousand commands stored in your history. The size depends on HISTSIZE variable, which you can easily change if you wish to. Here is how you can change view and change your history size.

You can also limit the number of lines to display if you don't want your screen to be cluttered by using the history command together with -n/n option, where n is the number of lines you want to be displayed. For example, to show only the last 8 commands from the history.

Pro Tip💡: In BASH you use just n without -, in ZSH you use -n with a -.
2⃣Searching Commands From the Bash History
There are two ways or several ways you can use to search through the bash history. Personally for me I prefer to use the history command, together with the grep command or a handy shortcut to do a reverse search through the history.
There are two ways or several ways you can use to search through the bash history. Personally for me I prefer to use the history command, together with the grep command or a handy shortcut to do a reverse search through the history.
▶️ Using Grep
Here issue the command history and pipe it's output as the input to the grep command and then specify an expression I'm searching for as a grep option.
Here issue the command history and pipe it's output as the input to the grep command and then specify an expression I'm searching for as a grep option.

▶️ Using CTRL + R shortcut
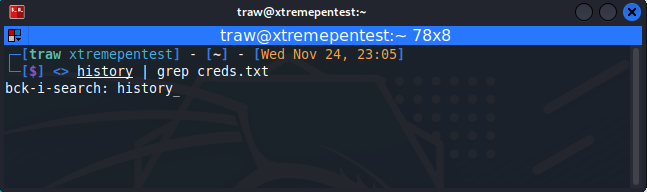
A better and super handy way to search through history is to use the CTRL + R shortcut key to start the reverse search and type the string you are looking for.
A better and super handy way to search through history is to use the CTRL + R shortcut key to start the reverse search and type the string you are looking for.
This is a handy way as it allows us to execute the command once we found it unlike with grep where we have to retype the command once we found it.
For example, the example below searches for a command that had 'history' in it.
For example, the example below searches for a command that had 'history' in it.
You can cycle through the choices by pressing CTRL + R repeatedly and when you find the command you were looking for, press CTRL + O or simply `enter` key to select and run that command. To come out of the reverse search simply press ESC or use CTRL + G.
3⃣Run command from bash history
Another handy trick that bash offers is the use of the ! to run commands in the history. That means you can run a command by using !# where # is the position/number of the command in the history. The value of # can be either negative or positive.
Another handy trick that bash offers is the use of the ! to run commands in the history. That means you can run a command by using !# where # is the position/number of the command in the history. The value of # can be either negative or positive.

You can rerun the last command with `!!` or `!-1`. A good use of this comes when you forget to use with a command and then quickly use it like this to run with sudo:

You may also run the last command starting with a certain text like this:
!text
Suppose you ran echo $HISTSIZE earlier and you want to run it again. You can use it like this:
The below command will run the last ran echo command from your history.
!text
Suppose you ran echo $HISTSIZE earlier and you want to run it again. You can use it like this:
The below command will run the last ran echo command from your history.

Pro Tip💡: If you have doubts with command, instead of running it, print it by adding `:p` to the end of it. So you use it like `!echo:p`, `!23:p` etc.
If you are using ZSH there's no need to do that as it will display the command before executing it. With BASH you should.
If you are using ZSH there's no need to do that as it will display the command before executing it. With BASH you should.

4⃣Changing an executed command
You can also use history to rerun a command with different syntax.For example, if I want to change my previous command `history | grep ftp` to `history | grep ssh`, I can execute the following at the prompt:
$ ^ftp^ssh^
You can also use history to rerun a command with different syntax.For example, if I want to change my previous command `history | grep ftp` to `history | grep ssh`, I can execute the following at the prompt:
$ ^ftp^ssh^

5⃣Reuse arguments from previous commands in your history
Another God-Like Bash History trick is the use of !$ and !* this will substitutes/place in the last argument and arguments of the last command into your line respectively.
Another God-Like Bash History trick is the use of !$ and !* this will substitutes/place in the last argument and arguments of the last command into your line respectively.
For example, say you were reading a file with the cat command and you decided you need to edit this file with vim or any editor of your choice. Instead of typing it entirely, you use the `!$` shortcut.

The above option gives you only the last argument of the previous command. If you want all the arguments, use this:

6⃣Clearing your history
If you feel like you there are too many commands and you no longer want them or for some security reasons you don't people or other users to know the commands you have been using throughout your session you can simply clear with the option `-c` or -d.
If you feel like you there are too many commands and you no longer want them or for some security reasons you don't people or other users to know the commands you have been using throughout your session you can simply clear with the option `-c` or -d.
This -c option will clear the present history of bash and start adding commands afresh from now onwards and the -d option will delete the specified command. The -d option works on BASH not ZSH

That's it! Thank you for reading today's thread😇. If you have other useful tricks I have missed, feel free to add them in the comments. Would love to know them as well. And be sure to rt🔁, like💌 and 🏄follow me (@xtremepentest) for more future Linux & security content.
• • •
Missing some Tweet in this thread? You can try to
force a refresh