(Thread).
Operation Martlet Pint-Sized Campaign (PSC) After-Action Review & Chain of Command Reflections.
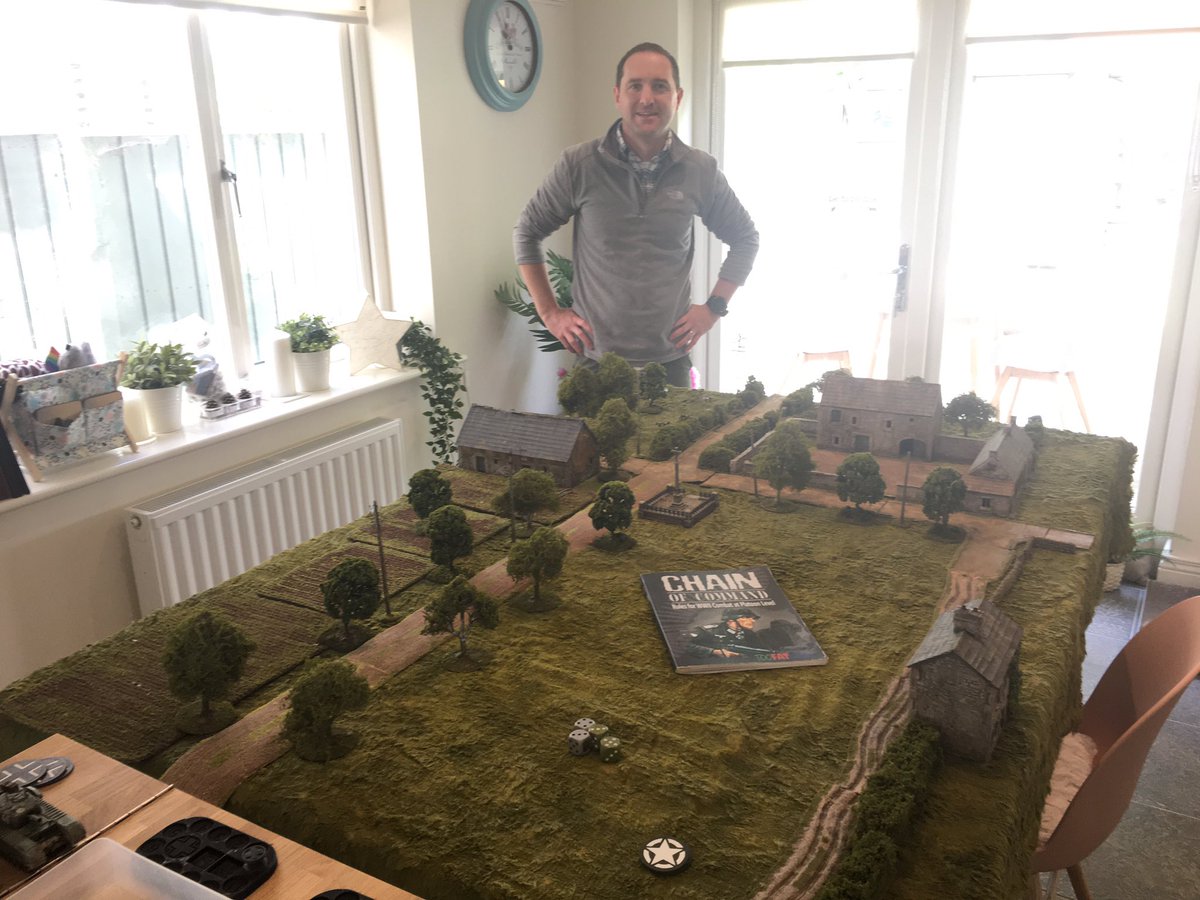
As you might be aware, after two years of virtual wargaming, @Joe_Wargamer came to stay for four days of wargaming over the recent June Bank Holiday. (1/n) #spreadthelard
Operation Martlet Pint-Sized Campaign (PSC) After-Action Review & Chain of Command Reflections.
As you might be aware, after two years of virtual wargaming, @Joe_Wargamer came to stay for four days of wargaming over the recent June Bank Holiday. (1/n) #spreadthelard

Whilst we played a lot of games over the visit, including some epic #SpaceHulk missions and also an introductory game of #AdeptusTitanicus for Joe, in discussions before the visit we’d decided that the main focus would be to try play out a full PSC over the 3 or 4 days. (2/n)

In attempting to leverage Joe’s amazing terrain and tables, as well as our existing miniature collections we settled on the Operation Martlet PSC. Given the diversity of tables, range of support options and broad tactical mission arc, it seemed like a good choice. (3/n)

Noting the time constraints, we decided we’d play each table once - to play all six tables and get a feel of the whole PSC. We’d also use the campaign rules from the At the Sharp End from @TooFatLardies to add tangible consequences to each scenario as we progressed (4/n).

We rolled up for sides, with Joe taking command of the British and I taking on the Germans. All preliminaries complete, including obligatory random names for our Leaders, we for the first table set up & crossed the Start Line at 1030hrs Saturday morning. (5/n) #ChainofCommand
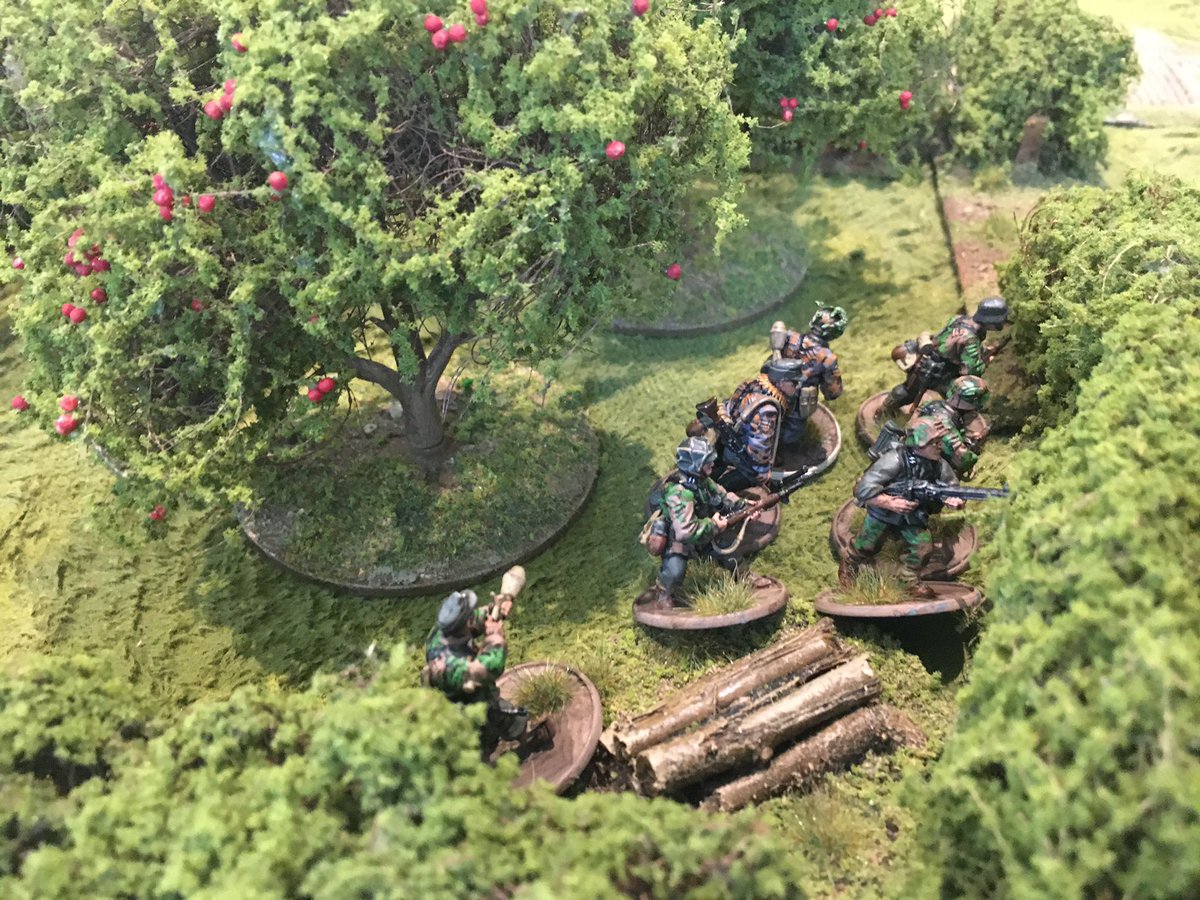
Scenario 1: Probe into Fontenay.
With a considerable amount of support, Joe’s British were tasked to probe through the German outpost line & ensure at least one team exited across the table. German defences incl. a reinforced building in a walled compound. (6/n) #Spreadthelard
With a considerable amount of support, Joe’s British were tasked to probe through the German outpost line & ensure at least one team exited across the table. German defences incl. a reinforced building in a walled compound. (6/n) #Spreadthelard

Securing a Jump-Off Point well forward on the right flank, the British deployed a firebase incl. 2” and Rifle section under the command of the Pl Sgt. Hindered by both the ongoing (off-table) British bombardment and morning mists, German elements were conspicuously absent. (7/n).

Taking advantage of the silent / absent German defenders, British armoured support moved up and adopted overwatch positions wary that prowling German armour might appear at any stage.. maybe. On the right, a M4 Sherman moves cautiously up the main road. (8/n) #ChainofCommand

Across the open fields and advancing along a parallel dirt track, a Churchill ARVE rumbled forward, it’s heavy armament turning ominously towards the farmstead buildings most likely to contain the still silent German infantry and machine-guns. (9/n) #spreadthelard

Keenly aware of the increasing Allied armour, a lone PzIV Ausf.H rattled forward along the main road, drawing a bead across the fields at the Churchill, considered to be the most dangerous threat to the German PzGrenadier defensive positions amongst the farm buildings. (10/n)

Sighting the lone PzIV, the M4 Sherman moved off road, and commenced a long-range, cat and mouse exchange of fire, which for a period remained inconclusive. A result very much to the favour of the Allied armour. (11/n) #Spreadthelard #ChainofCommand

This persisted until the M4 Sherman returned to the road, and the PzIV gunner found his range. The long-barrel 7.5cm gun making short work of the Sherman, even from the front arc. With the M4 gone, it turned its attention to the Churchill. (12/n). #ChainofCommand #Spreadthelard

This was little relief to the nearby PzGrenadiers, forced to evacuate the reinforced farmhouse after a round from the Churchill ARVE shattered its walls. With precious little infantry on table & certainly unable to withstand such firepower, German position was precarious (14/n).

With the German centre shattered, the British deployed smoke to mask the PzIV and screen a rapid foot advance with two sections led by the Pl Sgt. An audacious move, but one calculated to capitalise on German confusion and weakness. (15/n). #spreadthelard #chainofcommand

Critically aware of the threat now posed by the British flanking effort, the remains of the PzGrenadier section evacuated from the farmstead move to intercept, however the terrain and recovering shock significantly slow their response. (16/n) #ChainofCommand

Concurrently, and with some luck, a second German PzGrenadier section finally emerge onto the table through the storm of British bombardment. A hail of MG fire from them, added to from the PzIV, utterly stops the British infantry attack in its tracks. (17/n) #ChainofCommand

Solidly blocked, sustaining heavy casualties and with the prospect of being completely wiped out, Joe withdraws the British platoon, leaving the German outpost line secure, at least in this sector. Critically, post game, his Pl Sgt is not returned having being captured. (18/n).

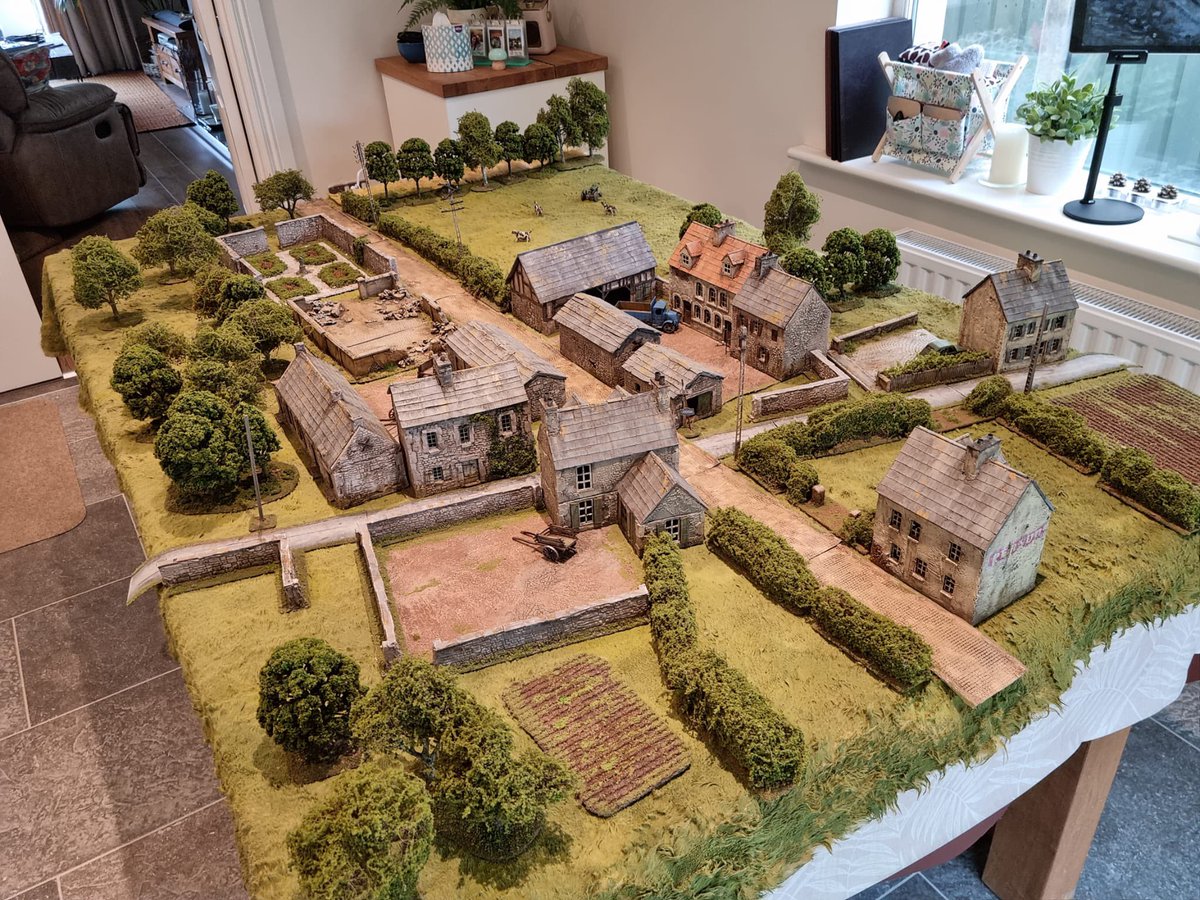
Scenario 2: Pushing On.
With German outposts pushed back (within PSC narrative), the British were now moving through Fontenay towards the main German defence line. Terrain was broadly similar; a reinforced German building amidst small fields and hedge-lined orchards. (19/n)
With German outposts pushed back (within PSC narrative), the British were now moving through Fontenay towards the main German defence line. Terrain was broadly similar; a reinforced German building amidst small fields and hedge-lined orchards. (19/n)

From the outset, German assets moved up far quicker here, with attached PzIVs the key elements of their plan. Operating as mobile, armoured MG nests, they would need to underpin the under strength PzGrenadier sections, assuming their own survival against Allied tanks. (20/n).

In this context, an additional PzIV was selected as support, with both moving into position to cover the principal axis of advance for the British towards their likely objective. (21/n). #spreadthelard #chainofcommand

Keen to establish a firebase to support the infantry advance, Joe deployed his SL and 2” mortar alongside a Vickers MMG behind the farm barn, centrally located to cover this left flank. Within minutes, smoke was to start masking German fields of fire. (22/n) #ChainofCommand

With smoke deployed, two British Infantry sections attempted to make rapid foot progress along both flanks, maximising the protective screen from German armour and infantry fires. Their movement allowed them to occupy the principal farm complex in the board centre. (23/n)

Increasingly wary of being flanked and then dislodged, the Germans were forced to deploy the weakened PzGrenadier sections so as to halt the British Infantry. However this simply opened them up to being targeted by the wealth of British firepower already on table. (24/n)
This firepower now included the Churchill ARVE - whose firepower makes it a veritable land battleship - and capable of immolating the German infantry sections piecemeal, be they in the hedge-rows or in reinforced defended buildings. (25/n) #spreadthelard

With little choice, one of the two PzIVs clattered forward to engage the British behemoth, hoping to get a first round hit before it was blown to pieces itself. The PzIV gunner, a veteran of the Eastern Front, took aim and let loose… (26/n) #ChainofCommand #SpreadtheLard

And… struck home, centre mass of the Churchills flank, detonating it in a cascade of fire. With the loss of its principal support asset, and with the German tanks now free to engage the British infantry and support fires directly, pressure started to mount quickly. (27/n)

Deploying a heavy smoke screen, British sections again began to disengage back towards the safety of their JOPs IOT ensure that on withdrawal all their elements will be subsequently available again. The permanent loss of the Pl Sgt from first scenario being a hard lesson. (28/n)

Scenario 3: Attack on the Hauptkampflinie
Having reached the main German defensive line, the British must now clear these positions, attacking deep into the town. Despite fortifications, the Germans are stretched thin and the increased cover aiding the British approach (29/n).
Having reached the main German defensive line, the British must now clear these positions, attacking deep into the town. Despite fortifications, the Germans are stretched thin and the increased cover aiding the British approach (29/n).
Covered approaches are available to the British through the shattered walled gardens on the right flank, whilst their left flank crosses open fields. Critically, many of the buildings lacked decent fields of fire towards the British approach. (30/n) #ChainofCommand #spreadthelard

With an additional 2” mortar, the British blanket the battlefield in smoke, masking already limited German fields of fire, and permitting their infantry sections, supported by a replaced Churchill to make rapid and substantial progress into the town proper. (31/n) #spreadthelard

Providing a critical fulcrum point from the British attack, the Churchill ARVE systematically reduces the surroundings buildings, both inflicting casualties on the German PzGrenadiers and concurrently denying them the use of any potential fortifications. (32/n) #spreadthelard

Operating effectively under the cover of smoke, British Infantry sections make it across the open ground almost unscathed, and are poised ready to launch across the Final Assault Line onto the primary objective. There is little left capable of effectively opposing them (33/n).


Crucially, the PzIVs, which heretofore whilst operating in a mobile role have formed the lynchpin of the German defence, are finding themselves heavily constricted by the tight urban terrain and their fires effective negated by British smoke. (34/n) #ChainofCommand

As rain falls further cutting visibility, and without adequate available infantry support against British infantry now swarming into the town, the Germans acknowledge they cannot effectively hold and so behind to disengage from the fight. (35/n) #SpreadtheLard

Scenario 4: Striking at St. Nicholas.
Evicted from Fontenay, Joe & myself decided to have a German counterattack at St. Nicholas, modifying ‘The Punch from Wünsche’ wild card option, allowing us both field a Troop/Zug of armour, which we felt would make for a great game! (36/n)
Evicted from Fontenay, Joe & myself decided to have a German counterattack at St. Nicholas, modifying ‘The Punch from Wünsche’ wild card option, allowing us both field a Troop/Zug of armour, which we felt would make for a great game! (36/n)

Playing to their armoured strengths, a 3-strong PzIV Zug clattered along the main road, deploying left and right of the road IVO the main German defended position in the fortified farmstead of St. Nicholas. (37/n) #SpreadtheLard #ChainofCommand

Within moments, they were heavily engaged by a Sherman Troop at long range to their front. Concurrently, British Infantry advancing through the orchards towards the farmstead started to drop smoke around the tanks, attempting to help protect their supporting Shermans. (38/n)

Several rounds of long-range gunnery later, and despite sustaining some light damage, all three Shermans (incl. a deadly Firefly) are smoking hulks on the battlefield. The British Infantry again now disengage, unable to advance against massed German armour without support. (39/n)

Scenario 6: Last Ditch at Rauray
With the blank table layout of Scenario 5: Winning Your Spurs, we decided to skip that table and go to the final table, depicting the fight onto the objectives at Rauray. Again, a different terrain layout for a different tactical challenge (40/n)
With the blank table layout of Scenario 5: Winning Your Spurs, we decided to skip that table and go to the final table, depicting the fight onto the objectives at Rauray. Again, a different terrain layout for a different tactical challenge (40/n)

Repeating well-versed tactics, British Infantry deploy forward in the relative absence of the PzGrenadiers and under the cover of smoke. Again, the burden of the German defence falls squarely on mobile PzIVs. A deadly battle ensues at close range. (41/n) #ChainofCommand

To counter the British FSG, a German le.IG18 deploys and engages the British 2” mortars and Vickers with direct fire HE to deadly effect given both the open field of fire and the lack of any meaningful cover for the British support weapons. (42/n) #spreadthelard #chainofcommand

As their fire support crumbled away, a desperate effort by the PIAT team finally accounts for the PzIV knocking it out at deadly close range. However it’s not enough, and with their Force Morale collapsing, the British are forced to withdraw. (43/n) #ChainofCommand #spreadthelard

And there it finished - a 4:1 final score to the Germans over the full arc of the PSC narrative.
Overall, a fantastic supplement, with some superb depth, radically different platoons and supports for tough, varied challenges across very different tables. (44/n) #ChainofCommand
Overall, a fantastic supplement, with some superb depth, radically different platoons and supports for tough, varied challenges across very different tables. (44/n) #ChainofCommand

What did I learn? Loads!
This was my first in-person experience of #ChainofCommand, despite playing a load of virtual games over 2 years & even hosting a game at Virtual Lard!
We played five full games over 3 days. Each inter-linked. Each consequential. (45/n). #SpreadtheLard
This was my first in-person experience of #ChainofCommand, despite playing a load of virtual games over 2 years & even hosting a game at Virtual Lard!
We played five full games over 3 days. Each inter-linked. Each consequential. (45/n). #SpreadtheLard

That, alongside the At the Sharp End supplement, created a whole other layer of considerations, which was both challenging and immersive.
The narrative arc was equally key for drawing you in, which the utterly amazing tables then only strengthened further (thanks, Joe!). (46/n)
The narrative arc was equally key for drawing you in, which the utterly amazing tables then only strengthened further (thanks, Joe!). (46/n)

Having learned to play #ChainofCommand with Joe via Zoom over the past 2 years, it was an absolute pleasure to play in person with him. We’ve a very similar attitude and approach to wargaming, managing rules & playing to a narrative. That makes ALL the difference! (47/n)
Where does this leave me? Firstly, absolutely wanting to play another PSC - we’re already thinking of what our next full #ChainofCommand weekend will be! Thereafter, considering the tactical choices we made, the key decisions and what to take from them. (48/n) #SpreadtheLard

Won’t lie, I’m also looking at how to assemble a British Infantry Platoon, as I’m really keen to command them myself, having seen them in action. There’s certainly a lot more 28mm WW2 action to come and it was great to get back to playing both my favourite period & scale. (49/n)

Finally, I’m utterly convinced that #ChainofCommand is perhaps the very best platoon-level WW2 skirmish ruleset I’ve played or out there - tactical and campaign-level considerations, friction mechanics, and period reflection it’s just excellent. Lots more to come! (50/50).

• • •
Missing some Tweet in this thread? You can try to
force a refresh