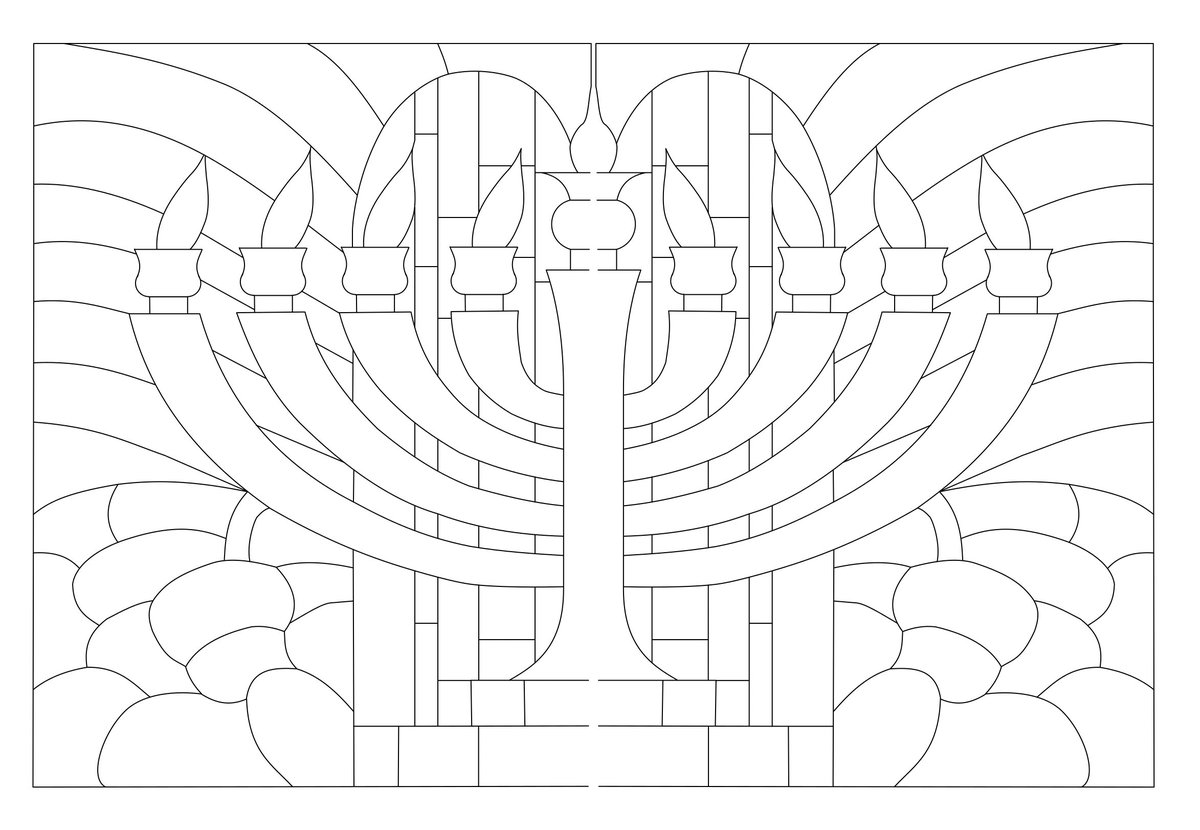
Alright. Okay. My long-dead grandpa Milt’s unfinished stained glass menorah piece. It’s been in my basement workshop for literal years now. I keep not tackling the job of picking up where he left off. I want to get past that block. 


I got this, along with all his other remaining stained glass stuff, out of the blue back in 2019 when my parents heard I'd taken up stained glass. I had no idea. I did my first blush documentation of it at the time here:
https://twitter.com/joshmillard/status/1099546329221480450
I can see what he was going for, and he did a lot of the work, but there are challenges here for me. For one, he started it in lead channel style, which I haven't done and don't have the equipment for and don't particularly want to get into; I do copper foil, I like it.
Which suggests the first big step with this is to undo all the lead channel framing on the existing pieces, with the intention to then rework all of this and finish the rest of the piece in copper foil. Doable, but it may change the fit of allllll the pieces a little.
With my copper foil style, the pieces can fit very snugly edge to edge; with lead channel you have a little more space between individual pieces (because of the small wall of lead between them) and you can cut a little less precisely because the channel walls have wiggle room.
So I have this worry that in stripping off the lead, I'll be subtly shrinking the piece as conceived (not itself a problem) and also causing the pieces to not quite fit right (more of a problem, requires some further grinding down probably) AND the original pattern will be off.
Though the original pattern itself is already off spec a bit from what grandpa had executed so far, so that may be its own issue anyway. Further to which, I've *never* tried to pick up a half-done piece like this and rectify the pattern and the existing pieces etc. Tricky.
And that's what's loomed before me and kept me from starting for three straight winters now, as Hanukkah has approached and happened and passed by. Uncertainty. Lack of confidence in the process. Confronting the totality of the work and shying away Until Next Year.
In the end there is this sense that, unfinished and damaged as it is right now, it's still the extant thing my grandpa left behind; and the fear, I guess that in starting I'll take apart what is there but not put it back together and there'll be less than there was before.
But as a counterpoint: fuck it. This year I start on it anyway. I might not finish it this year. That's okay. I might not finish it all. That's okay. But not starting isn't doing anything for me or for the piece, and my brain pulls "I can't start because..." way too often. So.
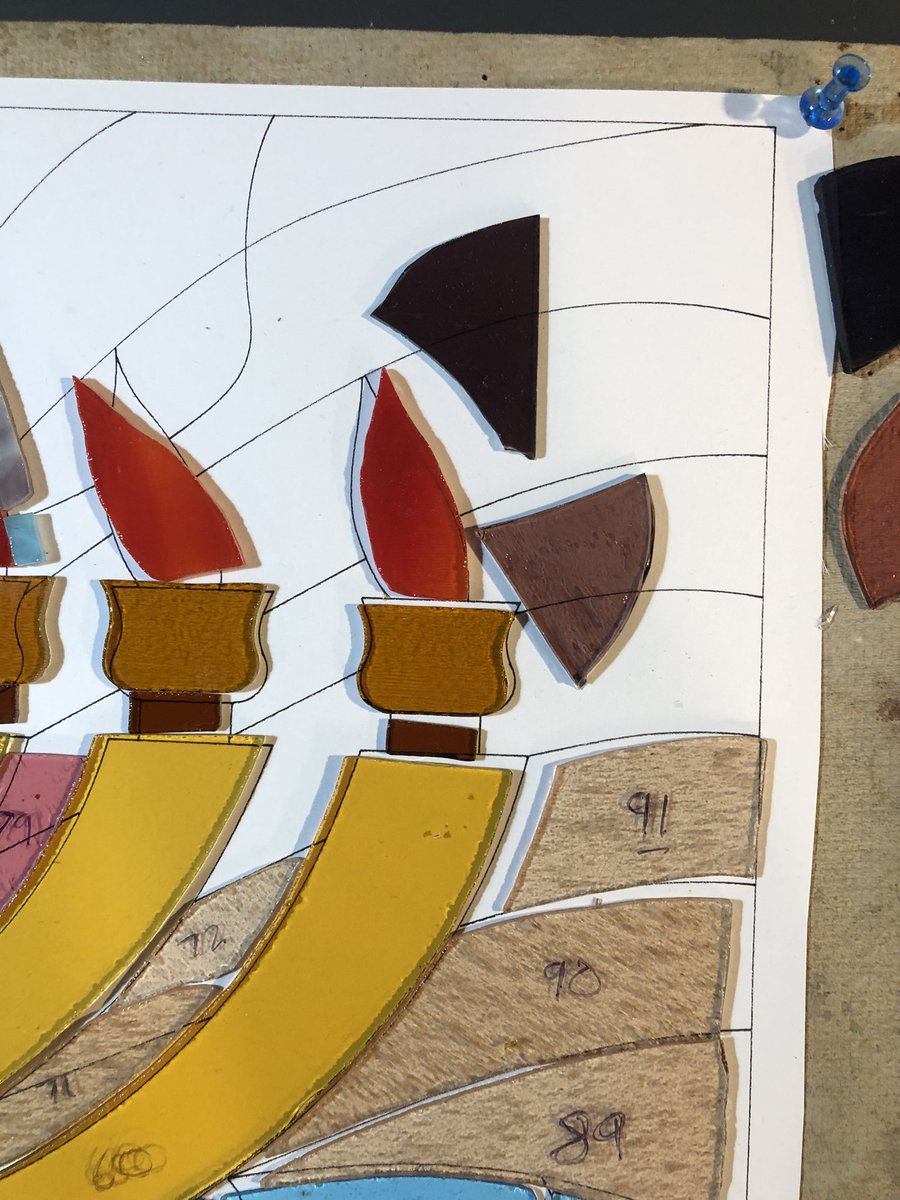
First thing: number each of the existing pieces, and photograph that, so I have a fallback reference of some sort if everything gets jumbled up at some point between when I start disassembling and when it starts to cohere again.


I’ve pinned down the original drawing on a board and I’ll use this to place the pieces as I strip them out of the lead channel. Of which, haven’t tried this before, wish me luck.

Grab lead channel with pliers; gently pull it away from the glass; snip it with lead cutters; peel back. Okay, pretty straightforward. Helps that this is unfinished and so hadn’t been glazed with putty between the lead and the glass.


Okay. So far so good.


Okay, that’s all of the previously assembled pieces freed from the lead and transferred to the pattern.


There’s also a few mystery pieces: I think that blue rectangle was just not cut to use yet at all, but the orange trapezoid sure looks like Milt saying “damn my original lantern fixtures will take forever, how about this instead?”


You can see he was working bottom up, and a lot is missing from the upper half. I have a small box of his glass scraps; maybe enough to complete some of the existing color implications, certainly not enough to finish the piece. I’ll have decisions to make about how to proceed.
Said box of scraps, plus the twisted wreckage of lead channel left behind from disassembly.


One thing for sure: a lot of the glass is filthy. Next step should probably just be washing each of these pieces by hand.


Washing coming along. Dealing with a mix of dirt, adhesive residue from tape that had been on some of the glass, and mysterious tacky yellow stuff about which I choose not to speculate.

A few pieces like this with decades old tape adhesive. Soap and elbow grease not cutting it, just have to scrape it off with a knife.


But a couple hours later, it’s all clean! The transparent blues in the bottom left and right in particular look genuinely different, a stronger and cooler tone than when they had a bunch of yellow/brown muck on them.

Now for a different problem: grandpa’s original drawing. I will need to edit/supplement what he’s got to work out the rest of the piece, and I’d like a spare copy to work with to keep the original intact and no more dirty or damaged than it already significantly is.


I want something I can be sure of consistent scale on, so a photo is out. Instead I’m going to try to scan chunks of it in my little flatbed scanner, reassemble those into a whole, and create a vector graphics version of it to work from.
So far so good. Scanned it in four chunks and am comping those together in Inkscape as best I can. Feels good enough, within a millimeter or so which given the wiggle room in the grand scheme of things is plenty.

Making the next step, from this hacky comp job to actually producing a good clean vector pattern, is the hard one and I suspect that especially with the noise of this doc and my subpar skills there I'm going to be better off just doing a manual trace of it in Inkscape myself.
In fact, I've decided that doing a manual trace is the fastest AND best approach here, because I already know some of Milt's cutting on the existing piece deviates from the drawing. So I'm getting under way there, one bezier at a time, in Inkscape.

Once I've got it all done up as a vector drawing in Inkscape, I can then have my plotter draw it out on new paper, lay out the existing glass, and see whether and how much I need to rectify what's already there. Cart before horse, tho, a lot of drawing to do right now.
Left side traced, up to the point where glass has actually been cut already. The piece's layout is highly symmetrical in conception so I'll probably be able to duplicate and flip this for at least a very good start at the other side as well.

go go plotter
Original and initial partial trace. Next to see how the glacé lays out on this, see whether I’m off by much or can build from here.

Hey, not bad. The proportions are all roughly correct; I can see where the glass deviates a bit from the drawing (the revised stem of the menorah is a good bit wider, for one) but nothing is super janky. This is a good start, I can work forward from here we’ll I think.


Alright. Air quality has been shit because of forest fires and I slept fitfully through a horrid sinus extravaganza, but getting to work on this is as good a distraction as any. Time to try and iterate on my initial trace a bit to fit the actual glass better.


I don't think I'm going to do a better or more efficient job of this than just eyeballing and adjusting, so that's exactly what I'm doing: looking at my snapshot of the current layout, looking for major line variances, and drawing a new, closer matching line by eye.


I probably don't really need to fix these lines in the interior of what grandpa already cut out--it's all already in place--but I feel like as long as I'm doing the work I might as well be thorough. It'll feel nice to have the whole pattern documented in the end.
The original drawn plan had hints of the vertical striations of the milky blue glass area, but didn't actually elaborate those down into the lower area of the piece where grandpa had done his cutting, so I'm approximating those into place as well.

Plotter time again.
And transfer the glass over to the new version. Looks better, further reassured by the general cut even if it’s looser than I’d prefer if I were starting from scratch. Time to build out the rest of the trace based from this point I think.


One major element: the lamps and flames at the top of each arm of the menorah. From what I can see in his scraps, Grandpa had played with both this three-part lamp and a simplified trapezoid; I prefer his original more complicated take.

You can also see a suggestion of a three-part flame construction, with a small internal area that could be a brighter/hotter core of the flame. The idea is nice but also potentially very fiddly; for now I think I'll try just solid one-piece flames as his scraps suggest he did.
Using the same figure for all four side lamps; question of whether the variation in the drawing was a specifically motivated choice or not--so much of the design is overtly symmetrical--but I can revisit and play with the idea after I have more drafted.

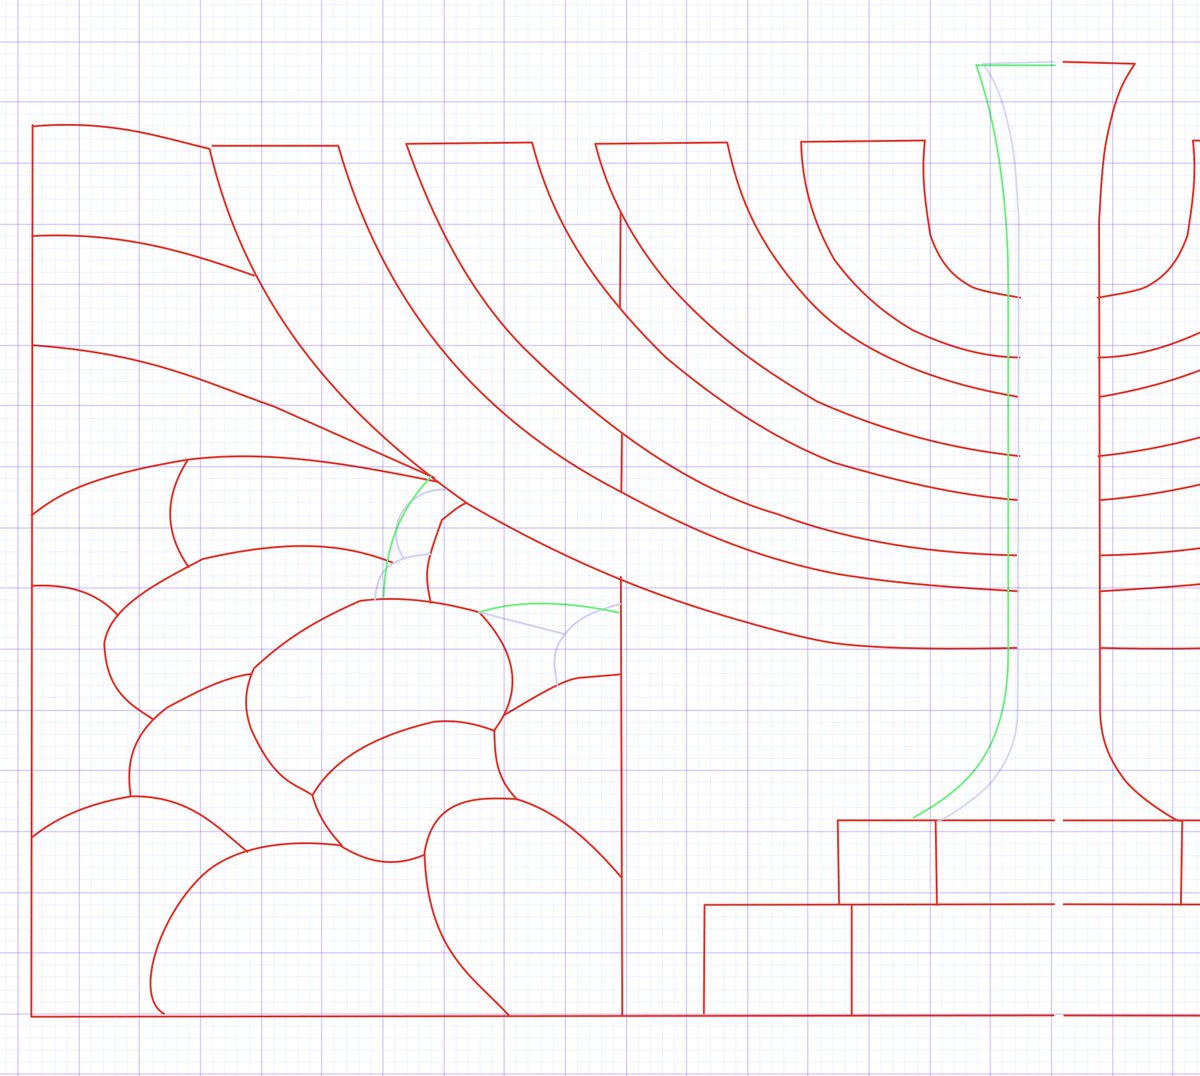
The other major elements from the unfinished top half: the arch top of the stained glass windows in the center behind the menorah, the horizontal breaks in those vertical striations, and the curved rays moving out toward the top and edges of the piece. Here's a first draft.


Which, oof, there's some headaches here in terms of where the lamps and flames intersect with the other areas. Lot of sharp corners and thin pieces; question both of the difficulty of the actual cutting and whether it lands well aesthetically. Gonna have to chew a bit.
I would honestly not be surprised if this is about where Milt started to look at the difficulty of what he'd cut so far vs the difficulty of what he was setting himself up for and been like, well, shit, who came up with THIS idea.
Also there are a number of different mathematical figures for different arch/window shapes, and none of them really match the slightly lopsided curve suggested by Grandpa's incomplete sketch. Will have to decide whether and how to modify that curve vs. stick to the sketch.
Looking at this with fresh eyes this morning and honestly that original trapezoid + ovaloid lamp design is a real pain in the local context of the piece. I see why Grandpa was considering a trapezoid. Currently thinking of simplifying it a bit like this as a compromise.

That still doesn't solve a couple of nasty areas with small (hence fragile) bits of glass with tight (hence very likely to break) inside corners. Especially these two highlighted bits. But if I need to I can add some additional horizontal break lines to make it work.

I'm teetering on how much to iterate at this drawing phase vs. settling on a plan and getting to work. I personally have a real hard time throwing away or redoing work, it's a nigh-pathological mental hurdle, but I know I can plan myself into exhaustion and burn out early too.
In principle, in PRINCIPLE, a reasonable way to go here would be call it a plan, plot out the new iteration of this drawing, and start cutting glass, because the worst case scenario would be changing my mind and revising it a bit and cutting glass over again. In principle, fine.
In practice a loud part of my brain abhors the idea of doing it, changing my mind, and doing it over again. In practice sometimes executing an otherwise useful, instructive draft is harder on me psychologically than just worrying it out on paper for seemingly too long.
I don't know which it is here. And one thing about committing to a draft is I need to do some serious cleanup on my drawing here -- tiny, tedious, time-consuming details -- that I'll have to do over again as well if I make later changes. So I'm hemming and hawing right now.
But if I'm hemming and hawing, I could also do some of the tedious prep work in parallel, and so here we are: a neatened up, unified compromise take on a completion of layout Milt had been approaching. And looking at it like that it feels worth pushing forward from here.
The other major design issue I've been chewing on is emphasizing the split-artist, time-gapped collaborative nature of this project by running an actual barrier through the piece with new glass above and grandpa's existing glass below, something like this:

In fact more like this: I'd keep the menorah itself foregrounded over the barrier, which I like better both aesthetically and symbolically. I like the notion of this diagonal break being the one major point of asymmetry in what is otherwise a deeply symmetrical design.

One nice thing about working this up in vectors is I can pencil-plot a copy onto watercolor paper and do a much quicker color experiment to think about the composition.


I don’t do as much watercolor as I’d like; I almost always find that doing a related watercolor painting helps me get a better grasp on a project or idea. In this case it gives me a chance to spend some up close time with my revised drawing, think about lines and composition.


And watercolor and stained glass are very different media on the whole, so ones only ever going to be an interpretation of the other. But it’s helpful for me to think about what I’m seeing in my mind and with my eyes in trying to make this translation feel faithful.

The notional Grandpa Milt portion; what’s left is thinking through a complementary color scheme for my side. I’m left to interpret a bit his intentions for the upper end of the sky, as there’s no clear indication in notes or spare glass what he was planning there.

Coming in with warmer, greener hues on the other side of the border. I have some specific glass in mind that this doesn’t capture but that’s not really the goal here so much as just considering the overall vibe.

Well, it’s a take. I have issues with the balance of it—I’m especially uncertain about the sky gamut—and should look at it in the morning and also look at the actual glass. Might glaze some more color on tomorrow. But even if I don’t like it I KNOW what I don’t like now, so.

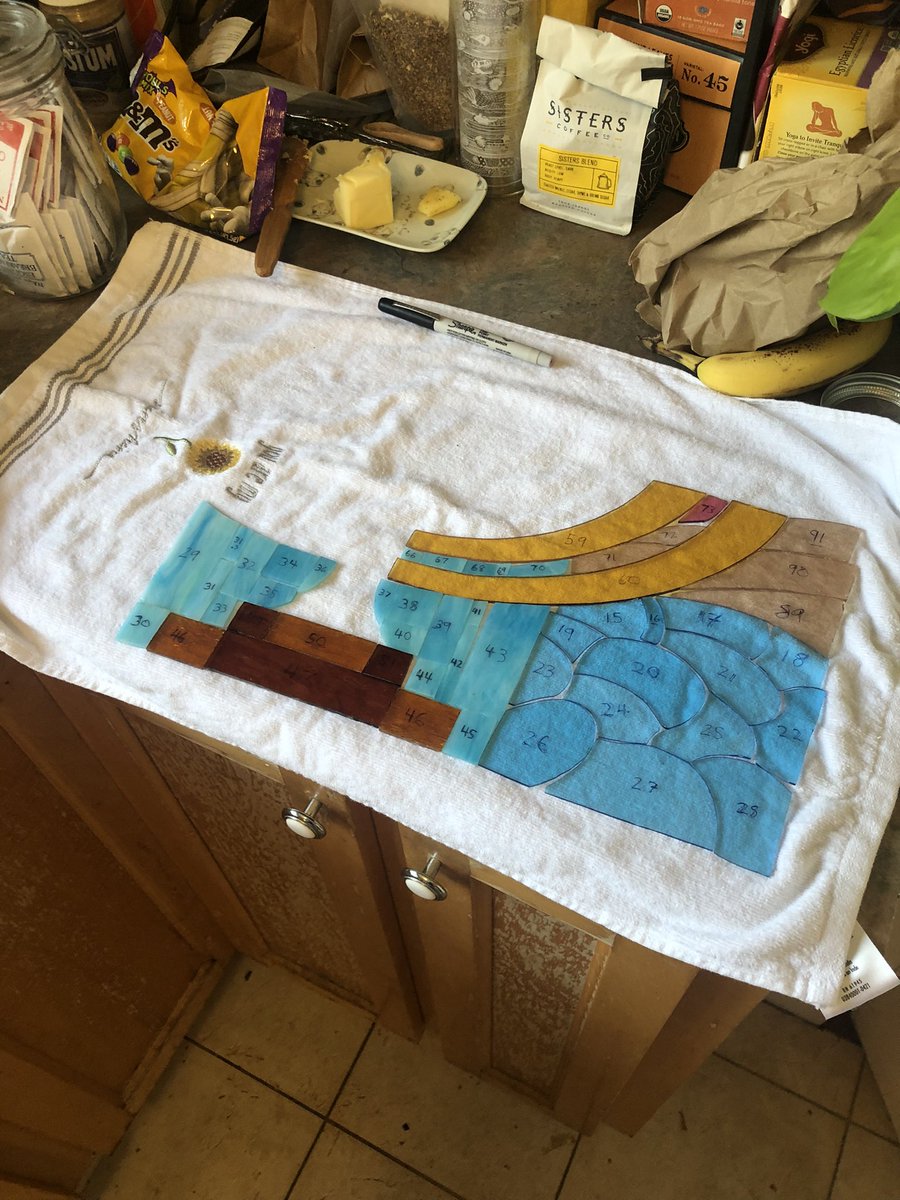
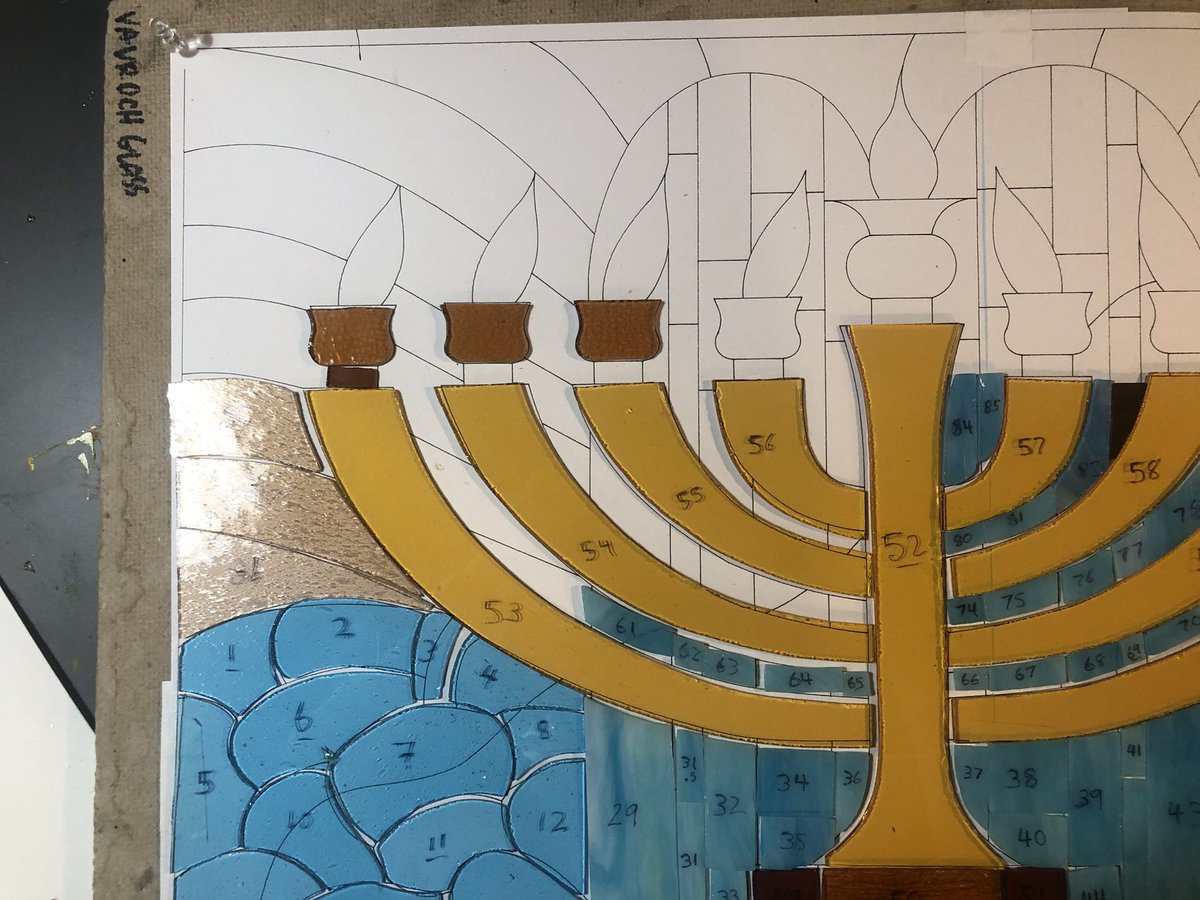
Time to get back to work on this. Committing myself to a final draft of the full layout, plotting it in pieces and taping it together since neither my plotter nor my paper on hand is big enough. Now to transfer all the extant pieces again.


Slide the old partial draft of my work board, glass and all; pin the new complete design down; and then transfer every bit over and nudge them around a little bit. Can see more clearly now what my needed new glass situation will be


Color choices. I want the lamp hardware to match the base of the menorah; I don’t have enough glass of grandpas scraps to make them out of that. But a couple of Bullseye colors I have on hand are pretty close, so I’m gonna cut a test lamp and see how it looks.


I’ll be more deliberate when I get to cutting for real, but for now gonna just trace by eye and knock out a rough cut to look at.


Quick trip to the grinder to clean up the edges and refine the shape, and that lamp bowl looks pretty good. Do the same with the other glass for the stem underneath, and I’ve got a lamp assembly.


I really wasn’t planning to turn a bunch of parts out right now but honestly I’m pretty tempted to just knock out the whole set of lamps now that I’m looking at it.
Back to it. Plotted a small section with the lamps and flames on some more bristol and hand cut the pieces out. I’ll probably machine cut the major share of stencils for this but this is a workable shortcut since I repeat all of these eight times, so, good enough.


Stencil in marker; rough cut with glass cutter and grozing pliers; smooth and refine with grinder; couple more lamps. Now to do that five more times.


Economy and shortcuts when a bunch of pieces are the same. Lay em out with common straight line edges and peel em off one at a time like pez.


Blam.


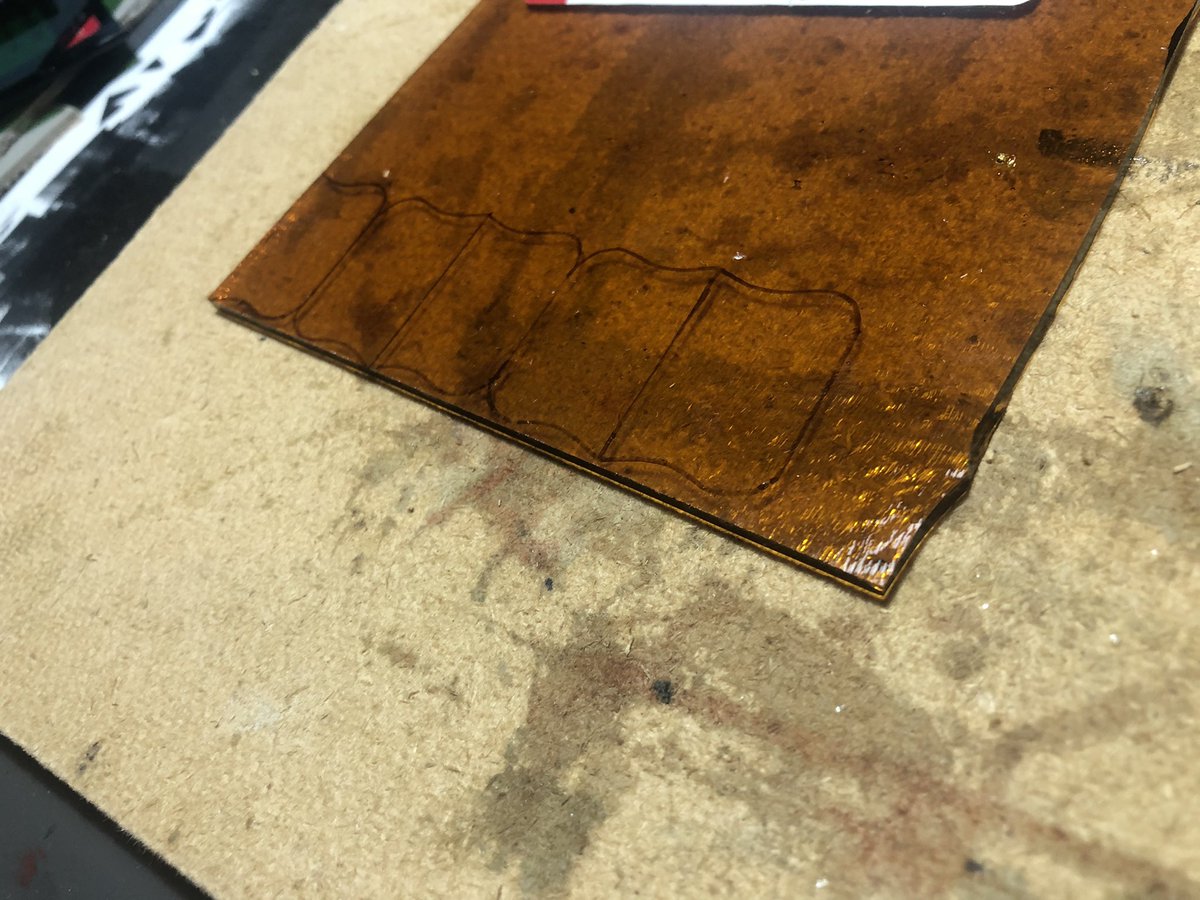
Same basic story for the darker glass for the stems, just geometrically even simpler and yet simultaneously a bit more fiddly to do because they’re so small. I thought about making the lamps just one continuous piece but I really like this look a lot more.


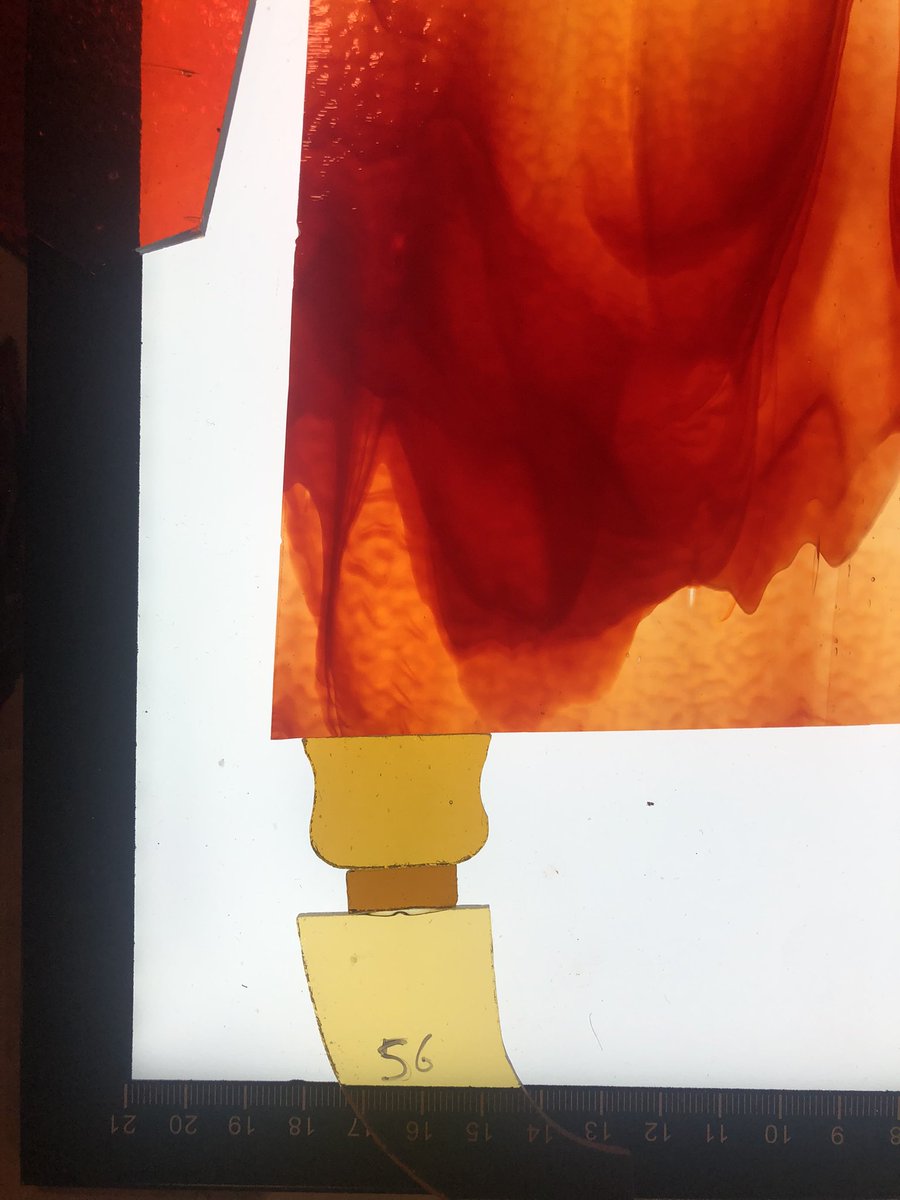
Flames tho. Grandpa’s glass scrub have this one specimen, cut from a transparent red, but no spare glass to cut more from, so I’m going to just pick a new red to cut from. Have a couple ideas for possible glass.


Some options: streaky opaque red I like but opaque is out, it’d mismatch the other glass elements in the menorah; a nice deep plain red; a streaky orange red chunk of Spectrum; and a streaky-opaque bit of Bullseye.


A couple of reds with a lot of glass texture, which I like a lot but at the size of the flame pieces it might not come through the way it would in a larger field of color.


Good time to go to the light table and look at colors with light through in context of the lamps. All of these could work, but at the moment I especially like the idea of pulling some flame texture out of this streaky semi-opaque piece.

And the good news I’m not committed till I solder it all together; I can look at the whole piece and see if the flames feel right or need changing. I might also use a mix of glass for different flames.
But I feel pretty good about this as Plan A. Grabbing specific areas from complicated, chaotic glass is something I almost never do in my work so it always feels both a little magical and like a terrifying high wire act. But I should try to do it more.


Back to the light table to see how they look with light through them and, yeah. Yeah. I like this.

While I’m working with this glass I might as well do up the shammus as well. Might rework this central flame but this is a good start and would probably work fine in the final piece if it grows on me.


More color choice thinking. Above the snaking diagonal line through the piece, for the stained glass arch windows behind the menorah, I want to transition from Grandpa’s original blue to another color scheme. Leaning to green but not settled there.

Here’s a selection of streaky colors, semi-opaque like the original blue glass. Some feel too dark. One feels a bit light. A couple feel like a good contrast within a reasonable value range. That Jovian warm grey bottom left also feels like a possibility.

I think I need to just cut a couple test pieces and see how it looks with more complete context. Might also work to use a mix of glasses to make the stained glass figure of the arch windows a little more lively, but I don’t want them to overshadow the lower half or menorah.
Rough cutting new pieces to see how this warm grey streaky glass looks in context. Feels promising, will take these bits farther.


Yeah, feels pretty good. Gonna grind these to a proper fit.

Some time with the grinder and I’ve hit a much better fit now. Laid out a bit more of the existing stuff on the light table to bring the context in. I think this new glass is a good contrast to both the lamp and flame warms and that existing blue below my boundary line.


To fill in the space between the existing glass and these new grey ish pieces, I need to cut some of grandpa’s scrap glass to fit in the remaining blue. This one piece is going to be especially dicey. This is a genuinely bad decision. But let’s see.


First pass, marking done bits that need more work, second pass. Good enough for now, glad it didn’t break. Fir narrow inside curves the best tool I have is thus like 3/32” accessory bit, fiddly to use and slow. But nothing is going to get me a truly sharp inside corner.


Which, I really set myself up for trouble there by not rounding all of grandpa’s sharp corners. I’m practice I’m going to just work with it through small adjustments as I do a final pass; in practice I could have done another edit pass on the design itself first. But, forward.

Got those five little bits of bridging blue glass made well enough for now; the fill the space and make the arched glass window a contiguous piece now, which is satisfying to see.


Have cut substantially the same set of pieces for the other window as well, and then laid it all out on the main pattern again. Coming along. I think I will need to trim some of the pieces down a shave more later though, it’s a tight fit to get it on the pattern right now.


Also, milestone: I finally need to cut some of Grandpa’s existing glass pieces, to get these guys to meet up with my new boundary line.


And then more like that too fill out the middle area of the left side, including trimming another grandpa piece for the boundary line, and, whew, that’s the bulk of the arched window work done. Will definitely have to do some fine tuning with the grinder but I’m very happy.


Alright, back to the problem of color decisions, need to sort out what I’m gonna do with the rays of the upper background, which I’ve been thinking of as the sky even if it’s pretty abstract in practice. I want a couple of gradated gamuts of color, one for each side.


As part of the design I’ll also be replacing the few existing sky bits on the left and some of the blue land bits as well, and trimming those remaining border pieces. By far the biggest removal of existing glass. Feel a little conflicted there but it’s what I’ve settled on.


So along with working out sky colors I’ll also need to choose a new complementary land color. And I want to make it all work locally from color to color and with the overall piece. It’s intimidating and I’ve been putting it off by working on other parts.
It’ll be a lot simpler to compare colors close together if I’m not wrangling large sheets of glass, so I’m gonna cut off a little square inch or so of scrap for a bunch of these and use those to check color selection possibilities.


I like these three as possibilities for the new land color. My new upper glass for the central arch windows are of darker value than the lower glass, and being consistent about that in all the upper vs lower contrasts will make that boundary read more clearly to the eye.


Over on the right side of the piece I’ve got grandpa’s bottom sky piece and a hint of his next color in what I am guessing was meant to be a gamut of three colors total. I have no more if his pink/magenta glass but I can aim for a close replacement.


A few possibilities, two using a close match to the original middle pink, two pushing out into a subtler washed out chroma. I like one and four respectively at first glance.


Either might work. Will hold them as two initial possibilities while I tack back to the side sky colors.

Moving upward, blue land transitions into green land transitions into three color gamut.

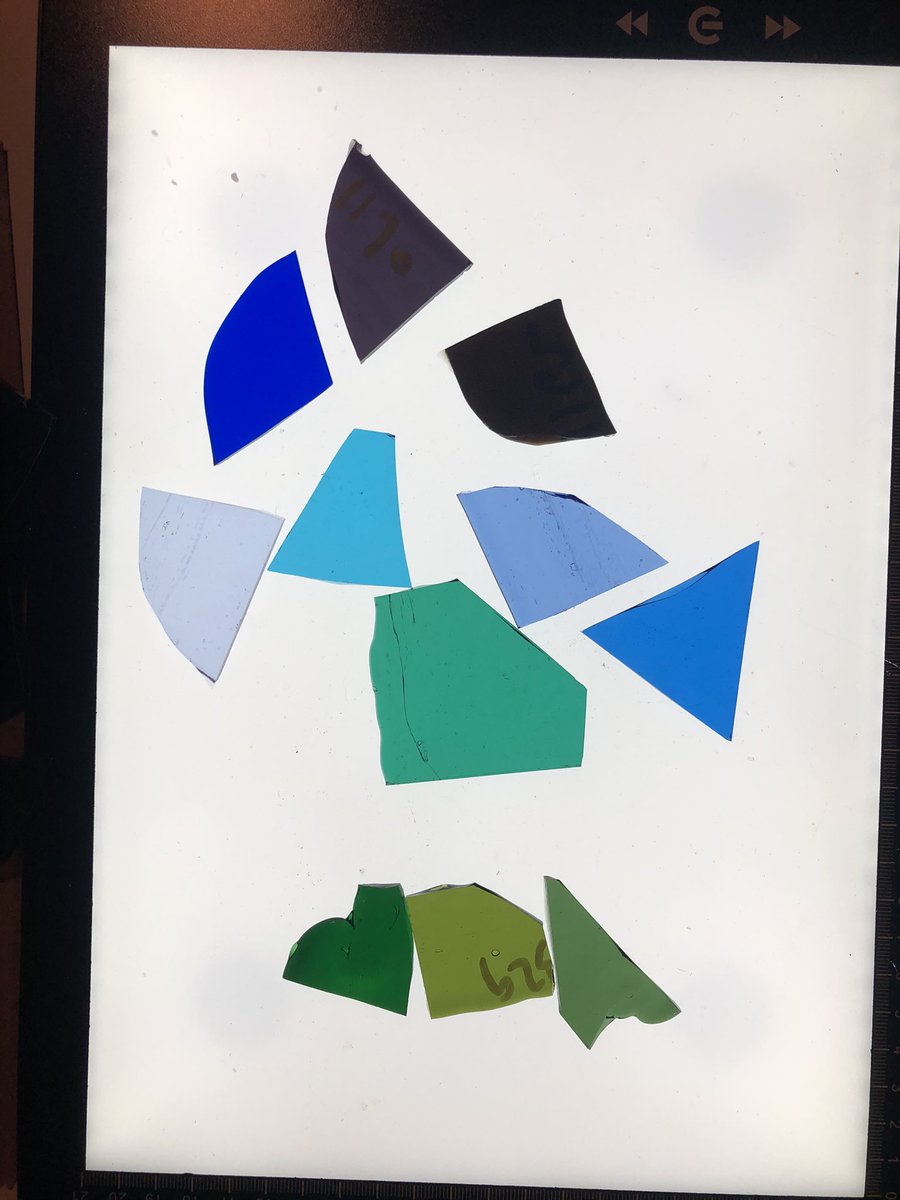
Some possibilities. Who said I’d never use combinatorics in the real world.


Giving it some more context. I could really trap myself here for a long time trying to make up my mind; I think the only way I’m gonna make real progress is to cut some pieces and see how it looks, and to hell with worrying about potentially redoing work.


Looked up from my work and realized that (a) I'm bleeding a little, which is not uncommon when moving a bunch of glass around, and (b) it's noon and I haven't eaten breakfast, which is more of an issue. Time for a little break even though I want to keep going.
Maybe.

Maybe.

Rest of the blue in there. Done really stupid fiddly pieces in the middle there, but it’s close enough for now. Will have to do some work on the other half of the sky and see how the colors look altogether.

Back to it, right side sky. That pink stuff went quick and easy but this darker purple glass is really poorly behaved; had to cut this main piece four times before I didn’t have the little panhandle lip break wrong during some pretty normal meat and potatoes trimming.


Duly chastened I manage to get this objectively more fragile cut the first time, so I’ll take it.


Some frustrating little setbacks this morning with the glass but kept my head down and right side sky pieces are cut now. Getting close to have a complete first rendition cut; a bit more central sky, some new left side land.

Like, that’s most of a piece.

Starting on the green for the new left side land area, so far so good but…I need to get more area out of this shard of olive green than exists right there. Hrm.


Yeah, hell. Lots of other greens on hand, but I guess this is all the olive I have left. O either pick another green or drive out to Bullseye, if they’re open today. Vexed. I’m vexed.
Zipped out to Bullseye, found my olive green, and snagged three other colors I don’t have any of that feel like they would slide into a nice gamut somewhere.


Back at it, got all my olive green glass cut. There’s a subtle difference in warmth between the old and new sheets of glass; I sort of like it but I’ve got plenty of extra new olive to recut the earlier pieces if it bothers me in the long run.


Now to mark and cut the pieces of grandpa’s glass that meet my new border. For three of the pieces that’s pretty simple, but I’m genuinely nervous about these two bigger pieces on the left where the remaining pieces are thin and thus potentially easy to break wrong.


I don’t think I have any scraps big enough to recut these if this goes wrong. Fingers crossed and doing it as carefully as I can.
One of two done without incident. I scored a few subsections of waste to take off first, and then used grozing pliers to nibble away at the remaining waste. Whew.


Other came clean too. Deep breaths. Okay.

Which means the first pass of cutting is complete except a couple pieces at the crown of the sky. This piece is the first time I’ve really wished I had a larger light table because the glass can look so different with transmitted light; look how dark this new green looks laid out


Blam.


Here’s what I mean: my little 9x12 light table really isn’t big enough to get all of the color context in view at once, even just transferring a carefully selected chunk over at once. Makes my color choices throughout harder to evaluate.


But hey, I’ve got all my pieces cut at least in theory. My biggest problem now is the crowded fit of in particular the arch window pieces. So next up is gonna be some tedious check-and-revise followup grinding on a bunch of small pieces.
What that tedium looks like in practice: taking each piece, laying it down on my drawing, and seeing where if anywhere it’s a little too tall or wide or wonky to sit cleanly inside the pattern section, grind to fix, check, grind, until I’m satisfied. Then onto the next one.


Tedious and fiddly and my back hurts from all the bending over to caaaarefully nudge loose glass and then go back and forth to the grinder for a an hour and change. But worth it. The fit is much much better now. I could in theory start foiling now.

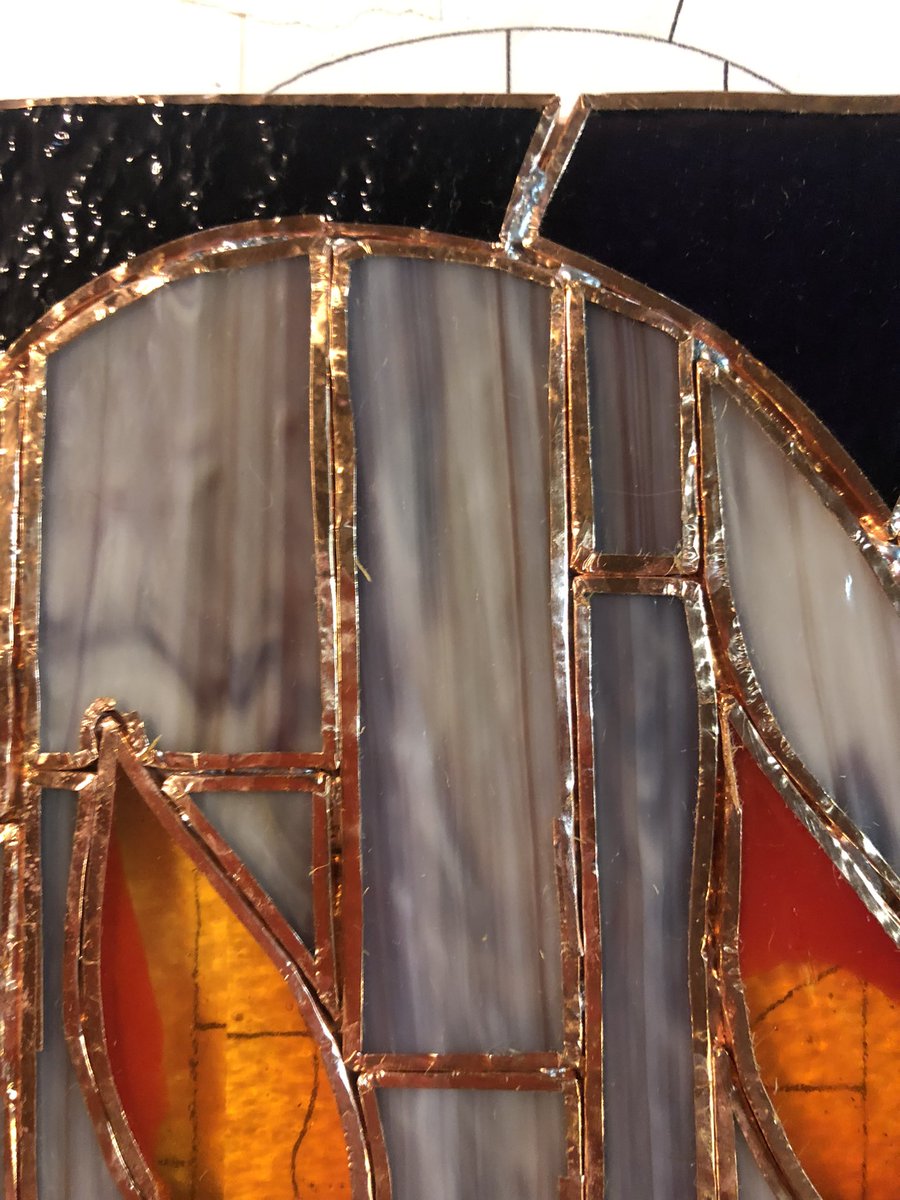
Taking a critical eye to details this morning, to see what if anything I should, or even can, fix up more before moving forward (which I otherwise desperately want to do, which is why I’m slowing myself down). These edges are pretty uneven, might trim the grey bits.

The fit around the menorah is pretty loose in places. A mix of converting this area from the more spaced out original lead channel style to my tighter copper foil approach, and me just not quite getting my adaptation of grandpa’s original drawing and cutting as close as I’d like.

The lower blue land areas are similarly loose, but you can’t add glass back on so I’m working with what I inherited. I can space these loose bits evenly to minimize huge gaps and compensating by trimming my foil edges. It’ll be fine, no one will care but me probably.

And I wish the contrast between these two dark purple was starker rot sell the boundary there, though i think it’s better with light coming through which is what matters most.

But ultimately I think the things I’d usually be most likely to fix are the ones I can’t because legacy glass, and the rest are local issues where worst case I come back and cut some replacement pieces after all. So I think I’ll start cleaning and foiling. That’ll take a while.
(In the meantime my work table is a disaster area. Will clean later.)

Glass cleaning: I want to get grinder gunk and misc dirt/oil/blood/etc off the glass, especially the edges, so that I’ll have a nice clean surface for the copper foil to adhere to later. Wash each piece with glass cleaner and water and scrub edges dry and clean.


Wash wash wash


There’s so many pieces to this that I’m definitely doing it in chunks. And I’m cleaning off my reference numbers; between photos and familiarity spilling the pieces would now be annoying instead of catastrophic. Not working on both sides of a symmetry is some insurance there.


Foiling: lay the adhesive side of this thin foil against the center of the edge of the glass, apply it flush all the way around the piece with a little overlap, and then gently fold down the extra material and burnish it to the glass, creating a 1/16” or so border on both sides.


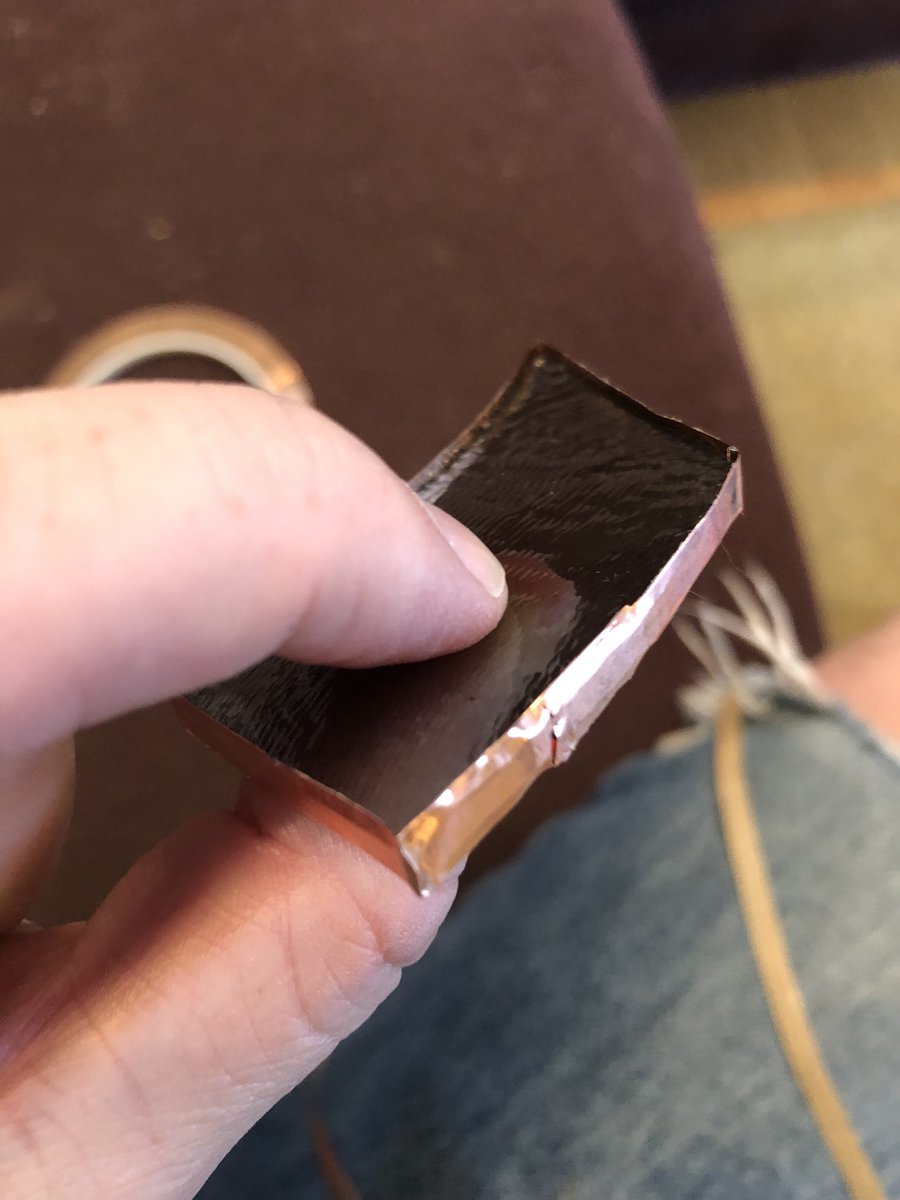

This wee triangle was already a stupid tiny piece that I subjected myself to; foil would almost totally erase it. Fortunately I have narrower widths of foil so I can overlap less. If that weren’t enough I could trim it back with a knife too, but this will be okay I think.


Narrower foil is more generally useful for thinner sheets of glass, though; thus blue stuff is quite thin and by going to a smaller gauge of foil the resulting overlap rim can be fairly consistent with the other fouled pieces.


Foil foil foil.


Only sevvvveral more hours of that to go.
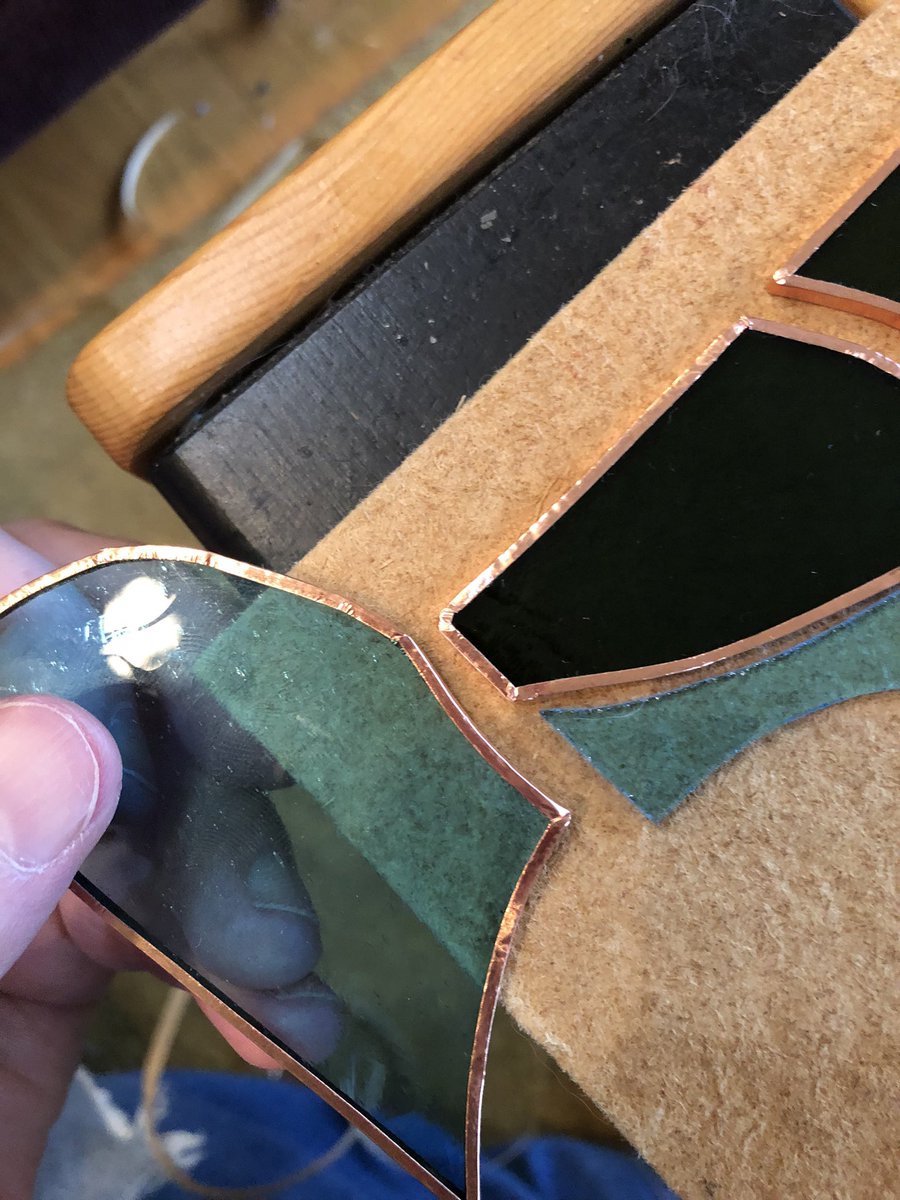
But still, this is always a satisfying turning point; it starts to really feel like a stained glass piece to me when the foil goes on and starts to assert the segmentation between colors that’s fundamental to the medium.
But still, this is always a satisfying turning point; it starts to really feel like a stained glass piece to me when the foil goes on and starts to assert the segmentation between colors that’s fundamental to the medium.


Wash wash wash

Foil foil foil. Just over halfway done now (which has outsized psychological value vs just under), and as good a reason as any for more closeup glamour shots. Might get some more foiling done tonight but I’m absolutely not finishing that step before tomorrow.


Wash wash wash. Made a deal with myself that I could wash up the rest of the pieces if I don’t start foiling them at all until the morning.

Back to it. Here’s one (1) Kid A of progress, which feels like a pretty good amount but this has mostly been larger pieces which goes faster per square inch. Lot of fiddly little chunks in that interior, gonna be slower going.


An additional “I’m The Court Of The Crimson King” of progress. My dad tried to get me to listen to this in my high school days but I never got around to it until this week. Will be interesting to finally discuss it with him especially re my early fixation on Pink Floyd.

And an hour of Benny Goodman to finish it off. If there was any disappointment from my grandparents that I dropped clarinet after middle school instead of becoming a new Jewish jazz phenom I never heard about it.

And all laid out together again. So satisfying. This stuff is at maybe its prettiest at this point, that high shine of burnished copper tape that even the copper patina available for solder can’t really recapture. Time for an egg salad sandwich and a beer.


At this point I can either futz more or get soldering. And I know where I am mentally and emotionally and that’s in the pipe already and worried about a loss of momentum catching me, so getting soldering it is.


First step: doing little bits of tack soldering around the perimeter and along some of the major lines of the piece, to secure the arrangement of glass in a basic way so pieces can’t go sliding willy nilly if they get bumped.


Then continue tacking more generally across the whole piece. I don’t need to tack every adjacent edge, just enough to fix things in place relative to each other. This is most useful for sparse areas like grandpa’s blue fields, where the pieces aren’t snug already.


And commence soldering in earnest. I’m not even trying to get a good bead here; I know I’ll want to flip this over, solder the back, and then finally come back to the front to do a nicer finishing pass on top of this initial rough job.

Hour and a half later, I’ve got a rough solder pass done in the front. Now to very carefully turn it over and do the back side as well.


Flip process: skooch bottom of piece to edge of work board; pivot board upright supporting the piece; spin piece around in the table while upright; use the board to lower it back down. Much safer than relying on the strength of a half-finished solder job against shearing force.


Back side close ups; you can set that wherever there were wide gaps between pieces solder tends to pool through. In tighter fits that happens far less.


And that’s the back side done. The soldering here isn’t tremendous but it’s much better than that front pass, partly because I didn’t have the same gap worries and partly because I’m limbered up now. I’m unlikely to do a finishing pass on this side so for the best.


And one brewing RSI later, finishing pass on the front is done too. The soldering here still isn’t excellent—this remains the step I feel most out of my depth on, craft-wise—but it’s about as good as I’m able to do in general and that’s good enough.


There’s more to do: I need to add a lead channel frame for extra stability, and wash and patina and wax the whole thing. Stuff for tomorrow, I’m really pooped now and my wrist hurts. But I’m really close.
And and it’s late enough the day that I’ve lost the kind of natural light that will show it off best, but dammit it’s a cohesive window strong enough to stand up on its own now so here’s some dodgy dim workshop light passing through it.

Alright, good morning, home stretch. Looking at my solder job with fresh eyes and it’s fine. Sanity check: run my hand loosely across the whole surface. If nothing is sharp or catching at my skin, I took it far enough. Checks out.

Next step: straighten and attach a frame of lead came around the piece to give it better structural integrity and an external support structure. Also the part of the program where I ritually giggle that it’s called “came” and is what happens at the end. I am 12.


The lead channel has a groove that the outer edge of the glass pieces fit into; I’ll then solder the lead to the copper foil areas at the edges. That’s why i didn’t solder all the way to the edges on the piece: might make it impossible to fit the lead came onto the edge well.


This stuff is fairly soft and pliable: sturdier than glass but also easy to shape and cut. I just use some small snips to put a miter on where it’ll meet at a corner with another piece. There are more rigid materials too but this is what I use generally.


Cut the lead to size, straighten it, slip it over the edge of the glass, and then hold it all in place with some little framing pieces I made a few years back.
Injury report: I poked myself in the tip of my phone typing finger while retrieving a pushpin.
Injury report: I poked myself in the tip of my phone typing finger while retrieving a pushpin.


Lead frame soldered to the edges. Will do the flip side as well now.


One more assembly tidbit: hanging loops. Snip off a couple inches of pre-tinned wire (it takes solder well), bend it with pliers, slip into into place at a corner of the lead frame, and go on some solder. Repeat both corners, both sides.


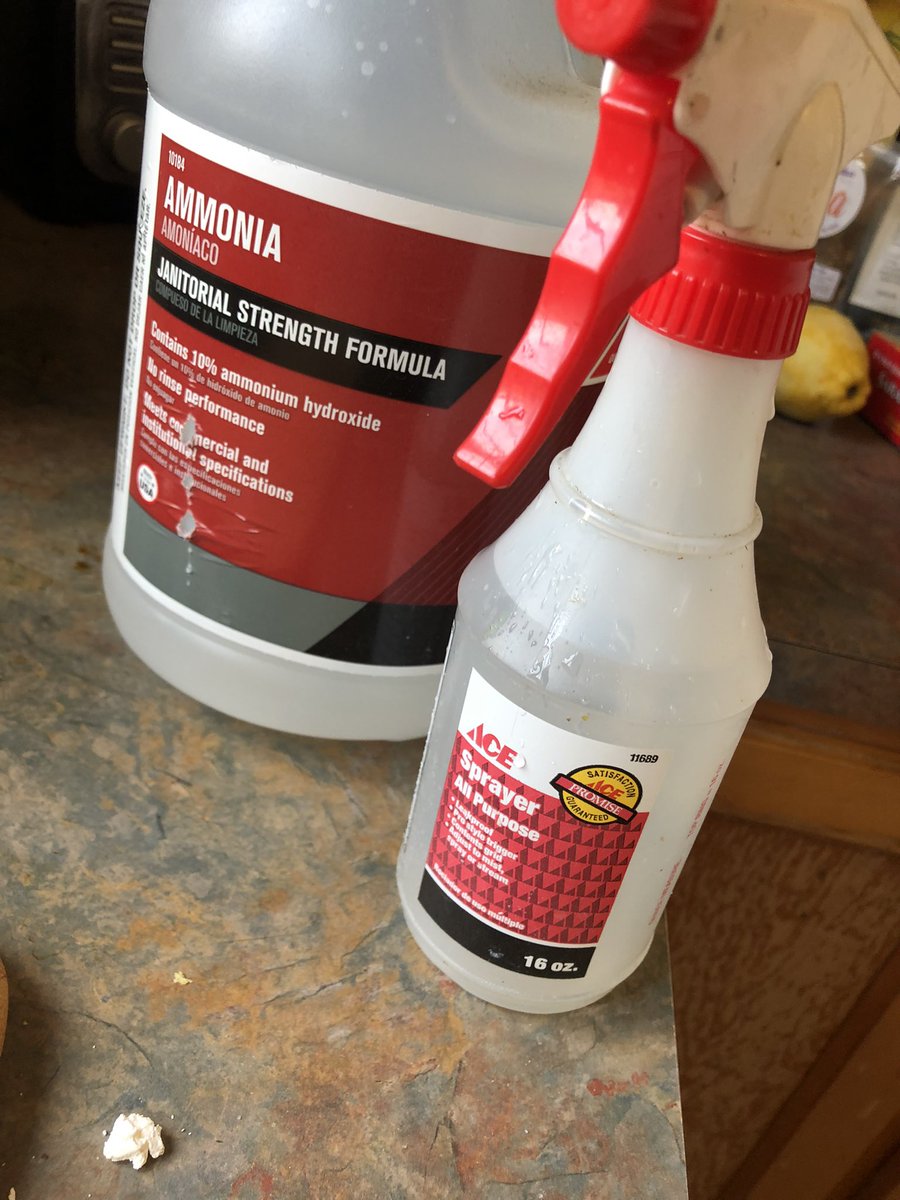
Then cleaning time. Scrub it vigorously after a generous few sprays of ammonia mixture to neutralize any remaining flux do it doesn’t etch glass or tarnish lead. Then scrub with soap. Then burnish the lead with steel wool to remove the natural oxidation patina.


Gotta take the natural patina off so my chemical patina will take better. Which my options are black or copper, and for most pieces I just use one. But I want to run a copper line through the piece. Never tried this before so I’m starting on the back side to experiment.


Putting on copper patina.
In fact right after that I switched to a beat up oil painting bristle brush. I usually use those disposable craft brushes for this step and just slather on plenty of patina compound messily, but needing accuracy here it’s very worth it to just wash thus brush out after.


Carefully edging up to the copper line with black patina. I learned from the experiment on the back side that black patina will totally overwhelm copper, so I went a bit wide with the copper application and am neatening at with this second pass.
Did that from one side of the piece, and then the other, for the whole seam line, coming out a half inch or so, blotting up extra patina solution with a paper towel immediately as I went so it would wick up onto the copper areas. Now I can patina the rest black more casually.


Half the black done; all of it. Time to clean it yet again and then wax it up for a final polish.


Wash off the leftover patina, then pour on some liquid wax compound, spread it everywhere, and stand the pied up so air can get both sides. Will let the wax set up and then I can polish it until my shoulder falls off.


Wax compound has dried to a, uh, waxy finish, now to polish with a cotton rag.


Shiny. I should probably hang this thing up so I can get a proper look at it.


Actually don’t have a great solution for hanging it up solo and wife is at work. Settling for now for some halfass windowsill shots, will get some better pics soon.


looping the ends together: I wrapped this up with a Patreon post including some new shots of the window.
https://twitter.com/joshmillard/status/1588211564066533377
• • •
Missing some Tweet in this thread? You can try to
force a refresh