Christoph Profile picture
Nov 24 16 tweets 11 min read
Match Analysis: How Japan beat Germany #GERJPN [THREAD]

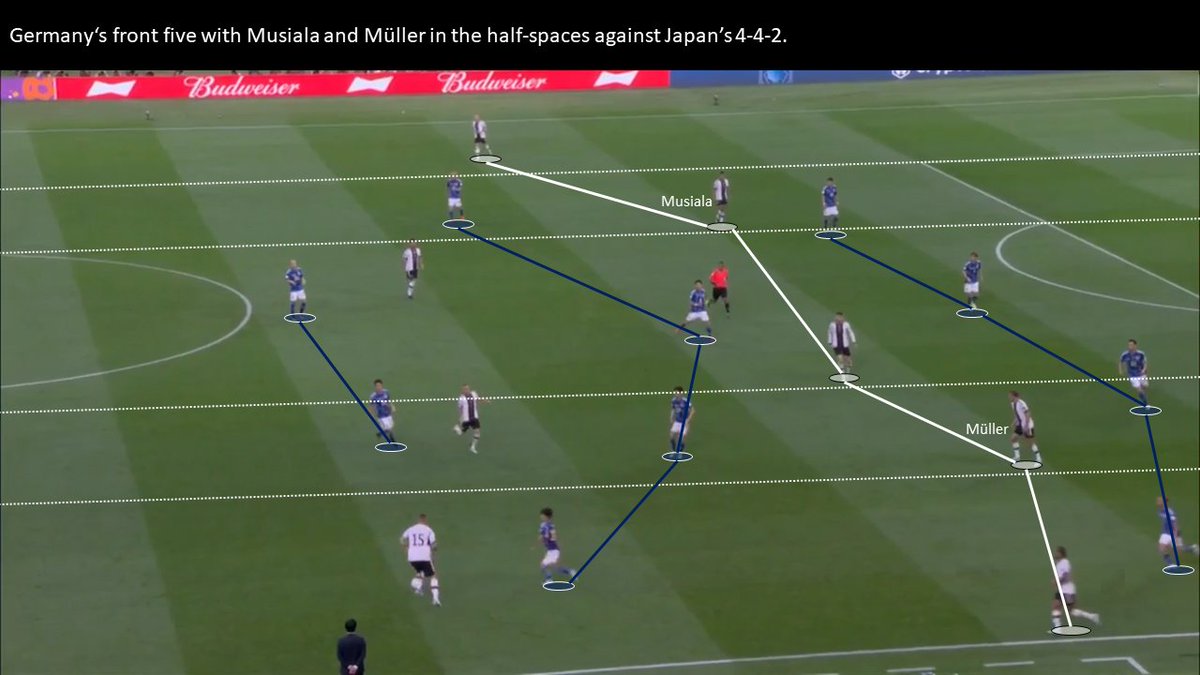
The Germans lined-up in a 3-2-5 structure in possession, using asymmetric fullbacks (Süle deeper and Raum higher). Musiala and Müller occupied the half-spaces. Japan defended in a 4-4-2 mid-block. ImageImage
The strikers of Japan looked to restrict passes into Germany’s double pivot by using their cover-shadows. Japan’s 6s stayed in between Germany’s 10s and 6s, allowing them to press the double pivot when a striker pressed a centre back or mark a 10 in deeper zones. ImageImageImage
When Japan’s 6s didn’t mark the 10s, they used a different approach to defend the wings on either side. On the right, Nagatomo pressed Gnabry, while Yosibah (left CB) shifted across to mark Müller. On the left, Ito tracked back to cover Raum, while Sakai marked Musiala. ImageImage
This defensive approach worked quite well in the beginning of the game and Japan was even able to create a few chances on transitions. ImageImage
However, as the game continued, Germany improved and was the dominant side. The Germans were regularly able to progress through the centre of the pitch by finding little 2v1 situations. Müller’s situational wide positioning was vital to create these occasions. ImageImageImageImage
Moreover, the Germans created most of their chances through the left side. Raum’s higher position continuously created an overload against Sakai, as Ito could press Schlotterbeck at times or didn’t track back enough. Additionally, Musiala could free himself from Endo. ImageImageImageImage
Even though Germany scored their goal from a penalty, the Germans were able to get in behind on the left side once again after a switch and amazing countermovement between Musiala and Raum, before receiving a foul in the penalty area. Image
Japan switched to a 5-2-3 out of possession in the second half, enabling them to play man-to-man and mark the players in the half-spaces more easily. Additionally, these man-orientations allowed them to have a better access and put Germany under pressure effectively. ImageImageImage
The Japanese pressed higher and more aggressively within this fully man-orientated setup. They regularly forced Germany to play long balls or won the ball high up the pitch themselves. ImageImageImageImage
However, that’s also a very risky approach, as it’s dependent on the players individual defensive qualities. Furthermore, everyone has to commit fully and mark tightly. If just one player leaves his man, the in-possession side has a free player with usually huge spaces.
Germany was at times able to find a free man, when Japan’s players left their men to press in a zonal-orientated approach and create a temporary overload ball-near. Moreover, the Germans could also outplay their individual qualities to create chances. ImageImageImage
Nevertheless, Japan mostly stayed solid defensively and also improved in possession with their switch to the 3-2-5. Key was the front five, which created a 5v4 overload against Germany’s backline and Japan could regularly outplay 2v1 situations against the fullbacks. ImageImageImage
Additionally, with the introduction of Doan, Kamada played as a 6 in the double pivot nominally, but continuously moved higher up in between the lines, allowing him to receive their and create even more decisional problems for Germany’s backline. ImageImage
Japan eventually scored the equalizer, which came from their 5v4 overload as well as Kamada’s higher positioning through pinning defenders. ImageImageImageImage
Germany was shocked and 10 minutes later, Asano netted in the winning goal, which once again came from Japan’s front five, which created decisional problems for the Germans and the Japanese were able to exploit the space in behind due to Germany’s poor communication. Image
Conclusion:
It was a truly historic victory by Japan thanks to the tactical and personal changes made by the coach. The foundation for promotion was laid and Germany is now massively under pressure, after actually starting the game very well.

• • •

Missing some Tweet in this thread? You can try to force a refresh
 

Keep Current with Christoph

Christoph Profile picture

Stay in touch and get notified when new unrolls are available from this author!

Read all threads

This Thread may be Removed Anytime!

PDF

Twitter may remove this content at anytime! Save it as PDF for later use!

Try unrolling a thread yourself!

how to unroll video
  1. Follow @ThreadReaderApp to mention us!

  2. From a Twitter thread mention us with a keyword "unroll"
@threadreaderapp unroll

Practice here first or read more on our help page!

More from @Chris17_t

Nov 26
Team Analysis: Spain’s positional play under Luis Enrique at the #FIFAWorldCup [THREAD]

The Spaniards lined-up in a 4-3-3 formation in possession against Costa Rica with deep FBs, high 8s and wingers hugging the touchline. Occupying all 5 vertical lanes. Image
Spain circulates the ball slowly and looks for a free man in the build-up to advance higher up, making use of this unmarked player and arriving with optimal conditions in the final third. ImageImageImage
3rd man combinations are key for Spain to both find a free man as well as switch the point of attack and get out of pressure. ImageImage
Read 20 tweets
Oct 30
Aspect Analysis: How Brighton applied the 3rd/4th man principle vs Chelsea #BHACHE

The 3rd and 4th man principle can be highly beneficial for every team. De Zerbi’s side utilized it for various purposes, which allowed them to beat Chelsea.

[THREAD]
Many teams use third man combinations in the build-up to find a free man. And so did Brighton. They often found the free centre back through a player from the double pivot, enabling them to progress higher up more easily.
Moreover, players from the front line could drop in between the lines and then lay the ball off, allowing Brighton to create promising situations.
Read 8 tweets
Oct 17
Match Analysis: Leeds vs. Arsenal #LEEARS
[THREAD]

The main aim by Leeds’ press was to force Arsenal wide, create an overload against the winger and eventually win the ball back to create a chance after a transition. ImageImageImageImage
This approach worked quite well at times. Especially on Arsenal’s left side, Leeds was regularly able to create a 3v1 situation against Martinelli and won the ball back there, by applying aggressive pressure. ImageImageImage
However, Arsenal found a few ways to bypass this overload. For example, through clever positioning, individual quality and quick combinations. The goal was then always to switch the ball to the underloaded side and attack potential 1v1s/2v1s. ImageImageImageImage
Read 11 tweets
Sep 15
Match Analysis: Graham Potter’s Chelsea debut vs. Salzburg #CHESAL

Potter set his team up in a 3-diamond-3 formation in-possession, a shape we could observe often at Brighton as well.
Especially in the 1st half, Chelsea was regularly able to progress down the right against Salzburg’s asymmetric 4-diamond-2 press. When Kjaergaard (left 8) moved out, Mount was often free, if Salzbrug didn't adjust. When the pass was played wide, Chelsea had a 2v1 overload wide.
At times, Sucic would leave Jorginho to press Mount, but this obviously allowed Chelsea to easily progress through Jorginho and break the press.
Read 13 tweets
Sep 14
Perfect example by ManCity on strategically using backwards passes to attract pressure, unsettling the opponent and switches through short passes.
Switches through short passes have the advantage that the in-possession side can adapt faster to open gaps compared to switches through long balls. Additionally, switches through short passes are faster and the opponent has to react to the change of the ball's position more often
For example at a long diagonal ball, the opponent only has to shift across and usually has enough time to adapt.
Read 5 tweets
Aug 2
“Look for the 3rd man (free man) to be able to turn and face the play.” ~ Lillo

Pure De Zerbi football in the following scene:

Initial 2-4 build-up structure. Image
RCM dropping deep to help RCB. This dropping movement triggers RB to move up and RM to invert (out of frame), leading to the creation of a 2-3 structure. Image
RCM can now access the lone 6/free man (initial LCM) through a 3rd man combination. Image
Read 6 tweets

Did Thread Reader help you today?

Support us! We are indie developers!


This site is made by just two indie developers on a laptop doing marketing, support and development! Read more about the story.

Become a Premium Member ($3/month or $30/year) and get exclusive features!

Become Premium

Don't want to be a Premium member but still want to support us?

Make a small donation by buying us coffee ($5) or help with server cost ($10)

Donate via Paypal

Or Donate anonymously using crypto!

Ethereum

0xfe58350B80634f60Fa6Dc149a72b4DFbc17D341E copy

Bitcoin

3ATGMxNzCUFzxpMCHL5sWSt4DVtS8UqXpi copy

Thank you for your support!

Follow Us on Twitter!

:(