toyxyz Profile picture
Feb 16 11 tweets 4 min read
#01_ ControlNet Mocap2Image Workflow Quick Tutorial
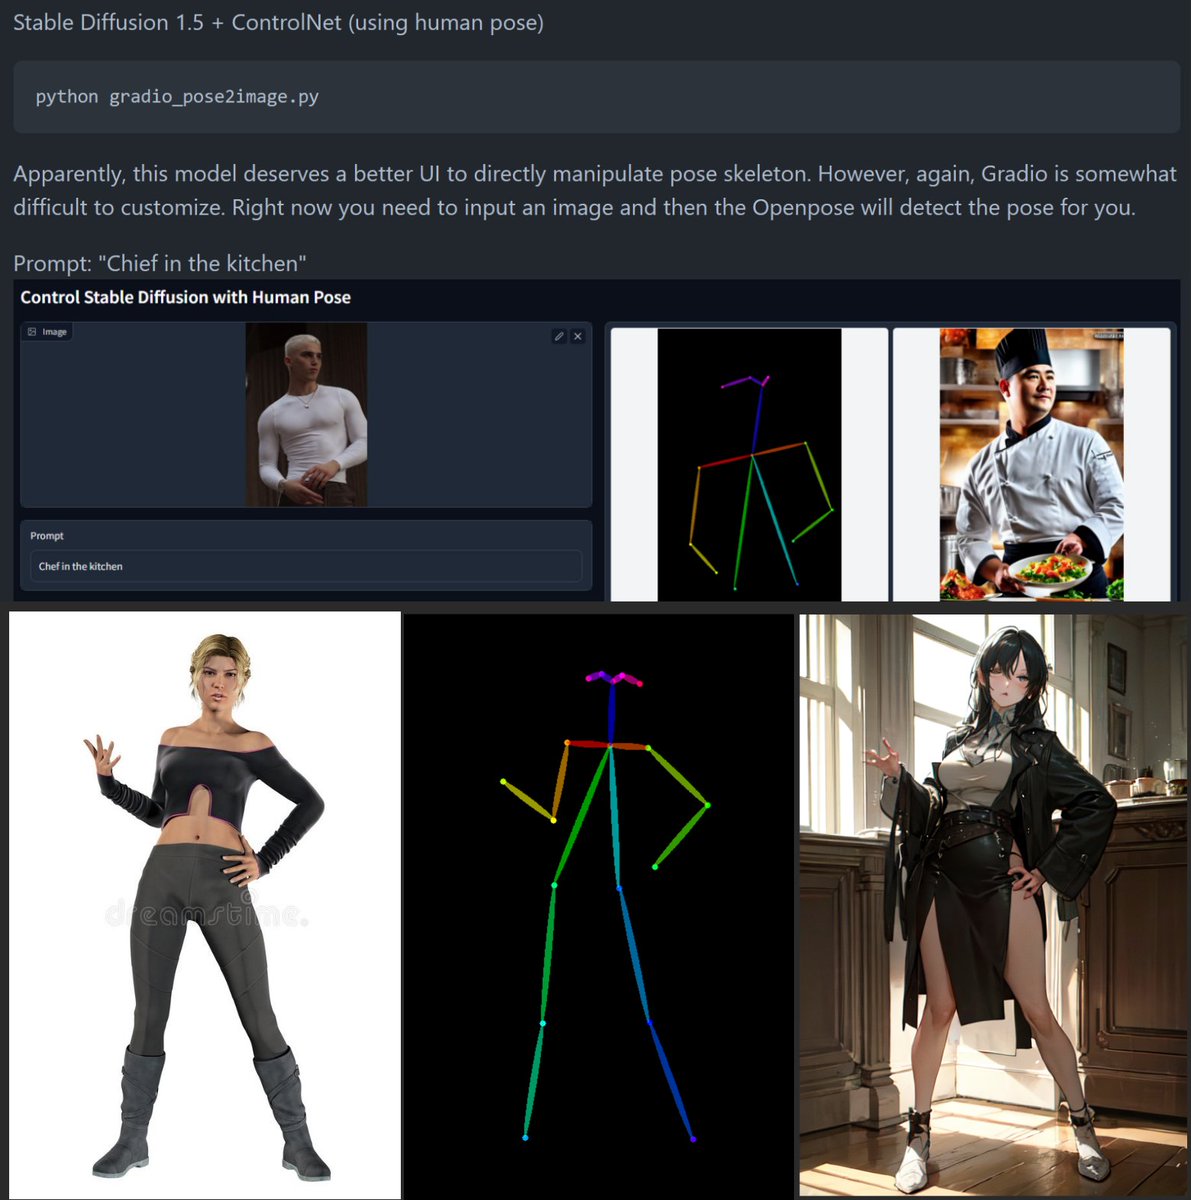
#02_ The only image the Openpose model needs is an openpose skeleton. The use of images of real people is due to the Gradio UI, according to the developer's comments.
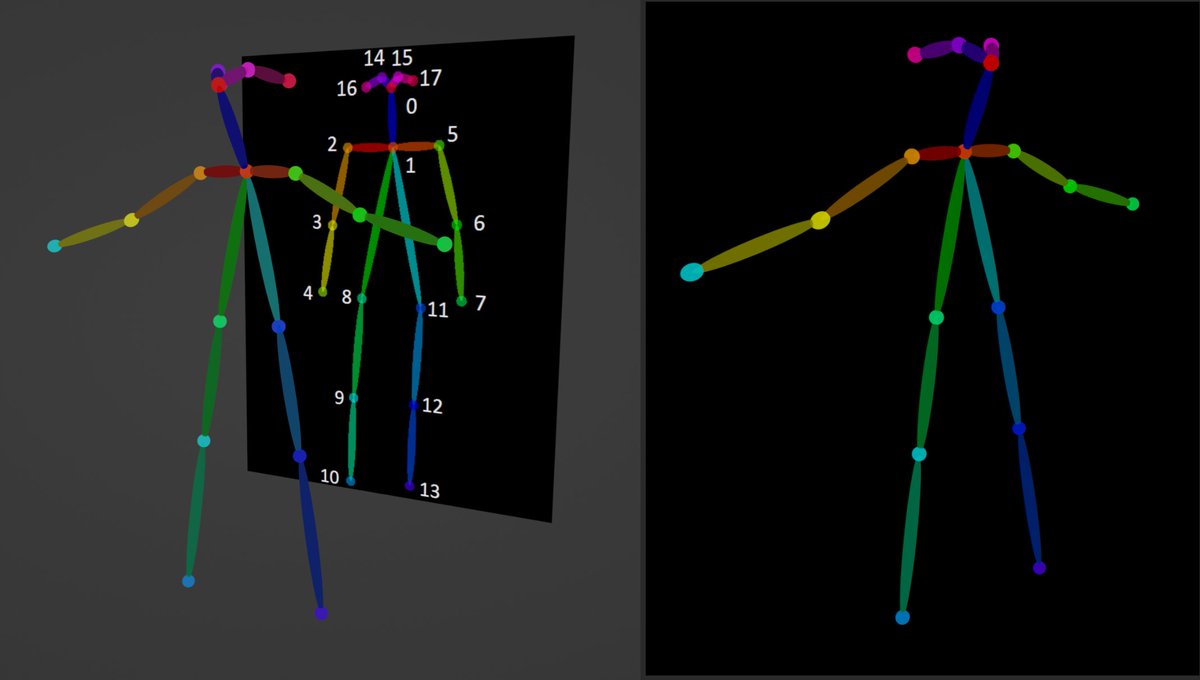
#03_ So I used Blender to create a simple character that looks like an Openpose skeleton. You can download it for free here. :toyxyz.gumroad.com/l/ciojz
#04_ The important thing is the color and the number of joints. The background needs to be completely black. If it is a different color, the probability of pose recognition failure increases.
#05_ Then, you can directly input the created image into ControlNet Openpose. The preprocessor should be set to none because there is no need to create a pose skeleton image.
#06_ And of course, these openpose-like bones can also be retargeted to Mocap. I used Autorig-pro. mixamo.com/#/?page=2&quer…
#07_ And render the image sequence >BatchImg2Img. To run BatchImg2Img using ControlNet, you must enable "Do not append detectmap to output" in settings.
#08_ Now, you can create a video by combining the image sequences. I used After Effects.
#09_ However, when Controlnet is used for Img2Img, it is affected by the color of the input image differently from Txt2Img. Therefore, the background tends to come out dark. Add 'Black background' to the negative prompt.
#10_ The pose recognition of the Openpose model is accurate, but it is often confused whether it is front or back. In that case, it is good to specify the direction the character is looking at in the prompt.
#11_ I used this extension. github.com/Mikubill/sd-we…

• • •

Missing some Tweet in this thread? You can try to force a refresh
 

Keep Current with toyxyz

toyxyz Profile picture

Stay in touch and get notified when new unrolls are available from this author!

Read all threads

This Thread may be Removed Anytime!

PDF

Twitter may remove this content at anytime! Save it as PDF for later use!

Try unrolling a thread yourself!

how to unroll video
  1. Follow @ThreadReaderApp to mention us!

  2. From a Twitter thread mention us with a keyword "unroll"
@threadreaderapp unroll

Practice here first or read more on our help page!

More from @toyxyz3

Feb 17
#02_ First we need to render the background and character Openpose bones separately. We will use them for Depth2image and Pose2image respectively. I used Blender. Image
#03_ The reason for using the rendered depth rather than the automatically generated depth is that the sharper the boundary of the depth, the better the detail and sharpness of the image. Top: Rendered depth / Bottom: Auto-generated depth Image
Read 11 tweets
Feb 15
ControlNet Mocap2Image test #stablediffusion #AIイラスト #pose2image
Read 4 tweets
Oct 16, 2022
A simple tutorial on creating 2D animations using AI. Tool used: github.com/AUTOMATIC1111/…
1. Convert the original video into an image sequence. Image
2. Create the desired character illustration using Img2Img. Image
Read 7 tweets

Did Thread Reader help you today?

Support us! We are indie developers!


This site is made by just two indie developers on a laptop doing marketing, support and development! Read more about the story.

Become a Premium Member ($3/month or $30/year) and get exclusive features!

Become Premium

Don't want to be a Premium member but still want to support us?

Make a small donation by buying us coffee ($5) or help with server cost ($10)

Donate via Paypal

Or Donate anonymously using crypto!

Ethereum

0xfe58350B80634f60Fa6Dc149a72b4DFbc17D341E copy

Bitcoin

3ATGMxNzCUFzxpMCHL5sWSt4DVtS8UqXpi copy

Thank you for your support!

Follow Us on Twitter!

:(