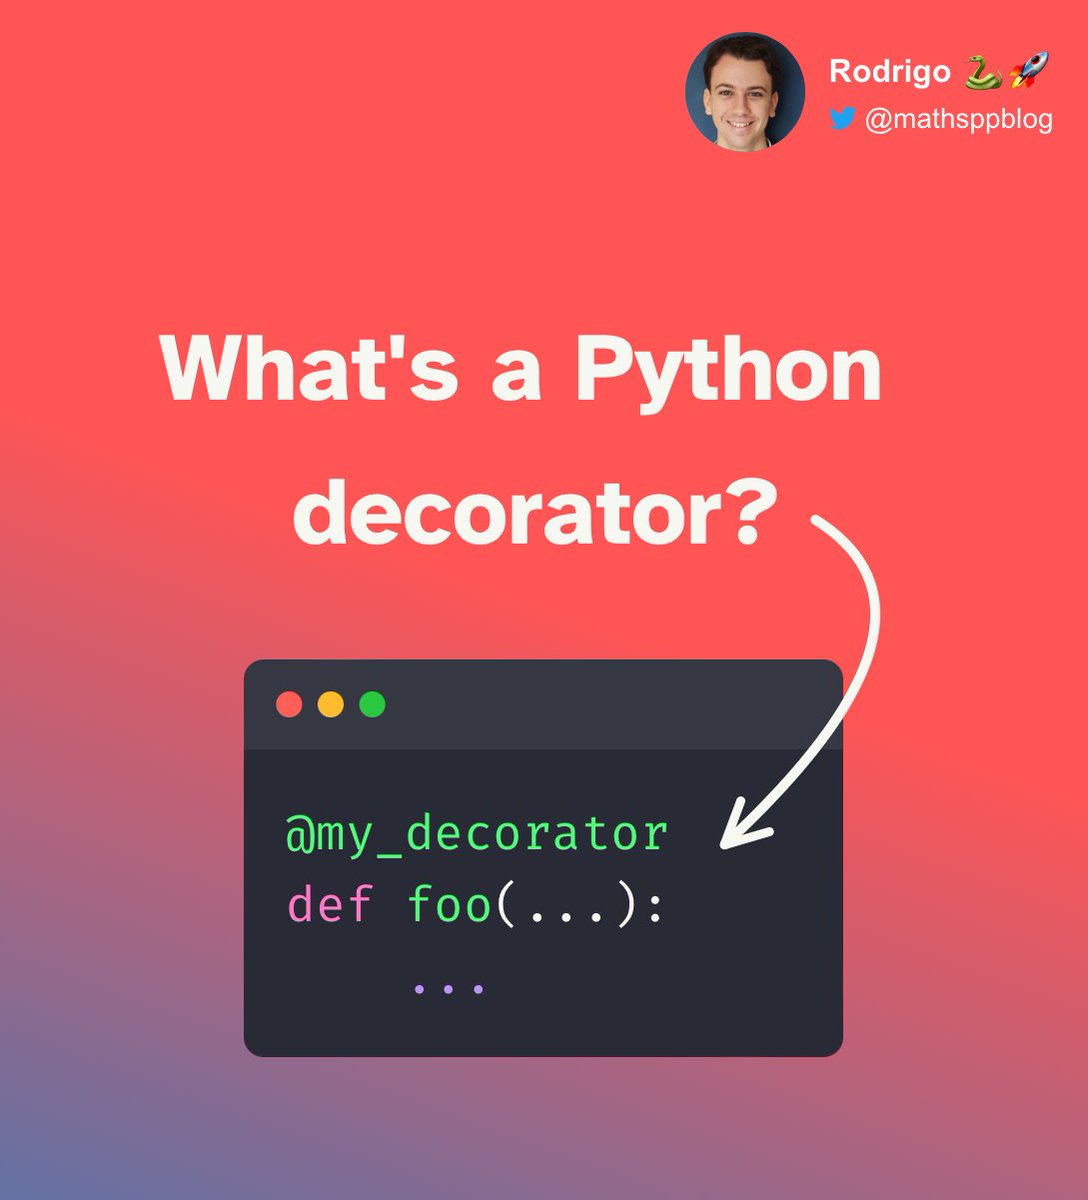
Python 🐍 decorators are often considered an “advanced” topic.
But they don't need to be hard.
Let me explain 👇 how decorators are an elegant and powerful tool. 🚀
But they don't need to be hard.
Let me explain 👇 how decorators are an elegant and powerful tool. 🚀
The first thing you need to understand is WHY decorators matter.
A decorator is a tool that you use to add a feature to another function.
For example, you can add caching to a function with a caching decorator.
But the, why not implement that in the function itself?
A decorator is a tool that you use to add a feature to another function.
For example, you can add caching to a function with a caching decorator.
But the, why not implement that in the function itself?
What if you need to add caching to three, four, ten, or twenty functions?
Will you implement the caching behaviour over and over?
Also, your function fulfils a purpose.
Caching would be the cherry `@` on top of the cake!
But it's not the main point of the function, right?
Will you implement the caching behaviour over and over?
Also, your function fulfils a purpose.
Caching would be the cherry `@` on top of the cake!
But it's not the main point of the function, right?
So, you take the caching logic and put it in a decorator.
Then, you can sprinkle the caching on top of the functions you want…
You can DECORATE your functions with caching.
Here is an example 👇
But how do you write a decorator?
Then, you can sprinkle the caching on top of the functions you want…
You can DECORATE your functions with caching.
Here is an example 👇
But how do you write a decorator?

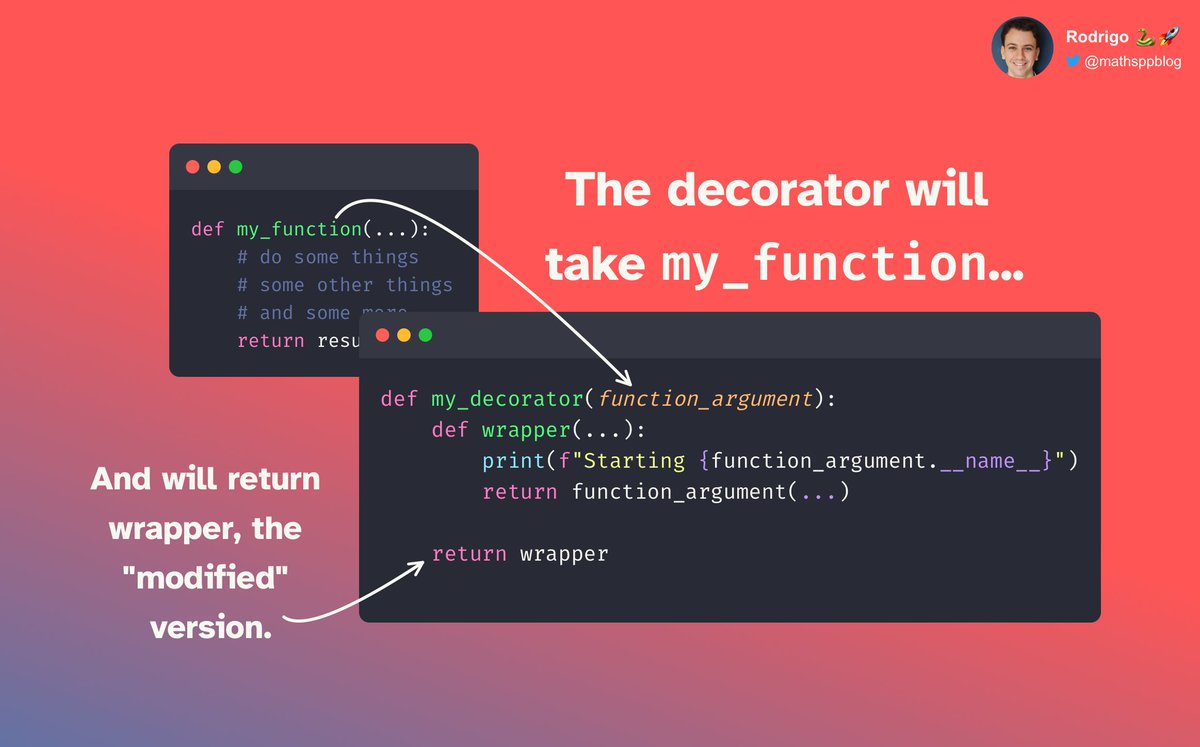
A decorator will add functionality to a function, right?
So, it must accept a function as its argument.
Then, it does some decorating magic to that function…
And it returns the modified function.
The $1,000,000 question is: how does it modify the function?!
So, it must accept a function as its argument.
Then, it does some decorating magic to that function…
And it returns the modified function.
The $1,000,000 question is: how does it modify the function?!

The quick answer?
It doesn't!
It cheats! 😆🤡
But it's a clever cheat.
I'll explain.
It doesn't!
It cheats! 😆🤡
But it's a clever cheat.
I'll explain.
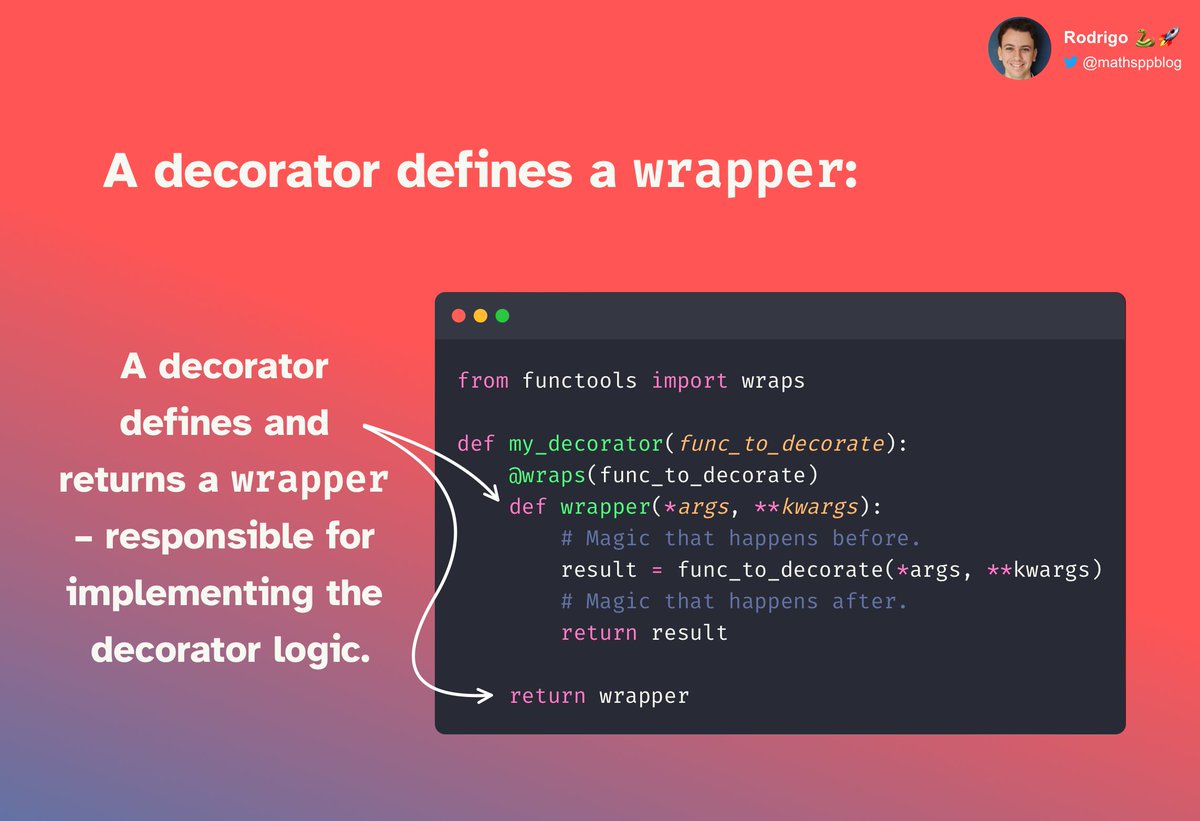
A decorator doesn't really modify the function…
It creates another one around it!
We call it a “wrapper”.
The wrapper is the one responsible for doing the extra work in coordination with the function you want to decorate.
Want a simple example?
It creates another one around it!
We call it a “wrapper”.
The wrapper is the one responsible for doing the extra work in coordination with the function you want to decorate.
Want a simple example?
Let's create a logging decorator.
It will print the name of the function being called.
What needs to be the behaviour of your “modified function”?
It would need to start by printing its name, and then do the original thing.
If you could just add a `print` at the beginning...
It will print the name of the function being called.
What needs to be the behaviour of your “modified function”?
It would need to start by printing its name, and then do the original thing.
If you could just add a `print` at the beginning...

So, we'll create a new function.
I'm not imaginative, so I will just call it “wrapper”.
The function “wrapper” will start by printing the name of the original function.
Then, it does everything the original function would do.
How..?
I'm not imaginative, so I will just call it “wrapper”.
The function “wrapper” will start by printing the name of the original function.
Then, it does everything the original function would do.
How..?
It just calls the original function! 🤣
That's it, really.
Since we can't open the original function and change it…
We just do the logging before, and then call the original function.
Something like this 👇
That's it, really.
Since we can't open the original function and change it…
We just do the logging before, and then call the original function.
Something like this 👇
If we look at `my_decorator`, we see it actually doesn't do much.
It just creates a function called `wrapper` and it returns it.
That's it.
`wrapper` is the one doing all the work.
And even so, it isn't that much…
It just creates a function called `wrapper` and it returns it.
That's it.
`wrapper` is the one doing all the work.
And even so, it isn't that much…
It prints the name of the function that was the argument to the decorator…
And then calls that very same function!
Challenge:
Modify `wrapper` to also log the return value of calling the original function.
Hint:
The template I'll show next will help.
And then calls that very same function!
Challenge:
Modify `wrapper` to also log the return value of calling the original function.
Hint:
The template I'll show next will help.
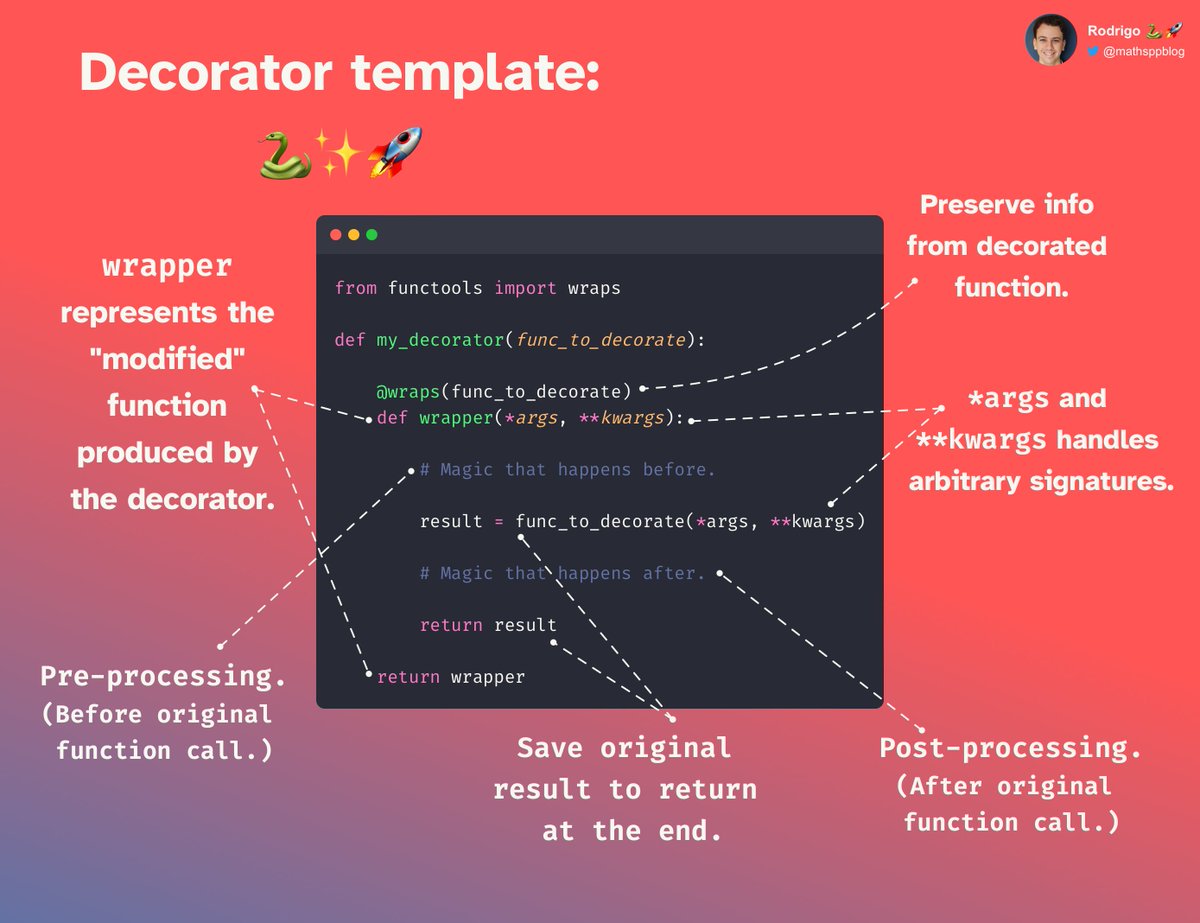
I always use this template 👇 when writing decorators.
It covers 99%, if not 100%, of the use cases for decorators.
The template has a couple of parts that I will summarise for you.
It covers 99%, if not 100%, of the use cases for decorators.
The template has a couple of parts that I will summarise for you.

First, we need to fix the issue with the ellipsis `...`.
What are they doing there?
Well, the decorator needs to work for all possible functions `func_to_decorate`.
And we can't know, beforehand, what their signatures will be…
So, what do we write in place of the `...`?
What are they doing there?
Well, the decorator needs to work for all possible functions `func_to_decorate`.
And we can't know, beforehand, what their signatures will be…
So, what do we write in place of the `...`?
We write `*args` and `**kwargs`, because that will cover all possible use cases!
Usually, that is what you write there.
The only exceptions are when you want to decorate very specific functions with specific signatures.
That was part 1 of the template.
Usually, that is what you write there.
The only exceptions are when you want to decorate very specific functions with specific signatures.
That was part 1 of the template.

The next thing we take a look at is that mysterious `wraps`.
It has to do with how the decorators are applied and the syntax with the at sign `@`.
The at sign `@` is a shortcut to apply a decorator.
A Python decorator can be applied in two different ways 👇
But, what gives?
It has to do with how the decorators are applied and the syntax with the at sign `@`.
The at sign `@` is a shortcut to apply a decorator.
A Python decorator can be applied in two different ways 👇
But, what gives?
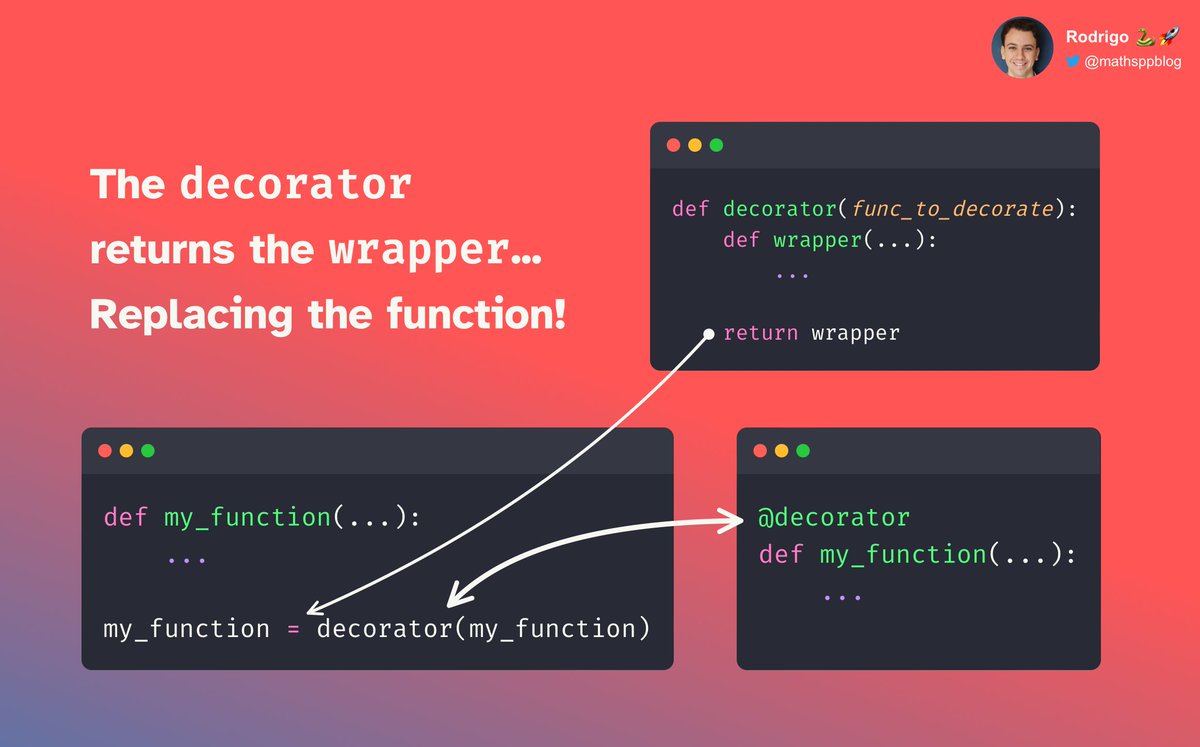
Applying a decorator actually replaces the original name.
The original name that you gave to the original function is now used to point to the `wrapper`.
Do you see the issue with this?
Not very obvious, but it simple to understand:
The original name that you gave to the original function is now used to point to the `wrapper`.
Do you see the issue with this?
Not very obvious, but it simple to understand:
You lose direct access to useful things like:
👉 the original function name; and
👉 the original function signature.
So `functools.wraps` is there to make sure you don't lose that nice information.
This was part 2 of the template.
👉 the original function name; and
👉 the original function signature.
So `functools.wraps` is there to make sure you don't lose that nice information.
This was part 2 of the template.

Next up: the decorator defines a `wrapper` and then returns it.
We have seen this was the closest we could come to actually modifying our original function.
The `wrapper` is where we implement the logic of the decorator.
(Caching, logging, … you name it!)
That's part 3.
We have seen this was the closest we could come to actually modifying our original function.
The `wrapper` is where we implement the logic of the decorator.
(Caching, logging, … you name it!)
That's part 3.
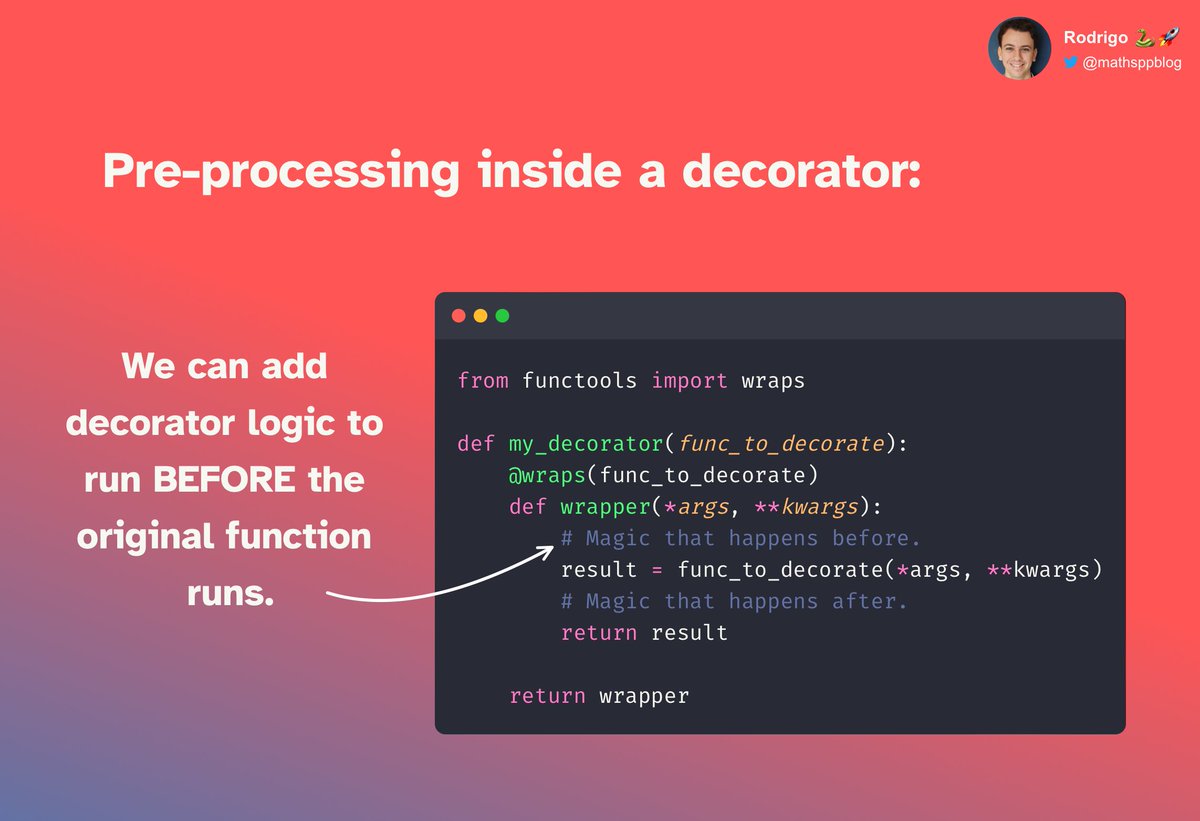
We can add whatever code we want before calling our original function.
Similarly, we can add code that runs after the function was called.
To allow this, we need to save the result of the original function.
This way, we can still return the original result.
Similarly, we can add code that runs after the function was called.
To allow this, we need to save the result of the original function.
This way, we can still return the original result.

I created a huge, final annotated decorator template for you 👇
Let me know if it is useful or if it is a mess.
As a challenge, go write a timing decorator.
It should print the execution time of the decorated functions.
Let me know if it is useful or if it is a mess.
As a challenge, go write a timing decorator.
It should print the execution time of the decorated functions.
That's it for now! 🚀
This thread took a lot of effort to write! 😵 If you enjoyed it:
👉 follow me @mathsppblog for more Python 🐍 knowledge; and
👉 retweet the tweet below to share this thread with your audience!
I'll see you around. 👋
This thread took a lot of effort to write! 😵 If you enjoyed it:
👉 follow me @mathsppblog for more Python 🐍 knowledge; and
👉 retweet the tweet below to share this thread with your audience!
I'll see you around. 👋
https://twitter.com/mathsppblog/status/1636800909274382340
• • •
Missing some Tweet in this thread? You can try to
force a refresh

![Diagram showing how you can use f-strings and their format specification to redact private or sensitive information, like email addresses. The code from the diagram: def redact_email(email): user, _, domain = email.partition("@") return f"{user[:2]:*<{len(user)}}@{domain}" print(redact_email("rodrigo@mathspp.com")) # ro*****@mathspp.com](https://pbs.twimg.com/media/GqhlkWbXgAAE9kd.jpg)