Some people have posted about a potential nuclear war but the lack of knowledge about surviving a nuclear conflict is not as common as it should be. Its a multifaceted monster but we will go over the main horrors you will have to overcome to survive.
The blast.
Below is an image of estimated blast sites based on limited exchanges (triangles) and full blown war (black dots plus triangles) generated by FEMA. If you want to use a service like to better estimate your survival based on missiles you can. https://t.co/sngYjRsLYnnuclearsecrecy.com/nukemap/
To survive the blast you want to hope you're not in an area directly targeted, else you will probably just be vaporized. If not, stay away from windows and follow tornado survival rules. Do not look at the blast, cover your head and keep your mouth open to prevent eardrum burst.
FALLOUT
This is going to be a long section. There is much to cover.
Fallout is radioactive dust that follows a nuclear explosion. It will be worse if the missile is a groundburst versus airburst but it will exist in both cases. This radiation will penetrate far and wide.
Theres 2 types of fallout. We will NOT be covering the long term carcinogenic type. If you survive, cancer isnt a concern.
Instead we will discuss the acutely deadly type with a shorter half life. First lets cover a half life.
A half life is basically the amount of time to have half of the material decay into another, more stable product. For example, some radium isotopes used for old watches and night sights decay into Radon gas (if you own a yugo sks, you should not lick the sights because of this)
Local fallout.
Lets begin with the 7-10 rule which is "every sevenfold increase in time after detonation, there is a tenfold decrease in the radiation rate" so after 7 hours, the radiation is only 10% of its strength. This rule of thumb is imperative, keep the hours noted.
Where do you hide to survive?
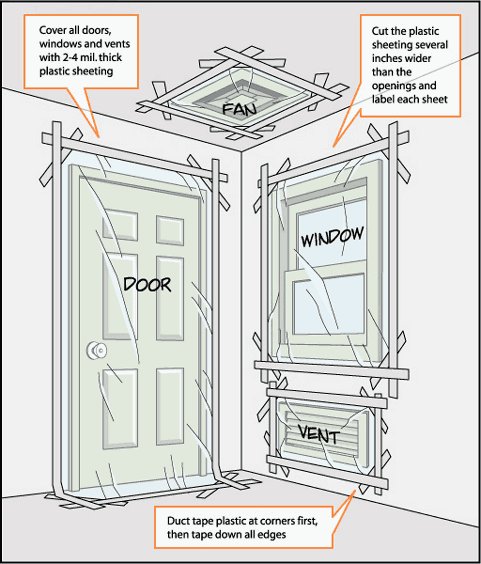
Stay in your house. If possible prior to the blast, tape off your windows and doorways with duct tape to reduce the chance of dust entering. If you can cover these in a plastic tarp prior to taping this can also help in case of glass breaking.
Where in the house do you stay?
As low and inside as you can get. You want to put as much mass between you and the fallout to add protection from the fallout. A crawlspace or under the stairs is ideal for this. Fortify it with dense objects to surround yourself with. H
How long will you need to stay?
This depends entirely on where you are at and how heavily contaminated it is. Have multiple radios to listen to reports of safety in your area. The roughest of rough estimates range between a few days to 5 weeks. Be prepared for at least 6.
Lastly comes the iodine question.
Does it keep me safe?
Yes and no. It protects the thyroid from absorbing radioactive iodine but it doesn't protect you from acute radioactive death. Only mass between you and the radiation can do that for you.
In summation. Nuclear attack IS SURVIVABLE but it REQUIRES PREPARATION. All my sources are from government agencies and fromhttps://defconwarningsystem.com/links-tools/ do research now to protect you later.
• • •
Missing some Tweet in this thread? You can try to
force a refresh
It’s no surprise that most people in the US and Western civilization as a whole are not physically active enough. Many people are overweight, have little muscle endurance, and absolutely no cardiovascular ability. By not maintaining some basic level of physical fitness one is put at much higher risk for various health conditions such as heart disease, strokes, type 2 diabetes, and a number of cancers by up to 40% in some cases. From a more practical and less abstract approach, US Army data shows that soldiers with higher aerobic capacity and muscle endurance had less non-combat injuries in the field, as well as being more effective in their roles in the field.
From a prepping perspective, not being mildly to moderately fit puts yourself at a massive disadvantage and makes one a liability. Fitness means you can do the physical tasks such as walking home with a 30 pound get-home (bug out) bag, it means you can haul water from a body to your home for purification, it means you can cut up and remove the fallen tree after the tornado in your front yard, it means you can properly engage a potential threat if the fight lasts longer than a minute. Prepping is often thought of a “hobby” where you are just hoarding goods and items (something I have fought vehemently against and wrote 2 books because of it), as a byproduct of that mentality, the body is often neglected. Both from a medical perspective and a fitness perspective. Prepping is as much about “weathering the storm,” as it is about being able to effectively operate after it. You can’t be a basement shut-in forever.
Thankfully getting a basic level of fitness doesn’t require you to become a psychopath who lives in the gym and eats nothing but liver and chicken breast for ever meal. You can make minor adjustments that grow your abilities with TIME without even needing a gym membership! Americans tend to want to go hard and fast with things, expecting instant results, this is one of the many cases where that is not realistic. To become better we must slowly build ourselves up. The purpose of this piece is to help those who are just starting find initiative, assess their current abilities, build a weekly exercise regimen, and then stick to it. I also want to briefly touch on diet at the tail end of this.
Assessing Current Abilities.
Before determining what sort of exercise plan one is going to adhere to, they need to determine what their current abilities are. This unfortunately is a usually a very humbling experience and needs to happen. Without knowing what one’s limitations are, they risk injury, overtraining, or wasting time on an inappropriate plan.
Cardiovascular endurance can be tested in a high impact and low impact test, ideally one performs both. The high impact test begins with a 5 minute walk, then try to cover 1.5 miles as fast as one can without harming themselves. This does not mean push yourself beyond your limits and risk injury. If you need to stop or walk, that’s okay. After achieving 1.5 miles the time taken is noted and checked against a generic reference. If it takes less than 13 minutes, one is an above average point for a beginner, for between 13 and 16 minutes, that is a relatively average start point, and if it is longer than 16 minutes, they are below average (and that is okay!). The low impact test is a 6 minute walk on a flat surface and after 6 minutes the distance is noted, healthy adults often exceed 500 to 600 meters (~1600-1900 feet). Note all of this information for the next section and for goal planning.
Testing muscular strength likewise is a relatively quick process and does not require any specific equipment, bodyweight is a decent enough baseline. Begin with testing pushups, see how many you can do without breaking form. If you can’t even do one, try knee pushups, if you can’t do one, try against a wall! Then try squats, perform as many as you can in one set. Then try a pull up if you have a pull-up bar (very cheap online and cheaper if bought used), if you cannot do one, try a flexed arm hang, if you can’t do longer than a second, note it. Finally try a forearm plank and hold it as long as you can with good form. Note all of this information for the next section and for goal planning.
You can also test your mobility and flexibility with a sit and reach test where you sit flat on the ground, legs extended, knees straight, and reach forward. Not being able to reach past your toes is generally regarded as a negative score and is something to work on.
The air in MN right now is the equivalent of smoking a pack of cigarettes an hour thanks to Canadian wildfires.
But for less than $100, I can breathe much easier. 🧵
Here’s how a DIY Corsi-Rosenthal box can clean your air and protect your lungs.
First some background on why I researched and built this. Canada is burning and the AQI in Minnesota is atrocious and will continue to be for a while. This is also becoming a yearly issue where Canada bursts into flame and pollutes the entire country.
Today I woke up and could smell smoke and my throat hurt in spite of my home air filter on the HVAC system. I investigated my options and everything was expensive and overpromising. You realistically cannot expect 1000sqft of HEPA filtration from a device the size of a soda can.
Breaching is more than door kicking. It’s a battlefield art. Here’s how real fighters clear the way under fire.🧵
Breaching and SOSRA.
Breaching, the act of creating lanes through enemy obstacles to allow assault forces to pass. In the zeitgeist breaching is just when tier 1 guys blow up doors with C2 charges but breaching is a very broad action and the drill of breaching a mined wire obstacle is actually one of the 14 primary drills taught by the US Army for infantry to be competent in the performance of. Breaching can be conducted on minefields, razor wire fields, walls and roofs of buildings, vehicle based obstacles like dragon’s teeth and tank ditches, and even the clearing of trees or crossing rivers! Breaching at its core follows the doctrinal sequence of SOSRA, where no matter what the application may be, the team can follow the steps and achieve a positive outcome when performing breaching tasks.
Breaching.
As previously stated, breaching is the act of clearing an enemy obstacle to create a lane of passage for assault or friendly forces to pass through safely. Breaching is often conducted under fire and almost certainly covered by enemy observation. To put it succinctly, breaching is conducted to restore mobility for friendly forces while minimizing casualties.
Doctrinally, breaches come in three forms. The deliberate breach, the hasty breach, and the in-stride breach.
The deliberate breach is a pre-planned operation and is generally very resource-heavy in nature. The team plans ahead of time where to approach a well-prepared obstacle and how to remove it. These types of breaches are used against strong defenses and obstacles that are covered by direct or indirect fire. For example, the D-Day sea wall obstacle breaches as seen in films like Saving Private Ryan depict a preplanned breach. They knew the obstacles were there, engineers brought charges, and the SOSRA sequence (which we will cover shortly) was followed.
Hasty breaches are rapidly conducted breaches when an unexpected obstacle is encountered and while contact with hostile forces has been made. Hasty breaches are used when momentum is critical and planning is not a reasonable option. Hasty breaches make use of the assets available to the team at the time. If it is an armored division they may have tank plows, if it’s an infantry team they may have to manually cut wire, whatever the situation may demand, the team employs what they have and act as fast as possible. Hasty breaches put more men at risk due to the limited planning associated with them. Examples of hasty breaches include infantry in a CQB environment blowing open a door with a shotgun or a sledgehammer, another is an infantry team cutting barbed wire that they encounter while crossing a field under fire.
An in-stride breach is performed while the team is on the move as part of an offensive maneuver, often with mechanized forces. In-stride breaches are very similar to pre-planned breaches but conducted as part of a greater maneuver and done while forces are already on the move. They are deliberate breaches but done while still on the move. This type of breach was common in soviet doctrine for decades. During Desert Storm, 1stInfantry breached Iraqi minefields with prepositioned mine clearing vehicles while the rest of the brigade flowed through behind them without a major slowdown to operational tempo. In-stride breaches are best described as “deliberate-lite.”
Is your defensive position secure, or will it collapse at first contact? 🧵
Knowing how to build a fighting position properly is a lifesaver. Here's how you do it.
Basic Fighting Positions
For as long as man has found it pertinent to kill one another, there has been a need for field construction to build defensive and offensive structures to gain an advantage over an adversary. From the siege towers of medieval Europe to the hastily built trenches of modern Ukraine, fighters have felled many trees and dug many pits to defend positions, obfuscate their location, and protect them from fire. While every rifleman is not a combat engineer, every rifleman should have a repertoire of the basic fighting positions that they can dig in the field under their belt.
Fighting positions are more than simple holes to hide in during artillery barrages. Fighting positions do provide a lot of protection from enemy fire, shrapnel from explosives, and other forms of indirect fire but they also provide an easy way to organize a team into fields and sectors of fire to overwatch large areas with little overlap. Positions can be built in a manner that allows units to defend a location of any shape or size, offering opportunities for even full 360-degree coverage if the situation demands it.
Position selection.
When selecting a location for a fighting position the acronym of KOCOA is commonly utilized for assessing prime locations for fighting positions. KOCOA is often used for tactical and strategic battlefield analysis. The letters stand for:
K – Key Terrain: Key terrain is terrain features that give a tactical advantage to either side or it may be an objective that must be taken or held. This could be a hill, ridge, gulley, bridge, or a building that oversees an area with a lot of enemy movement. Key terrain should be occupied or at the very least, denied to the enemy.
O – Observation and Fields of Fire: The ability to see your enemy and effectively engage them with direct or indirect fire is a core necessity of a proper fighting position. Fields of fire should be clear. Examples of an ideal field of fire would be down the slope of a hill or across an open field as both provide excellent line of sight for the defender while minimizing their own visual signature (especially for the one looking down a hill, these are some of the best fighting position locations).
C – Cover and Concealment: Cover protects from bullets and shrapnel while concealment hides one from view. Ideally a fighting position should offer both protection and stealth. If a decision must be made for only of those, the selection of which will depend entirely on circumstances unique to the situation such as the enemy, the team and their abilities, the objective, etc.
O – Obstacles: Obstacles will slow or halt enemy movement. Obstacles can be natural such as rives and cliffs or manmade with area denial tools like razor wire and minefields. Positions should be placed behind or beside obstacles in order to funnel enemy movement into the team’s fields of fires.
A - Avenues of Approach: Routes in which the enemy force can use to advance toward the team or their objective are the avenues of approach. These should be covered with fields of fire. Positions should not be on or in these areas unless there are no other options as they place the team in direct confrontation with the opposing force.
While the acronym is clumsy like most military acronyms, KOCOA provides leaders with a simple tool to identify strong areas for positions to be placed to better confront their enemy.
He’s been watching you for hours. One shot. One kill.
You never saw him, but he saw everything.🧵
This is just one of the specialized threats modern riflemen face.
Here’s what you need to know before it’s too late.
Specialized Threats and Countermeasures.
“You can't say that civilization don't advance, for in every war they kill you a new way”
-Will Rogers
The postmodern battlefield is radically different from the battlefields of the Second World War or even those of the Global War on Terror. Bringing with it unique and specialized threats that riflemen should be keenly aware of in order to avoid meeting an untimely end. While a number of the threats that are encountered in the battlespace today are the same as they were 100 years ago, the tactics used by the threat actor and those countering it have changed. Snipers, IEDs, ISR assets, and landmines have all adapted to the 21stcentury in various ways while threats such as peers using NVGs and thermal observation equipment, and drones are relatively new to the western battlespace.
It should be noted that this is not a be-all-end-all guide to identify and mitigate these threats perfectly. There are entire books dedicated to each subject. The goal is to familiarize yourself with them and understand the basics of them. Not everyone is going to encounter the same threats and some may never encounter any of them. Having a basic understanding, at the very least, puts you in a space that allows you to more proactively approach situations where they may be present or react to them in a more level headed way. Every threat encountered in the battlespace is unique in it’s own way and not every strategy is perfect to engage it, use common sense and discretion in the field.
Snipers.
Snipers exist to operate as force multipliers, appliers of psychological pressure, disruptors of command and control, or are used for targeting and eliminating specific personnel. They are usually identified by their telltale signatures of single-round fire, precision of hits (usually to the head/vital organs), and their firing from heavy concealment followed by movement. Snipers can operate in any environment and make use of their terrain in various and unique ways.
In rural settings, snipers are more likely to engage in long-range overwatch of strategic or key areas, likely from elevated natural terrain such as ridges, treelines, and rock formations. They employ the use of natural camouflage and hand-made ghillie suits. They may have hide sites dug into the earth or concealed by foliage such as bushes.
Some potential detection cues for these snipers are unnatural terrain disruption in the area (flattened bushes, cut branches, trimmed brush), reflection or glint from sunlight hitting scopes, particularly during sunrise or sunset, local civilians may entirely avoid areas that are known sniper-dominated zones, and intermittent single-shot fire with long intervals between shots.
Potential mitigation strategies for rural area snipers are the use of terrain masking, having units move behind hills, rocks, trees, low ridges, and reverse slops to cover themselves from potential sniper fire in certain directions. Avoiding open fields and roads and making use of bounding movement is a solid way to avoid ease of detection while providing security while moving through areas that may have snipers. The use of smoke or other obscurants while crossing danger areas like roads or clear areas can make target acquisition harder. Finally the use of decoy targets such as mannequins and helmets on sticks, or use of decoy heat sources can draw fire.
Snipers operating in suburban areas will make use of abandoned homes, attics, and other multi-story buildings as hide sites. They are likely to employ shoot-and-scoot style tactics where they set up in a hide, take a few shots, and then rapidly leave the area. They may operate alone or with spotters in nearby structures or even local civilian populations. They are likely to engage in shorter distances than rural snipers but will exploit longer sightlines such as long and open roadways.
Potential detection cues include (but once again are not limited to) curtains or blinds being out of place or shifted in an unnatural manner, rooftop access doors being left open or having signs of being pried open, flat top roofs with singular bricks pushed out to create murderholes, improvised holes in fences, hedges, building walls, garages, or other areas for firing, and flash reports will be more visible at night if the sniper does not have a flash suppression device.
Suburban snipers are tricky to engage because of their shoot-and-scoot tactics. Prior to any units holding a building or ground, dismounted clear of potential sniper hides is a must. Units should avoid any obvious danger zones that funnel them into neat lines such as roads, alleyways, hedgerows, or anything of the sort. When crossing open terrain, units should use vehicle armor, hasty cover, or even soft-skinned vehicles such as civilian cars for concealment when rapidly crossing. Finally the use of thermal imaging devices will make spotting sniper threats much easier, but remember that they may also be utilizing thermal optics.
Urban sniper threats are likely to come from higher angles, that is to say, elevated terrain inside of skyscrapers and other multistory buildings, similar to that during the siege of Sarajevo. The use of pre-cut murderholes and coordination with spotters is likely to be conducted in a similar manner as suburban snipers. They are likely to use shorter engagement distances, sometimes as close as 50 meters away.
Detection of these snipers is done first and foremost from gunshots coming from rooftops or behind defilade on elevated levels of buildings. Snipers are going to leave behind murderholes that can indicate to units that a sniper has been in an area. Interrupted civilian patterns, such as avoiding streets, blocks, or even crosswalks can indicate snipers in an area. Finally the audiovisual report of their weapons may be identifiable as buildings are likely to reflect and carry more sound.
Avoiding and mitigating the threat of these snipers is similar to that of suburban snipers with the added threat of the increased height of buildings in urban centers. Roofline overwatch is a necessity when crossing in these areas and the use of the heavy corners of buildings as cover is a must. Suppressive fire on suspected positions can force snipers into cover while units cross danger areas. Finally the use of mirrors or optics on poles (including trench periscopes) to check blind spots around corners has been employed by the units such as the IDF in Israel and the Russian military in Grozny.
Some additional comments are that sniper calibers are likely to vary. Snipers in rural environments are engaging at long distances, likely with heavy duty calibers such as .338 Lapua, .300 Winchester Magnum, or even 7.62x54R. Snipers in more suburban or urban areas may use 5.56 or even as small as .22 LR caliber weapons with suppressors to hide themselves better. Snipers with thermal scopes and rangefinders are also becoming increasingly common, especially during state-backed and proxy forces as seen in Ukraine, Syria, and Israel. Civilian defenders and riflemen are likely to lack the resources for precision counter-sniper work and may more effectively focus their efforts on avoidance and detection than engagement.
Do you immediately know who's shooting, where to move, and what to do, or are you frozen in confusion?🧵
Situational awareness isn't instinct, it's a trained skill. Here's how you stay sharp and stay alive under pressure.
Situational Awareness and Tactical Observation
Situational awareness and tactical observation are two skills that are critical to success in chaotic and kinetic environments. Whether conducting a security sweep in a trench or simply moving through a busy shopping mall while armed, the ability to identify cues, distinguish threats from friendlies, and when to anticipate action, are all basic skills everyone should have. By following the process of perceiving the area, comprehending it, and projecting the next moment in their mind, the warfighter, or armed citizen, is able to more appropriately approach any potential scenario, particularly using the Cooper Color Code, shifting the individual from a Condition White (completely relaxed) to a Condition Yellow (relaxed awareness).
Tactical observation is the active action of this process. Passively seeing and hearing the area is not enough, systematically sweeping areas with fixed reference points allow the individual to properly alternate between a fine and a wide focus of an area, keeping the individual well informed, propping up their situational awareness.
Cooper’s Color Codes.
Before delving into the concept itself of situational awareness and how to develop and train it, first the idea of Cooper’s Color Codes must be explained.
Cooper’s Color Codes are often employed by police and armed citizens to gauge how cautious or alert they should be while entering an area. The colors correspond to the severity of the situation and amount of alertness one has. The colors are:
White: Unprepared. Not looking for threats. Unready to take any action.
Yellow: Relaxed alert. No specific threat identified but prepared in case one arises. Good situational awareness.
Orange: A potential threat is identified and observed. Ready to take action. Preparing to take action.
Red: Taking action. Actively engaging the threat.
Black: Panicked, frozen, mental shock, breakdown of any type of response.
Ideally once one enters yellow, they begin employing the situational awareness levels covered later constantly and keep updating the current color code level, informing the severity of the situation and the depth of analysis needed. Someone in condition yellow probably doesn’t need to scan the area as in depth as someone who just engaged an active threat, for example. There are varying opinions on one should or should not enter condition yellow, but a good rule of thumb is if you are out of your home, condition yellow is not a bad idea. This of course is harder to apply if you are engaged in an armed conflict and you are in the field, in which case, condition yellow is a minimum when in the field. Use your head.