Over the years, I've worked on a wide range of projects from small indie ideas to AAA games.
Here is how I would build an interaction system from scratch in Unreal Engine if I were to start a new project today.
A thread 🧵👇🏼
Here is how I would build an interaction system from scratch in Unreal Engine if I were to start a new project today.
A thread 🧵👇🏼
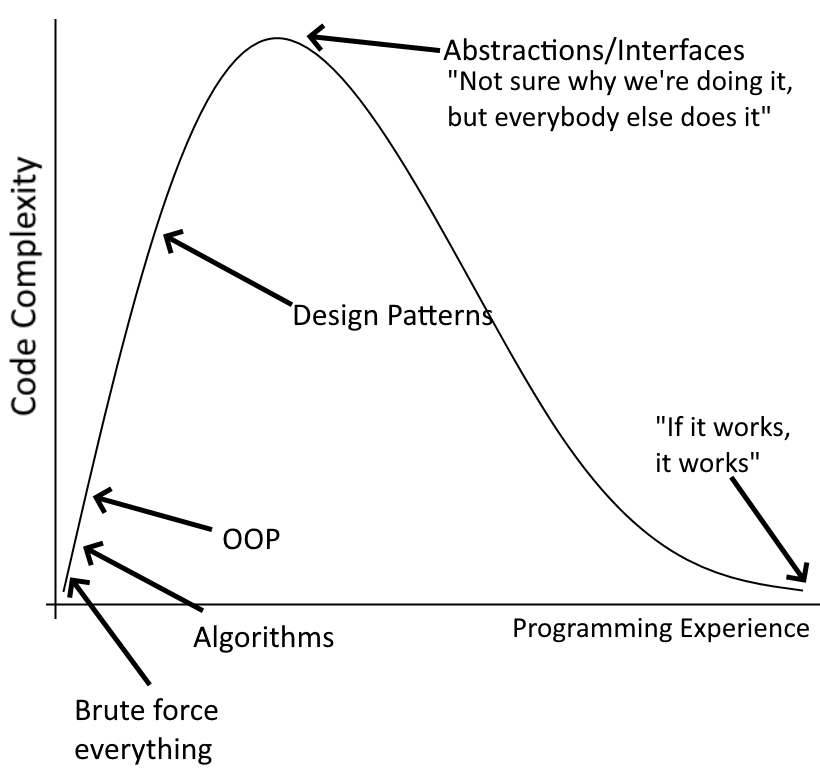
1/17 General Philosophy
The main goal is to make an architecture that's easy to maintain. To achieve this we are going to go for simple bare bones solutions.
We are not going to develop a one-size-fits-all solution, instead, we aim to keep complexity to a minimum.
The main goal is to make an architecture that's easy to maintain. To achieve this we are going to go for simple bare bones solutions.
We are not going to develop a one-size-fits-all solution, instead, we aim to keep complexity to a minimum.

2/17 Limiting inheritance
Let's take the example of a door.
If we have an Interactable base class, the next logical step is to create a Door class inheriting from it and add the rotation logic.
This way the user can open the door by interacting with it.
Let's take the example of a door.
If we have an Interactable base class, the next logical step is to create a Door class inheriting from it and add the rotation logic.
This way the user can open the door by interacting with it.

3/17 Limiting inheritance
If we need a broken door (BrokenDoor) that can be opened only by an explosion, now we have to:
• Copy-paste the rotation logic to a new component
or
• Add the option to disable the interaction - which makes inheriting from Interactable useless
If we need a broken door (BrokenDoor) that can be opened only by an explosion, now we have to:
• Copy-paste the rotation logic to a new component
or
• Add the option to disable the interaction - which makes inheriting from Interactable useless

4/17 Interfaces
Interfaces are a great way to ensure that classes of unrelated types have common functionality implemented.
They are a solid choice, but in the context of Unreal, they have some limitations (e.g.: complicated setup to expose configurable per-object properties).
Interfaces are a great way to ensure that classes of unrelated types have common functionality implemented.
They are a solid choice, but in the context of Unreal, they have some limitations (e.g.: complicated setup to expose configurable per-object properties).
5/17 Interfaces
For this reason, we are going to avoid this time around and go with actor components.
(However, for other systems like an Events System, where we want to broadcast events to both actor-based components and widgets, they are the go-to choice).
For this reason, we are going to avoid this time around and go with actor components.
(However, for other systems like an Events System, where we want to broadcast events to both actor-based components and widgets, they are the go-to choice).
6/17 What are we going to do?
This time around, we are going to go for an ActorComponent. This way the component can be added when actors need to be interacted with.
We are going to focus on C++ mainly, but similar delegates & functions can be exposed to blueprints.
This time around, we are going to go for an ActorComponent. This way the component can be added when actors need to be interacted with.
We are going to focus on C++ mainly, but similar delegates & functions can be exposed to blueprints.
7/17 The InteractableComponent
• OnInteract - executed upon interacting, e.g.: rotate the door 90 degrees
• CanInteract - performs additional tests before interaction, e.g.: does the user have the required key
• TryInteract - called when the user wants to interact
• OnInteract - executed upon interacting, e.g.: rotate the door 90 degrees
• CanInteract - performs additional tests before interaction, e.g.: does the user have the required key
• TryInteract - called when the user wants to interact
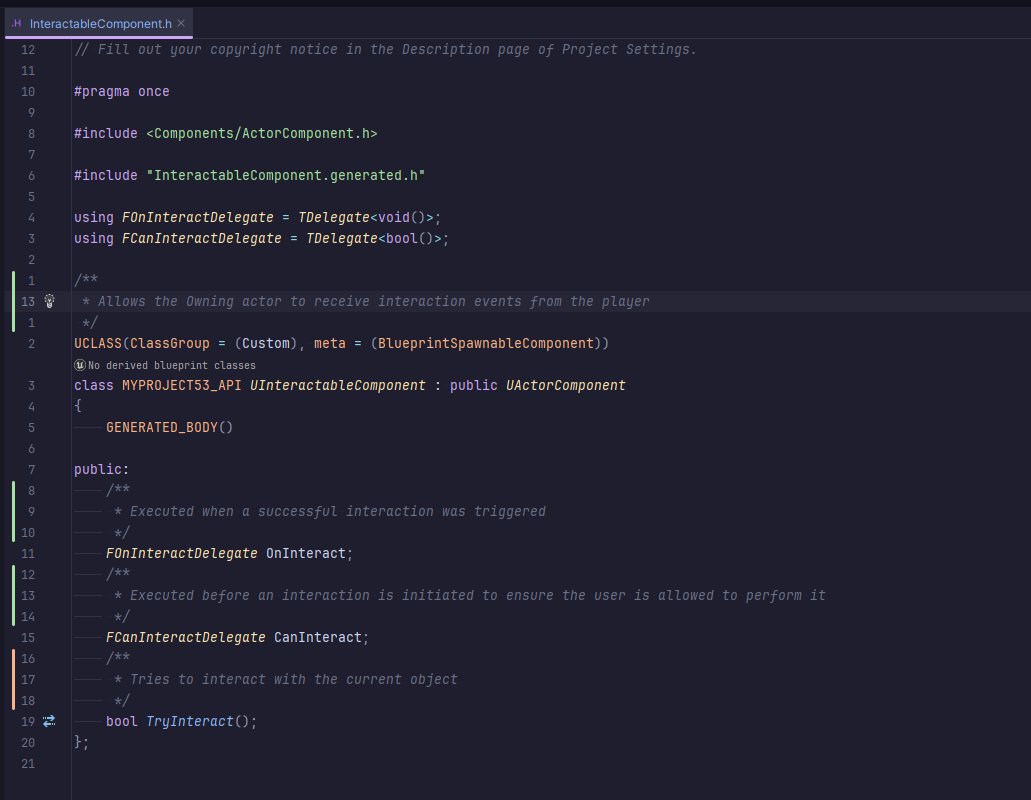
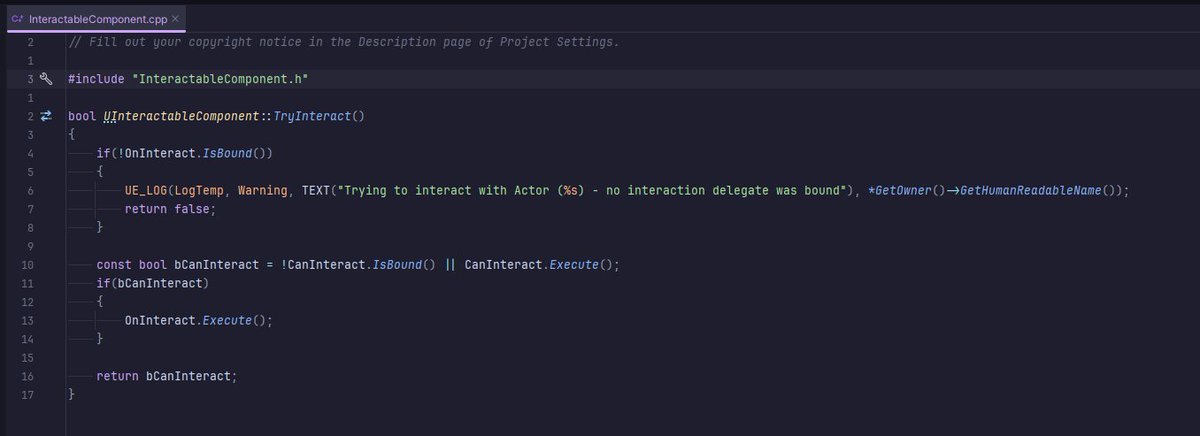
8/17 InteractableComponent implementation
In the component's implementation, we have 2 important aspects:
• if the OnInteract delegate is not bound, we are going to raise a warning
• if the CanInteract delegate is not bound, the user is always allowed to interact
In the component's implementation, we have 2 important aspects:
• if the OnInteract delegate is not bound, we are going to raise a warning
• if the CanInteract delegate is not bound, the user is always allowed to interact
9/17 How to trigger interactions
To allow the player to interact with objects, we need to give him the ability to call the TryInteract function.
To achieve this, we are going to add an InteractorComponent component to the player which will scan for nearby interactable actors
To allow the player to interact with objects, we need to give him the ability to call the TryInteract function.
To achieve this, we are going to add an InteractorComponent component to the player which will scan for nearby interactable actors
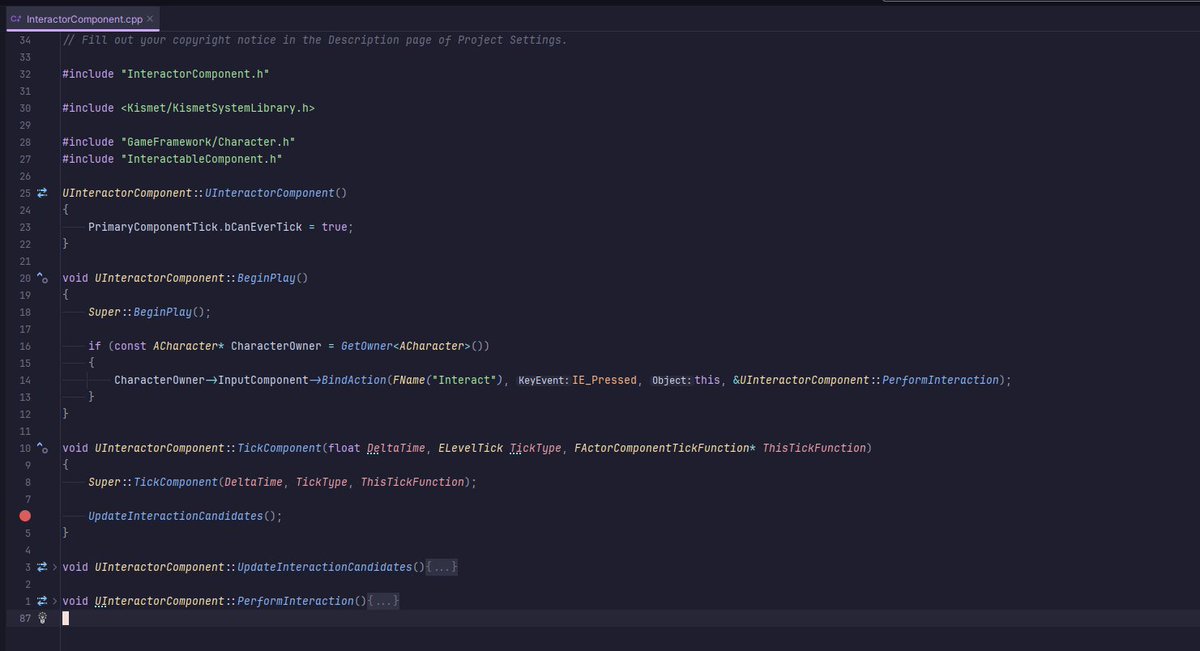
10/17 The InteractorComponent
This component will do a Sweep in front of the player to check for interactables every frame.
We have a few configurable properties which we will cover as we go over their usage.
This component will do a Sweep in front of the player to check for interactables every frame.
We have a few configurable properties which we will cover as we go over their usage.
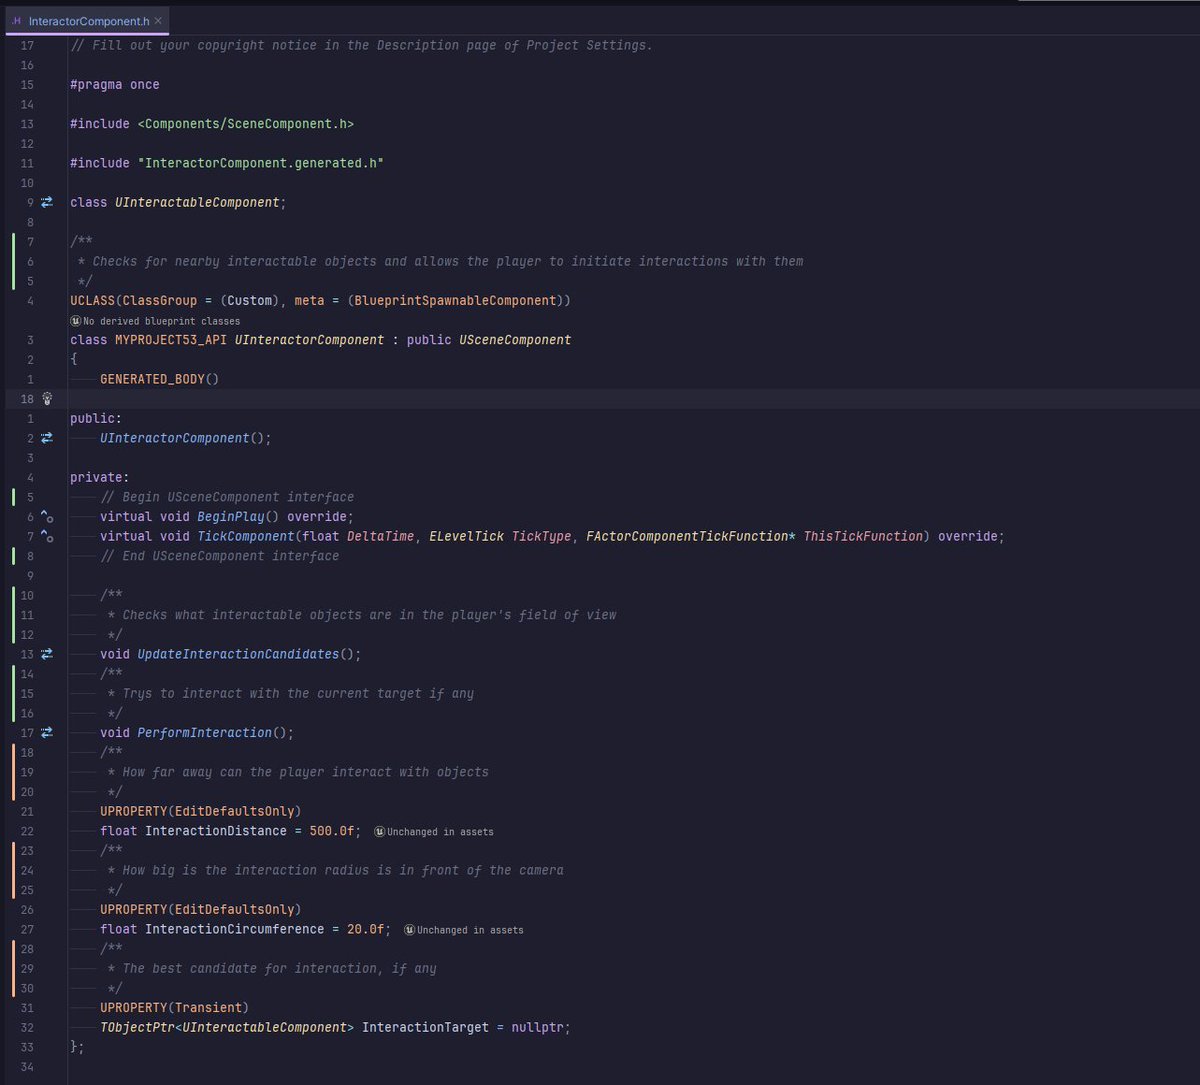
11/17 InteractorComponent Implementation
• Constructor: enables the component's tick function
• BeginPlay: binds the user's "Interact" input to the PerformInteraction function
• Tick: runs the UpdateInteractionCandidates each frame
• Constructor: enables the component's tick function
• BeginPlay: binds the user's "Interact" input to the PerformInteraction function
• Tick: runs the UpdateInteractionCandidates each frame
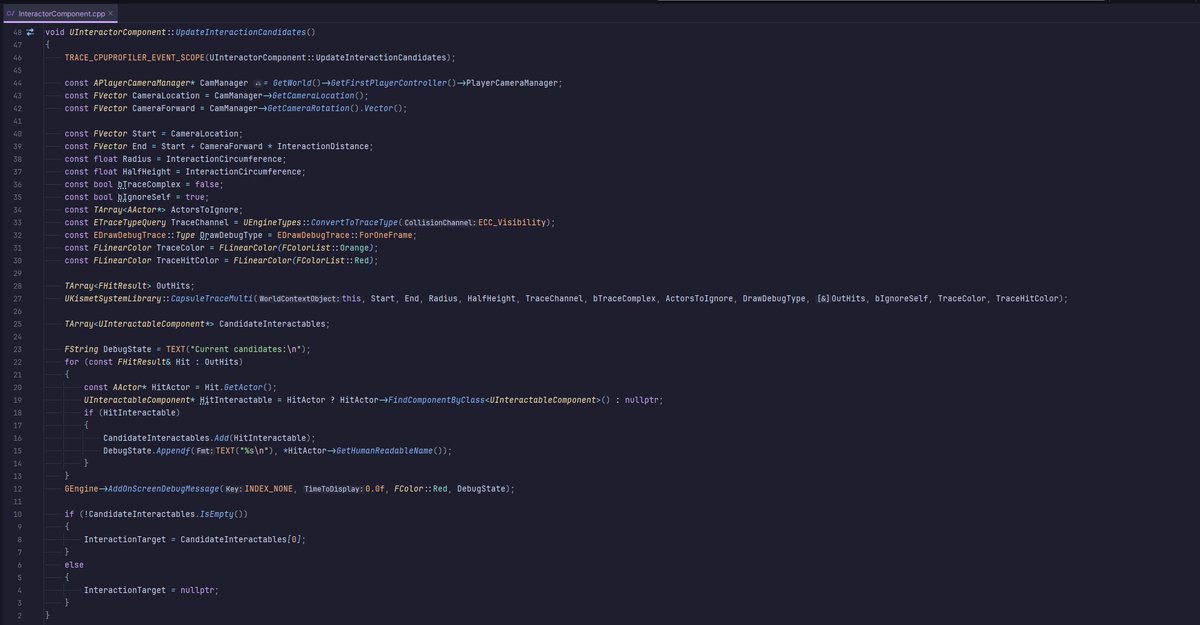
12/17 UpdateInteractionCandidates
This function performs a trace with debugging data - which we will live view.
Afterward, we look for potential interaction targets (you can sort them based on distance, but for simplicity's sake, we are just going to go for the first hit).
This function performs a trace with debugging data - which we will live view.
Afterward, we look for potential interaction targets (you can sort them based on distance, but for simplicity's sake, we are just going to go for the first hit).
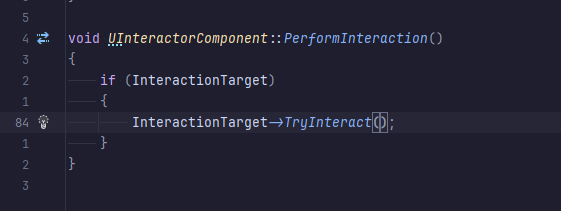
13/17 PerformInteraction
The hard work has already been done, here we can just check if we currently have a valid target and try interacting with it.
The hard work has already been done, here we can just check if we currently have a valid target and try interacting with it.
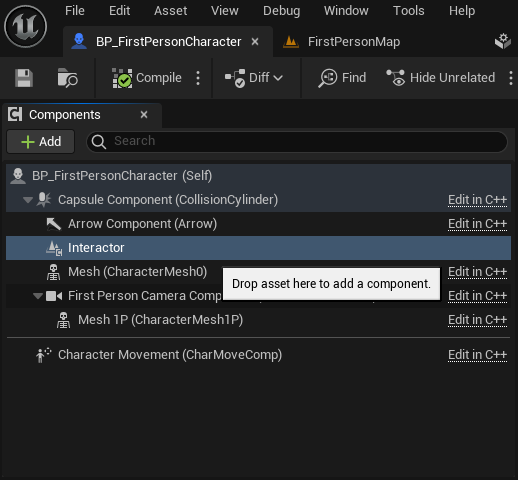
14/17 Player setup
Now that all the code has been laid out, we will begin adding our new components starting with the player's Interactor.
Now that all the code has been laid out, we will begin adding our new components starting with the player's Interactor.
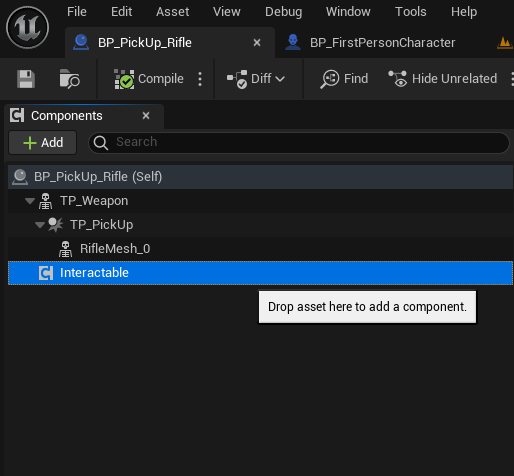
15/17 Interactable setup
Next up, we will add the Interactable component to the rifle.
(This project started from the first-person C++ template).
Next up, we will add the Interactable component to the rifle.
(This project started from the first-person C++ template).
16/17 Interact input setup
And finally, we will add the same Interact input we assigned in the code and bind it to the "E" key.
(As pointed out in the warning below, we should use the Enhanced Input system, but that would result in a way longer thread).
And finally, we will add the same Interact input we assigned in the code and bind it to the "E" key.
(As pointed out in the warning below, we should use the Enhanced Input system, but that would result in a way longer thread).

17/17 Live Demo
Here we have a live demo of the interaction system with the additional debug drawings.
Here we have a live demo of the interaction system with the additional debug drawings.
That's all for today!
If you learned something new:
1. Follow me @OutoftheboxP for more of these
2. Retweet the tweet below to share it with your fellow developer friends.
If you learned something new:
1. Follow me @OutoftheboxP for more of these
2. Retweet the tweet below to share it with your fellow developer friends.
https://twitter.com/OutoftheboxP/status/1759912996678103270
Since this thread went way over my expectations already, here is a friendly remind Quick Actions is free on the Unreal Marketplace:
unrealengine.com/marketplace/en…
unrealengine.com/marketplace/en…
• • •
Missing some Tweet in this thread? You can try to
force a refresh