
Welcome to more #BookbindingWithAziraphale! Well, we’ve looked at paper and binding techniques, so now it’s time to actually sew some signatures. I’ll be putting up lots of pictures but, as always, if anything is confusing do please ask questions and I’ll try and clear things up.
You will need: your improvised sewing frame (if you’re using one), darning needle, strong cord or twine, sewing thread (waxed linen thread for preference, but use what you can find – thick embroidery thread or dental tape will do for now), a piece of stiff cardboard for pressing
pages, and PVA glue or wheat paste.
Your folded signatures (sets of nested folios), which should have been sitting patiently under a clean piece of board, will be removed one at a time for sewing. To ensure you place them in the same orientation as they were stored, you may
Your folded signatures (sets of nested folios), which should have been sitting patiently under a clean piece of board, will be removed one at a time for sewing. To ensure you place them in the same orientation as they were stored, you may
want to mark the fold with a different coloured pen at each end. That way, if there was any small variation in the spacing of holes on your pricking template, it shouldn’t affect your text block.
The first step is to tie the cords onto your frame. With a made-for-purpose frame, this would involve tying the cord to the top of the frame, attaching sewing keys to the free end of each cord, and winding any surplus cord around the key before securing them in place.
For our more rudimentary process, simply tie each cord to the top of your frame, spaced apart to match your sewing holes, and fasten the other end to the bottom of the frame by tying, adhesive tape, prayer – whatever works best. 

Make sure that you have at least two inches of cord below the point where you attach it to the lower part of the frame. You’ll need this later on when consolidating your book block.
The cords should be pulled taut enough that there is no slack in them – to check that you have a similar tension in each, you can pluck them like rather coarse harp strings and aim for a similar sound from each. If, like Sandalphon, you have a tin ear, do the best you can.
You only require three cords – the holes at each end of the signature are the kettle stitch holes, to link one signature to the next.
Next, take your first signature and align it with the cords. If you're using tape, each pair of sewing holes should sit either side of the tape.
Next, take your first signature and align it with the cords. If you're using tape, each pair of sewing holes should sit either side of the tape.
Otherwise, you should have just one hole for each cord – the thread will emerge from the signature, travel across (or loop around) the cord, and re-enter through the same hole.
Thread your needle with a length of waxed linen thread (or whatever alternative you managed to find).
Thread your needle with a length of waxed linen thread (or whatever alternative you managed to find).
I suggest using no more than a metre of thread at once; you can always attach more thread as you go, using the weaver's stitch (more on that anon).
Push the needle through the right hand hole (with the fold in the signature facing you)
Push the needle through the right hand hole (with the fold in the signature facing you)
and draw most of the thread through, leaving around 10cm outside the signature. The loose end of the thread can be taped to the sewing frame and will be tied into the book once all the signatures are sewn.


Push the needle back out through the next hole. Depending on the type of sewing, you will guide the needle to one or the other side of the cord or tape (see diagram).


Pull the thread through, ensuring you’ve secured the end with some tape. When pulling the thread to tighten, always pull parallel to the fold in the paper, or you risk tearing through the fold. The thread should have no slack, and should lie neatly along the inside of the fold.
Re-insert the needle through the hole (second hole for tape sewing) and pull through.

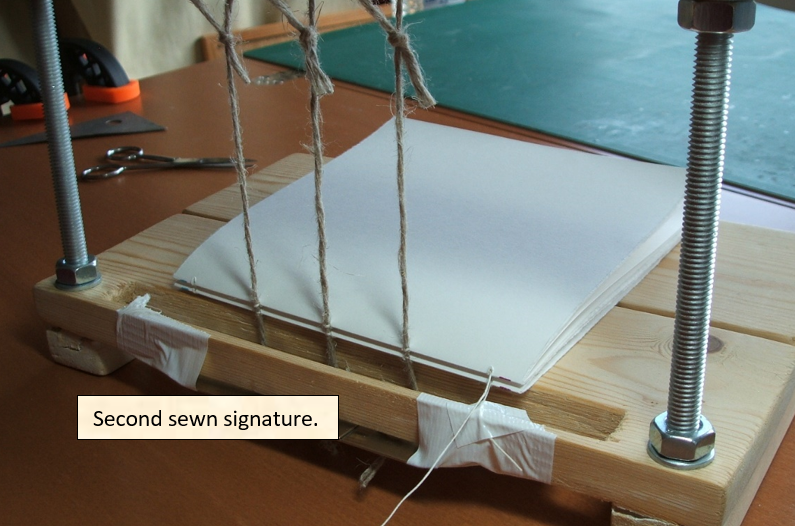
Repeat for the other two cords, carefully pulling the thread straight as you go. When you finish your first signature, this is how it should look inside:

Close the first signature and place a second on top. If you’ve colour-coded the ends, you can be sure that the holes will align. Now begin sewing again, this time starting on the left, pushing the needle through the left-most hole and working your way to the right.
The needle emerges on the left of the cord and re-enters on the right (for recessed cords).
It's a little like a formal dance, but with fewer sublimated hormonal urges.
It's a little like a formal dance, but with fewer sublimated hormonal urges.
For raised and ‘not to show’ cords, pull the needle out on the right side of the cord, loop around the front and re-enter on the left. For tape, the needle emerges through the hole on the left of the tape and re-enters on the right.
Now add a third signature and proceed as before, from right to left. This time, when you reach the left side, you will add your first kettle stitch.
"But Aziraphale, why is it called 'kettle stitch'?", you ask, with eager faces shining. Possibly.
"But Aziraphale, why is it called 'kettle stitch'?", you ask, with eager faces shining. Possibly.
I believe the name was derived from /kettel/ - a 'little chain' in High German. Along with küechelin - little cakes, which rather exhausts my stores of High German.
Moving on...
Moving on...


The fourth signature can now be added. Sew as before, from left to right. Throughout the sewing process, pause every now and then to press down the pages to close up the spine. Upon reaching the right hand kettle hole, we are going to repeat the kettle stitch as before.


Carry on in this fashion, adding new signatures and sewing them into the book block, finishing each end with a kettle stitch that loops behind the connecting stitch of the previous two signatures. Ensure as you work that the thread is pulled straight within the fold of the
signature and that you regularly press the pages down lightly to keep the spine nice and compact.
It’s quite possible that, during sewing, you’ll find yourself running out of thread. This is perfectly normal and nothing to worry about.
It’s quite possible that, during sewing, you’ll find yourself running out of thread. This is perfectly normal and nothing to worry about.
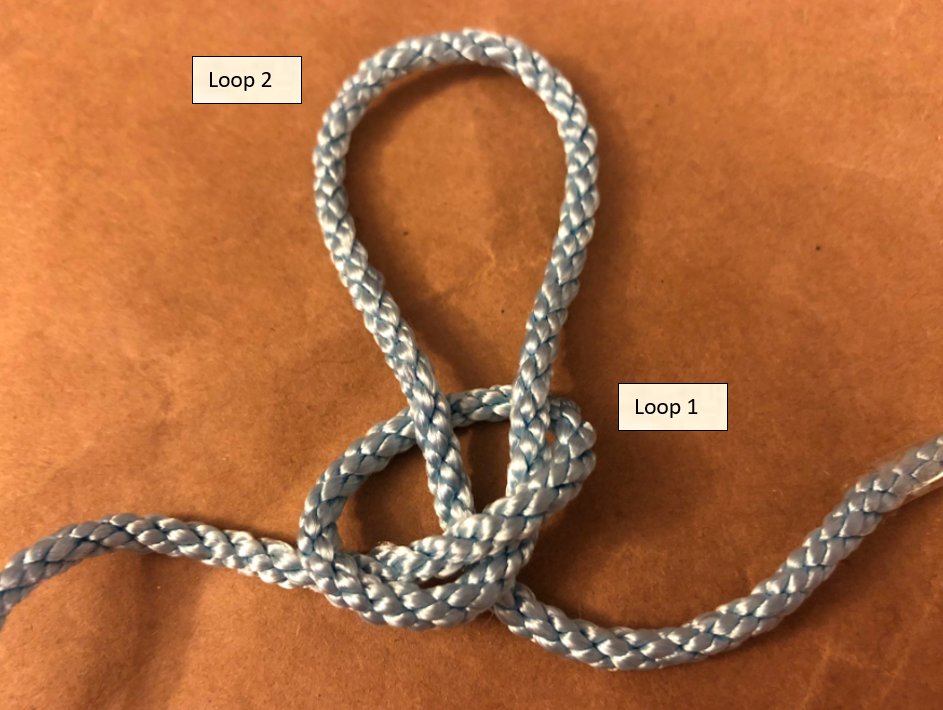
The ‘weaver’s knot’ can be used to join additional thread. Try to avoid tying on new thread close to the kettle stitch holes, where it’s more vulnerable to being loosened.
For your edification, I have attempted to recreate the weaver’s knot in a series of diagrams. It’s not as complicated as it looks, once you try it for yourself!


Once you have reached the end of your final signature and completed the kettle stitch, add an extra kettle stitch to the section below (between the third and fourth signatures from the top).
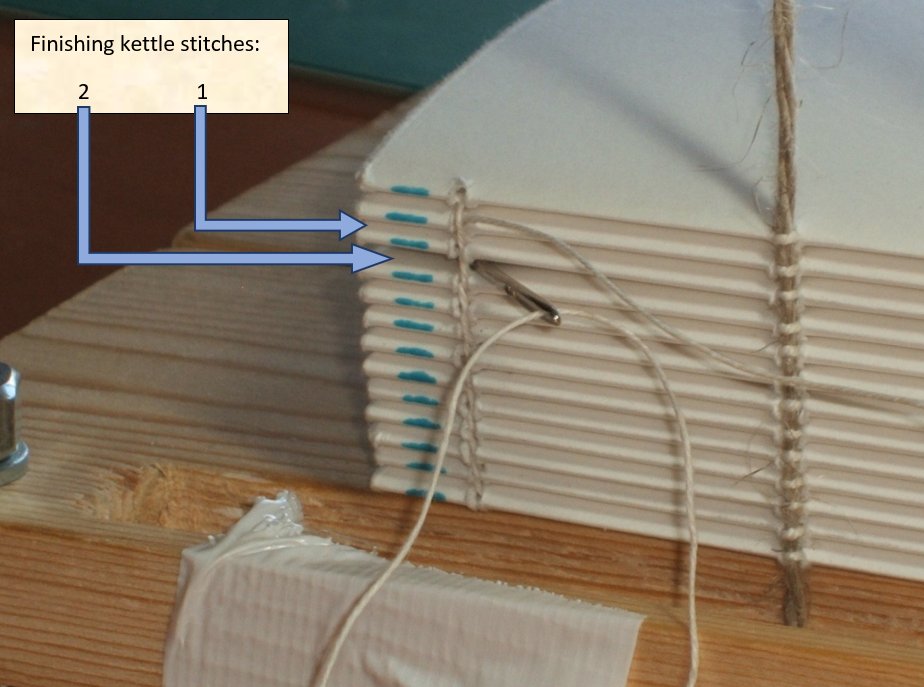
Cut the thread, and untie the cords (how exciting!), then turn the book block over so that the first signature is on top with the length of loose sewing thread you left at the beginning. Now, using your darning needle, kettle stitch between the second and third signatures,
and then between the third and fourth. Snip off the spare thread, and you have completed your first book block. Well done!

The final step isn’t technically part of sewing, but it’s good to get it out of the way or you’ll find yourself waiting for glue to dry before we can begin next time.
Start by placing the text block between two clean pieces of board near to the front of your work space.
Start by placing the text block between two clean pieces of board near to the front of your work space.
Using an engineer's square (if you have one) make sure that the signatures are neatly aligned both at the head (top) and spine of the book.

Place a weight on top of the book - a board with several tins may be used. Here I have a slab of marble functioning both as pressing board and weight.

Secure your cords away from the spine of the book - you may tape them to the boards, or trap them under the weights. No tension needs to be applied, you just want to keep the cords away from your glue.

Using a spatula, fingertip, small ornamental dagger, or whatever you have to hand, carefully spread glue across the spine of the book block. It's important that you avoid gluing the cords or tape, as the block needs to be flexible for the next part of the binding process.
Once you have a thin layer of glue filling all the gaps between signatures, you can leave the book block to dry and go and make the cup of tea you deserve.
Have some /küechelin/. You have absolutely earned it!
We will adjourn, here. Next time, we'll look at shaping the spine,
Have some /küechelin/. You have absolutely earned it!
We will adjourn, here. Next time, we'll look at shaping the spine,
also known as 'backing and rounding', and what to do with those stray lengths of cord or tape that are currently flapping untidily around like a tipsy cherub.
As always, feel free to ask questions, and I hope to see you at the next installment of #BookbindingWithAziraphale!
As always, feel free to ask questions, and I hope to see you at the next installment of #BookbindingWithAziraphale!

