
Good evening everyone and thanks to Shutters Network for hosting me.
I'm Kahli Brown and I'll be your host for tonight on the topic SHOOTING PRO MODE on your Smartphone.
Its a thread...
I'm Kahli Brown and I'll be your host for tonight on the topic SHOOTING PRO MODE on your Smartphone.
Its a thread...
https://twitter.com/ShuttersNetwork/status/1306296596183896067
PRO MODE (PROFESSIONAL MODE)
PRO MODE lets you move beyond the simple “point and shoot” features by unlocking advanced adjustments settings, and letting you tweak just about every aspect of the photography experience.
PRO MODE lets you move beyond the simple “point and shoot” features by unlocking advanced adjustments settings, and letting you tweak just about every aspect of the photography experience.

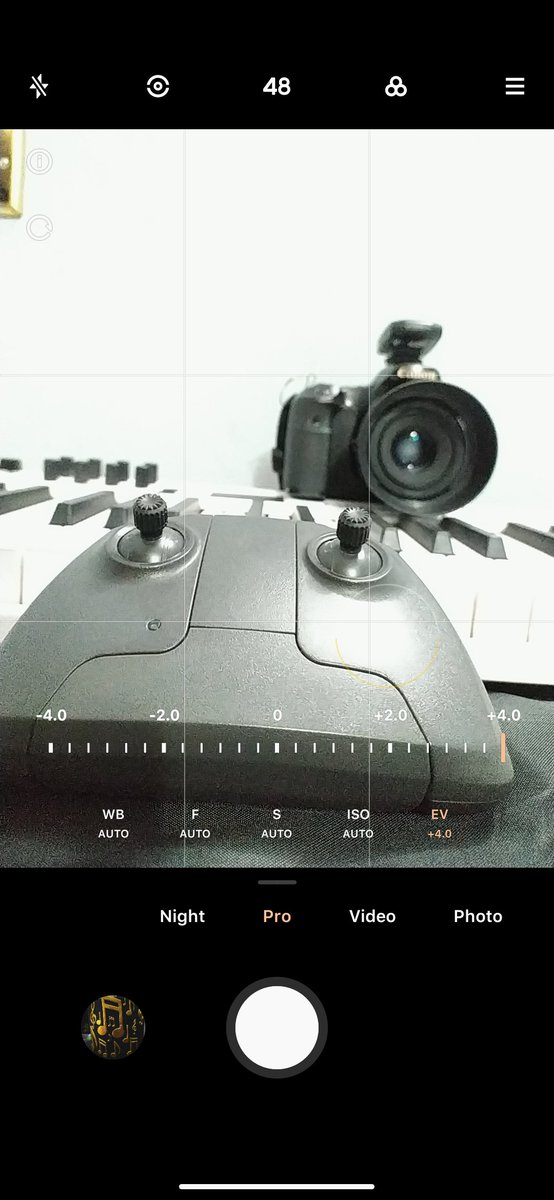
When you open your camera app you need to navigate to the PRO MODE just like in the image above.
In the PRO MODE, you'll be presented with a screen with multiple settings but not to worry I'll explain what each settings does.
In the PRO MODE, you'll be presented with a screen with multiple settings but not to worry I'll explain what each settings does.
WB (WHITE BALANCE)
White balance is the colour balance on a digital camera. It affects how much white light is in a shot, which ultimately affects all colors. This is what determines how warm (yellow) or cool (blue) a shot will look.
White balance is the colour balance on a digital camera. It affects how much white light is in a shot, which ultimately affects all colors. This is what determines how warm (yellow) or cool (blue) a shot will look.

It has a bunch of settings ranging from auto, cloudy, sunny, incandescent, and fluorescent lights which can be toggled to get accurate colors in your image.
If you have ever noticed your photos skew a particular color, this might be why.
If you have ever noticed your photos skew a particular color, this might be why.
F (FOCUS)Focus refers to the state or quality of having or producing clear visual definition.
Focus point is simply the sharpest area of an image or the point of interest or focus.
Focus point is simply the sharpest area of an image or the point of interest or focus.


Pulling the slider towards the left would focus on close-up objects creating a blur background and pulling the slider towards the right would focus on farther objects just like in the Images above
S (SHUTTER SPEED)
Shutter speed refers to how long the image sensor is exposed to light.
Pulling the slider towards the left (1/1000 seconds) makes the image darker but captures the image faster without blur and is often referred to as a fast shutter speed.
Shutter speed refers to how long the image sensor is exposed to light.
Pulling the slider towards the left (1/1000 seconds) makes the image darker but captures the image faster without blur and is often referred to as a fast shutter speed.

pulling the slider towards the right (32 seconds) makes the image more brighter but captures the image with blurry movements and shakes so a tripod or a steady hands will be needed to help stabilize this kind of shot.
This is often referred to as LONG EXPOSURE.
This is often referred to as LONG EXPOSURE.
ISO (INTERNATIONAL ORGANIZATION FOR STANDARDIZATION)
ISO refers to how sensitive the image sensor is to light. The lower the ISO, the less sensitive it is, and the sharper your image is with less noise.
ISO refers to how sensitive the image sensor is to light. The lower the ISO, the less sensitive it is, and the sharper your image is with less noise.


The higher it is, the brighter the image gets, the more you risk noise or grain creeping into the shot.
Pulling the slider towards the left (100) makes the image darker and pulling the slider towards the right (3200) makes the image brighter but with grains in your images...
Pulling the slider towards the left (100) makes the image darker and pulling the slider towards the right (3200) makes the image brighter but with grains in your images...
so you have to watch while you increase your ISO to make sure there's no presence of much noise that will ruin your shots.
EV (EXPOSURE COMPENSATION)
Exposure compensation is easy to identify because of its + and – symbols. PRO MODE will often do this automatically for you, but it is a setting you can adjust yourself.
Exposure compensation is easy to identify because of its + and – symbols. PRO MODE will often do this automatically for you, but it is a setting you can adjust yourself.

Even if you have made your adjustments, this setting can be used in an advantageous way to get a little brighter or darker image.
Pulling the slider towards the left (-4) makes the image darker and pulling the slider towards the right (+4) makes the image brighter.
Pulling the slider towards the left (-4) makes the image darker and pulling the slider towards the right (+4) makes the image brighter.
Exposure compensation comes in handy when you have set both your ISO and Shutter speed and the image is still not as exposed as you want it to be then you can use exposure compensation to compensate 😁
IMPORTANT NOTE
For beginners the PRO MODE could be so confusing but with this class and constant practice you'll become a Pro at it in no time. 😉
With that said, this brings us to the end of the class
Hopefully you found this helpful.
For beginners the PRO MODE could be so confusing but with this class and constant practice you'll become a Pro at it in no time. 😉
With that said, this brings us to the end of the class
Hopefully you found this helpful.
Thank you Shutters network for hosting me and thanks to everyone who participated 🙏🏽
STAY SAFE NIGERIA ❤️
STAY SAFE NIGERIA ❤️
• • •
Missing some Tweet in this thread? You can try to
force a refresh


