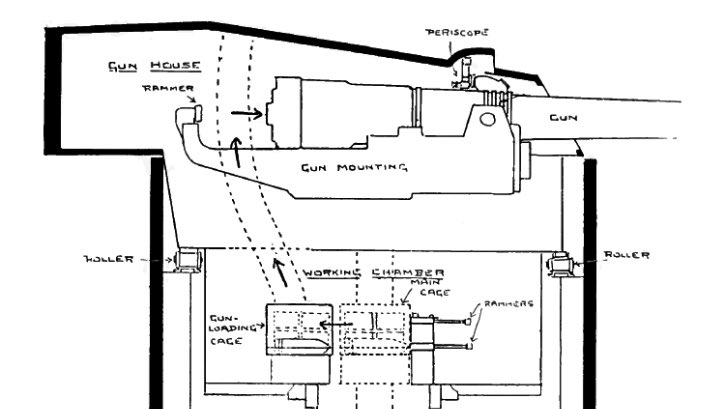
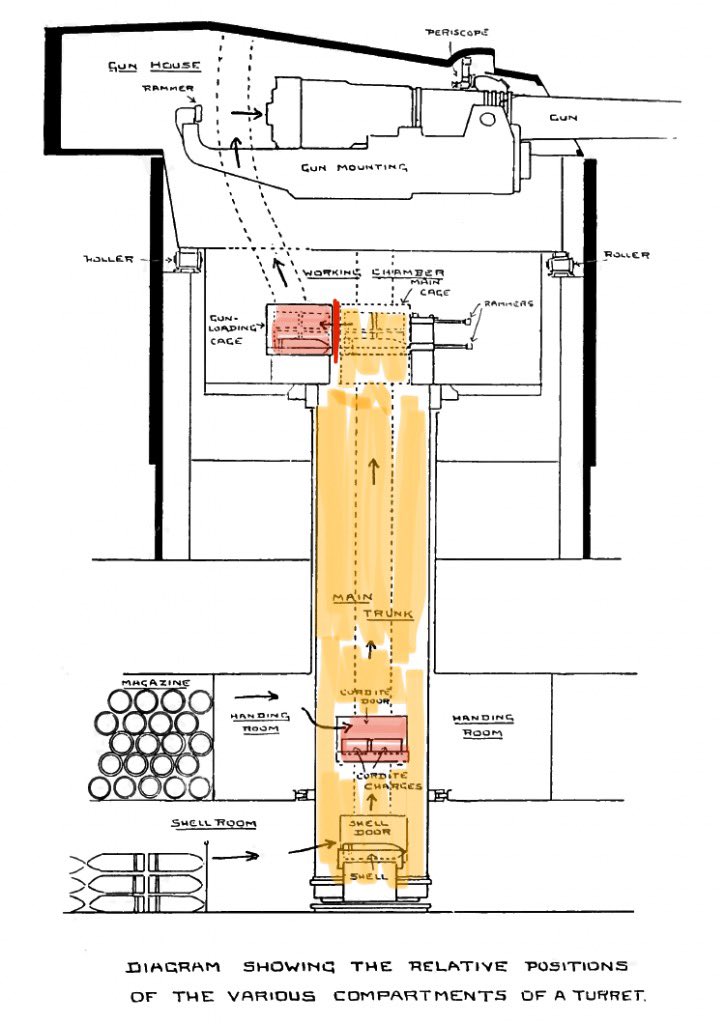
A thread on propellant loading and safety precautions at the Battle of Jutland. This image shows a simplified cross section of a British dreadnought battleship or battle cruiser mounting and is fairly representative of the various calibres. #history 1/ 

The propellant was called cordite for obvious reasons. Cords were bundled together in a silk bag and called a cartridge. At ONE end was a gunpowder igniter covered by a protective tear off disc. Four cartridges were required for each shell. 2/

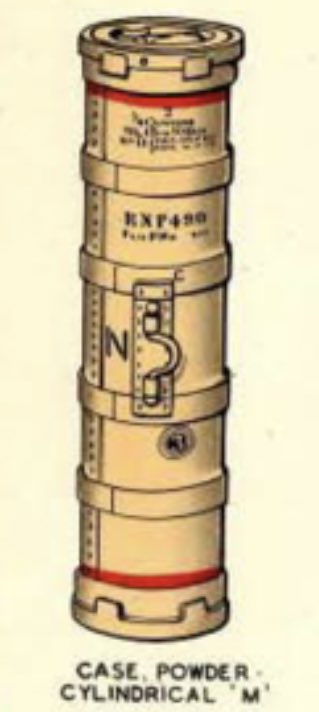
Cartridges were stored in brass cases, two to a case (case for 15-inch cartridges shown). These were NOT called Clarkson or Clarkson’s Cases. They were not entirely flashlight on account of the danger of spontaneous ignition, and had lids at both ends. 3/
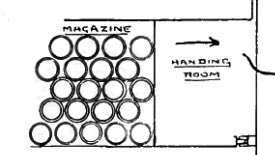
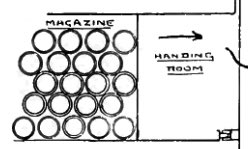
The cases were stowed in racks in the magazine. When required the lid was removed with a key and the cartridges pulled out, leaving the case in place. The cartridges were then passed out the door into the aptly named handing room. 4/
The only way a cartridge could be passed out was through the magazine door. There were NO scuttles or airlocks in British dreadnoughts before Jutland. Four men worked in the magazine. 5/
In the middle of the handing room was the trunk which revolved with the turret. Here the tear off discs were removed from the cartridges. Regulations also dictated that one full charge of four cartridges be kept there for the auxiliary hoist. Five men worked here. 6/

On either side of the trunk were waiting positions. For 12-inch gunned battle cruisers it was a exposed tray which took four cartridges two by two. For 13.5-inch gunned ships it was a covered hopper which took cartridges two by two. 7/

The cartridges were then loaded by gravity into the main cage. This was through a sliding flashtight cordite door which had to be manually opened and closed. If the door was open the main cage could not go up the trunk. The cordite was now in a closed system. 8/
The main cage, which also carried shell, proceeded up the trunk to the working chamber. Here the shell and cordite was transferred to the obviously named gunloading cage. 9/

In 12-inch gunned battle cruisers the shell and cordite were rammed through a flash door direct into the gunloading cage. In other ships it was emptied into a covered waiting tray, then rammed through a flash door into the gunloading cage. 10/
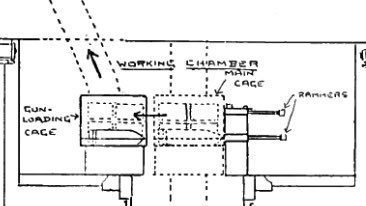
The gunloading cage then went up to the gunhouse. In all dreadnoughts it had to pass a large angled flash door which went up. However when the gunloading cage was up the flash door was up, leaving the working chamber exposed. 11/
This clip from Sink the Bismarck demonstrates a 15-inch gun’s gunloading cage being emptied in the gunhouse, on the same principle as smaller calibres. All the time the cage is up the flash door between the working chamber and gunhouse is open. 12/
British heavy gun mountings were designed for speed. A 12-inch or 13.5-inch gun could be loaded in 30 seconds or even faster. With alternate guns firing salvoes a round per turret every 15 seconds was possible—and aimed for—in the Grand Fleet. 13/
As we have seen this would pose problems when the only way in or out of the magazine was one door. A maximum of 16 cartridges a minute (not allowed to be stacked) would have to be passed between four men through that one door. To call it a design flaw is an understatement. 14/
Perhaps it is not surprising then that all dreadnoughts, and not just the battle cruisers of the Battle Cruiser Fleet, kept their magazine doors open. At any rate doors for the passing of ammunition were specifically not directed to be closed in the regulations. 15/
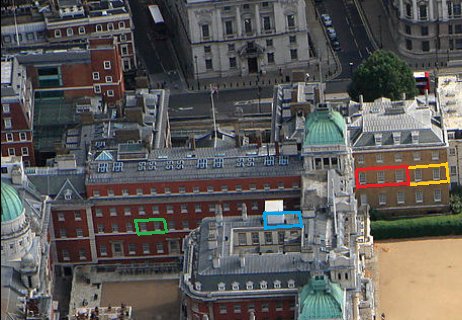
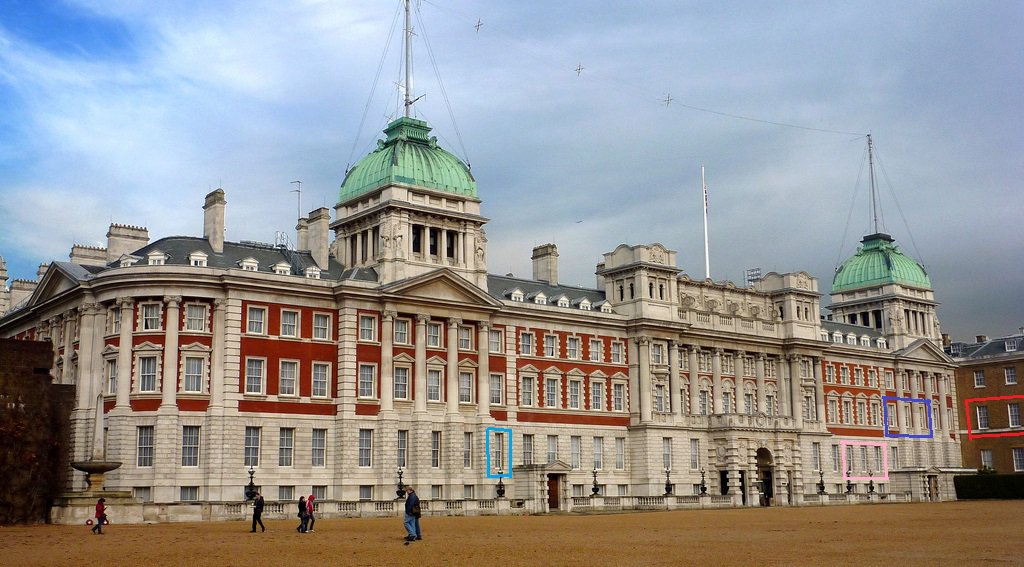
Designers and users put their faith in the existing safety features. Nominally flashtight cartridge cases and nominally flashtight doors at nearly every stage of the journey from handing room to gun. (Red: flash doors: orange; flash free.) 16/
It was found after Jutland that most of these precautions weren’t flashproof, and that even closed magazine doors might not even be flashproof. After the battle both officers and constructors admitted they’d been very wrong. 17/
Indeed Hubert Dannreuther, a gunnery specialist and one of the handful of survivors of H.M.S. Invincible, admitted decades later “it is easy to be wise after the event”. Which is incidentally the title of my 100 page monograph on cordite handling. 18/

All of this is *before* one gets to the allegations of cordite handling which contravened regulations, which are actually few and far between. There was a distinct possibility of a direct train of cordite from gun to magazine even under favourable conditions. 19/
Senior figures at the Admiralty looked at why so many ships blew up at Jutland. The majority of their correspondence on the subject is reproduced at @navyhistorian: dreadnoughtproject.org/tfs/index.php/… 20/
As can be seen in the written minutes some officials claimed that safety drill had been neglected and that the men couldn’t be trusted to safely handle the cordite without officers. H.M.S. Lion was specifically cited as an example of poor handling. 21/
Notoriously Lion’s “Q” turret received a hit. The turret officer apparently was able to order magazine doors closed and send the senior sergeant to the bridge, but at least eight full charges were left unattended for nearly half an hour before catching fire. 22/
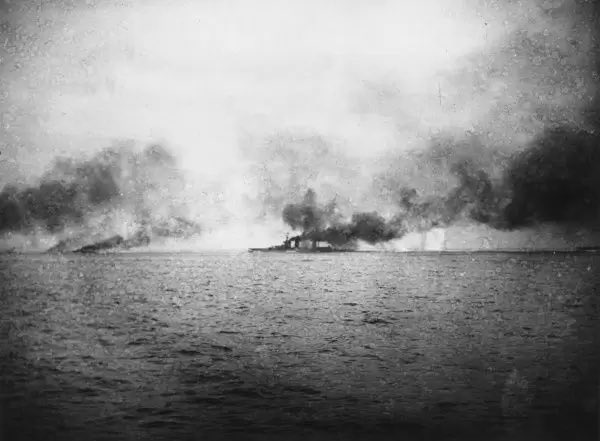
The resulting conflagration killed dozens of the surviving turret crew who had been loitering nearby without shutting the access hatches. It’s no wonder the Admiralty wasn’t impressed by Lion. 23/
Fortunately the magazine had been flooded, though not until the necessity had been double checked: a legacy of one of Lion’s magazines being accidentally flooded at the Battle of Dogger Bank in 1915. The incident had been highlighted as a lesson from the battle. 24/
https://twitter.com/simonharley/status/1399284126474289152
One important detail missed out earlier. Cartridges were supposed to be inserted into the trunk with the igniter towards the breech. Not exactly difficult with the bright red colouring of the correct end. Some historians have claimed igniters were at both ends. Not true. 25/
Stephen Roskill went so far as to claim they were needed at both ends because sailors couldn’t be trusted to load them the right way. A remarkable error and insult given he served as a gunnery officer in battleships of the era. Paul Halpern later repeated the claim. 26/
Tempted to move on to the historiography now. 27/

Some historians have claimed that the manner in which cordite for the secondary armament of capital ships was indicative of the manner in which cordite for the big guns was treated. But for the smaller guns a ready supply of cordite at the gun - in cases - was the rule. 28/
John Campbell claimed increased safety measures for secondary guns were not allowed in the Fourth Battle Squadron and that they were too lax in the First Cruiser Squadron in 1915. Unreferenced, but clearly based on a post-war official report. 29/
The actual report paints a rather different picture, as does a handwritten 1915 order from Jellicoe that has survived, directing how many charges per gun should be kept in each squadron. Too few or too many as appropriate. He specifically did not want a train of cordite. 30/
Nicholas Lambert, in his article on the subject which is regarded as gospel by many, repeated Campbell unquestioningly and also claimed his examples represented the majority of senior officers in the Grand Fleet. This was not true nor even claimed by Campbell. 31/
Lambert included immediate pre-war quotes from senior officers regarding secondary armament cordite at the guns which suggest that a risk could be incurred. The quotes are from a document in the papers of the then-Director of Naval Construction, Tennyson d’Eyncourt. 32/

However, Lambert for some wild inexplicable reason chose not to mention the only two who believed risk should not be incurred: a certain Rear-Admiral David Beatty of First Battle Cruiser Squadron and Captain Osmond Brock of Princess Royal. Go figure. 33/


• • •
Missing some Tweet in this thread? You can try to
force a refresh