
You can always enhance your development skills by creating projects. 🚀
Let's see How to Create an Emotion Recognition App using React and RapidAPI.
🧵👇🏻
Let's see How to Create an Emotion Recognition App using React and RapidAPI.
🧵👇🏻

Step 1: Connect to the Facial Emotion Recognition API 🖇️
We will be using the free Facial Emotion Recognition API for this particular project. Head over to the Pricing page (RapidAPI.com/cloud-actions-…) and click on the “Subscribe” button of the Basic plan.
We will be using the free Facial Emotion Recognition API for this particular project. Head over to the Pricing page (RapidAPI.com/cloud-actions-…) and click on the “Subscribe” button of the Basic plan.

Step 2: Test the API on RapidAPI Playground 🧪
The Facial Emotion Recognition API has only one endpoint that allows us to make a POST request using the image URL.
Add image URL inside source and URL inside sourceType parameter.
Great, click on the “Test Endpoint” button.
The Facial Emotion Recognition API has only one endpoint that allows us to make a POST request using the image URL.
Add image URL inside source and URL inside sourceType parameter.
Great, click on the “Test Endpoint” button.

After hitting the “Test Endpoint” button, you will see the API response in the third section of API Playground.

You’ll get an object with two keys - the first key contains all the emotion values, and the second key will contain the Face Annotations.
We need the `emotions` key, which contains seven different emotion values.
We need the `emotions` key, which contains seven different emotion values.
Step 3: Create React App
Create a React application by running the following command:
`npx create-react-app emotion-recognition`
Head over to React docs (reactjs.org) if you're not familiar with React.
Create a React application by running the following command:
`npx create-react-app emotion-recognition`
Head over to React docs (reactjs.org) if you're not familiar with React.
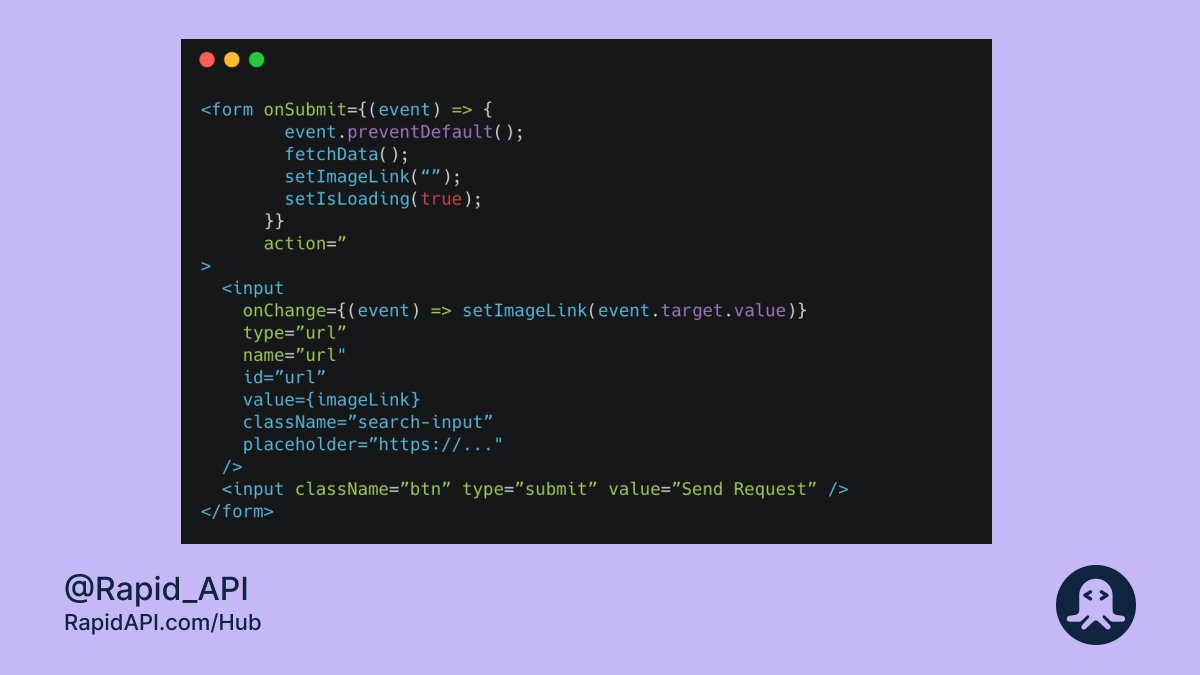
Step 4: Create a Form Inside App.js File
Go to the emotion-recognition folder > src > App.js, and create a form with an URL input field and a submit button.
Here, the user can enter the image URL and get the desired result.
Go to the emotion-recognition folder > src > App.js, and create a form with an URL input field and a submit button.
Here, the user can enter the image URL and get the desired result.

Run the application to check the output by running the following command from the root of the project:
`npm start`
`npm start`

Step 5: Copy-paste the code snippet from RapidAPI Hub
You are all set to integrate Facial Emotion Recognition API code into our application. You don’t even need to write the code. RapidAPI provides the code snippet in 20 programming languages with 40 libraries’ support.
You are all set to integrate Facial Emotion Recognition API code into our application. You don’t even need to write the code. RapidAPI provides the code snippet in 20 programming languages with 40 libraries’ support.
Go to the Facial Emotion Recognition (RapidAPI.com/cloud-actions-…) API homepage and copy the code snippet from the third section of the API playground.
Select the JavaScript language and fetch method from the dropdown menu and click on the “Copy Code” button.
Select the JavaScript language and fetch method from the dropdown menu and click on the “Copy Code” button.
Create a function `fetchData()` in the App.js file and paste the code inside that function.
Step 6: Validate the Form and Make API Request
We are almost done! We need to validate the form to enter the image URL and get the emotions.
We are almost done! We need to validate the form to enter the image URL and get the emotions.
Render the data (emotions) on the webpage when API successfully returns the data. You can do this by adding some paragraph tags inside the return method in the App.js file.
If you missed some parts, this is how the entire code file looks like: 👇🏻
🔗 codesandbox.io/s/emotion-reco…
🔗 codesandbox.io/s/emotion-reco…
Step 7: Run the Application
Yay! Run the `npm start` command, and you’ll see the result at http://localhost:3000/.
Yay! Run the `npm start` command, and you’ll see the result at http://localhost:3000/.
You can also add some great designs to your project to make it look more appealing.
Check out the complete project here:
🔗 codesandbox.io/s/emotion-reco…
Check out the complete project here:
🔗 codesandbox.io/s/emotion-reco…

That's pretty much it for this tutorial thread. We hope you like this. 💙
Feel free to drop your suggestions or doubts below.
Follow @Rapid_API for more quality content. 😉 🚀
Feel free to drop your suggestions or doubts below.
Follow @Rapid_API for more quality content. 😉 🚀
• • •
Missing some Tweet in this thread? You can try to
force a refresh


