
Chain Runner - On Chain 32x32 Pixel Art
@chain_runners seems like all that everyone talked about during the weekend as it surged to 2 eth floor. What's special is this 32x32 art is all stored on chain.
Today, we'll see how on chain pixels work.
@chain_runners seems like all that everyone talked about during the weekend as it surged to 2 eth floor. What's special is this 32x32 art is all stored on chain.
Today, we'll see how on chain pixels work.

1/ A quick rundown for today breakdown, we'll look into:
- Chain Runners DNA
- Rarity & Weights
- How layers are stored
- How layers are constructed
- Pixel Colors
- Layouting the layers
Let's get into it :)
- Chain Runners DNA
- Rarity & Weights
- How layers are stored
- How layers are constructed
- Pixel Colors
- Layouting the layers
Let's get into it :)
2/ Through the weekend, we see an influx of people adopting a runner! Only last week, each runner sat at around 0.1 eth and now it's at around 2 eth! We also see many figures in the tech and VC space getting a runner like Figma CEO @zoink and @greylockVC partner @saranormous
3/ Many say Chain Runners can be the next punk? Interestingly, this 32x32 pixel art turns out to be all stored on the blockchain without the use of any external hosting like IPFS.
After reading their contract, I think they do deserve the hype they've gotten.
After reading their contract, I think they do deserve the hype they've gotten.
4/ Let's look into some code! There's a lot to unpack and I need to warn you that the contract is non-trivial. However, I will try my best to summarize the core mechanism of the contract.
5/ Chain Runners comprised of two contracts:
- Main contract to store data and minting
- Renderer contract to create SVG
This is the same technique used by @dhof's Corruption(s*). You can check Corruption(s*) breakdown here:
- Main contract to store data and minting
- Renderer contract to create SVG
This is the same technique used by @dhof's Corruption(s*). You can check Corruption(s*) breakdown here:
https://twitter.com/marcelc63/status/1459700388177727488
6/ The main minting contract has functions that we'll expect from a minting contract. What's different is, it also tracks information called runner.dna
This DNA is what the Renderer contract will use to give each runner its unique looks.
This DNA is what the Renderer contract will use to give each runner its unique looks.
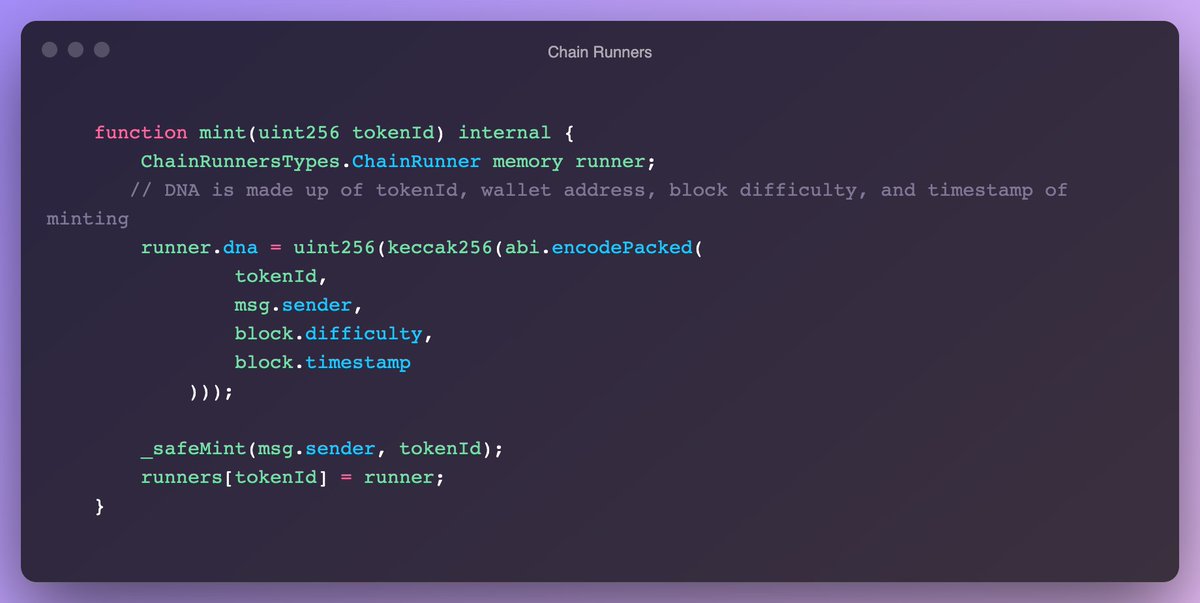
7/ Upon minting a new runner, a new runner.dna is created. The DNA is a 256 bits integer that's randomized by taking:
-tokenId
-wallet address
-block difficulty
-mint timestamp
This ensures each DNA is different. Then this DNA is passed to the renderer contract.
-tokenId
-wallet address
-block difficulty
-mint timestamp
This ensures each DNA is different. Then this DNA is passed to the renderer contract.
8/ The Renderer contract is where all the guts of the contract are in. There are other contracts that stores pixels on chain such as @blitmap and @nounsDAO. Chain Runners took inspiration and credited those projects properly. The mechanism here is non-trivial and deserves praise.
9/ Before we go over the process step by step, I'll highlight some unique techniques that Chain Runners renderer uses.
First, a lot of data are stored as partial base64. For example, the final JSON metadata is already partially encoded as base64.
First, a lot of data are stored as partial base64. For example, the final JSON metadata is already partially encoded as base64.
10/ This greatly contrasts the common way of doing on chain data where data are constructed as a string and the final output is later on encoded as base64.
While this adds complexity, it saves gas and computation. We'll see this repeatedly throughout the contract.
While this adds complexity, it saves gas and computation. We'll see this repeatedly throughout the contract.
11/ Second, many other data that describe the art are stored in a variety of different data formats such as ByteCode, HexString, and Base64. I don't think any "plain text" is stored in the contract. We'll explore this further later.
12/ The entry point of the contract is the tokenURI function. It uses DNA to determine the traits of the runner. How its done is mainly handled by the getTokenData() function. But before we get into the implementation, let's see how rarity distribution works.
13/ Distributing rarity uses a weights mechanism. The team got this from Anonymice. It stores three information:
- The Race
- The Layer Index
- Array capturing the frequency each layer should be selected
What's unique is, each race can have different layer distribution.
- The Race
- The Layer Index
- Array capturing the frequency each layer should be selected
What's unique is, each race can have different layer distribution.

14/ To use the DNA and map it to the weight, several steps are taken.
First we split the DNA into 13 parts, this is done through the splitNumber() function. Based on this there are two methods to get the layer distribution.
First we split the DNA into 13 parts, this is done through the splitNumber() function. Based on this there are two methods to get the layer distribution.

15/ 1. Compare the value with a frequency value. If a value is less than frequency, it satisfies the condition. Determines traits like face accessories, mask, etc,
2. Compare DNA value by lowerBound and upperBound of the frequency. Determines race & other layers.
2. Compare DNA value by lowerBound and upperBound of the frequency. Determines race & other layers.
16/ How the lowerBound and upperBound works are as follows.
1. Get the array of frequency
2. lowerBound starts at 0
3. We scan the array from left to right
4. upperBound is lowerBound + the frequency (called percentage)
1. Get the array of frequency
2. lowerBound starts at 0
3. We scan the array from left to right
4. upperBound is lowerBound + the frequency (called percentage)

17/ 5. Check if DNA value is bigger than lowerBound and smaller than upperBound
6. If not, set the upperBound as the new lowerBound, and do steps 3-5 again.
7. When it's in between, the number of times we've done this is the index of the trait that we will use.
6. If not, set the upperBound as the new lowerBound, and do steps 3-5 again.
7. When it's in between, the number of times we've done this is the index of the trait that we will use.
18/ After knowing what layers to use, it's time to retrieve the stored layers and start constructing them into the final image.
The layers are stored in two parts:
1. The name of the layer as Base64 encode
2. The actual pixels and its colors as ByteCode
The layers are stored in two parts:
1. The name of the layer as Base64 encode
2. The actual pixels and its colors as ByteCode
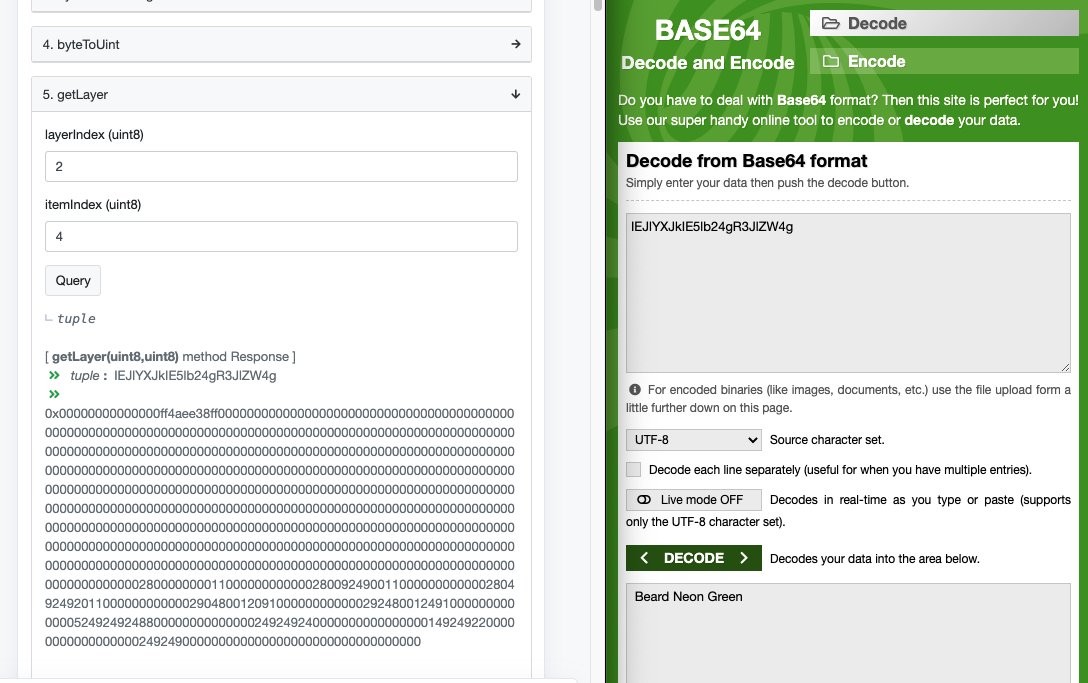
19/ For example, item #5 (index 4) for layer 2 gives us the following base64 and bytecode.
The base64 decodes as "Beard Neon Green".
The base64 decodes as "Beard Neon Green".
20/ There's also a setLayers function that the team used to upload this information before launch. And these transactions are expensive. For example, this is the transaction that uploads data for layer 0. It costs ~$5000! etherscan.io/tx/0x9a0ddc5ad…
21/ Finally, the last step we need before completing the SVG is knowing what the pixel looks like and its colors. To do this is through the palette() function that takes in the byteCode.
22/ What happens next is really cool. It converts the byteCode into five pieces of data:
1. hexString that represent the pixel
2. Alpha, Red, Green, and Blue value of the pixel
I tried decoding a byteCode to see the output.
1. hexString that represent the pixel
2. Alpha, Red, Green, and Blue value of the pixel
I tried decoding a byteCode to see the output.

23/ Using the RGBA values, a blendColor function will interpret the RGBA values and apply them to the SVG properly.
This is mindblowing to know that the contract stores RGBA values in bytecode and interprets them later vs storing hex color codes as most do.
This is mindblowing to know that the contract stores RGBA values in bytecode and interprets them later vs storing hex color codes as most do.
24/ Now that we have all the information we need, the last thing to do is construct them. This is all done through the tokenSVGBuffer function. A lot is going on, but let's look at it together
1. The function will try to construct SVG pixel by pixel from top left to bottom right
1. The function will try to construct SVG pixel by pixel from top left to bottom right

25/ 2. It will parse the colors of all 8 layers at once and properly arrange the layer stack. This is done via colorForIndex function.
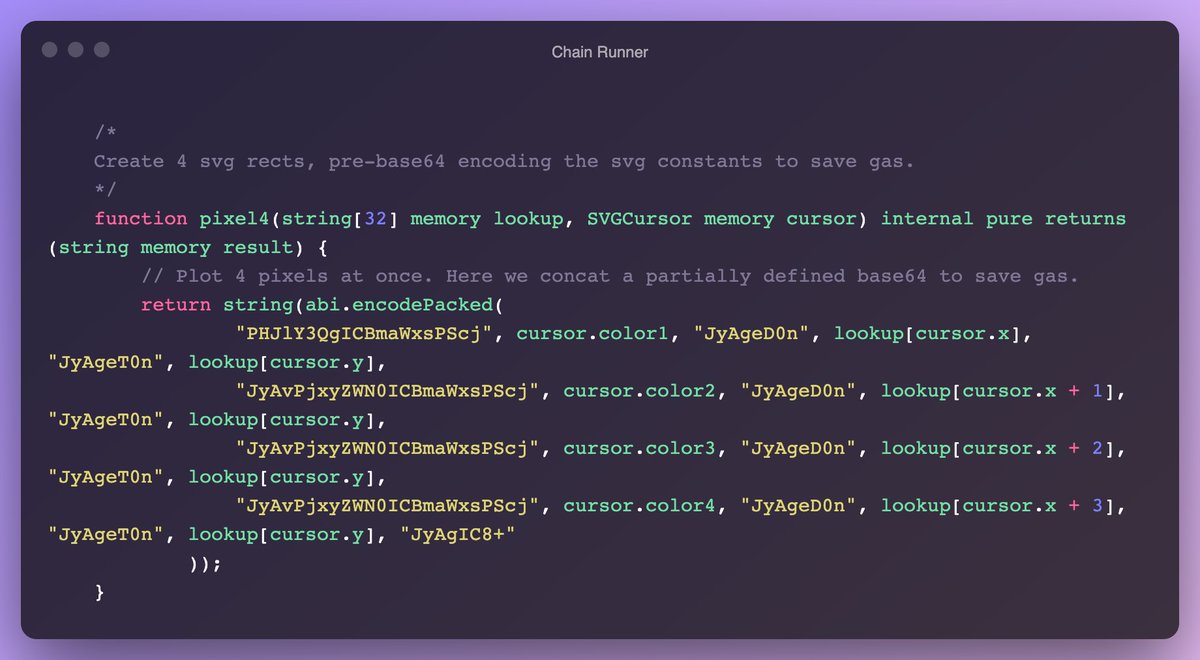
3. It will construct 4 pixels at once per operation. This is done via pixel4 function.
3. It will construct 4 pixels at once per operation. This is done via pixel4 function.
26/ Let's see the colorForIndex function first. Using the hexString and RGBA values of the bytecode, we can determine when we should display a color on which pixel of the canvas. Most of the time, it will be transparent.
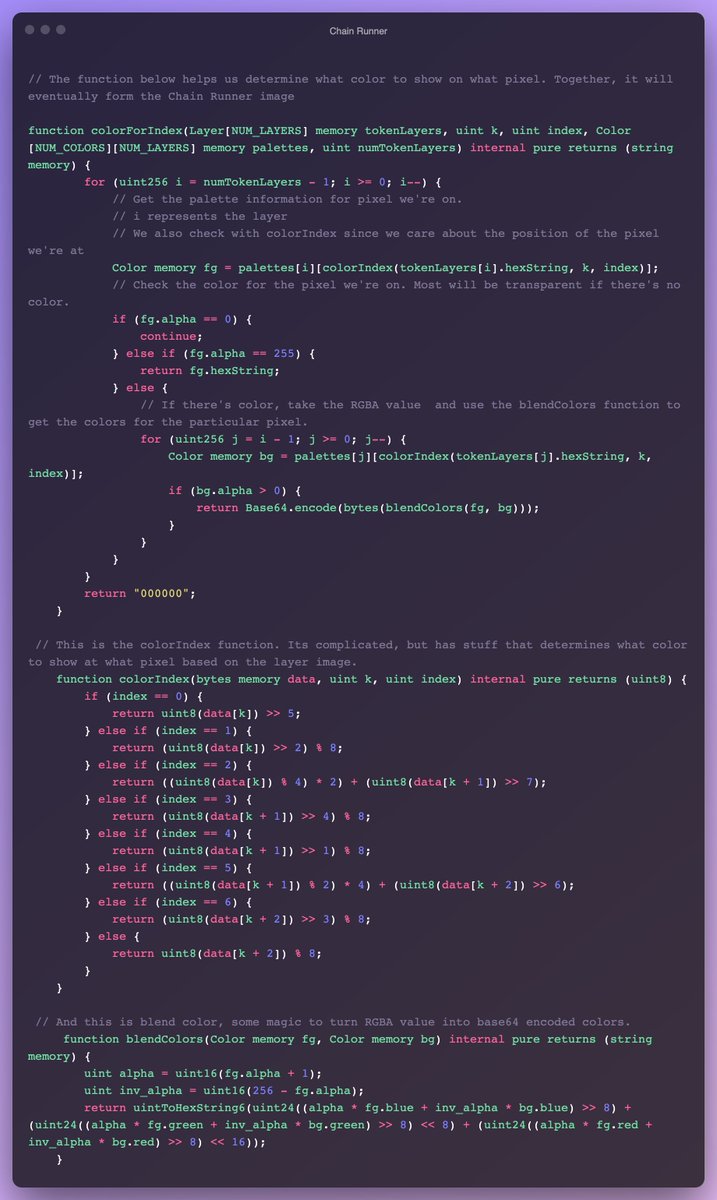
27/ So a way to think about it is, as we scan from left to right we check whether it's time to show the pixel yet or not. If not, we return transparent, if yes, we return the color for that pixel.
28/ As we do this for all 8 layers, we can determine what color to show while maintaining the order of the layers.
29/ Next is the pixel4 function. It takes the color that we received from colorForIndex function and plots it to the SVG. If we remember the use of base64, everything is already partially encoded as base64.
We do this for 4 pixels at once.
We do this for 4 pixels at once.
30/ This is a lot to take in, I hope I didn't lose you, but summarizing the entire operation follows this order.
1. Get rarity via DNA using weight mechanism
2. Get the hexString and byteCode of the layers based on the rarity
3. Convert byteCode into RGBA values
1. Get rarity via DNA using weight mechanism
2. Get the hexString and byteCode of the layers based on the rarity
3. Convert byteCode into RGBA values
31/ 4. Scan from top left to bottom right of the 32x32 pixel to create SVG
5. For each pixel we ask, what color to show here?
6. Do this for 4 pixel at once
7. Do this from top left to bottom right and we have the final 32x32 chain runner image
5. For each pixel we ask, what color to show here?
6. Do this for 4 pixel at once
7. Do this from top left to bottom right and we have the final 32x32 chain runner image
32/ Phew we made it, this is quite long and again, there's more to the contract that's not covered here. I encourage you to read the contract directly and please feel free to ask me questions or correct me if any of my interpretations are wrong.
33/ The beauty of @chain_runners is not just the art but its code. How it stores its data and constructs them while keeping in mind gas efficiency is something to note by other projects.
It deserves its weekend rally as it displays mastery to do things on chain.
It deserves its weekend rally as it displays mastery to do things on chain.
34/ ✨Free Chain Runners Template✨
There's more to the contract that doesn't fit the thread so I've created a template for Chain Runners contract. You can find line-by-line commentary and a deployment script here.
web3pad.xyz
There's more to the contract that doesn't fit the thread so I've created a template for Chain Runners contract. You can find line-by-line commentary and a deployment script here.
web3pad.xyz
35/ Also, check my previous breakdown on ConstitutionDAO👇🏻
https://twitter.com/marcelc63/status/1461376157736005638
36/ I'm learning web3, and writing this breakdown is my learning method.
I'll break down interesting contracts and share templates every Tuesday 6PM PST.
If this interests you, follow me to get notified of the next breakdown!
I'll break down interesting contracts and share templates every Tuesday 6PM PST.
If this interests you, follow me to get notified of the next breakdown!
37/ Source:
1. Main Contract:
etherscan.io/address/0x9759…
2. Renderer Contract: etherscan.io/address/0xfdac…
3. Chain Runners Website: chainrunners.xyz
1. Main Contract:
etherscan.io/address/0x9759…
2. Renderer Contract: etherscan.io/address/0xfdac…
3. Chain Runners Website: chainrunners.xyz
• • •
Missing some Tweet in this thread? You can try to
force a refresh


