If you are seeing this tweet congratulations, as it's time to maximize your mobile phone capabilities to create cool design and edit pictures.
Course Title: PicsArt for Beginners (Color Change)
I'll try to make this as simple as possible. Kindly retweet, so others can learn.
Course Title: PicsArt for Beginners (Color Change)
I'll try to make this as simple as possible. Kindly retweet, so others can learn.
You are welcome to my first class of creating/editing photos using PicsArt app. To avoid missing any class, kindly follow me and put on my notification.
The road won't be easy but we will definitely get there eventually, just have an open mind and keep practicing.
The road won't be easy but we will definitely get there eventually, just have an open mind and keep practicing.
PicsArt Photo Editor app is one of the best free editing app in the market. In this step by step class, you’ll learn how to edit photos and create wonderful designs using PicsArt app.
In fact, you can make amazing pictures no matter your skill level using its wonderful features
In fact, you can make amazing pictures no matter your skill level using its wonderful features
Before we proceed, there are 4 things you must know
1. Classes are twice a week & Twitter thread will be used. Twitter moments will be created for each class
2. PicsArt app is available for free on both i-Phones and Androids.
3. Internet access
4. Interest and determination
1. Classes are twice a week & Twitter thread will be used. Twitter moments will be created for each class
2. PicsArt app is available for free on both i-Phones and Androids.
3. Internet access
4. Interest and determination


Now let's dive into using the app. After downloading the app you can either purchase or continue to use the free feature.
To use the free feature just close the pop up message that asks you for "7 days trial" to land to this screen. Then you can click on the + to start
To use the free feature just close the pop up message that asks you for "7 days trial" to land to this screen. Then you can click on the + to start

The app is grouped into 5 menus, depending on what you want to create at that point in time. I will briefly explain each now.
1. Photo: used for editing images on your phone. This menu is what we will be using most of the time. In this menu you virtually have all the features
1. Photo: used for editing images on your phone. This menu is what we will be using most of the time. In this menu you virtually have all the features


2. Video: Used to edit short length videos. Though the features under this menu is limited, but if your sole purpose is to edit videos, you can download KineMaster app instead.
3. Collage: Used to quickly arrange group of images from customised grids, freestyle and frame.
3. Collage: Used to quickly arrange group of images from customised grids, freestyle and frame.
4. Drawings: Used for drawings, you can add up to 10 layers. I use here to create my logos.
5. Color Background: Used to start your edit with a particular colour or even a transparent background. I love this menu if don't want to use the photo menu.
5. Color Background: Used to start your edit with a particular colour or even a transparent background. I love this menu if don't want to use the photo menu.
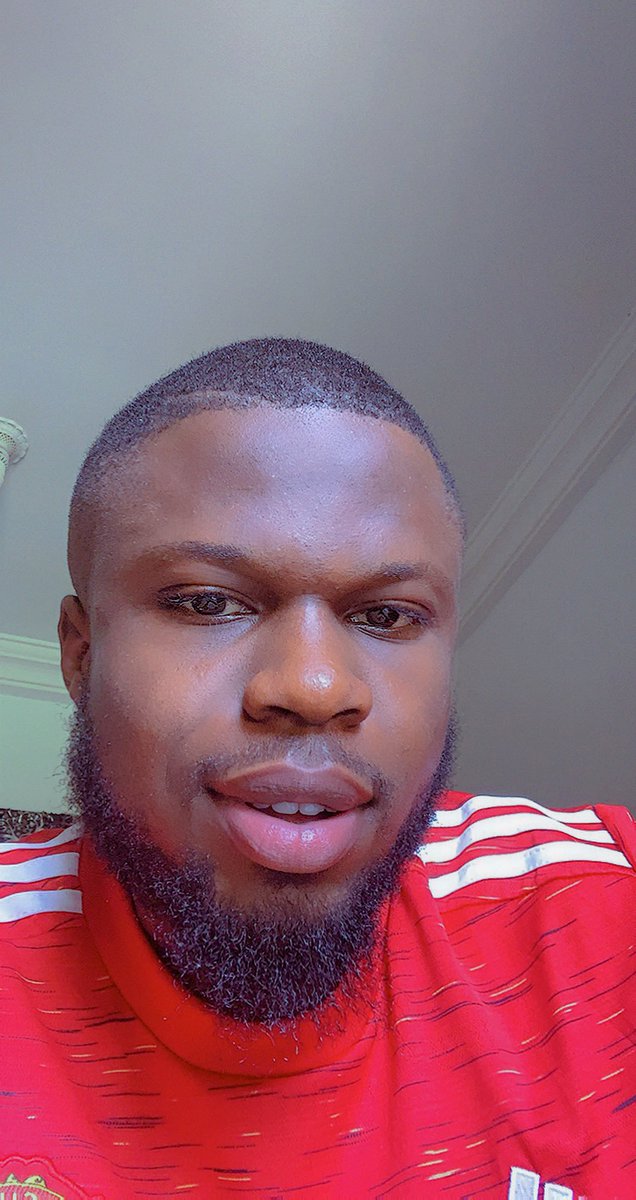
Now let's me introduce you to the features by editing this random image below, using the first menu. Load the image and you will get the 2nd frame.
By default that image loaded has become the background image. We are going to edit this image using few tool to get to 3rd frame
By default that image loaded has become the background image. We are going to edit this image using few tool to get to 3rd frame


Click on Tools to get to 1st frame.
Before we proceed let me quickly explain the 2 features we are going to use
1. Crop: To adjust to a particular image
2. Adjust: To adjust image properties from brightness to hue to saturation.
The remaining features I will introduce later.
Before we proceed let me quickly explain the 2 features we are going to use
1. Crop: To adjust to a particular image
2. Adjust: To adjust image properties from brightness to hue to saturation.
The remaining features I will introduce later.

1st we are going to crop d image to a square, then change the colour.
1. Click on Tools,
2. Click on crop
3. Click on square option
4. Click on the ✔️ option at the the top right to accept the changes
If you now noticed you have successfully cropped the initial image to square
1. Click on Tools,
2. Click on crop
3. Click on square option
4. Click on the ✔️ option at the the top right to accept the changes
If you now noticed you have successfully cropped the initial image to square


Next is to change the colour.
1. Click on Tools
2. Click on Adjust
3. Select the hue option and adjust the slider to get the colour.
4. Click on ✔️ to accept changes
Since we are changing the entire picture colour there is no need to use the erase option to clean some part off
1. Click on Tools
2. Click on Adjust
3. Select the hue option and adjust the slider to get the colour.
4. Click on ✔️ to accept changes
Since we are changing the entire picture colour there is no need to use the erase option to clean some part off


If you noticed there are 5 options above but we are focusing on 3. The 1st is to UNDO should incase you did a mistake, the 2nd is to REDO to redo what u just undid and last to download the image to your media gallery. So you can now save your work by clicking the save button.


If you check your photo gallery you will now be able to see your saved image.
Kindly note that the image is saved and can't undo it to the original form. This means a new image was created the moment it was saved.
Kindly note that the image is saved and can't undo it to the original form. This means a new image was created the moment it was saved.
You can practice changing to various color and adjust the sliders of the other options to see different output. The next class we will be adding layers to the created background. By the end of this course we would have successfully designed this.

A video summary of what we learnt today. You can can change the image color to any colour you want.
ASSIGNMENT
Use the Erase button under the "option" feature to change the jersey colour of our tech guru to blue, you can use the #PicsartWithDAPSY so I can easily see your progress.
Use the Erase button under the "option" feature to change the jersey colour of our tech guru to blue, you can use the #PicsartWithDAPSY so I can easily see your progress.


Thank you for your time and patience, don't forget to retweet this class for others to learn. See you guys in next class.
#PicsartWithDAPSY
#PicsartWithDAPSY
• • •
Missing some Tweet in this thread? You can try to
force a refresh