So what exatly is raymarching, and why should I care?
Essentially, raymarching is a mind-bogglingly simple method for rendering 3D surfaces based off of a greyscale texture.
(1/?)
Essentially, raymarching is a mind-bogglingly simple method for rendering 3D surfaces based off of a greyscale texture.
(1/?)
To get a better idea of what's going on here, lets look at an example in 2D.
Every "step", the point checks how far it is from the nearest surface, and moves in a given direction based off that distance.
The more steps, the closer the point gets to the actual surface.
(2/?)
Every "step", the point checks how far it is from the nearest surface, and moves in a given direction based off that distance.
The more steps, the closer the point gets to the actual surface.
(2/?)
The most complex part of this system is figuring out how close the point is to the nearest surface, so lets start there.
In order to do this, we need what's called an SDF, or Signed Distance Function.
(3/?)
In order to do this, we need what's called an SDF, or Signed Distance Function.
(3/?)
This may sound complex, but a nice example of a basic SDF is our good ol'friend the Voronoi texture.
For every pixel, it displays how far it is from the nearest of many randomly positioned points.
(4/?)
For every pixel, it displays how far it is from the nearest of many randomly positioned points.
(4/?)

With this in mind, lets set up our SDF nodegroup. All it needs is a position input and distance output.
For now, I'll use a noise texture with some distortion.
(5/?)
For now, I'll use a noise texture with some distortion.
(5/?)


Before we go further, there's a small mistake that we need to resolve.
Returning to the voronoi example, if we display pixels greater than .5, scaling up the texture causes the circles to change size too.
(6/?)
incorrect correct
Returning to the voronoi example, if we display pixels greater than .5, scaling up the texture causes the circles to change size too.
(6/?)
incorrect correct
Luckily this can be easily resolved by dividing by the scale after the noise texture like so:
(7/?)
(7/?)

With our SDF node complete, we can move onto our main function.
For every step, it needs to:
1. Detect the distance to the closest surface
2. Move by that distance away from the camera
(8/?)
For every step, it needs to:
1. Detect the distance to the closest surface
2. Move by that distance away from the camera
(8/?)
Before we figure out how to do this, we need 2 variables:
Ray origin: the current position of the point we are moving around.
Ray direction: the direction that each point moves in every step.
These can both be achieved with the geometry node like so:
(9/?)
Ray origin: the current position of the point we are moving around.
Ray direction: the direction that each point moves in every step.
These can both be achieved with the geometry node like so:
(9/?)

Next up, we can plug our ray origin into the SDF node to see how far away from the surface we are.
After that, we scale our ray direction by that distance and add it to the old ray origin to create the new ray origin.
We've just marched forewards!
(10/?)
After that, we scale our ray direction by that distance and add it to the old ray origin to create the new ray origin.
We've just marched forewards!
(10/?)

Believe it or not, we've just made the entire raymarching function! We can cram it all into a nodegroup like so:
(11/?)
(11/?)


Now for the fun part.
Since our inputs and outputs are identical, we can just repeat the nodegroup over and over to march the ray forewards!
I've found around 8 marches works well for what we need.
(12/?)
Since our inputs and outputs are identical, we can just repeat the nodegroup over and over to march the ray forewards!
I've found around 8 marches works well for what we need.
(12/?)

If we pan around the scene while previewing the final ray origin, its clear we're getting closer to the desired effect.
(13/?)
(13/?)
It's a bit hard to visualize, though, so lets change that.
If we get the distance from the starting ray origin to the final ray origin and plug it into the function 1/(10x+1), we get a much nicer gradient.
(14/?)
If we get the distance from the starting ray origin to the final ray origin and plug it into the function 1/(10x+1), we get a much nicer gradient.
(14/?)

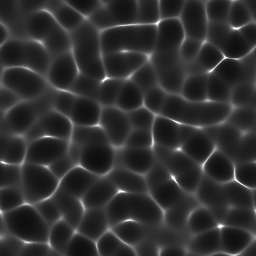
After a bit of fiddling with the SDF and the function we just made, I've found that this setup seems to achieve the nicest results:
(15/?)
(15/?)

You may have noticed that there are some pretty stars in the original render.
These can be achieved pretty easily by adding a Voronoi texture, dividing it by its scale, and combining it with the noise texture using a minimum operation like so:
(16/?)
These can be achieved pretty easily by adding a Voronoi texture, dividing it by its scale, and combining it with the noise texture using a minimum operation like so:
(16/?)

As for the coloring, just slap a colorramp on the end and play with it to your liking. You can achieve a ton of variation with different palettes!
(17/?)
(17/?)
The great thing about this method is that it works perfectly on any object, which means...
✨Magic Suzanne✨
✨Magic Suzanne✨

Well, that's about it for the thread!
Raymarching is a super interesting topic to get into, and I just barely scratched the surface.
As usual, the project file is available for free on my Gumroad: nuggetblends.gumroad.com/l/tdpua
Raymarching is a super interesting topic to get into, and I just barely scratched the surface.
As usual, the project file is available for free on my Gumroad: nuggetblends.gumroad.com/l/tdpua
exactly*****
• • •
Missing some Tweet in this thread? You can try to
force a refresh