📈SUPPLY & DEMAND ZONES (Thread):📈
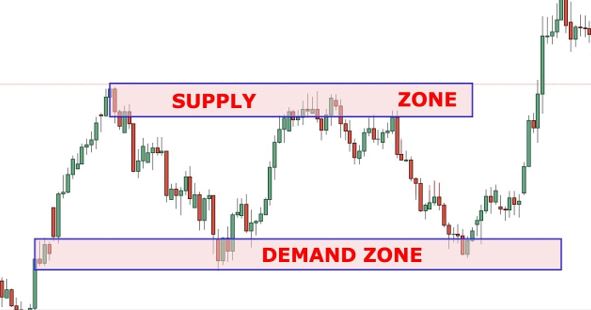
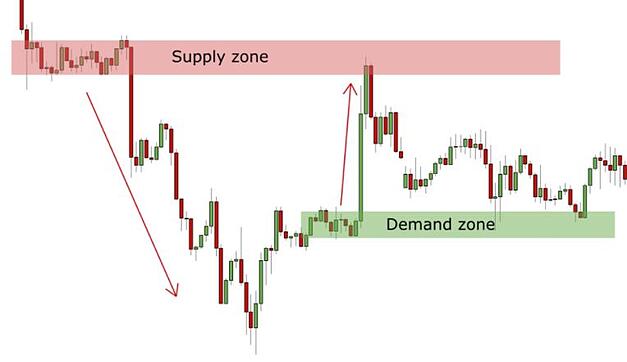
Supply and demand zones are the periods of sideways price action that come before explosive price moves. A supply zone forms before a downtrend, a demand zone forms before an uptrend
$SPX $SPY $ES_F $TSLA $LCID $GME $AMC #OptionsTrading
Supply and demand zones are the periods of sideways price action that come before explosive price moves. A supply zone forms before a downtrend, a demand zone forms before an uptrend
$SPX $SPY $ES_F $TSLA $LCID $GME $AMC #OptionsTrading
Let’s think about the three simplest concepts in trading financial markets
1. When demand is greater than supply, the price goes up
2. When demand is equal to supply, the price goes sideways
3. When supply is greater than demand, the price goes up down
1. When demand is greater than supply, the price goes up
2. When demand is equal to supply, the price goes sideways
3. When supply is greater than demand, the price goes up down
Types of supply and demand patterns:
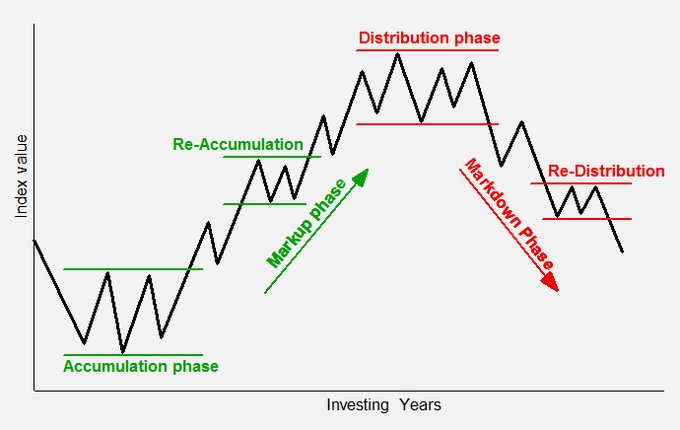
There can be several periods of accumulation during an uptrend and several periods of distribution during downtrends. This means that there are supply and demand reversal patterns and supply and demand continuation patterns.
There can be several periods of accumulation during an uptrend and several periods of distribution during downtrends. This means that there are supply and demand reversal patterns and supply and demand continuation patterns.
S&D Reversal Patterns:
The Drop-Base-Rally is a bullish reversal pattern
The Rally-Base-Drop is a bearish reversal pattern
The Drop-Base-Rally is a bullish reversal pattern
The Rally-Base-Drop is a bearish reversal pattern
S&D Continuation patterns:
The Rally-Base-Rally is a bullish continuation pattern
The Drop-Base-Rally is a bearish continuation pattern
The Rally-Base-Rally is a bullish continuation pattern
The Drop-Base-Rally is a bearish continuation pattern

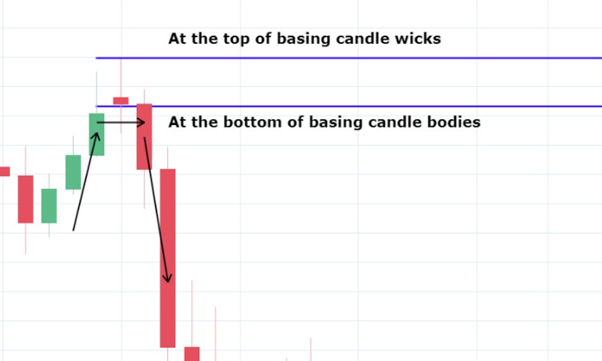
How do you mark a supply and demand zone?
STEP 1: Look for big green or big red candles
STEP 2: Find the origin of the big candles
STEP 3: Mark the zone around this ‘origin’
STEP 1: Look for big green or big red candles
STEP 2: Find the origin of the big candles
STEP 3: Mark the zone around this ‘origin’
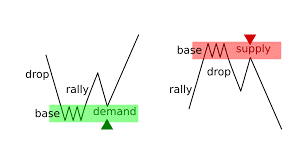
There are two types of candle zones to look for on the chart, either one will proceed a big price move.
1. From a base
2. From a single candle
1. From a base
2. From a single candle
Supply/Demand Base:
In the context of supply and demand, a base means a small series of candles (typically less than 10) in a tight consolidation.
In the context of supply and demand, a base means a small series of candles (typically less than 10) in a tight consolidation.
Single Candlestick:
This is simply when one candle is enough to draw the zone. The two candlesticks together often form a classic Japanese candlestick pattern like a hammer or shooting star or bullish and bearish engulfing candlestick patterns.
This is simply when one candle is enough to draw the zone. The two candlesticks together often form a classic Japanese candlestick pattern like a hammer or shooting star or bullish and bearish engulfing candlestick patterns.
How do you identify a strong supply and demand zone?
Like in any form of technical analysis or trading strategy, there are strong signals and weak signals. To get the best trading results, we need to ignore the weak signals and take the strong ones.
Like in any form of technical analysis or trading strategy, there are strong signals and weak signals. To get the best trading results, we need to ignore the weak signals and take the strong ones.
Narrow price range:
If the trading range that exceeds the breakout is too wide or has too many long-wick candles, it shows uncertainty and is less likely to represent accumulation from a whale.
If the trading range that exceeds the breakout is too wide or has too many long-wick candles, it shows uncertainty and is less likely to represent accumulation from a whale.
Less than 10 candles:
The demand or supply zone should ideally be between 1 and 10 candles. Accumulation and distribution can take a while but too long and the zone may get exhausted before the re-test later.
The demand or supply zone should ideally be between 1 and 10 candles. Accumulation and distribution can take a while but too long and the zone may get exhausted before the re-test later.
Strong price move:
What we want to see in the breakout candle is an ‘Extended range candle’ or ERC. This shows a strong price move that has significance.
What we want to see in the breakout candle is an ‘Extended range candle’ or ERC. This shows a strong price move that has significance.
Fresh / untested:
The best zones are when the price has not revisited it since the breakout. Just like support and resistance, the more times supply zones and demand zones are test, the more likely they are to fail.
The best zones are when the price has not revisited it since the breakout. Just like support and resistance, the more times supply zones and demand zones are test, the more likely they are to fail.
Fakeout or ‘spring’:
This is when the price temporarily breaks out in the opposite direction but then quickly reverses. This is a sign of big players ‘stop hunting’ to find extra liquidity for their accumulation or distribution.
This is when the price temporarily breaks out in the opposite direction but then quickly reverses. This is a sign of big players ‘stop hunting’ to find extra liquidity for their accumulation or distribution.
• • •
Missing some Tweet in this thread? You can try to
force a refresh