Let’s keep using #StableDiffusion to design or create #game assets, quickly and consistently.
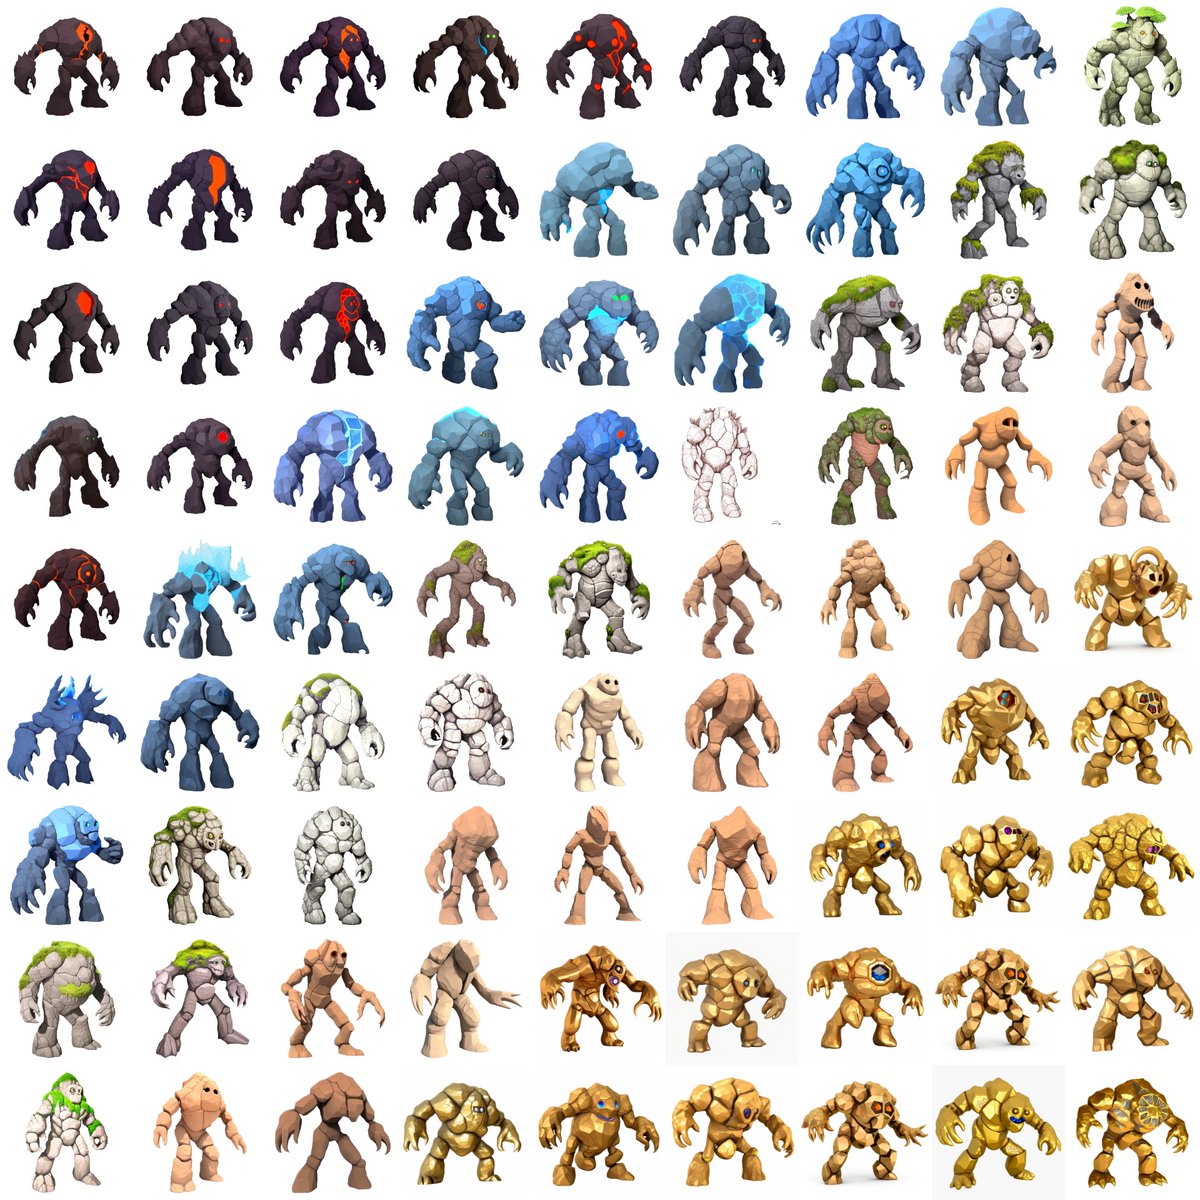
In 15 min, generated an army of golems with similar shapes and sizes, but various “materials” (lava, rock, water, ice, forest, sand, gold…).
No in-painting is needed. Thread 🧵
In 15 min, generated an army of golems with similar shapes and sizes, but various “materials” (lava, rock, water, ice, forest, sand, gold…).
No in-painting is needed. Thread 🧵
Step 1 (as in my previous examples with chests -
As soon as the model was trained, the first step was randomly generating a large set of images w. a simple prompt ("golem, detailed, realistic, 3D rendering")
https://twitter.com/emmanuel_2m/status/1588249020182368258), I made a Dreambooth finetune w. just 11 pics.
As soon as the model was trained, the first step was randomly generating a large set of images w. a simple prompt ("golem, detailed, realistic, 3D rendering")


Each golem can be extracted by removing the images' backgrounds (reco: @photoroom_app).
Some of the designs are amazing. However, the golems all look very similar to each other. Let's separate them into categories.
Some of the designs are amazing. However, the golems all look very similar to each other. Let's separate them into categories.

The following step is to prompt some more precise description (e.g. "golem with stone, lava, steel, fire")
Here's a first set of 16 golems that look consistent.
Here's a first set of 16 golems that look consistent.


Because that initial set of lava golems was a bit simplistic, I used #img2img and an improved prompt to slightly increase the level of details (e.g. "3D rendering, trending on Artstation, etc.)
Here's the result:
Here's the result:


And now, we can keep the same prompt and introduce many other variations while keeping the overall shape, posture, and level of detail.
Here are the ice golems (like the ones in Clash of Clans)
Here are the ice golems (like the ones in Clash of Clans)


The forest golems! My favorites 🌲🌳


The sand golems 🏜️


And... the golden golem (directly inspired by the golden golem in Minecraft, via #img2img)


Now it's also possible to use the same finetune, and generate pictures that could be used elsewhere than in the game (ads, splash screens, etc).
Just add "Greg Rutkowski" in the prompt and start seing some cinematic composition, dramatic lighting, etc.
Just add "Greg Rutkowski" in the prompt and start seing some cinematic composition, dramatic lighting, etc.


Some other tests I made...


As always, feel free to add any questions, feeback, remarks (and don't forget to like/follow/RT if you find this content interesting. I really appreciate it!)
Tomorrow, I'll keep sharing other explorations with #StableDiffusion 🚀🚀
Tomorrow, I'll keep sharing other explorations with #StableDiffusion 🚀🚀
(11/06 update - here's another run to create more characters, this time with "Space Marines" heavy infantry)
Link here >
Link here >
https://twitter.com/emmanuel_2m/status/1589161367105601537
Just posted another exploration around dwarves, and they turned out great 👀
https://twitter.com/emmanuel_2m/status/1589418134880292865
• • •
Missing some Tweet in this thread? You can try to
force a refresh