Mushtaq Bilal, PhD Profile picture
Dec 10, 2022 23 tweets 7 min read Read on X
You can connect Zotero with your Google Drive if you don't want to pay $ for extra storage.

But most folks don't know how to go about it.

Here's how to connect Zotero with Google Drive 👇

A step-by-step tutorial with screenshots 🧵
Start by downloading and installing Google Drive for desktop. A screenshot of the landing page of Google Drive. A yellow a
While installing, Google Drive may or may not ask you to sign in with browser.

If it does, go ahead and sign in with browser. Google Drive prompting to sign in with browser.
Once installed, Google Drive (G:) will show up in your computer along with other drives. A screenshot of the three drives on Mushtaq's computer. A ye
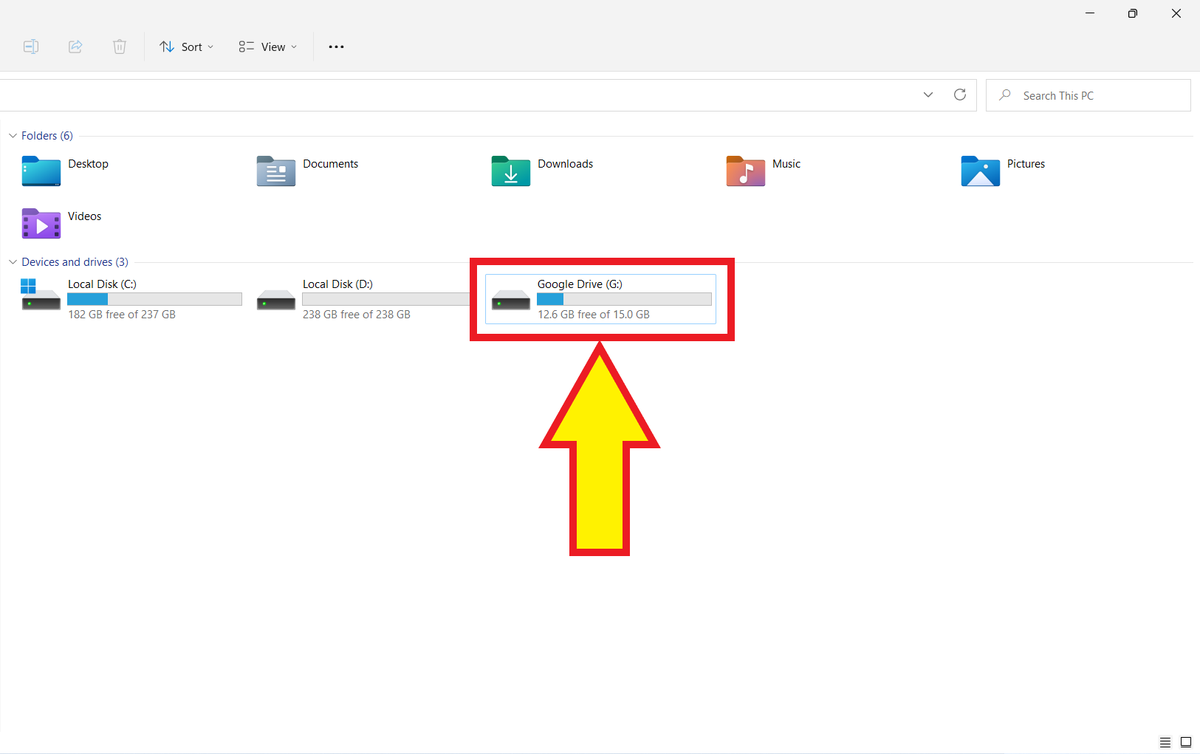
Click on Google Drive and then open "My Drive."

Create a folder titled "Zotero PDFs." A folder titled "Zotero PDFs" in Mushtaq's Google
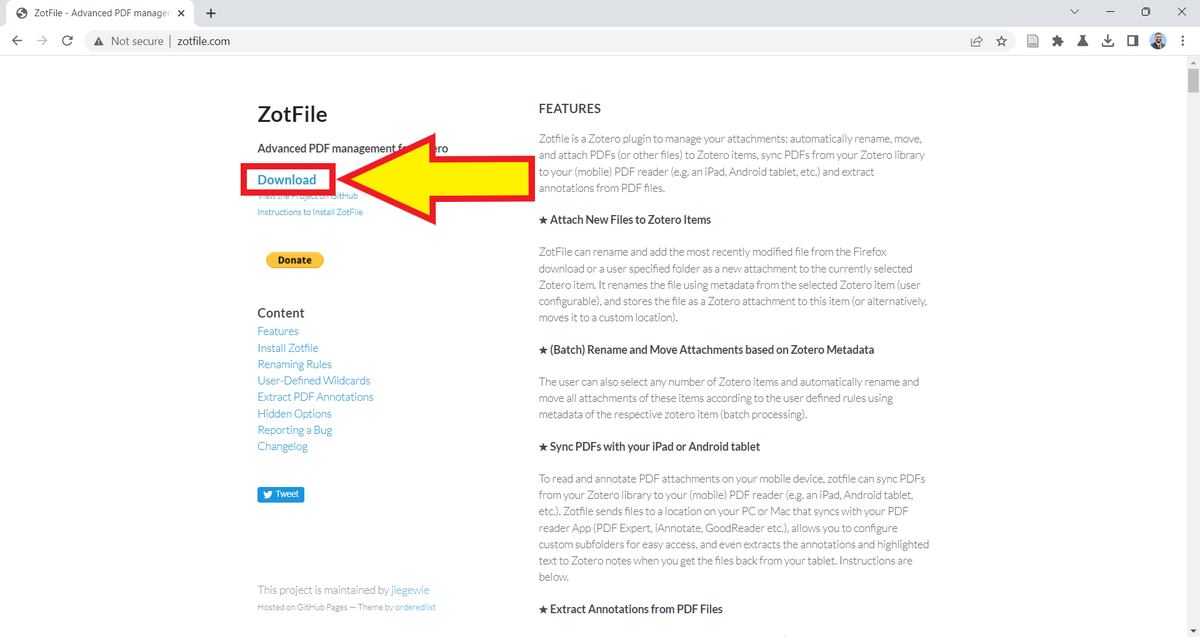
Next, go to zotfile.com and download the ZotFile add-on.

It will download a .xpi (pronounced zippy) file to your computer. A screenshot of the landing page of Zotfile. A yellow arrow
Open your Zotero desktop app and click on "Tools" and then "Add-ons." A screenshot of Mushtaq's Zotero library. A yellow arrow poi
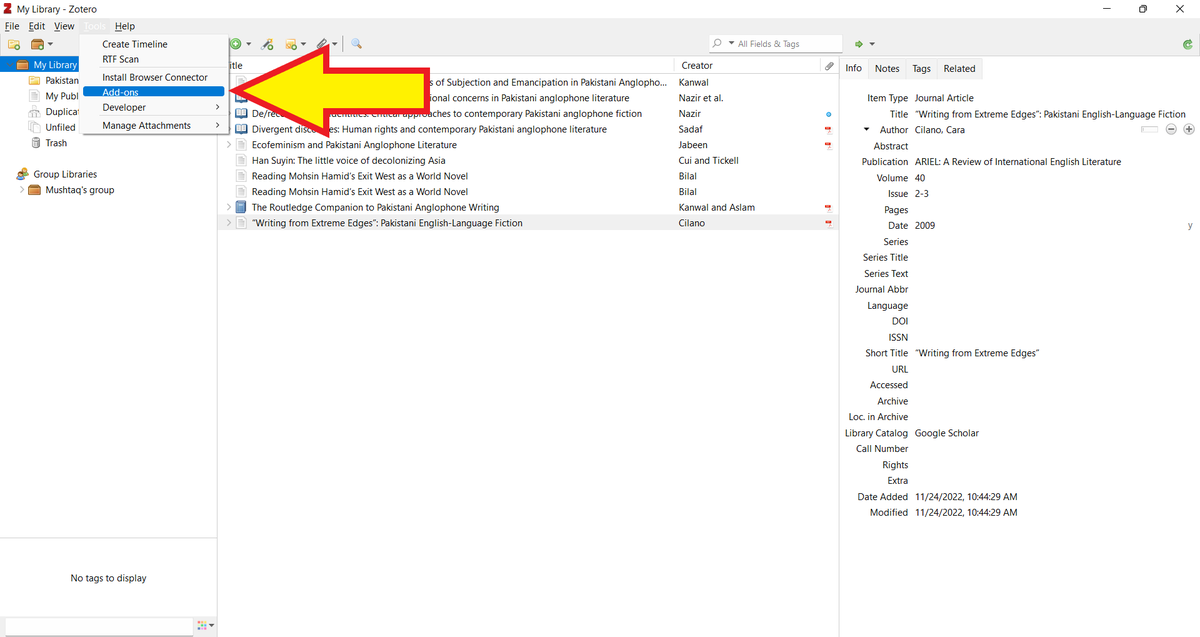
You will be taken to Zotero's "Add-on Manager."

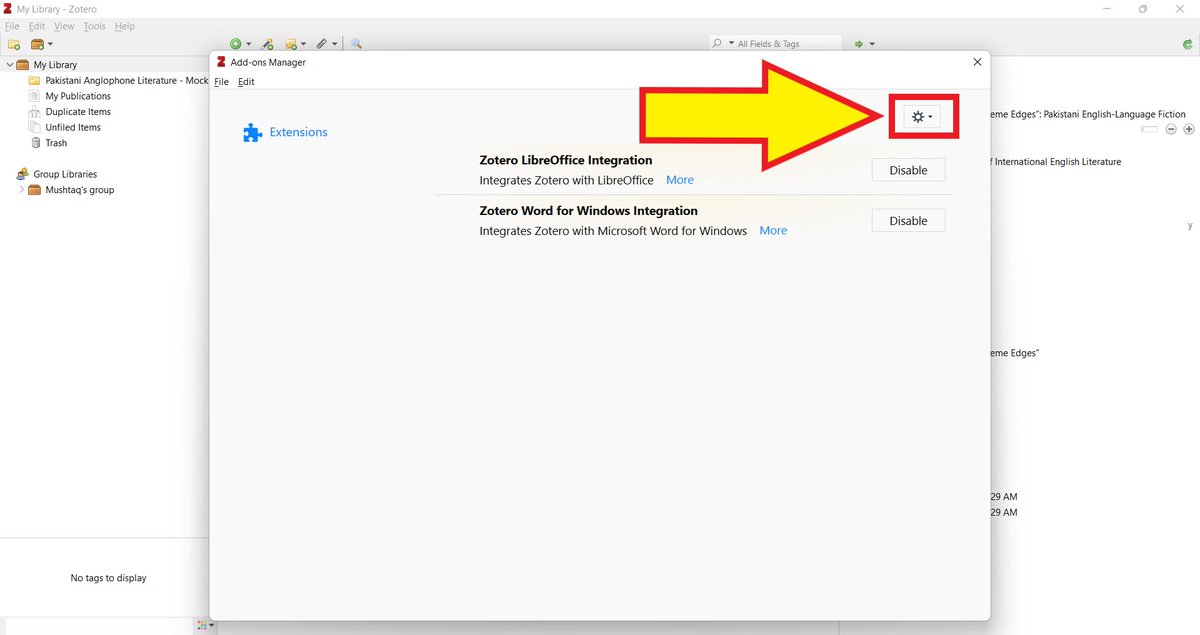
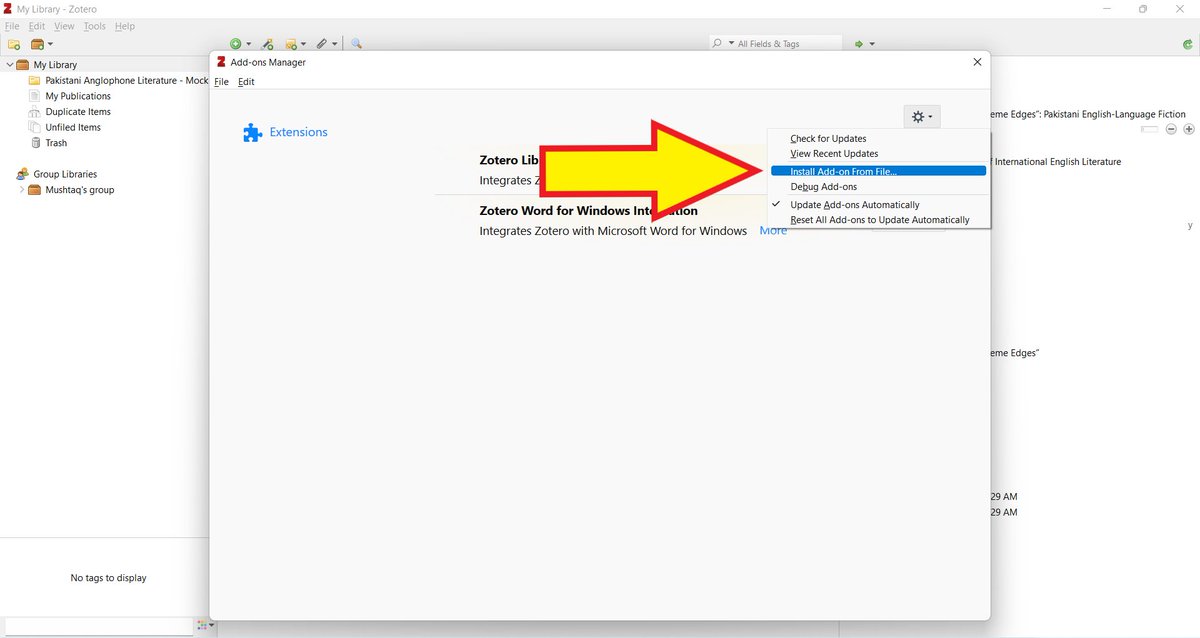
Click on the "Settings" button in the top-right corner. A screenshot of Zotero's "Add-on Manager." A yello
Select "Install Add-on From File." A screenshot of Zotero's "Add-on Manager." A yello
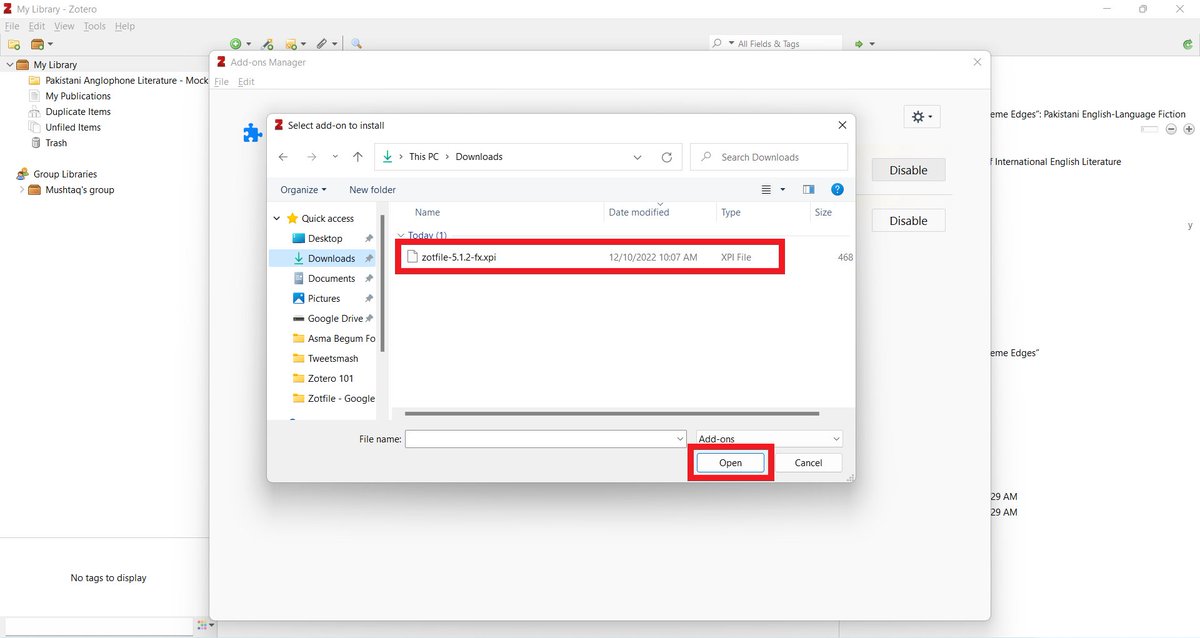
Go to your Downloads folder and select the ZotFile (.xpi) file.

Click on the "Open" button. A screenshot of Zotero's "Select add-on to install"
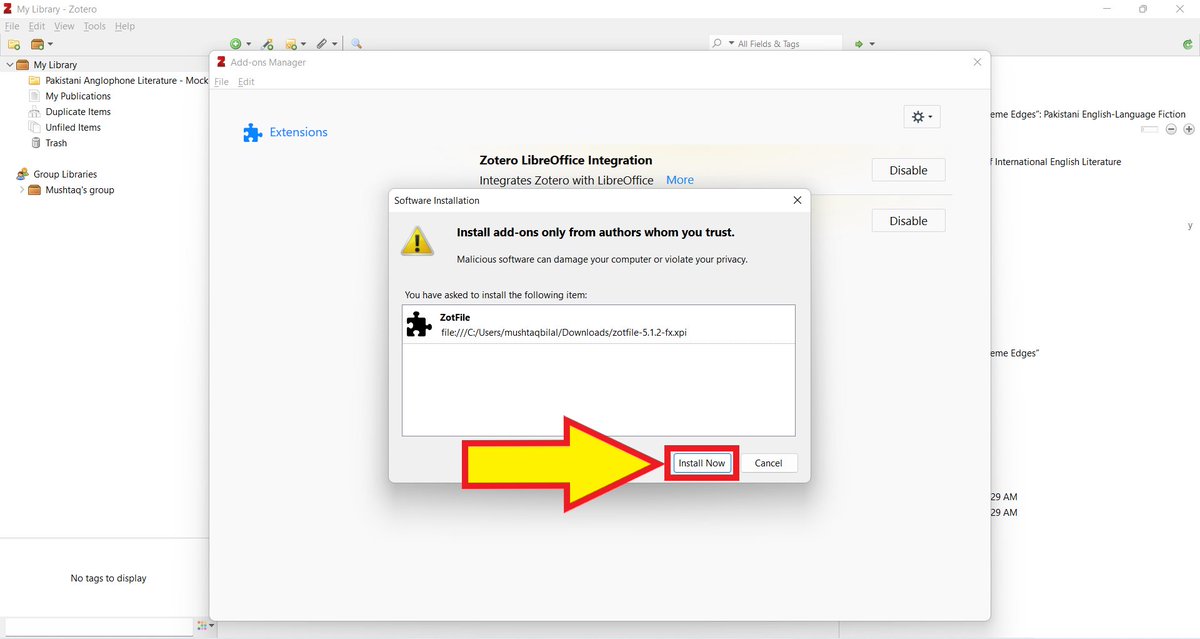
You will be alerted to be cautious of malicious software.

Since ZotFile is not a malicious software, click on "Install Now." Zotero's malware alert. A yellow arrow points to the "I
Zotero will inform you that it needs to restart for ZotFile to work.

Go ahead and click on "Restart now." A screenshot of Zotero's "Add-on Manager." A yello
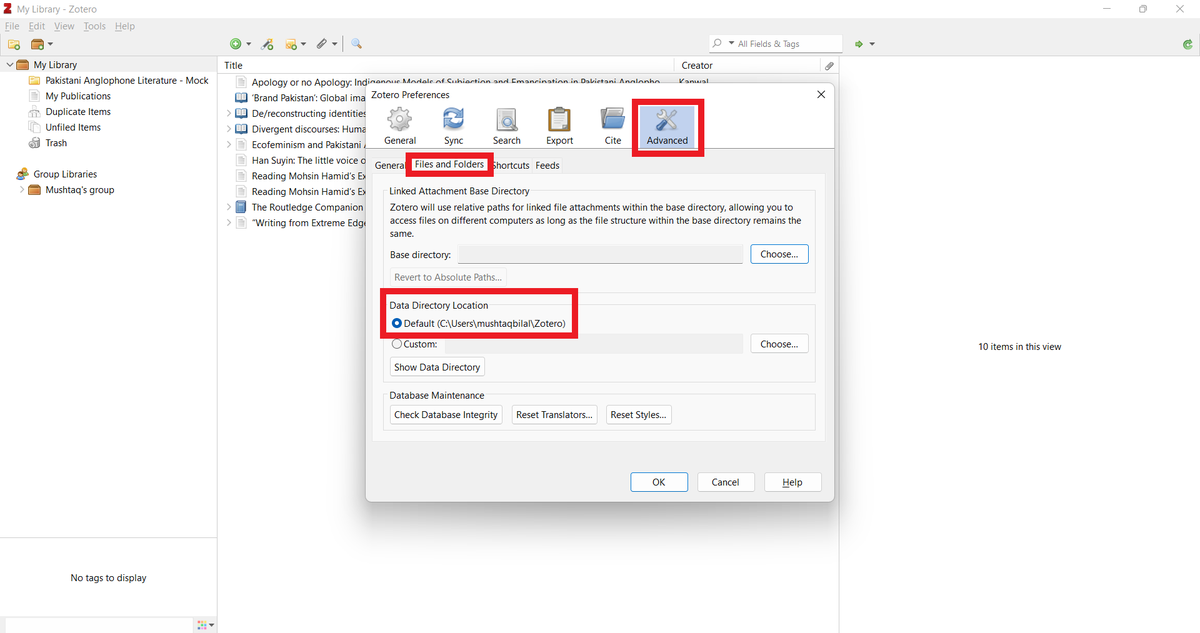
Now that you have ZotFile installed, you need to find out where Zotero stores your PDFs.

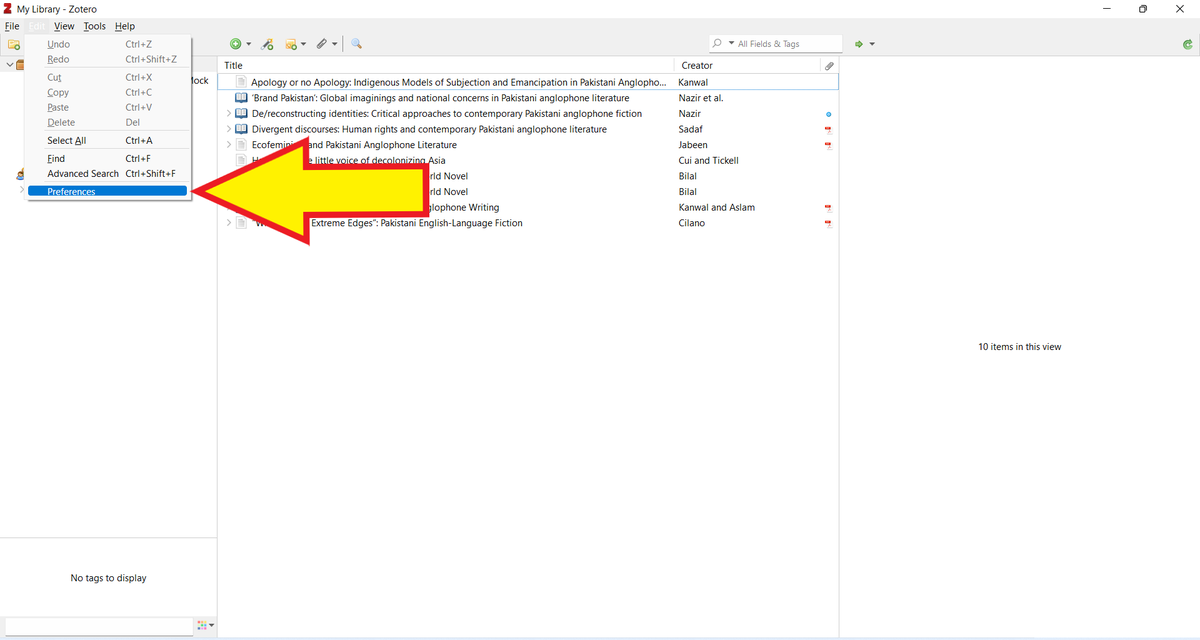
To do so, click on "Edit" and then "Preferences." A screenshot of Mushtaq's Zotero library. A yellow arrow poi
In "Zotero Preferences," go to "Advanced" and then "Files and Folders."

Zotero will show you the default location of the data directory.

In my case, it's C:\Users\mushtaqbilal\Zotero

Note it down. A screenshot of the "Advanced" menu in "Zoter
Next, go to "Tools" and then "ZotFile Preferences." A screenshot of Mushtaq's Zotero library. A yellow arrow poi
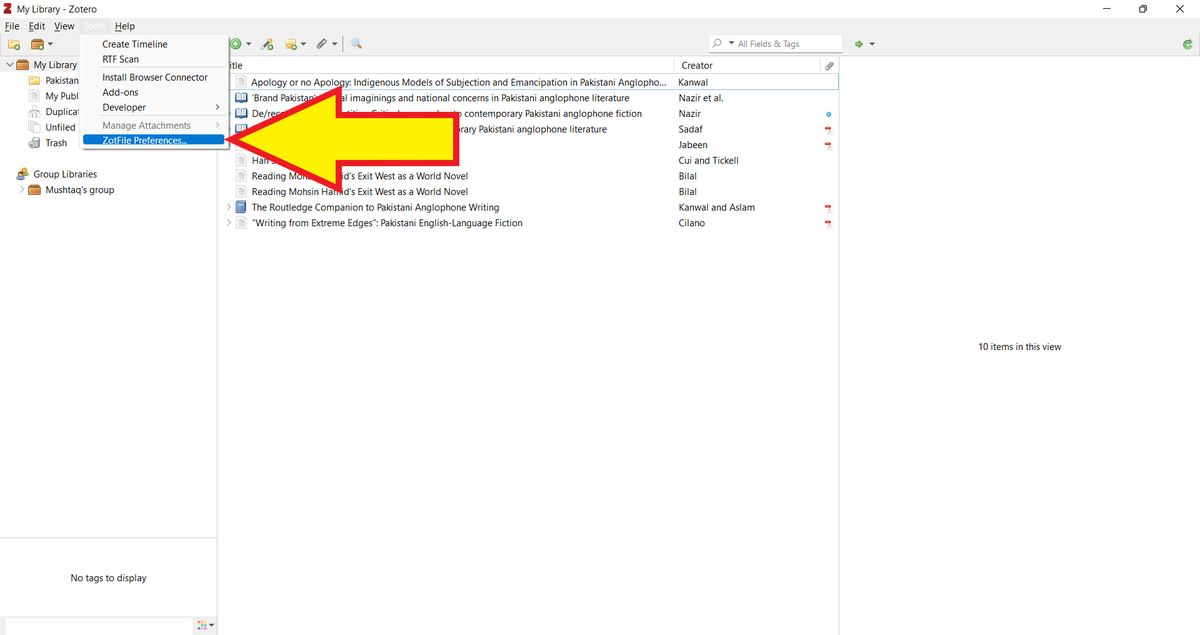
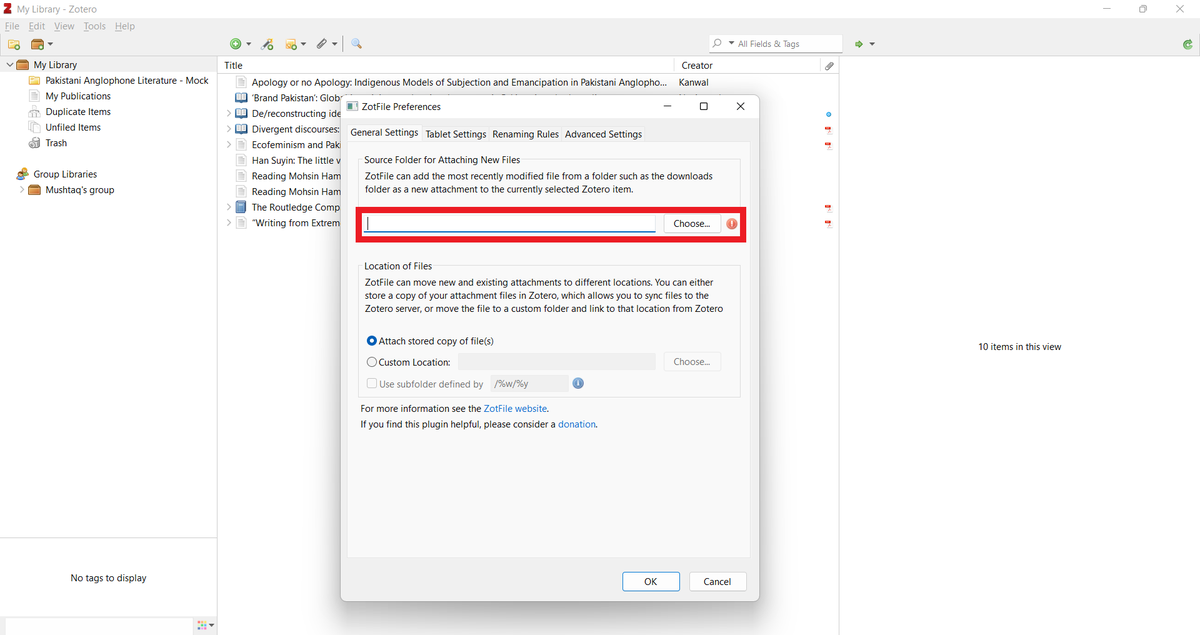
In "General Settings" of "ZotFile Preferences," you will see "Source Folder for Attaching New Files."

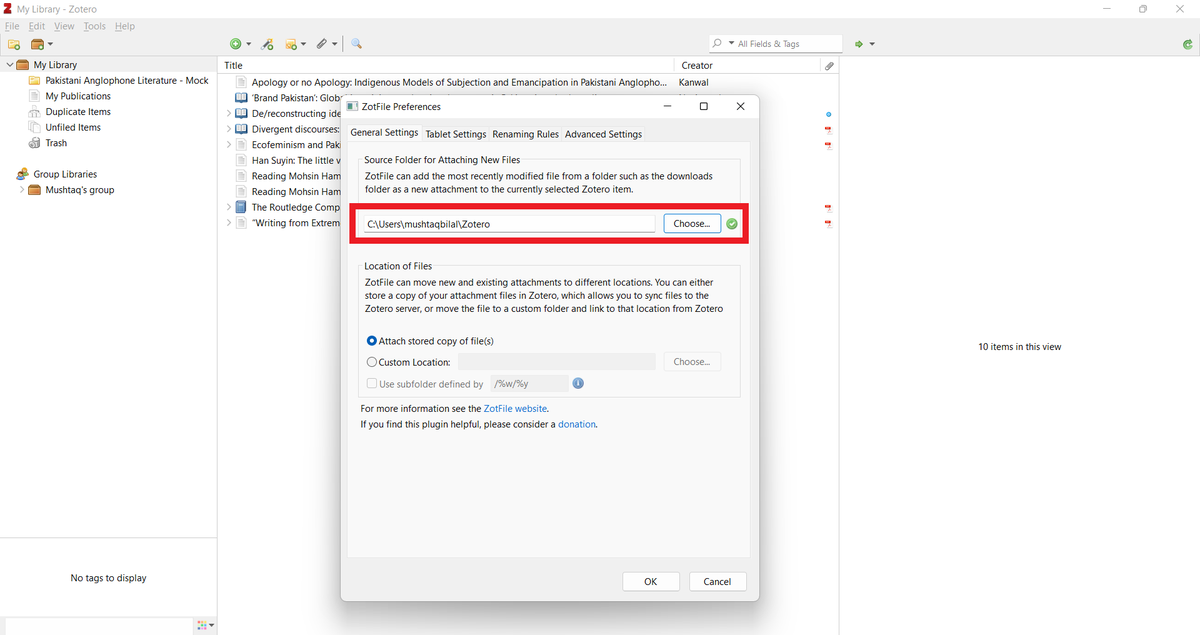
In the search bar, type in the default location of the data directory. A screenshot of "ZotFile Preferences." A red recta
In my case, it's C:\Users\mushtaqbilal\Zotero

You can also use the "Choose" button to reach the default location. A screenshot of "ZotFile Preferences." In the sear
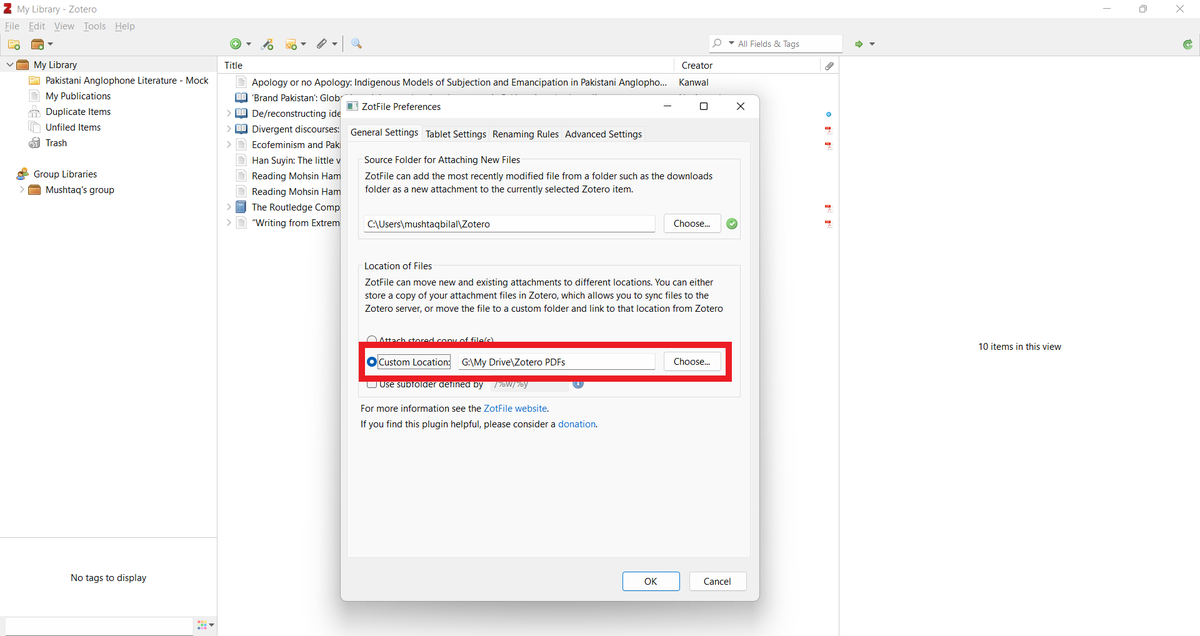
Next, select "Custom Location." Using the "Choose" button, enter the location of the Zotero PDFs folder you created a little while ago in G: drive.

In my case, it's G:\My Drive\Zotero PDFs

Click "OK" once you are done. A screenshot of "ZotFile Preferences." A red recta
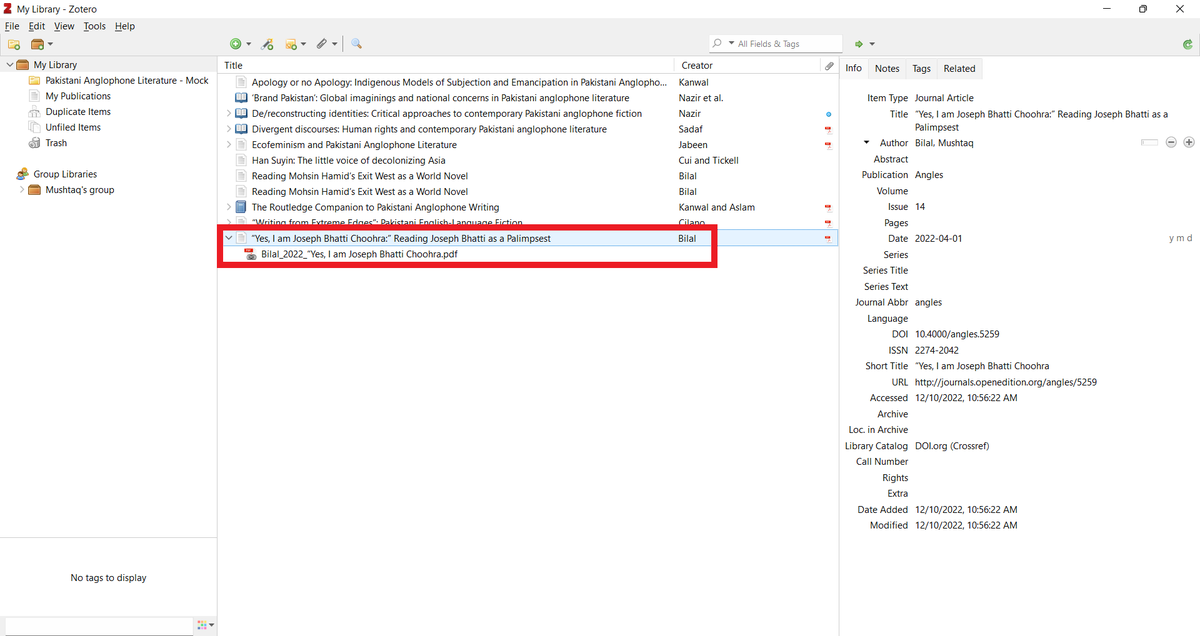
Next, add a PDF to your Zotero library.

Here I am adding a PDF using its DOI. A screenshot of Mushtaq's Zotero library. He is adding a PDF
Your (unpaywalled) PDF will be downloaded and attached to an item.

ZotFile will rename your PDF. A PDF added to Mushtaq's Zotero library.
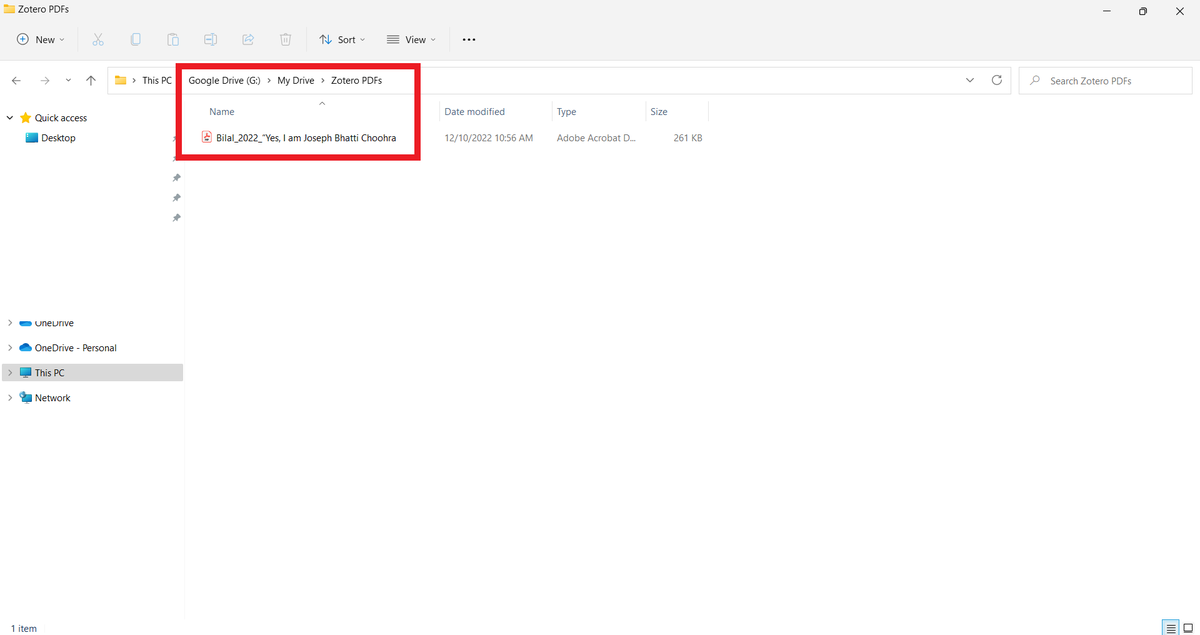
Now go to the "Zotero PDFs" folder in your G: drive and you will see the same PDF there with the same name.

And that's how you connect Zotero with your Google Drive. A PDF shown in Mushtaq's G: drive.
I'd like to thank David Todd (@dtod) who took the time to teach me how to connect Zotero with Google Drive.
Found this thread helpful?

1. Scroll to the top and retweet it to share it with your friends and colleagues.

2. Follow me @MushtaqBilalPhD for regular tips on Zotero and academic writing.

• • •

Missing some Tweet in this thread? You can try to force a refresh
 

Keep Current with Mushtaq Bilal, PhD

Mushtaq Bilal, PhD Profile picture

Stay in touch and get notified when new unrolls are available from this author!

Read all threads

This Thread may be Removed Anytime!

PDF

Twitter may remove this content at anytime! Save it as PDF for later use!

Try unrolling a thread yourself!

how to unroll video
  1. Follow @ThreadReaderApp to mention us!

  2. From a Twitter thread mention us with a keyword "unroll"
@threadreaderapp unroll

Practice here first or read more on our help page!

More from @MushtaqBilalPhD

Apr 8
Karpathy's idea of LLM Knowledge Bases went viral: 18M+ views.

Now everyone wants to build one but many are facing problems, especially non-technical folks.

Here is a step-by-step tutorial on setting up an LLM Knowledge Base for non-technical folks: A tweet by Andrej Karpathy discusses using LLMs for personal knowledge bases, achieving 18.3M views and highlighting user challenges.
1. Go to obsidian[.]md

Download and install the app on your computer.
2. Once installed, Obsidian will ask you to create a "Vault" (folder on your computer).

Create a vault called "MyWiki" and save it in your Documents.

Once your vault is created, Obsidian will open it for you.

Don't be intimidated by what you see. It's very easy to use.
Read 16 tweets
Mar 19
Scopus has 100M+ research papers.

LeapSpace AI lets you generate research reports and literature overviews based on full-text papers in Scopus.

It generated for me a 27-page report with 143 references.

Also helps you find research grants.

Here's how to use it:
1. Go to researcher[.]elsevier[.]com and sign up for a free trial.

Log in to LeapSpace and enable deep research.

Ask a question and it will generate a complete report based on full texts of research papers.

Click on a reference and it will give you the relevant paper.
2. You can also download the research report as a PDF.

You can see here that it's a 27-page long report with 143 references to papers in Scopus.
Read 6 tweets
Mar 5
A lot of academics still think AI apps generate fake references to papers that don't exist.

They are living in 2023.

You can easily integrate a database of 280M research papers with Claude and ChatGPT to get answers with references to published papers.

Here's how to do it:
1. Go to scite[.]ai/mcp and select Claude ai

Copy the URL given in the second line. Then click on the blue "Add Scite" button.

This will open Claude Connectors. Type in the name Scite and paste the URL in the "Remote MCP" field.

Then click on "Add."
2. This will add a Scite Connector to your Claude.

Scroll down a little and you will see a Scite Connector. Click on "Connect" and log in to your Scite account.

Give Claude permission to access Scite. And that's it.

You will need a paid subscription for Scite to do this.
Read 7 tweets
Mar 4
Claude Code will fundamentally change the nature of academic research.

But most academics don't know how to use it.

Here's how to get started on Claude Code (even if you've never coded).

Claude Code for Academics 101:
Before getting started, we need to understand what Claude Code (CC) is.

It's not a simple chatbot.

Think of it as a general-purpose work enviroment that lets you create customized features for your own specific purposes.

It'll become clear by the end of this thread.
1. To get started, go to claude[.]com/download and download the Claude desktop app.

You will need a paid plan.

Select the $20/m one. That'll be enough to get you started.
Read 17 tweets
Mar 3
Academics are abandoning ChatGPT for Claude, and for good reason.

Claude is way better than ChatGPT for intellectual work.

But moving to Claude risks losing your work history and memory in ChatGPT.

Here's how to move all your work history and memory from ChatGPT to Claude:
1. Open Claude and click on your profile in the bottom-left corner.

Then click on "Settings" and select "Capabilities."

In Capabilities, look for the "Start Import" button.

Click it and then copy the prompt given on the top.
2. Open ChatGPT and put it on "Thinking."

Then run the prompt you just copied from Claude.

ChatGPT will give you an answer. Copy that.
Read 6 tweets
Mar 2
Claude Cowork is set to revolutionize intellectual and academic work.

But most academics don't know how to use it.

Here's how to set up Claude Cowork as your research assistant:

(This workflow will take you only 15 min.) Guide on setting up Claude Cowork for academic research.
1. To use Claude Cowork, you'll need to download Claude desktop app.

Go to claude[.]com/download

and download the Claude desktop app.

You'll also need a paid plan for $20/m or $100/m.

Start with $20/m plan.
2. Once you've installed it, open Claude desktop app.

On the top, you will see three options: Chat, Cowork, Code.

Click on "Cowork." Claude user interface displays options for chat, coding, and co-working, with prompts for user interaction prominently featured.
Read 13 tweets

Did Thread Reader help you today?

Support us! We are indie developers!


This site is made by just two indie developers on a laptop doing marketing, support and development! Read more about the story.

Become a Premium Member ($3/month or $30/year) and get exclusive features!

Become Premium

Don't want to be a Premium member but still want to support us?

Make a small donation by buying us coffee ($5) or help with server cost ($10)

Donate via Paypal

Or Donate anonymously using crypto!

Ethereum

0xfe58350B80634f60Fa6Dc149a72b4DFbc17D341E copy

Bitcoin

3ATGMxNzCUFzxpMCHL5sWSt4DVtS8UqXpi copy

Thank you for your support!

Follow Us!

:(