
Weekend 😊 😊
… now with some extra urgency since a little lady has a fever
… now with some extra urgency since a little lady has a fever

I might as well tweet the process.
Just took a break to feed everyone.
So far I have gathered all my materials, tested all of my fans to make sure they work before I install them in this contraption!
Just took a break to feed everyone.
So far I have gathered all my materials, tested all of my fans to make sure they work before I install them in this contraption!
Power (and lights because I’m using RGB fans in this one) all work 😊
My 20x30 filters still haven’t arrived. I have 20x20 filters left so I’m making one that size.
I have 20x30 foam board, which was the perfect size to make the non-filter sides of the device.
My 20x30 filters still haven’t arrived. I have 20x20 filters left so I’m making one that size.
I have 20x30 foam board, which was the perfect size to make the non-filter sides of the device.
I’m using 120mm fans for this one because that’s what I have. 140mm likely has advantages, but I have noted it’s harder to get 140mm fan guards.
To decide the width of the non-filter sides (the solid bottom and one solid side, as well as the 2 sides that will have holes cut in them to place the fans), I put the fan down and the filter next to it, with a 1cm gap in between, and repeated for the other side of the fan.
The gap gives space for cables and also room for error 😅
Luckily for me, using the 20x30 foam board to cut 4 sides worked out perfectly with just a small strip to spare. This is about $6 worth of foam board being used to make this device.
Luckily for me, using the 20x30 foam board to cut 4 sides worked out perfectly with just a small strip to spare. This is about $6 worth of foam board being used to make this device.
It’s a tight squeeze, but I can fit 4 120mm fans. Actually typing this out I realize I’ll have to do the 2 opposite sides with fans rather than the top and 1 side, because there might not be room in the corner of the connecting sides if they both have fans in them.
So this is where I am now - to start cutting the holes for the fans, I draw a centre line down the board so it’s easy for me to line up the compass after.

Green is the favourite colour of the kid getting this filter 🥰
Next I have to figure out the placement of 4 fans on this piece. They’ll be squished tightly together. I’ll set my compass cutter to the diameter of the fan and start cutting out round holes.
Cat sitting on my work intermission 😂 the fans are 12 cm, so every 6cm is either the end of a fan or the centre of a fan. I put lines every 6cm with a longer one for each fan centre. I cut a circle using the compass at each fan centre.


4 circles cut. 4 to go on a second board. At this point if you wanted a different look for your device, you could put a sticker down over the foam board, like a drawer liner or other design. Or you could put paper over it and paint or colour it, put kids’ stickers on, etc.

I’m not the most aggressive with cutting the foam so I usually cut one side, flip it over, measure again and cut on the back side as well. Then it pops out easily. I can’t imagine doing this without the compass with the blade on it.
Now you need to know what way your fans blow and how you want them oriented for your device. The main people whose designs I’ve followed have theirs set to have the PC fans blow clean air OUT into the room. Room air getting sucked in through filters.
You can also choose to have the PC fans suck in the room air, and have the clean air diffuse out into the room from the filters.
I am not knowledgeable on the pros and cons or trade offs of those choices. I’m going with the classic - fan blows the clean air out.
You’ll want to check your fan brand to see what side blows air out. So far I find the pretty logo side sucks in but may not be universal.
You’ll want to check your fan brand to see what side blows air out. So far I find the pretty logo side sucks in but may not be universal.
So this side is nicer looking but alas it will face the interior of the device. Oh well. I’m lining them up so I can poke pilot holes through where the bolts need to go.

Screws, nuts, and the washers are off screen 😆

Time to attach some fans!!
I put my fan guard on the outside and the fan on the inside.
There are probably lots of ways to do this and many better than what I do.
If I was using the same fans, I could use this as a template to cut the 4 holes on other board. But…
I put my fan guard on the outside and the fan on the inside.
There are probably lots of ways to do this and many better than what I do.
If I was using the same fans, I could use this as a template to cut the 4 holes on other board. But…

The Corsair RGB fans I’ve been using connect to 1 hub which can take 6 fans.
This design is for 8 fans.
I could use a second hub, but I’d need a second SATA to USB ($20?) and then I’d have to power it. If I keep it to just 6 RGB fans…
This design is for 8 fans.
I could use a second hub, but I’d need a second SATA to USB ($20?) and then I’d have to power it. If I keep it to just 6 RGB fans…
I can power it all with 1 single power brick (the USB plug that can power 2 separate USB devices). Just a bit simpler and cheaper to keep it to 6 RGB fans, and it will still look nice.
I’m sure there are workarounds, but in terms of cost / time / and what I have available to me right now, I’m personally happy with this trade off. I’ll have the side with only 2 RGB fans face the far wall 😂
“You’re doing a great job mom! You just need to put a filter there!” 😂
Getting there… this part is tedious. You can see on the side of the Corsair fan, there’s an arrow showing air flow direction.
Getting there… this part is tedious. You can see on the side of the Corsair fan, there’s an arrow showing air flow direction.


If I was using something sturdier than foam board I’d get some little helpers but as it is, it would be pretty easy to damage the foam board and I’d be back to cutting circles on a new piece
One fan side done!
If you use non-RGB fans you’ll have fewer cables. 😊
If you use non-RGB fans you’ll have fewer cables. 😊

This is the ultimate hot dog / bun situation btw. I’ve been acquiring parts since mid-Dec. Everything comes in different quantities. I have a running list so I know what my “limiting reagent” for making air cleaners is. Right now it’s adaptors to power supplies. And washers.
Hot dog / bun problems
Ran out of 1 style of fan guard 😬 I have more but they’re quite different 😆
Ran out of 1 style of fan guard 😬 I have more but they’re quite different 😆


Short 4 screws
🏃♀️ to the basement where I am pretty sure I have more…
Getting hungry so I know I will be error-prone and trying to rush to get this finished so I can make supper 😊
🏃♀️ to the basement where I am pretty sure I have more…
Getting hungry so I know I will be error-prone and trying to rush to get this finished so I can make supper 😊
The tedious stuff is done… I should take a break now but with a febrile kid I want to get this finished and running ASAP. Shouldn’t be much longer.
Now my favourite part, plugging stuff in and taping things 😊
Now my favourite part, plugging stuff in and taping things 😊


Solid bottom panel is taped in. Two 20x20x1 MERV-13 filters, purchased in a 12-pack from United Filter Canada, oriented correctly and taped to solid bottom panel.
Mismatched “back” fan panel taped on too.
Mismatched “back” fan panel taped on too.


Because I bought in bulk (12 pack) from United Filter, these filters cost me less than $15 each including taxes and shipping. I’ve paid $30 for a single 3M filtrete of the same size before. Much cheaper to buy in bulk from United Filter.
Now it’s time to start plugging stuff in and taping cables aside so they won’t end up in the fans. Because there are 2 RGB fans on this panel, there are 6 cables. One power cable for each fan, and the RGB cable for the 2 with lights. Repeat of the pic above.

I’m all done now so coming back to fill in the steps. This is an extra part you only need to deal w if using RGB fans. The Corsair ones come with a 6-fan hub. It’s possible to get larger hubs. I plugged the 2 fans from the “back” wall into spots 5-6 b/c colours change in series

The black cables at the bottom power the hub but you only need to use one, so I coiled up the extra and taped it. The other one is SATA connected to SATA to USB adapter. Repeat of previous image.

Here’s a pic just showing how the hub is powered. Again if you don’t use the RGB fans you won’t have to do this. Hub to SATA to USB.

Now to power the fans and not just the lights. There are 4 fans on the “back” panel, but the 2 non-RGB ones are the daisy chain kind. So I plugged the RGB fans into the regular fans and only had to plug 2 fans into the splitter.

Poking a little hole in the “back” panel so the power cables can come out here

Looking messier now - added the other panel with fans. 4 fans, but 8 cables because they’re all RGB so they each have 2 cables. The ones for the hub have the yellow sticker on them.

Separating cables into power/lights, getting them in order, plugging them in, taping them aside to secure them.


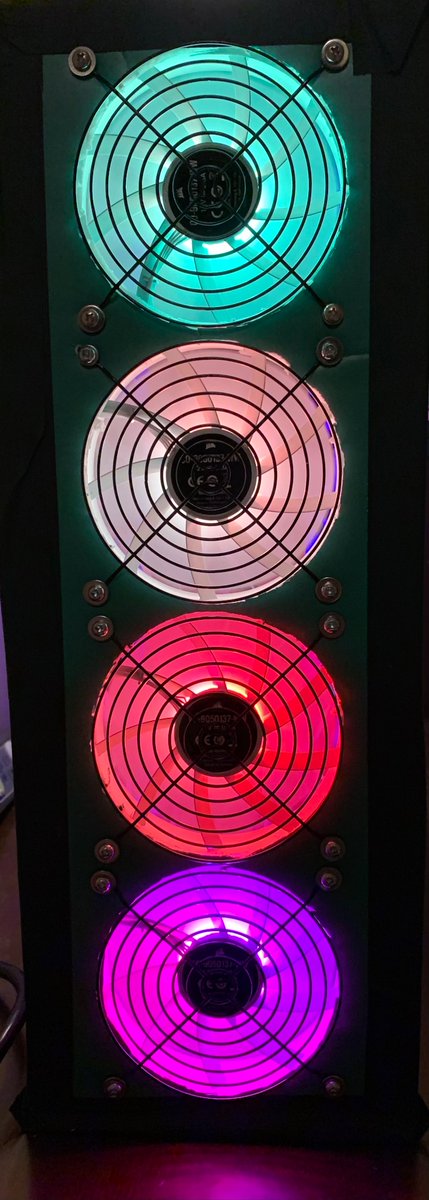
Before taping on the solid top panel - does it work? Tested all the fans yesterday so there shouldn’t be any surprises. They all work.

Ta da. Top foam panel taped on, hole for the power taped up so it’s sealed. The filter is now in the room and running. I need to go to the hardware store for washers before I can build the next one 😂

Design is totally based off of this one by Rob Wissmann. This particular one doesn’t have a CADR as high - my filters are only 20x20; this is only 8 fans and they’re 12cm not 14cm. I don’t have a way to measure the CADR for the one I built.
https://twitter.com/robwiss/status/1586442341354815492?s=20
The only difference in construction as far as I know is the addition of the RGB power, which I learned from @CRBoxKits. I have links to all the resources I used and where I bought the components in my google document.
I forgot to take a pic but I taped a cardboard divider into the centre of the top panel, running from the top to almost the bottom of the device but not sealed - just taped from the top. Wissmann found higher CADR with divider; unsure if mine is as effective.
Here’s a link to my document where I’ve written up the references and materials:
https://twitter.com/nb_covid_info/status/1629587958780100610?s=20
Happy building 💕 if anything is unclear I’ll be building another non-RGB one soon so just ask away; I’ll try to get a pic of whatever it is next time!
Oh, NIOSH app measures dB. About 1m from fan side it was 45 dB but also background fam noise. About 1m from filter was 40 dB.
Oh, NIOSH app measures dB. About 1m from fan side it was 45 dB but also background fam noise. About 1m from filter was 40 dB.
I’ll figure out total cost later tonight. For me the remarkable quiet of the PC fans is pretty addictive. I’m looking forward to replacing my remaining HEPA filters 😂 They’re much louder. I have a $100 CADR: 48 Honeywell at 56 dB on high. So loud compared to this!
Cost:
RGB fans *really* increase the price. This 8 fan build has $230 of fans in it 😬
I got the RGB fans on eBay for $35 each. A non-RGB fan is about $10. This build has 6 RGB fans and 2 plain ones. Adding the RGB fun also added $150 to the price.
RGB fans *really* increase the price. This 8 fan build has $230 of fans in it 😬
I got the RGB fans on eBay for $35 each. A non-RGB fan is about $10. This build has 6 RGB fans and 2 plain ones. Adding the RGB fun also added $150 to the price.
Before Christmas I managed to get 4 140mm RGB Corsairs for under $30 each. Lately I find RGB fans to be around $35 each.
The two plain fans were leftover from other builds, but an Arctic 5 pack works out to close to $10/fan.
The two plain fans were leftover from other builds, but an Arctic 5 pack works out to close to $10/fan.
$14.37 per MERV 13. Bought in 12 pack from united filter. Used 2 for this project.
So we’re up to $258.75.
So we’re up to $258.75.
USB to Sata: $12.79
Anker power supply: $19.99
CRJ 3/4pin to USB: $19.37
Plus tax = $59.97
Running total: $318.72
Anker power supply: $19.99
CRJ 3/4pin to USB: $19.37
Plus tax = $59.97
Running total: $318.72
Splitter: $8
Foam core: $6
Hardware: $4.93 in nuts; $10 in bolts; $4.50 in washes
$11.20 in fan guards
=$51.32 with taxes
Foam core: $6
Hardware: $4.93 in nuts; $10 in bolts; $4.50 in washes
$11.20 in fan guards
=$51.32 with taxes
$370.04 with taxes
Without the RGB fans, you don’t need SATA to USB and daisy chain fans don’t need a splitter
That would be much cheaper: $200.
Without the RGB fans, you don’t need SATA to USB and daisy chain fans don’t need a splitter
That would be much cheaper: $200.
Omg i was falling asleep adding up costs 😂
I’ve been obtaining the parts for both my RGB air cleaners since mid-Dec, because it’s too expensive for me to get all at once. Medium-term planning made it doable. This one replaces a super old and small HEPA.
I’ve been obtaining the parts for both my RGB air cleaners since mid-Dec, because it’s too expensive for me to get all at once. Medium-term planning made it doable. This one replaces a super old and small HEPA.
Now in use in a community volunteer office.
For comparison, a large Honeywell HEPA with a CADR of 338 is $420 from CT, before taxes.
I expect this device has a comparable CADR. It’s quieter and uses less electricity plus has fun lights 😂
For comparison, a large Honeywell HEPA with a CADR of 338 is $420 from CT, before taxes.
I expect this device has a comparable CADR. It’s quieter and uses less electricity plus has fun lights 😂
Regardless, unless I win the lottery that’s the last RGB #corsirosenthalbox I have planned for my house - both kids’ rooms have one now. For the rest of my PC fan CR boxes, if they’re lit at all it will be with much cheaper LED strips!
• • •
Missing some Tweet in this thread? You can try to
force a refresh


