Exploring Camera Angles & Shot Types in Midjourney v5
A tutorial thread on how to control the camera angle, shot type, and position of your subject with Additive Prompting. If you'd like me to cover something specific, lmk in the replies.
🧵 Part 3 of an ongoing series
A tutorial thread on how to control the camera angle, shot type, and position of your subject with Additive Prompting. If you'd like me to cover something specific, lmk in the replies.
🧵 Part 3 of an ongoing series


Here's the curriculum for this Additive Prompting series. So far we've looked at the effects of film stock, cameras, and lighting (links at end of thread).
I'll be posting a new thread every day. To follow the series, follow me @nickfloats
I'll be posting a new thread every day. To follow the series, follow me @nickfloats

First, let's look at camera angles.
The base prompt for these camera angle tests:
/imagine street style [CAMERA ANGLE] photo of a woman, shot on Afga Vista 400, natural lighting --seed 1 --v 5
✏️ After this, I'll move shot types, then I'll combine the two
The base prompt for these camera angle tests:
/imagine street style [CAMERA ANGLE] photo of a woman, shot on Afga Vista 400, natural lighting --seed 1 --v 5
✏️ After this, I'll move shot types, then I'll combine the two

📐 Low-Angle
💬 Street style low-angle photo from below of a woman, shot on Afga Vista 400, natural lighting --seed 1 --v 5
✏️ I've found that it helps to include "from below" in the prompt when looking for low-angle shots.
💬 Street style low-angle photo from below of a woman, shot on Afga Vista 400, natural lighting --seed 1 --v 5
✏️ I've found that it helps to include "from below" in the prompt when looking for low-angle shots.

📐 High-Angle
💬 Street style high-angle photo of a woman, shot on Afga Vista 400, natural lighting --seed 1 --v 5
✏️ Like low-angle shots, including "from above" for high-angle shots can help, especially once you add a shot type to your prompt (examples later in thread)
💬 Street style high-angle photo of a woman, shot on Afga Vista 400, natural lighting --seed 1 --v 5
✏️ Like low-angle shots, including "from above" for high-angle shots can help, especially once you add a shot type to your prompt (examples later in thread)
📐 Extreme Low-Angle
💬 Street style extreme low-angle photo from below of a woman, shot on Afga Vista 400, natural lighting --seed 1 --v 5
✏️ Prefacing your angle with "extreme" can create a more dramatic effect
💬 Street style extreme low-angle photo from below of a woman, shot on Afga Vista 400, natural lighting --seed 1 --v 5
✏️ Prefacing your angle with "extreme" can create a more dramatic effect

📐 Extreme High-Angle
💬 Street Style Extreme High-Angle Photo From Below of a Woman, Shot on Afga Vista 400, Natural Lighting --seed 1 --v 5
💬 Street Style Extreme High-Angle Photo From Below of a Woman, Shot on Afga Vista 400, Natural Lighting --seed 1 --v 5

📐 Side-Angle
💬 Street Style Extreme High-Angle Photo From Below of a Woman, Shot on Afga Vista 400, Natural Lighting --seed 1 --v 5
✏️ When combining a side-angle with another angle, change it to "Side-View" to avoid confusion. For example, a "side-view low-angle photo"
💬 Street Style Extreme High-Angle Photo From Below of a Woman, Shot on Afga Vista 400, Natural Lighting --seed 1 --v 5
✏️ When combining a side-angle with another angle, change it to "Side-View" to avoid confusion. For example, a "side-view low-angle photo"

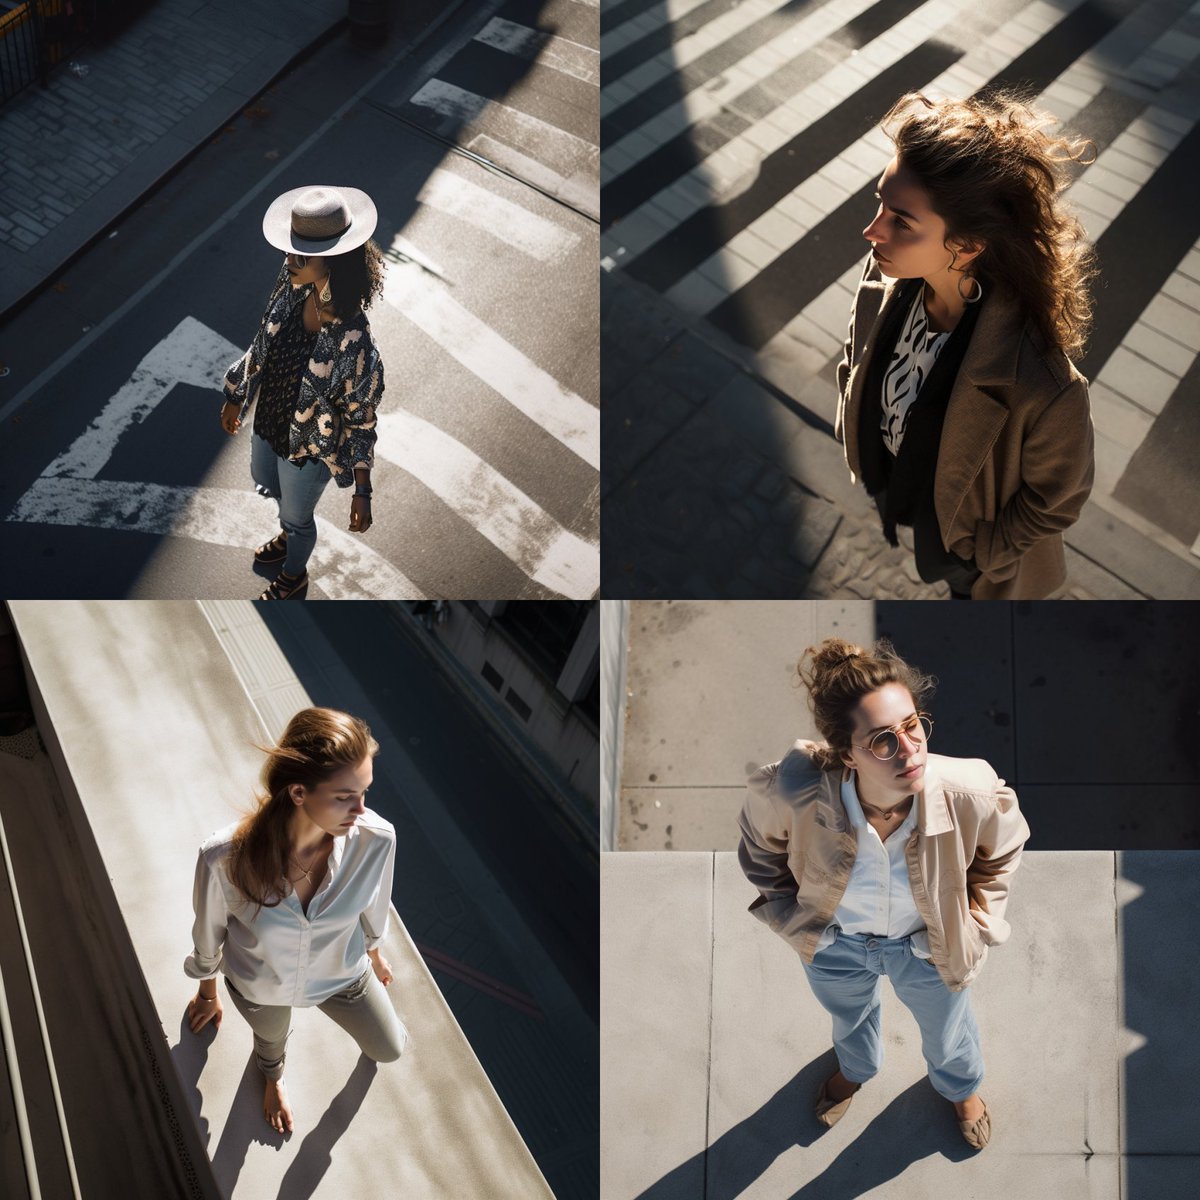
📐 Birds-Eye-View
💬 Street Style Birds-Eye-View Photo From Below of a Woman, Shot on Afga Vista 400, Natural Lighting --seed 1 --v 5
✏️ You can also use "Drone Shot Photo" or "Aerial Photo" to achieve a similar effect.
💬 Street Style Birds-Eye-View Photo From Below of a Woman, Shot on Afga Vista 400, Natural Lighting --seed 1 --v 5
✏️ You can also use "Drone Shot Photo" or "Aerial Photo" to achieve a similar effect.

📐 Eye-Level
💬 Street Style Eye-Level Photo From Below of a Woman, Shot on Afga Vista 400, Natural Lighting --seed 1 --v 5
✏️ Eye-level is going to be the default angle you get, so including it in your prompt isn't super critical.
💬 Street Style Eye-Level Photo From Below of a Woman, Shot on Afga Vista 400, Natural Lighting --seed 1 --v 5
✏️ Eye-level is going to be the default angle you get, so including it in your prompt isn't super critical.

Now let's look at shot types.
The base prompt for these shot type tests:
/imagine street style [SHOT TYPE] photo of a woman, shot on Afga Vista 400, natural lighting --seed 1 --v 5
✏️ After this, I'll combine camera angle + shot type.
The base prompt for these shot type tests:
/imagine street style [SHOT TYPE] photo of a woman, shot on Afga Vista 400, natural lighting --seed 1 --v 5
✏️ After this, I'll combine camera angle + shot type.

📷 Closeup Shot
💬 Street style closeup photo of a woman, shot on Afga Vista 400, natural lighting --seed 1 --v 5
✏️ Notice the camera angle isn't specified in this prompt. Examples combining camera angles AND shot types later in this thread.
💬 Street style closeup photo of a woman, shot on Afga Vista 400, natural lighting --seed 1 --v 5
✏️ Notice the camera angle isn't specified in this prompt. Examples combining camera angles AND shot types later in this thread.

📷 Extreme Closeup Shot
💬 Street style extreme closeup photo of a woman, shot on Afga Vista 400, natural lighting --seed 1 --v 5
💬 Street style extreme closeup photo of a woman, shot on Afga Vista 400, natural lighting --seed 1 --v 5

📷 Medium-Full Shot
💬 Street style medium-full photo of a woman, shot on Afga Vista 400, natural lighting --seed 1 --v 5
✏️ You can also use "Medium-Long" for similar results. Medium-full/long shots tend to include more of the subject's body than a "Medium Shot" will.
💬 Street style medium-full photo of a woman, shot on Afga Vista 400, natural lighting --seed 1 --v 5
✏️ You can also use "Medium-Long" for similar results. Medium-full/long shots tend to include more of the subject's body than a "Medium Shot" will.

📷 Full-Body Shot
💬 Street style full-body photo of a woman, shot on Afga Vista 400, natural lighting --seed 1 --v 5
✏️ Try changing the aspect ratio for full-body shots to include the feet. On the left is --ar 1:1 and on the right is --ar 9:16
💬 Street style full-body photo of a woman, shot on Afga Vista 400, natural lighting --seed 1 --v 5
✏️ Try changing the aspect ratio for full-body shots to include the feet. On the left is --ar 1:1 and on the right is --ar 9:16


Combining Camera Angle + Shot Type
The base prompt:
/imagine street style [CAMERA ANGLE] [SHOT TYPE] photo of a woman, shot on Afga Vista 400, natural lighting --seed 1 --v 5
✏️ I'll also play with positioning the subject using "Centered View", "Side View", and "From Behind"
The base prompt:
/imagine street style [CAMERA ANGLE] [SHOT TYPE] photo of a woman, shot on Afga Vista 400, natural lighting --seed 1 --v 5
✏️ I'll also play with positioning the subject using "Centered View", "Side View", and "From Behind"

👤 Centered View
📐 Low-Angle
📷 Extreme Closeup
💬 Street style centered view low-angle extreme closeup photo from below of a woman, shot on Afga Vista 400, natural lighting --seed 1 --v 5
📐 Low-Angle
📷 Extreme Closeup
💬 Street style centered view low-angle extreme closeup photo from below of a woman, shot on Afga Vista 400, natural lighting --seed 1 --v 5

🗣️ Side View
📐 Low-Angle
📷 Closeup
💬 Street style side view low-angle closeup photo from below of a woman, shot on Afga Vista 400, natural lighting --seed 1 --v 5
📐 Low-Angle
📷 Closeup
💬 Street style side view low-angle closeup photo from below of a woman, shot on Afga Vista 400, natural lighting --seed 1 --v 5

📐 High-Angle
🔙 Shot From Behind
💬 Street style high-angle photo from above shot from behind of a woman, shot on Afga Vista 400, natural lighting --seed 1 --v 5
🔙 Shot From Behind
💬 Street style high-angle photo from above shot from behind of a woman, shot on Afga Vista 400, natural lighting --seed 1 --v 5

📐 High-Angle
📷 Closeup
💬 Street style high-angle closeup photo from above of a woman, shot on Afga Vista 400, natural lighting --seed 1 --v 5
✏️ Including "from above" makes all the difference here. Without it, MJ doesn't seem to understand what you want.
📷 Closeup
💬 Street style high-angle closeup photo from above of a woman, shot on Afga Vista 400, natural lighting --seed 1 --v 5
✏️ Including "from above" makes all the difference here. Without it, MJ doesn't seem to understand what you want.

Part 1 of this series: An exploration of film types 👇
https://twitter.com/nickfloats/status/1639478498875314180
Part 1.5 of this series: A quick look at digital cameras 👇
https://twitter.com/nickfloats/status/1639789850818936834
Part 2 of this series: An exploration of lighting 👇
https://twitter.com/nickfloats/status/1640073368115515393
Hope this helps. I'll cover more shots like action shots, or wide establishing shots later on.
Follow the series @nickfloats
BTW, check out my YouTube (link in bio)
Coming up next: 👗 Clothing, Color, & Materials
Like/RT the first tweet in this thread (quoted below) 👇
Follow the series @nickfloats
BTW, check out my YouTube (link in bio)
Coming up next: 👗 Clothing, Color, & Materials
Like/RT the first tweet in this thread (quoted below) 👇
https://twitter.com/nickfloats/status/1640404667036483586
Midjourney for Creatives course launching in June with @MavenHQ
It'll be a paid 2-week cohort w/ live sessions, geared toward professionals and production workflows.
Waitlist 👉maven.com/forms/672f82
It'll be a paid 2-week cohort w/ live sessions, geared toward professionals and production workflows.
Waitlist 👉maven.com/forms/672f82
• • •
Missing some Tweet in this thread? You can try to
force a refresh