 Read on Twitter
How to improve your microphone quality for your streams in OBS with just free tools - a detailed thread 🧵
It should make all of the most important filters less intimidating to you and give you a better understanding of how they work! #sipsandtricks
It should make all of the most important filters less intimidating to you and give you a better understanding of how they work! #sipsandtricks

Are you someone with little or no knowledge when it comes to using audio filters on your microphone in OBS?
Maybe you didn’t even know about filters until now? In this thread you’ll learn what filters are and how to set up some of the most important ones on your own!
Maybe you didn’t even know about filters until now? In this thread you’ll learn what filters are and how to set up some of the most important ones on your own!
So what are these filters I am talking about?
Audio filters in OBS are additional little effects/plugins often used while editing voice-overs or mixing vocals that help improve the quality of the sound, depending on your setup and whether they’re set up properly
Audio filters in OBS are additional little effects/plugins often used while editing voice-overs or mixing vocals that help improve the quality of the sound, depending on your setup and whether they’re set up properly
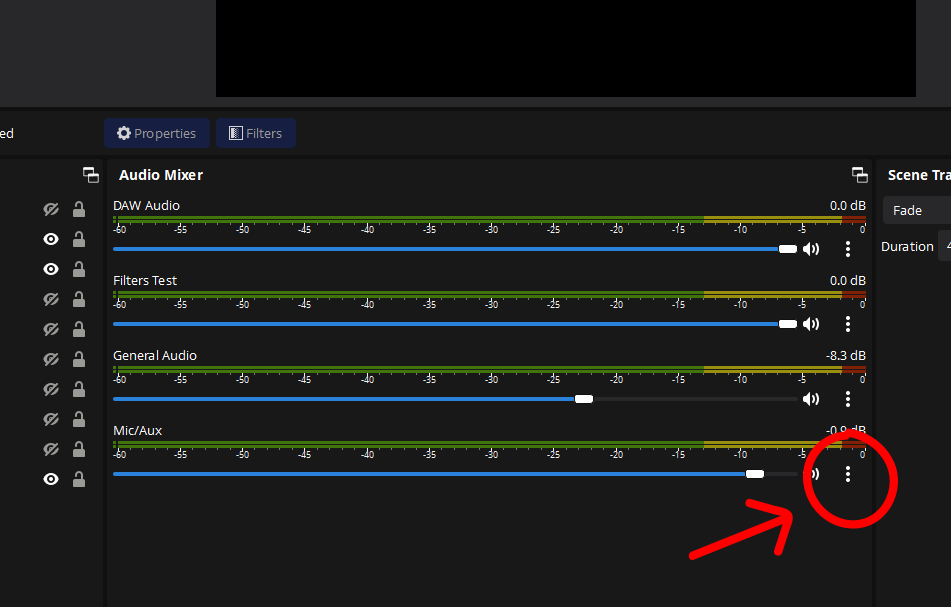
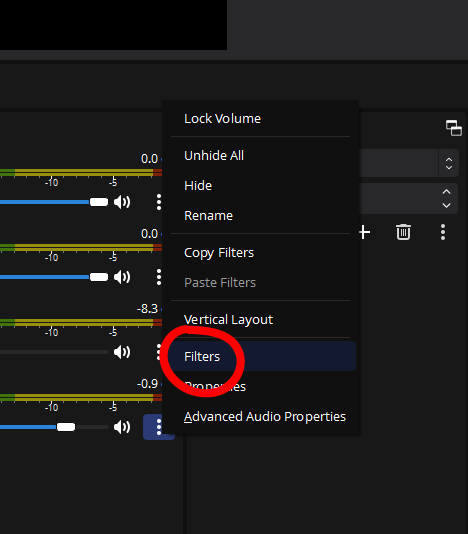
In order to set up filters in OBS, you need to go into the settings of your microphone in the audio mixer section and go to filters
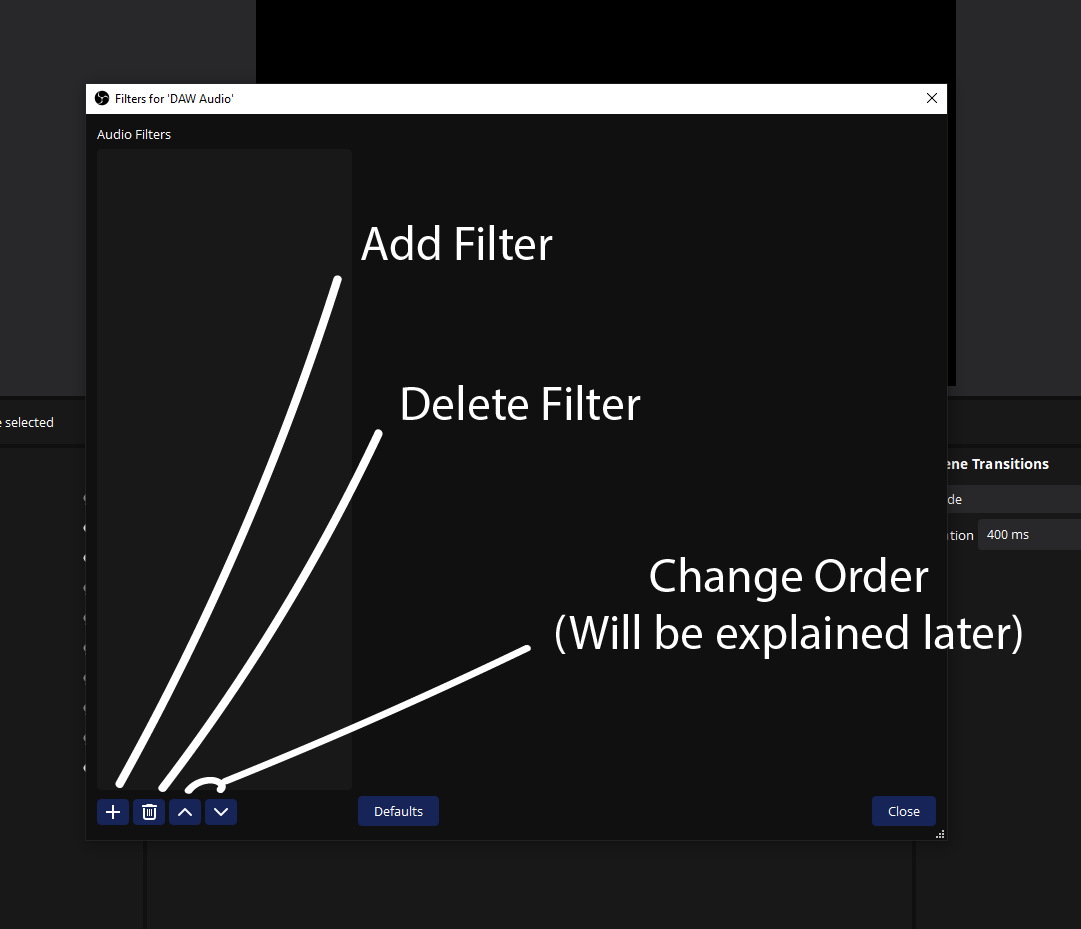
A window will open in which you’ll be able to apply a variety of them that are built into OBS or 3rd party plugins that you previously installed
A window will open in which you’ll be able to apply a variety of them that are built into OBS or 3rd party plugins that you previously installed
To check your audio with the effects on you can:
- Record yourself in a setting same as on stream and apply the filters to the recording added as a media source
- Turn on monitoring in advanced audio settings and listen to yourself on the go
- Record yourself in OBS and relisten
- Record yourself in a setting same as on stream and apply the filters to the recording added as a media source
- Turn on monitoring in advanced audio settings and listen to yourself on the go
- Record yourself in OBS and relisten
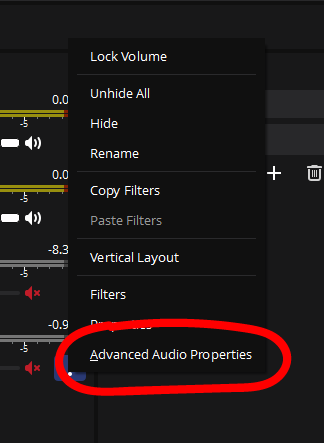
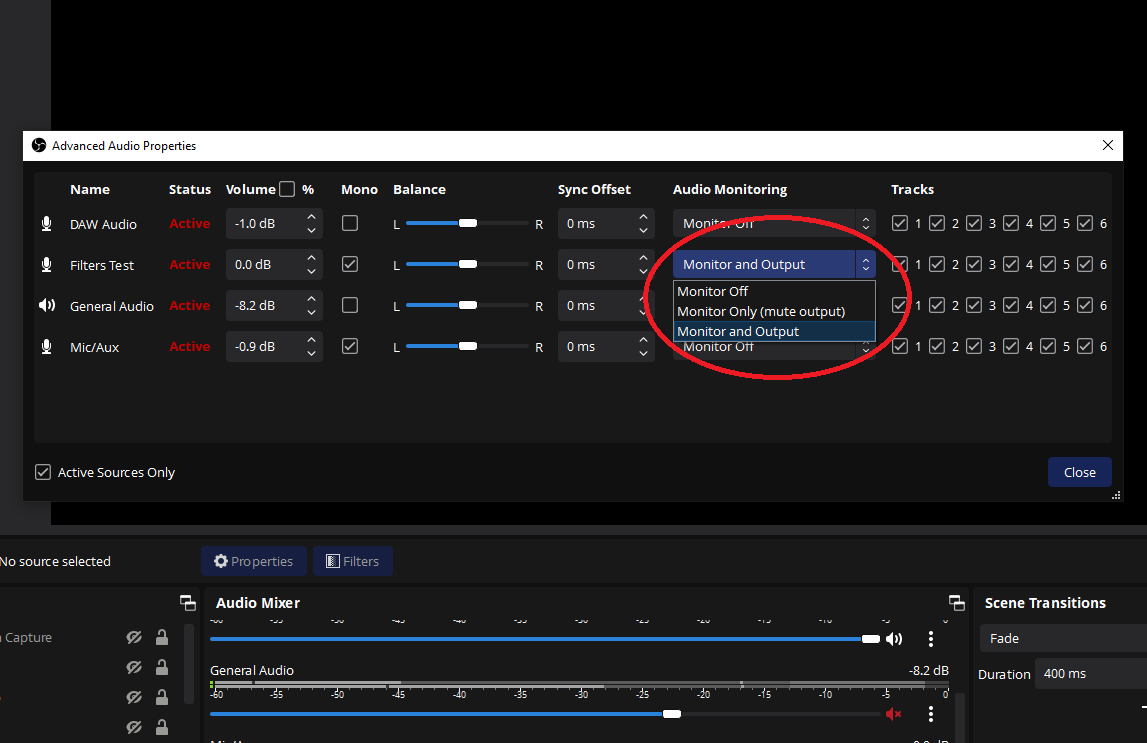
Before messing with filters, please make sure to adjust your distance from your microphone
It can change the way you will set up your filters, so it's important to be consistent with your distance and find a point close enough where you will sound clear but also won't distort
It can change the way you will set up your filters, so it's important to be consistent with your distance and find a point close enough where you will sound clear but also won't distort
With most microphones, speaking to them from a closer distance can make a huge difference in the sound quality and in how well the filters will work in case that is not something you have previously tested
Here’s a small example using the popular AT2020 microphone
Here’s a small example using the popular AT2020 microphone
Depending on the mic, the right distance will be different - If you get as close as me to a very sensitive microphone and happen to yell or speak louder, your audio may start distorting
That’s why testing some distances with different speaking levels is important in that step
That’s why testing some distances with different speaking levels is important in that step
For this guide, we’ll use some plugins from the Reaplugs bundle alongside native OBS filters
They’re free to use and very gear friendly, so they should work perfectly fine for most people even on older pcs!
You can download the plugins here: reaper.fm/reaplugs/
They’re free to use and very gear friendly, so they should work perfectly fine for most people even on older pcs!
You can download the plugins here: reaper.fm/reaplugs/

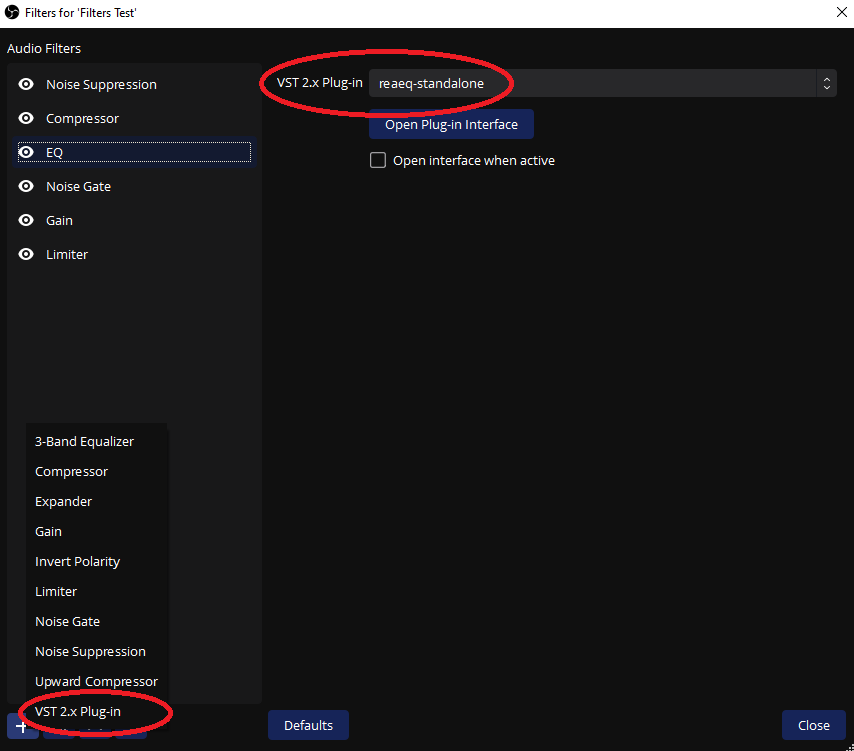
To add the 3rd party plugins, you’ll need to choose the filter called “VST 2.x Plug-in” and select them from the drop down menu afterwards
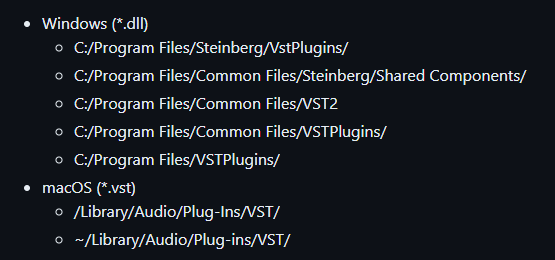
Disclaimer: In order for them to appear in OBS, they NEED to be installed in one of the following locations! (NOT "Program Files (x86)")
Disclaimer: In order for them to appear in OBS, they NEED to be installed in one of the following locations! (NOT "Program Files (x86)")
The first thing I want to cover is the EQ (Equalizer), which might arguably be one of the hardest things for a beginner to set up on their own, but also the most rewarding when it comes to sound quality!
It's also one of the 2 we'll use an external plugin for from the bundle
It's also one of the 2 we'll use an external plugin for from the bundle
What is an EQ? It’s a tool that lets you shape individual parts of your sound
Think of it as a spectrum which shows you areas of your sound, the lowest - bass type elements of your sound on the left side up to the highest, bright elements of your sound all the way to the right
Think of it as a spectrum which shows you areas of your sound, the lowest - bass type elements of your sound on the left side up to the highest, bright elements of your sound all the way to the right
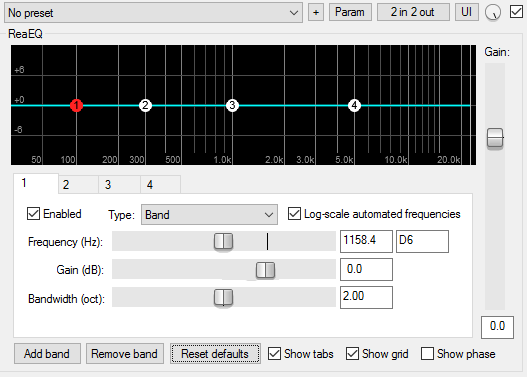
Thanks to an EQ, you’re able to change the volume of only specific areas/tones of your voice in that spectrum
That means you can make yourself sound more or less bass-y, sound like you’re speaking through an old radio, or sound very muffled. Here are some extreme examples!
That means you can make yourself sound more or less bass-y, sound like you’re speaking through an old radio, or sound very muffled. Here are some extreme examples!
I’d like to mention right away - the EQ is the most specialized plugin in this guide and probably the hardest one to set up on your own
I still encourage you to give it a try, but If it will feel too complicated - feel free to get back to it after configuring the other filters
I still encourage you to give it a try, but If it will feel too complicated - feel free to get back to it after configuring the other filters
We will use ReqEQ from the Reaplugs bundle for this. It looks scary at first If you never worked with audio stuff before, but there are certain settings that are very common starting points when it comes to stream audio
I’ll explain them on video to make it easier to digest!
I’ll explain them on video to make it easier to digest!
*Part 2 to the previous video because it was too long for Twitter so I had to split it*
To follow up on the settings I tried, depending on your audio you can absolutely for example cut down the lower parts of your sound more If you want to make things less boomy or push some stuff etc
Unfortunately there's no setting fits all here, give things a try!
Unfortunately there's no setting fits all here, give things a try!
Please be careful with the high shelf we covered on the right side, keep in mind that If you have excessive noise going on it will also boost that
Some microphones are also more or less bright sounding, so the amount you boost there is very situational, trust your ears!
Some microphones are also more or less bright sounding, so the amount you boost there is very situational, trust your ears!
The next effect I’d like to cover is a compressor (ReaComp). In simple words, It’s a tool that usually squishes louder parts of a sound
By that, I mean it makes the overall volume of the signal more consistent by taming excessively loud parts and making the outcome more even
By that, I mean it makes the overall volume of the signal more consistent by taming excessively loud parts and making the outcome more even
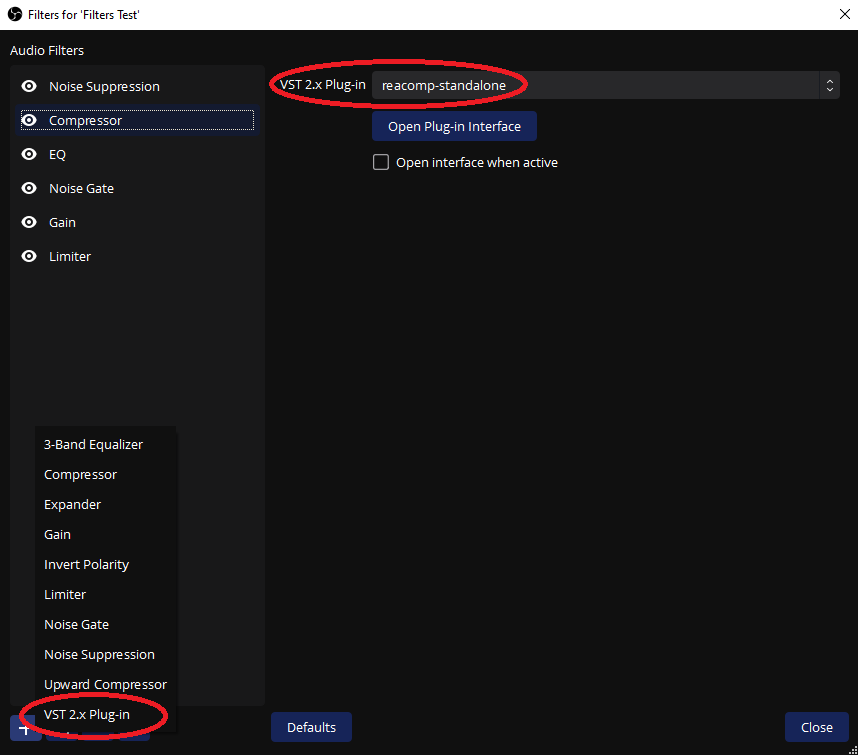
That can also sometimes elevate quiet parts of your dialogue as a result! That's why It's very useful to have one
Once you open the plugin, it will look incredibly confusing but don’t worry, we will ONLY focus on 4 settings! The threshold, ratio, attack and release
Once you open the plugin, it will look incredibly confusing but don’t worry, we will ONLY focus on 4 settings! The threshold, ratio, attack and release
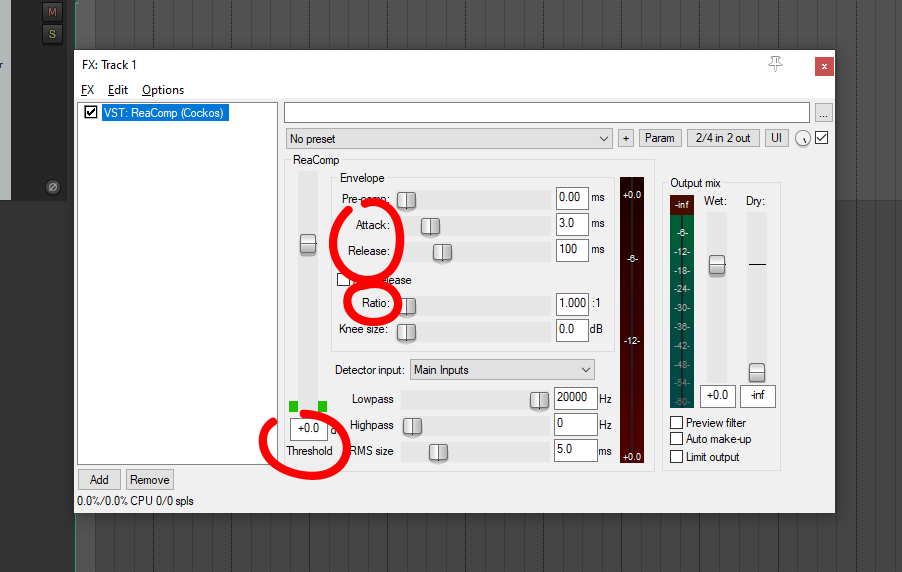
If the interface of the compressor looks a little bit different on your side, don’t worry! I might just have a version with a very slightly different look
Everything we will actually use in the compressor should still be in the exact same place
Everything we will actually use in the compressor should still be in the exact same place
The threshold is a set volume at which If your voice reaches it, the effect will start working
Think of the ratio as the strength of the compressor, the attack as the reaction time after the threshold is reached and the release as how much time it will take to recover
Think of the ratio as the strength of the compressor, the attack as the reaction time after the threshold is reached and the release as how much time it will take to recover
I think a good starting point for the ratio would be between 4:1 and 6:1, but you can try other values!
You want the threshold to be around a volume at which you’ll see the compressor work on this bar highlighted on the screenshot in order to know It’s actually doing something
You want the threshold to be around a volume at which you’ll see the compressor work on this bar highlighted on the screenshot in order to know It’s actually doing something
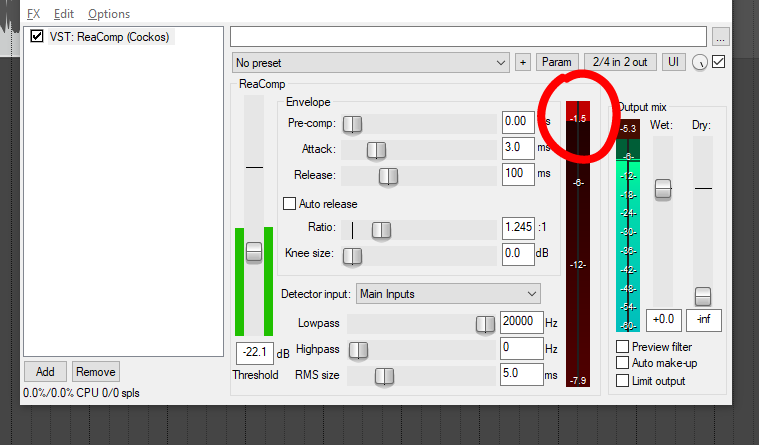
When it comes to the attack - you want to keep it around a 3-10ms area in order for the compressor to act quickly enough
For the release, you can try keeping it between 100-200ms
You may feel like the overall volume was affected and sounds lower, but we'll get to that later!
For the release, you can try keeping it between 100-200ms
You may feel like the overall volume was affected and sounds lower, but we'll get to that later!
We don't want the compressor to be too extreme, so when it comes to that red bar I highlighted before, it should only react a little bit (around up to -3db from the top at most) when speaking in your average volume!
If something too loud comes through, it will still tame it more
If something too loud comes through, it will still tame it more
Let’s get to the Noise Gate. It’s quite possibly the most important utility tool for streaming for many people
It's a filter that will get rid of any sound below a certain set volume threshold - nothing on the other side of it can make It’s way through, that explains the name
It's a filter that will get rid of any sound below a certain set volume threshold - nothing on the other side of it can make It’s way through, that explains the name
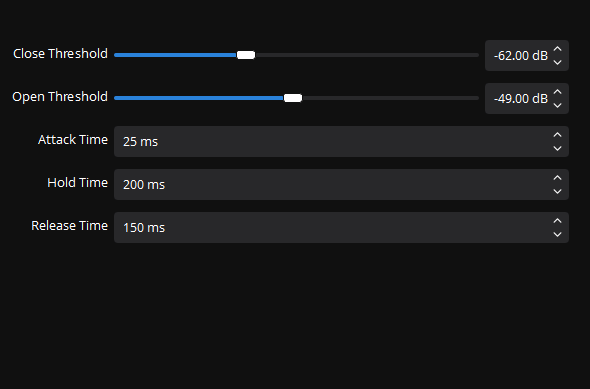
It helps you eliminate any background noise or microphone noise that is quieter than your actual voice while you’re not saying anything at a certain moment
No more PC fans, family ambience from downstairs and such
No more PC fans, family ambience from downstairs and such
The most important setting is the threshold, then yet again we work with the attack and release just like with the compressor
The threshold is the set volume level under which the gate won't allow any sound to go through. In OBS there are 2 of those, but the idea is the same
The threshold is the set volume level under which the gate won't allow any sound to go through. In OBS there are 2 of those, but the idea is the same
The open threshold is at what volume you want your audio to start going through and the close threshold is under what volume you don’t want anything to go through
The close threshold is always supposed to be at least a little bit lower than the open threshold in OBS
The close threshold is always supposed to be at least a little bit lower than the open threshold in OBS
The attack is how fast the gate will open, the hold is how long it will stay open after your volume drops under your threshold and the release smoothens out the gate closing
These are important to set up carefully in order to avoid any sort of stuttering bits between words!
These are important to set up carefully in order to avoid any sort of stuttering bits between words!
A good starting point would be keeping the attack around 1-5ms, the hold at 200ms and the release at 100-200ms!
Depending on the level of noise, it's important to mess around with the settings in a way that will sound good to you, just like with most of the effects covered
Depending on the level of noise, it's important to mess around with the settings in a way that will sound good to you, just like with most of the effects covered
Moving on, remember when I mentioned that the compressor might end up making things sound a bit more quiet?
In order to make up for that lost volume, we'll use the Gain filter! Thanks to that you can make the overall sound a bit louder without messing with the actual audio mixer
In order to make up for that lost volume, we'll use the Gain filter! Thanks to that you can make the overall sound a bit louder without messing with the actual audio mixer
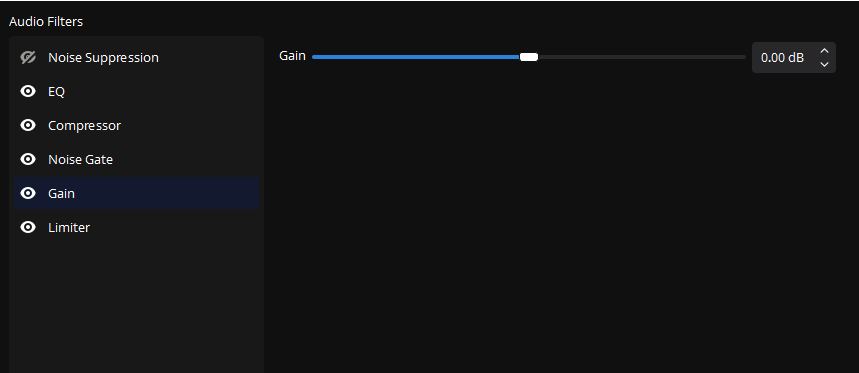
I personally like to keep my average voice volume between around the center of the yellow meter and at the loudest parts of the green meter in OBS, but that's by no means a must follow, It's just what I do
I keep my average speaking volume around -14 to -8
I keep my average speaking volume around -14 to -8
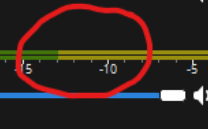
Often guides say that you should avoid anything other than the green areas on the meters, but that is not true!
Don't be scared to bump into the yellow parts of the meters, it won't add any distortion. The problem starts only when all your audio sources combined become too loud
Don't be scared to bump into the yellow parts of the meters, it won't add any distortion. The problem starts only when all your audio sources combined become too loud
Disclaimer: Some OBS versions have the yellow and red meters start at different values, so for example what might be the start of my yellow meter (-13) might be louder than it would be for someone else
So please do consider referencing the values over just the color positions
So please do consider referencing the values over just the color positions
Remember, your voice is the most important audio source of your stream!
That means your game audio, background music and such should be lower than your voice volume on the audio mixer to not overpower it, as always - remember to monitor things and see how you feel about them
That means your game audio, background music and such should be lower than your voice volume on the audio mixer to not overpower it, as always - remember to monitor things and see how you feel about them
Lastly, we’ll put a limiter at the end of the filters.
It's similar to a compressor, but its purpose is to prevent your audio from distorting!
Ever heard someone scream into the mic and it sounded like the scream was “deep fried”? It basically helps soften that
It's similar to a compressor, but its purpose is to prevent your audio from distorting!
Ever heard someone scream into the mic and it sounded like the scream was “deep fried”? It basically helps soften that
It also won’t allow the audio to go over a certain volume and avoids extreme distortion! We can use the stock OBS limiter for that purpose.
The only thing you really want to change up is the threshold. I think -6db is a solid starting point that you can balance to your needs
The only thing you really want to change up is the threshold. I think -6db is a solid starting point that you can balance to your needs
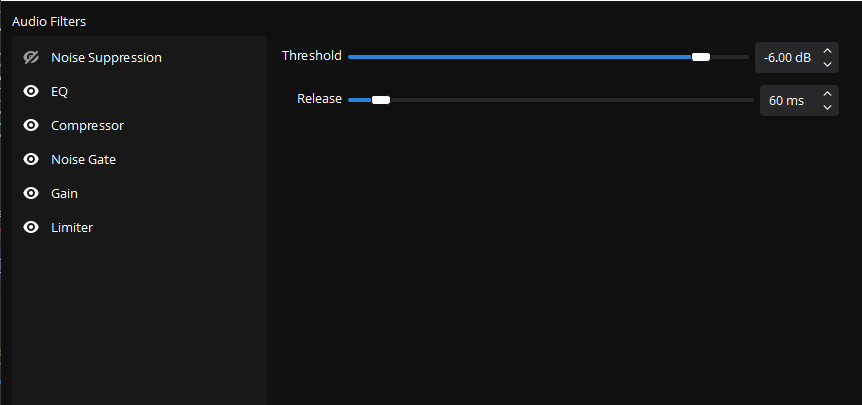
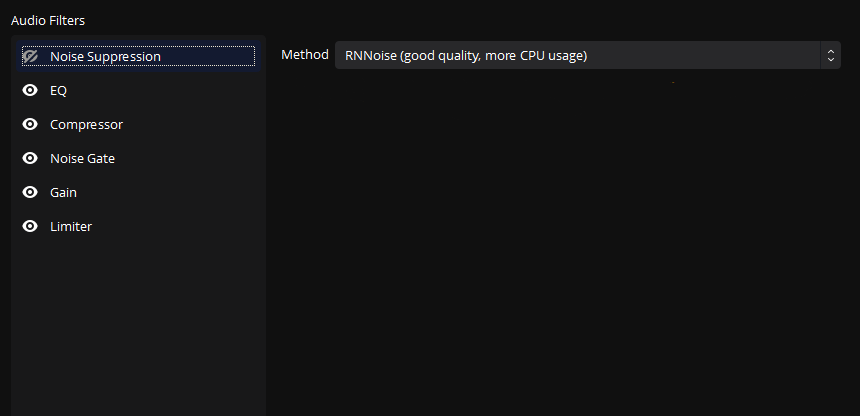
An additional thing I'd like to mention is the OBS Noise Suppression. That effect is a huge hit or miss and will NOT work well for everyone
If you're gonna use it - I personally think the RNNoise setting usually sound better, also put it at the very top of your filters
If you're gonna use it - I personally think the RNNoise setting usually sound better, also put it at the very top of your filters
The issue with noise suppression plugins is that depending on your set-up, mic etc it can make your audio quite muffled and actually worse than before using it! Especially If you have good gear with minimal noise
Test it and judge for yourself whether you prefer it on or not!
Test it and judge for yourself whether you prefer it on or not!
Now something that you might have not known even If you did use audio filters before
The order in which you place the effects actually matters! For the most part you want the order to look like the one in the screenshot, with the most important being the Limiter at the very end
The order in which you place the effects actually matters! For the most part you want the order to look like the one in the screenshot, with the most important being the Limiter at the very end
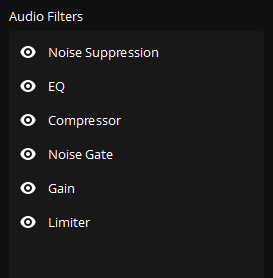
The reason for that is, the effects will process your voice one by one. That means If you for example have a gain plugin making things way louder before your limiter, the limiter will stop the volume If it goes crazy
But If they're the other way around, it won't work as intended
But If they're the other way around, it won't work as intended
If for any purpose you’d like to disable or enable any of the filters, you can press the little eye icons next to each filter name to do that!
It's especially helpful If you want to try doing a before/after comparison to see whether you're happy with your settings
It's especially helpful If you want to try doing a before/after comparison to see whether you're happy with your settings
Once again - please do not blindly copy paste the exact settings I am using, the reason I am so detailed with the effects is for you to learn how to find the right settings for yourself!
Especially with the EQ, copy pasting my exact shapes will not sound good for everyone
Especially with the EQ, copy pasting my exact shapes will not sound good for everyone
I hope this guide will help you understand the basics of these core filters more and help you set them up by yourself in a way that will ultimately improve your sound quality!
Please let me know below whether there's something you think is still unclear ^^
Please let me know below whether there's something you think is still unclear ^^
If you’ve enjoyed this guide - please consider sharing it!
I am currently working on more little tutorials for creators that I'll post under the #sipsandtricks tag where you can already find a guide on how to record your first cover and commission a mix! (I also make music lol)
I am currently working on more little tutorials for creators that I'll post under the #sipsandtricks tag where you can already find a guide on how to record your first cover and commission a mix! (I also make music lol)
Lastly, If you’d like to suggest a future guide, felt like something was missing in this guide or would like to see some little tutorials/tips on any recording, audio or even in general commission related things - feel free to leave some suggestions :)
You can also expect both video & PDF versions of both this guide and the recording guide on my Youtube and Ko-fi eventually once they’re completed, in case that's a format you prefer
That being said - thank you for reading and have a great day!
youtube.com/c/itscoffeerun
That being said - thank you for reading and have a great day!
youtube.com/c/itscoffeerun
• • •
Missing some Tweet in this thread? You can try to
force a refresh