
Secret storage!
It's the biggest request we get from clients - how can they maximize storage? In my experience, storage opportunities are often hidden in plain sight.
Here are 11 examples, all from my own work [plus a #12 that's kind of cheating but I stand by it]: 👇
It's the biggest request we get from clients - how can they maximize storage? In my experience, storage opportunities are often hidden in plain sight.
Here are 11 examples, all from my own work [plus a #12 that's kind of cheating but I stand by it]: 👇
1. Weird bump in a wall? Stick some cabinetry or shelving there!
This piece is in the kitchen, and is the mail/papers landing spot, dog food storage, etc - all the stuff you want near the kitchen, but not in the middle of all your cooking stuff.
[Before and after shown]
This piece is in the kitchen, and is the mail/papers landing spot, dog food storage, etc - all the stuff you want near the kitchen, but not in the middle of all your cooking stuff.
[Before and after shown]


2. Upside down vanity.
Put a big drawer at the *bottom* of the sink cabinet - you still get the wide open storage area under the sink, but now you get a full sized drawer as well. [Can't put it at the top, it'll hit the sink!]
Put a big drawer at the *bottom* of the sink cabinet - you still get the wide open storage area under the sink, but now you get a full sized drawer as well. [Can't put it at the top, it'll hit the sink!]

3. Thicken a wall.
This room was very narrow, and we still needed to fit closet and dresser space. By building in the bed, we saved space, and could integrate nightstand nooks, hanging storage, drawers [including under the bed], as well as high storage.
These types of closets take up a lot less room, and are a lot more efficient at storing stuff - a win-win!

4. Use the thickness of the wall framing itself.
In this bathroom, we needed to hide the machinery for the steam shower, which meant we were only left with the thickness of the 2x4 wall - no room for a cabinet. Or is there?!
Using panels that match the walls, and touch latch mechanisms to avoid handles/hardware, there is actually floor to ceiling storage that's only 4" deep - perfect for toiletries!

Here's another variation on that concept, this time next to a toilet. The lower shelf can hold extra TP, while the upper cabinet functions as an extra medicine cabinet - and as a nice aesthetic focal point in a mostly white room.

5. Steal some space under the uppers.
Bring some of the upper cabinets down to the counter, especially in a corner which would be largely dead/unusable anyway - it's very useful for hiding countertop appliances, coffee maker, etc!
Bring some of the upper cabinets down to the counter, especially in a corner which would be largely dead/unusable anyway - it's very useful for hiding countertop appliances, coffee maker, etc!

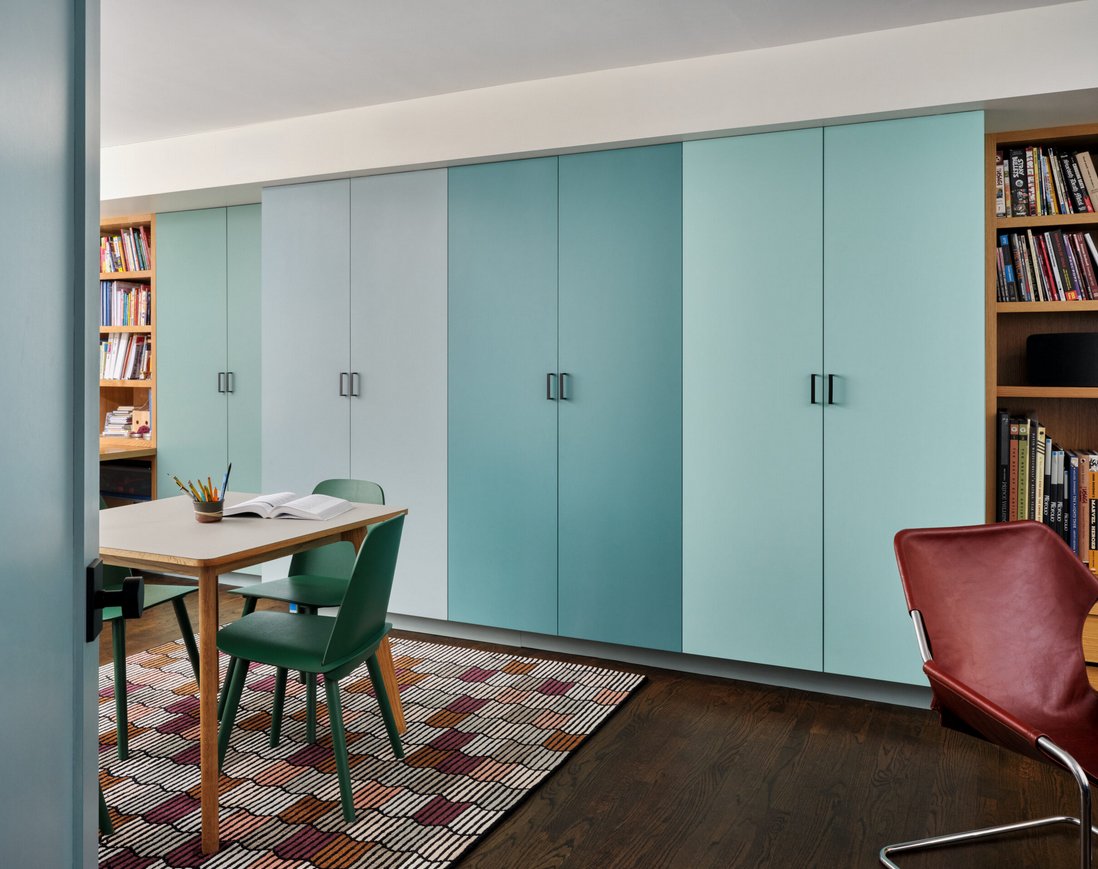
6. Create "bin cabinets" [and make storage aesthetically pleasing].
In this active family space, in a house with no basement or attic, we needed somewhere to easily store bins [holiday decorations, seasonal clothes, art supplies, camping gear, etc]...so we hid it in plain sight, with these extra deep, colorful cabinets, perfectly sized to hold big plastic tubs.
In this active family space, in a house with no basement or attic, we needed somewhere to easily store bins [holiday decorations, seasonal clothes, art supplies, camping gear, etc]...so we hid it in plain sight, with these extra deep, colorful cabinets, perfectly sized to hold big plastic tubs.
7. Fill awkward corners with built-ins - in a mix of open and closed storage.
Next to the fireplace is a classic example of this kind of leftover space - might as well fill it with usable storage! Closed storage is great for board games and stuff you don't want to see; open shelves are great for photos, books, collections, etc.
Bonus move: do glass doors to show off what's on the shelves, while keeping dust out!

8. Find pockets around HVAC, plumbing, etc.
This shelf was added during construction, after we saw that there was room in between the HVAC equipment and ductwork to slip this right in.
Be ready to spot these opportunities during construction, and make sure subs are being efficient with their runs and routing, so you actually have room to do other stuff like this!

9. Safes and secret rooms!
I can't show you pictures of these...that would defeat the purpose 🙃 But we've installed safes and secret compartments in almost every project we've done - in eaves, behind cabinets, concealed under floors - you name it!
I can't show you pictures of these...that would defeat the purpose 🙃 But we've installed safes and secret compartments in almost every project we've done - in eaves, behind cabinets, concealed under floors - you name it!
10. Custom headboard.
In a tight bedroom, we designed this custom headboard, which we then filled up w/ storage, nightstands, lights, outlets, etc. Doing something custom like this is a MUCH more efficient use of space, and isn't always more expensive than regular furniture!
In a tight bedroom, we designed this custom headboard, which we then filled up w/ storage, nightstands, lights, outlets, etc. Doing something custom like this is a MUCH more efficient use of space, and isn't always more expensive than regular furniture!

11. Get inspiration from commercial spaces.
In this very tight bathroom, we built in the TP holder, and if you look closely, you can see a little flap just below that for the trashcan. This is something you don't often see in a home, but why not?! It's a fun and practical idea.
In this very tight bathroom, we built in the TP holder, and if you look closely, you can see a little flap just below that for the trashcan. This is something you don't often see in a home, but why not?! It's a fun and practical idea.

12. Get rid of your stuff!!
I know, that's kind of cheating to list it as a storage option...but it's the cheapest and most efficient approach...just have less stuff! Your stuff will expand to fill whatever space you give it...just give it a bit less :)
I know, that's kind of cheating to list it as a storage option...but it's the cheapest and most efficient approach...just have less stuff! Your stuff will expand to fill whatever space you give it...just give it a bit less :)
That's it for now....I've got so many great ones in design and/or under construction that I can't wait to show you...just have to finish them first!
- dressing rooms in small spaces
- built-in beds, dressers, makeup tables
- hidden kitchen storage
- mudrooms
So stay tuned :)
- dressing rooms in small spaces
- built-in beds, dressers, makeup tables
- hidden kitchen storage
- mudrooms
So stay tuned :)
• • •
Missing some Tweet in this thread? You can try to
force a refresh


