From $1,000 to $1,000,000: A Guide to Strategic Compounding📕
This guide will explore the fundamental principles of compounding gains while simultaneously minimizing losses, a crucial skill for long-term success in trading.
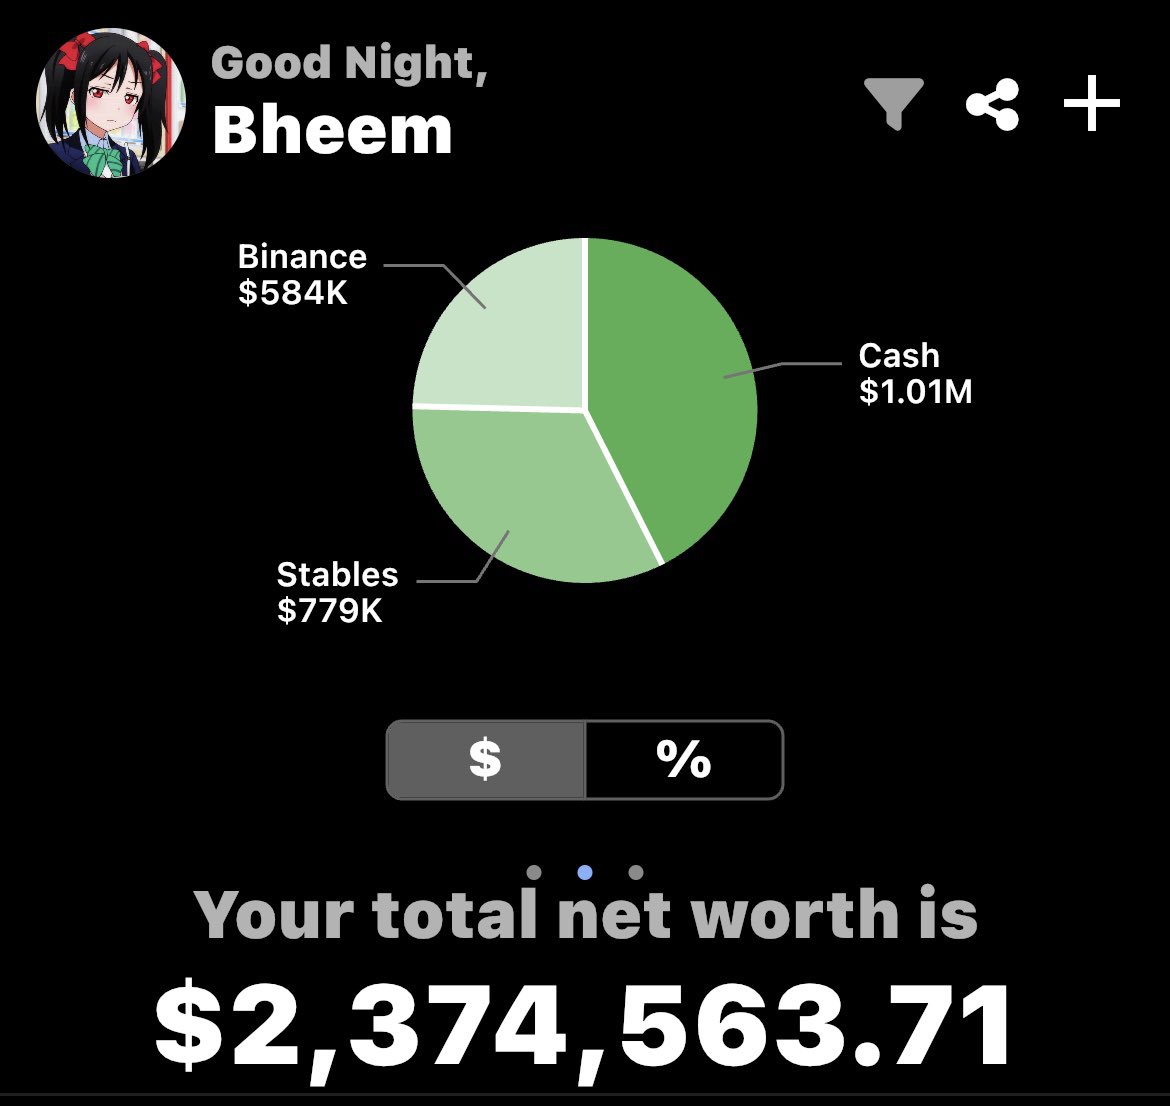
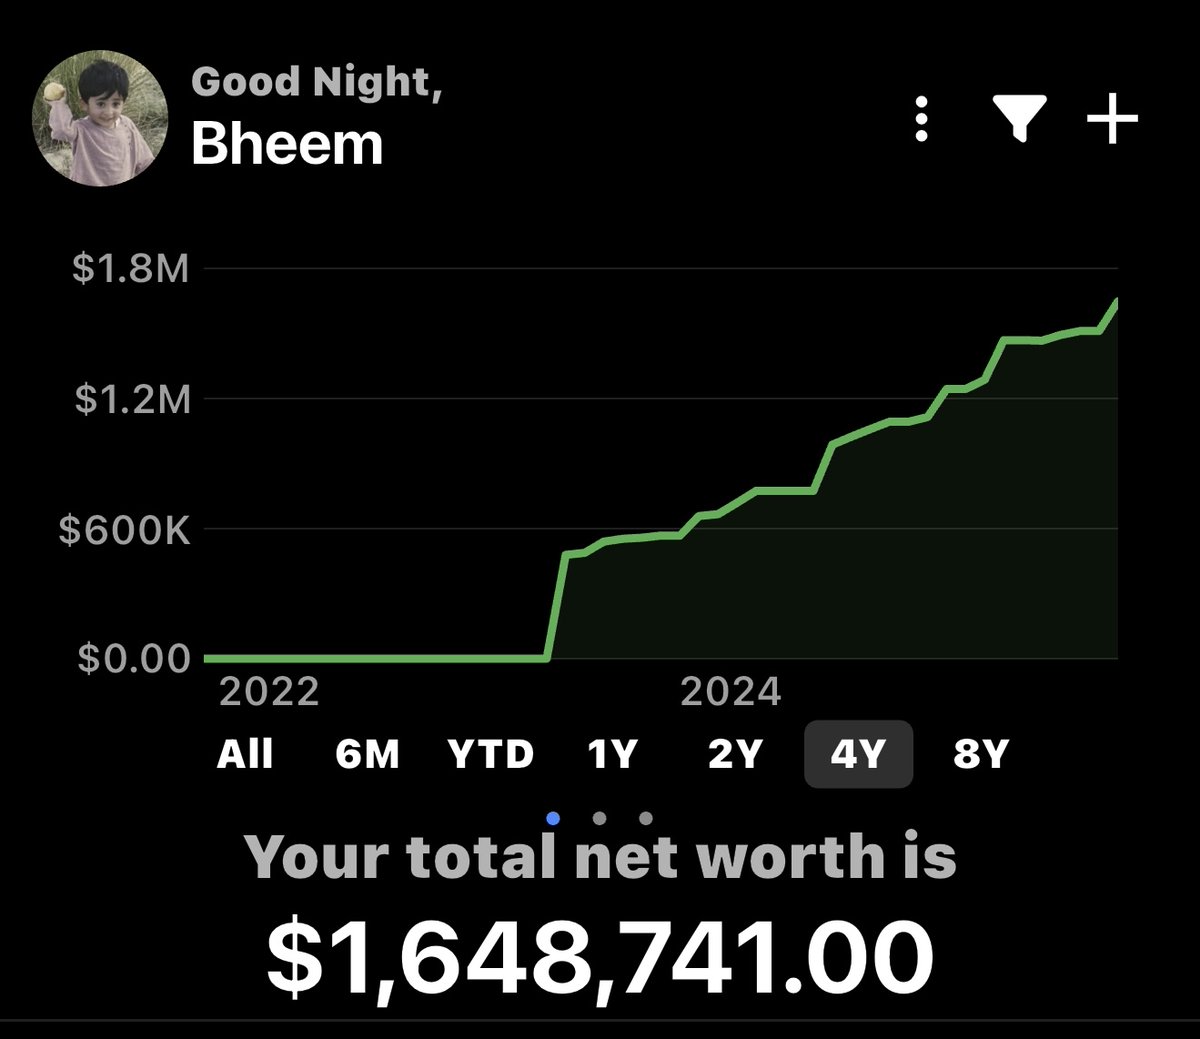
In this comprehensive thread, I will present and detail the 12 entry models that I personally used on a daily basis. These strategies were key to my journey as a spot markets day trader, enabling me to grow my initial capital to over one million dollars, all without the use of leverage or exposure to high-risk, volatile assets🧵
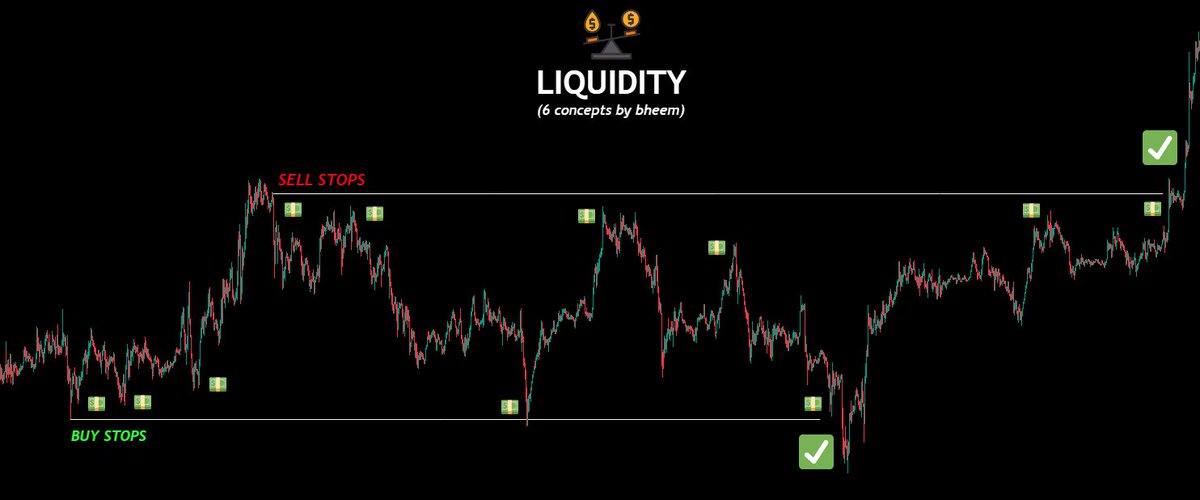
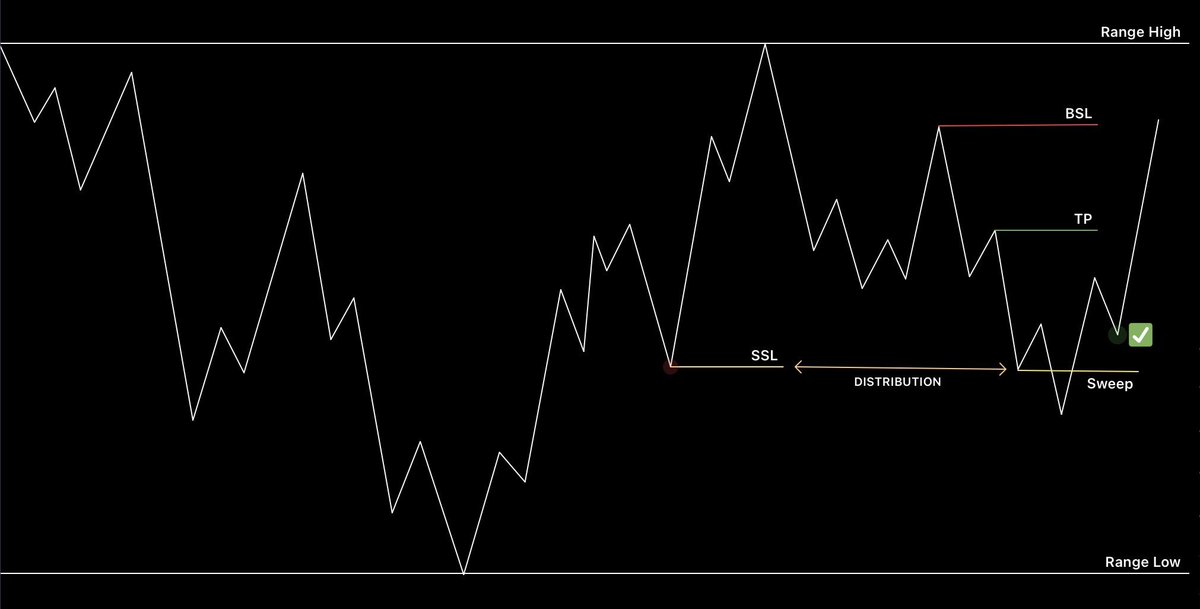
1. Sell Side Liquidity Model📈
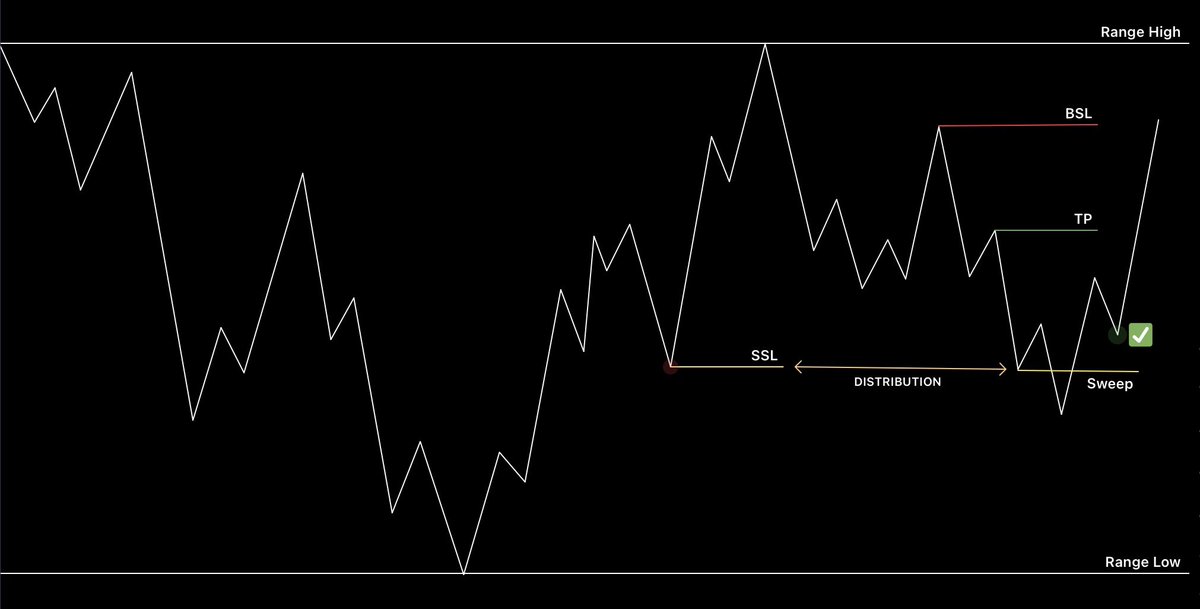
This section explains a trading concept called Sell-Side Liquidity (SSL). Think of liquidity as a pool of pending orders waiting to be filled. Sell-side liquidity is a concentration of "buy stop" orders, often found at low points on a price chart.
When a trading chart shows a candle with a large wick pointing downward, this often indicates that price initially dropped but was then pushed back up by a large number of buyers as well as triggered buy stop losses. This large wick is a key sign of a potential Sell-Side Liquidity (SSL) zone. It suggests that many sell orders were triggered, but the price quickly recovered.
🎯The Trading Strategy: Sweep and Reclaim
A common trading strategy involves identifying this SSL zone and waiting for a specific pattern to occur: the "sweep and reclaim."
👉The Sweep: First, you wait for the price to drop and "sweep" or briefly go below the low of the candle that created the SSL wick. This action triggers any remaining sell orders.
✅The Reclaim: Immediately after the sweep, the price should quickly reverse and "reclaim" the level by moving back above the previous low. The best way to confirm this is to wait for a 4-hour (4H) candle to close above that low. A successful 4H candle close provides a strong signal that the upward move is likely to continue.
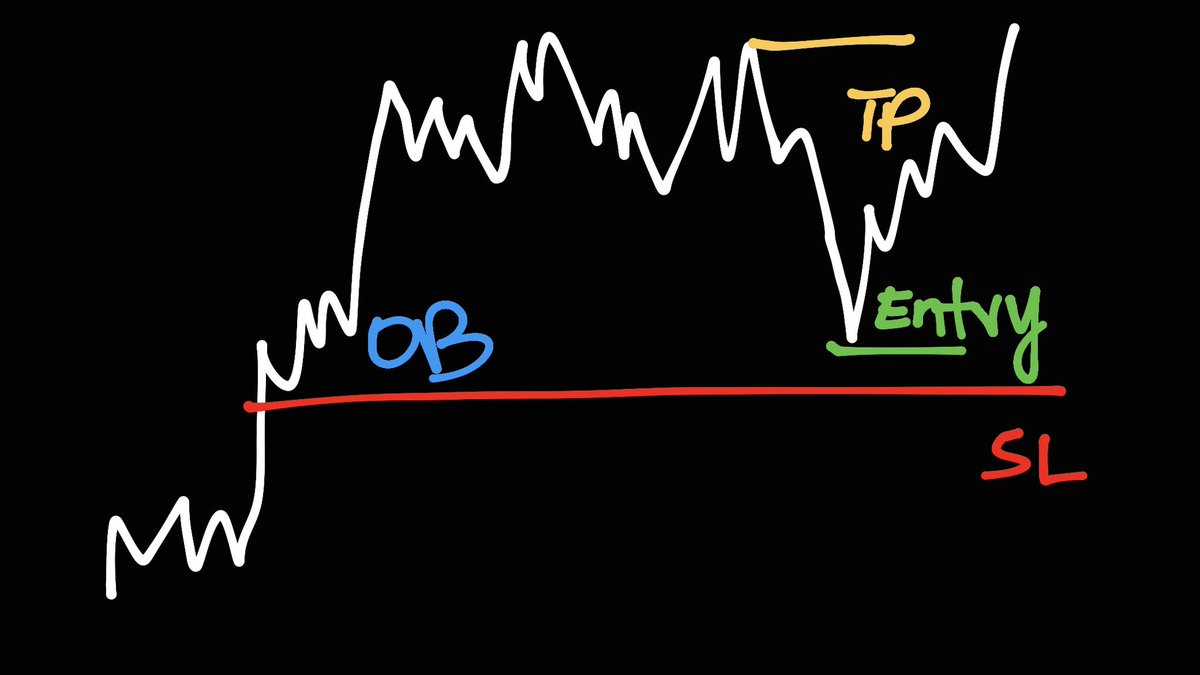
Setting Your Targets and Stops
Once you have identified the sweep and reclaim, you can set your target and invalidation levels.
Target: The goal is to profit from the price moving higher. A common target is the first significant high left on the chart, or the area known as Buy-Side Liquidity (BSL). BSL is the opposite of SSL; it's a zone with a concentration of "sell stop" orders, typically located at highs on the chart.
🚨Invalidation: This is your risk management tool. You should place a "hard stop" or a protective stop-loss order just below the lowest point of the recent low created by the sweep. If the price falls below this point, your trade is considered "invalidated" and the position is automatically closed to prevent further losses. This is a crucial step for managing risk.
2. Equal Lows Sweep Model📈
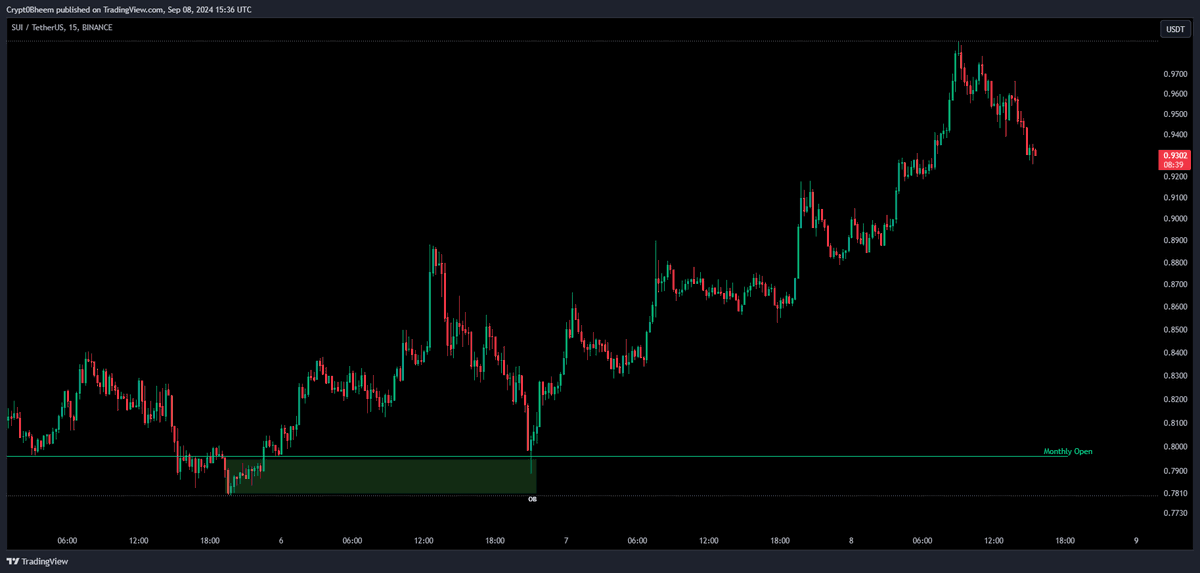
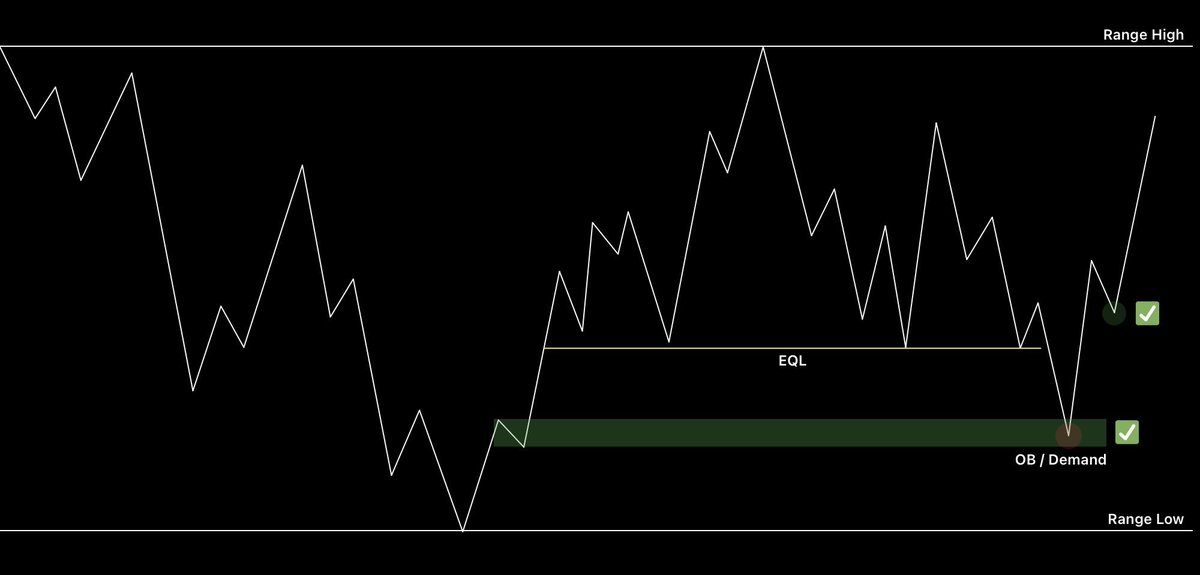
This model focuses on a trading pattern where the price forms two or more lows at roughly the same level, creating what's known as Equal Lows (EQL). These equal lows often attract traders who believe the price will go up, and they place their protective stop-loss orders just below this level. This creates a pool of sell orders, which is a form of liquidity.💧
The Strategy: Identifying and Trading the Sweep
The core of this strategy is anticipating that the price will drop to "sweep" or clear out the stop-loss orders below the EQL. This often happens before a significant move in the opposite direction.
👉Identify the EQL: Look for a "clustered area" on the chart where multiple candle wicks or lows are at a similar price level.
👉Find the Target: The next step is to find where the price might go after the sweep. To do this, look for an untapped Order Block (OB) or a Demand Zone located just below the EQL. These zones act as magnets for the price and potential reversal points.🎯
Entry and Invalidation
You have two main ways to enter a trade using this model:
👉Limit Order: You can place a limit buy order directly at the untapped OB or Demand Zone, anticipating that the sweep will hit this level and the price will bounce.
👉Wait for Sweep & Reclaim: A safer option is to wait for the sweep to happen first. After the price drops below the EQL and tags the OB/Demand Zone, you wait for it to "reclaim" the level by moving back up. The same confirmation rule from Model 1 applies: a strong confirmation is a 4-hour (H4) candle closing back above the low of the sweep.✅
For invalidation, or your exit strategy, there are two approaches:
👉Hard Stop: A simple way to manage risk is to place a hard stop-loss order below the OB or Demand Zone. If the price goes through this zone and the OB shows no reaction within the first few H4 candles, the trade idea is likely wrong, and you should exit.
👉Manual Stop: Some traders prefer to use a manual stop. This involves watching the trade closely and exiting if the OB doesn't show a strong upward reaction. This allows you to "absorb" small wicks that might briefly go lower before the price reverses, but it also requires more active monitoring🛑
3. Break of Structure (BOS) Model📈
This trading model, while less predictable, focuses on a continuation of a trend after a significant price event. The price action during this model can be "choppy," meaning it's erratic and hard to read.
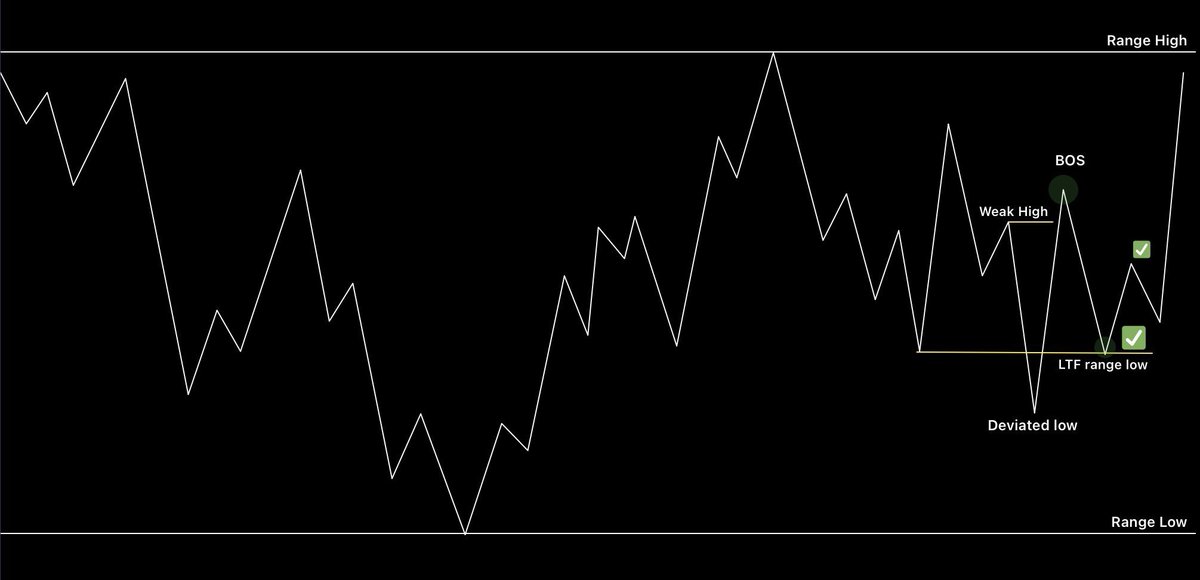
The core idea is to identify a "weak high" within a downtrend. Normally, in a downtrend, each new high should be lower than the previous one. A "weak high" is one that is not significantly lower, or one that price action seems to struggle to fall from.
The Thesis: What to Look For
The main theory behind this model is simple: if the price is able to push past this weak high during an overall downtrend, it signals strong buy pressure. This is a potential sign that the downtrend is weakening and a reversal or a temporary strong upward move is about to begin.
How to Enter a Trade
Once you've identified the potential Break of Structure (BOS), you need to find a good entry point.
👉Entry: Look for a low-timeframe (LTF) range low or an LTF Order Block (OB)/Demand Zone that was created after both the buy side and sell side liquidity have been taken. This area is known as a Point of Interest (POI). It's where you would expect buyers to step in and push the price higher.
Setting Your Target and Invalidation
Since a successful BOS often removes a lot of the resistance above, the price has a relatively clear path to move higher.
🎯Target: You can aim to take profit all the way back up to the previous range high.
🛑Invalidation: Place a hard stop-loss order just below the local low that was created before the BOS. If the price returns to this low, it suggests that the original downward trend is resuming and the trade idea is invalidated.
4. Range Low Sweep Model📈
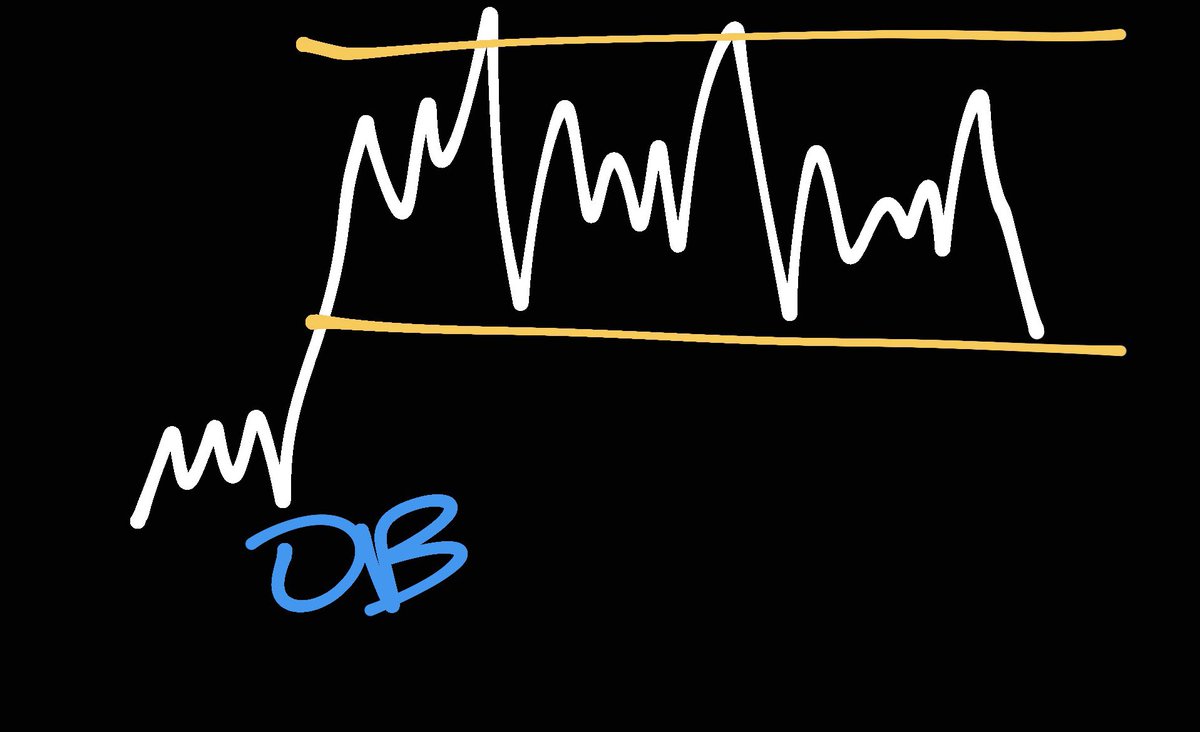
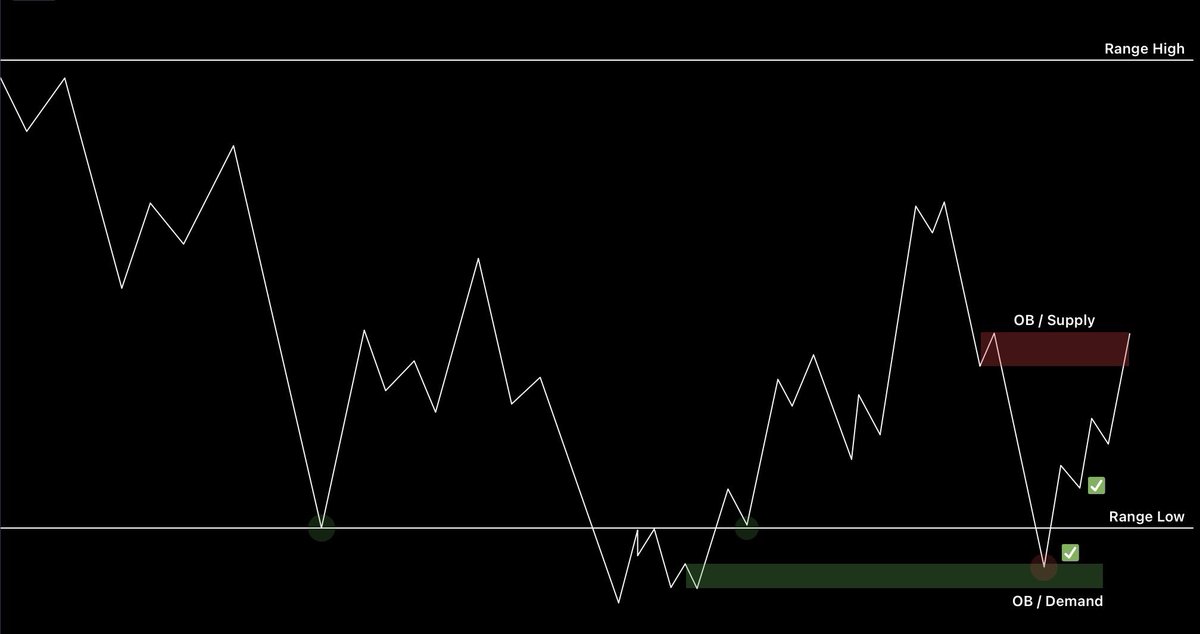
This is a trading model that focuses on range-bound markets—where the price moves back and forth between a high and a low. This strategy involves identifying a "sweep" of the low point of this range.
The Strategy: Identifying and Trading the Sweep
This model is popular because it often provides reliable entry points. The main idea is to watch for the price to drop just below the range low—this is the sweep. After the sweep, the price will often move quickly back up, a move called a "reclaim" or "deviation."
👉Entry: The key to this strategy is to identify the Order Block (OB) or Demand Zone that is formed just below the range low after the sweep. You can place a buy order here, as these zones are very likely to be tested again. This test often provides a strong bounce, making it ideal for scalping, which is a type of short-term trading.
👉Confirmation: If you are unsure about entering with a limit order, you can wait for confirmation. A similar approach to Model 1, you can wait for the price to reclaim the range low after the sweep. A strong move back into the range confirms that the sweep was likely a liquidity grab and not a true breakdown.
Setting Your Target and Invalidation
Like with any trading strategy, you need clear rules for managing your risk.
👉Invalidation: You should place your stop-loss order just below the lower band of the OB or Demand Zone. It's important to give it enough room to allow for small wicks, which might briefly dip lower before the price moves up.
👉Target: The goal is to profit from the price moving higher. A common target is the latest supply zone created during the price's downward move. A supply zone is an area where sellers are likely to enter the market, and the price will face resistance.
5. Range High Flip Model📈
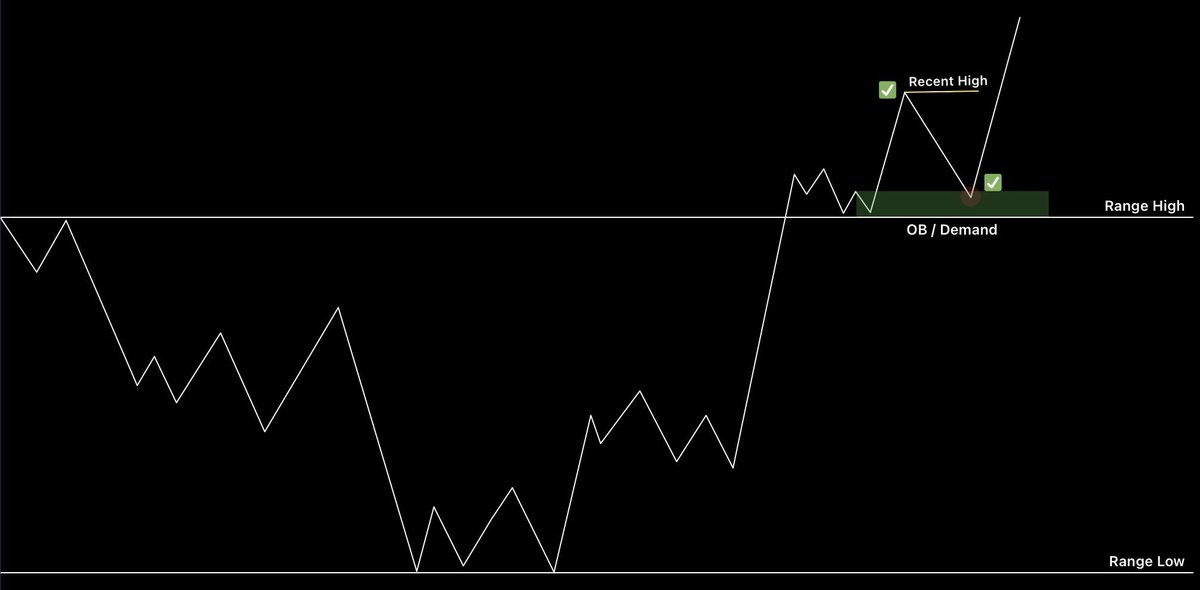
This strategy is for when the price breaks out of a trading range but then doesn't move higher. This often happens because you're following a trend without watching the actual momentum behind the price action.
The core idea of this model is to identify a specific signal that shows a large entity is interested in keeping the price moving up.
The Strategy: Spotting the 'Flip'
After the price breaks above the range high, you need to look for a specific confirmation: an Order Block (OB) or Demand Zone is created above the high. This is your key signal. It shows that a big player is interested in pushing the price higher, and this is your confirmation that momentum is on your side.
👉Entry: Once you see this OB/Demand Zone, you can "bid the retest." This means you place a buy order when the price comes back down to test this newly created zone. This is often the best entry point.
👉Target: You can set your profit target at the most recent high or, depending on the overall market structure, you can even target an all-time high.
Invalidation: Knowing When to Exit
The key to this model is watching for a loss of momentum.
👉Invalidation: Manually close your trade if the price goes back down and accepts below the range high for a couple of 4-hour (H4) candles. This indicates that the momentum has been lost, and the breakout was likely a "fake-out." Exiting the trade at this point helps you avoid a potential reversal.
6. Golden Pocket (GP) inside Imbalance (IMB) Model📈
This model focuses on a strategy that combines a specific Fibonacci tool with a price phenomenon called imbalance (IMB) to find precise entry points.
Understanding the Tools
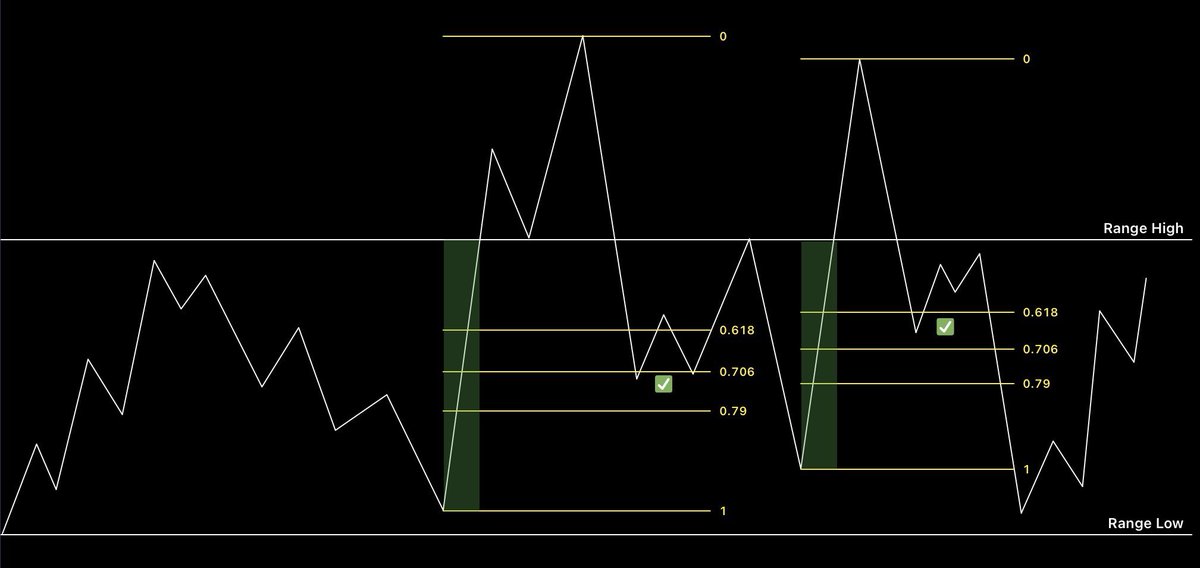
Golden Pocket (GP):💰 This refers to a specific zone on a Fibonacci retracement tool. Most traders use the standard 0.618 level, but this strategy uses a slightly custom range.
Imbalance (IMB):📈 Also known as a Fair Value Gap (FVG), an imbalance is created when a price moves very quickly in one direction, leaving behind a "gap" or a large candle with little to no retracement. Think of it as a huge "green dildo" candle on the chart. These imbalances represent an inefficiency in the market that price often comes back to fill.
The Strategy: How It Works
Have you ever seen a price chart where the highs and lows just keep swinging, making you question your entire analysis? This model is designed for those moments. Instead of using the entire, often too wide, imbalance as an entry zone, this strategy uses the more precise Golden Pocket.
👉Identify the Imbalance: Look for a large, impulsive candle that shows no signs of a pullback.
👉Mark the Golden Pocket: Use a custom Fibonacci retracement tool on the imbalance. The key entry zone is the 0.618 to 0.706 range. This is the Golden Pocket for this strategy.
👉Enter the Trade: You place your entry within this specific Golden Pocket range, anticipating that the price will retrace and "bounce" off of this zone.
Invalidation and Target
👉Invalidation: Your stop-loss is placed just below the 0.79 Fibonacci level. If the price falls below this point, the trade idea is invalidated, as it shows the imbalance is not holding and the momentum has shifted.
👉Target: When setting your target, keep in mind the current trend structure. Since imbalances often don't fully retrace to the very top after a retest, it's best to take profits in a timely manner on the bounce.
7. Patterns for Confirmation Model📈
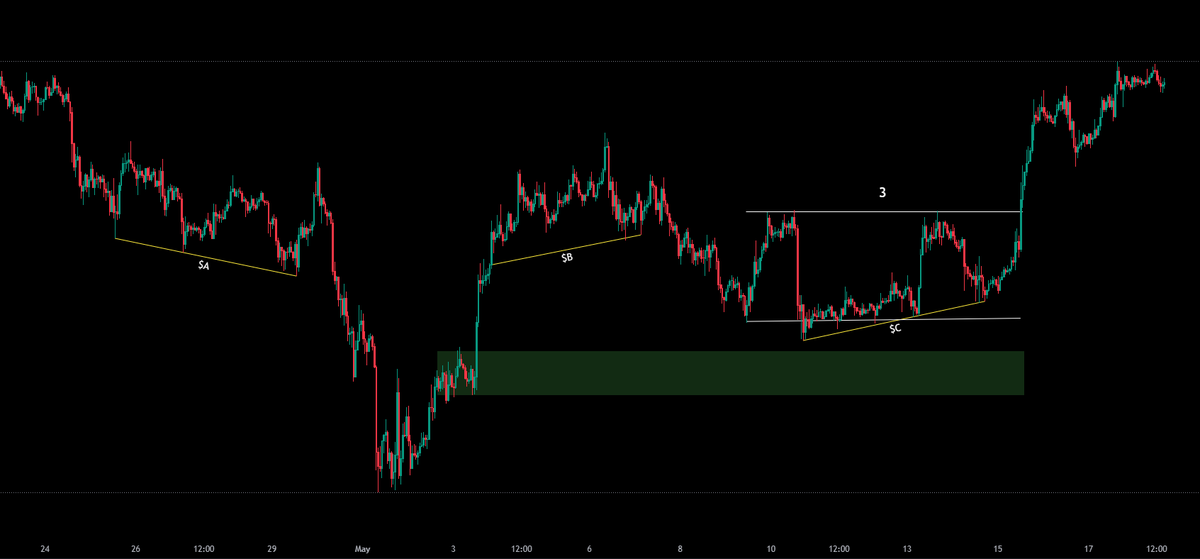
Some traders consider using chart patterns a beginner's mistake, but they exist for a reason—you might just be using them incorrectly. This model shows how to use classic patterns as a secondary confirmation for a change in trend, not as the primary signal.
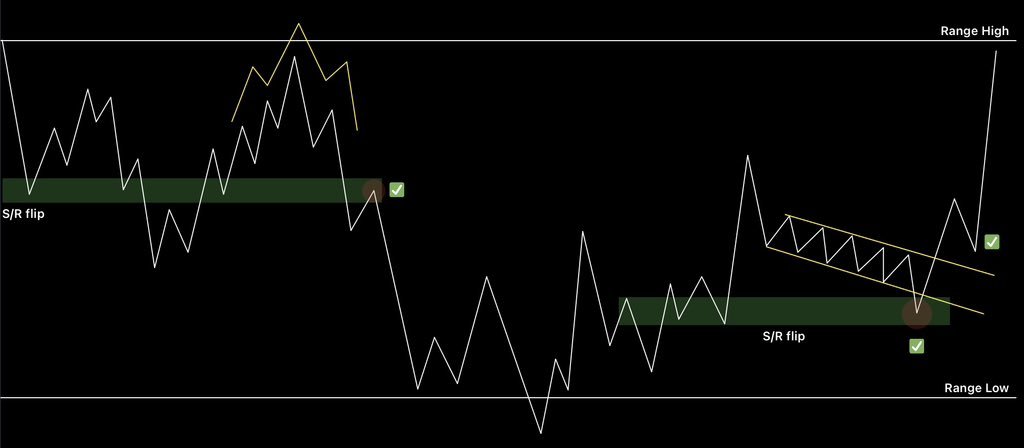
Step 1: Identify the Support/Resistance (S/R) Flip🔄
The first step is to identify an S/R flip. This is when a support level becomes resistance, or vice versa, and is a crucial first confirmation of a potential trend change. Once you see this flip, you can then look for a pattern to confirm the new direction.
Left Example (H&S Pattern): On the left side of the chart, you'll see a classic Head & Shoulders (H&S) pattern forming. The trigger to enter the trade isn't the pattern itself, but rather when the S/R level breaks down. This breakdown confirms that the downward momentum is taking over.
Right Example (Bull Flag): On the right side, after a sweep of the range lows, a new upward trend begins. Following a successful S/R breakout, a Bull Flag pattern forms. You have two options for entry:
1. Long the retest of the S/R level.
2. Long the retest of the flag breakout.
Both methods work because they are aligned with the new, established trend.
❌Why Patterns Fail
Patterns often fail when they are used in isolation or when they go against the trend of the individual price range. If you were to flip the examples in this model—for instance, trying to trade a bull flag in a strong downtrend—the pattern would likely fail. You'd be trying to force a pattern to work against the established momentum of the market.
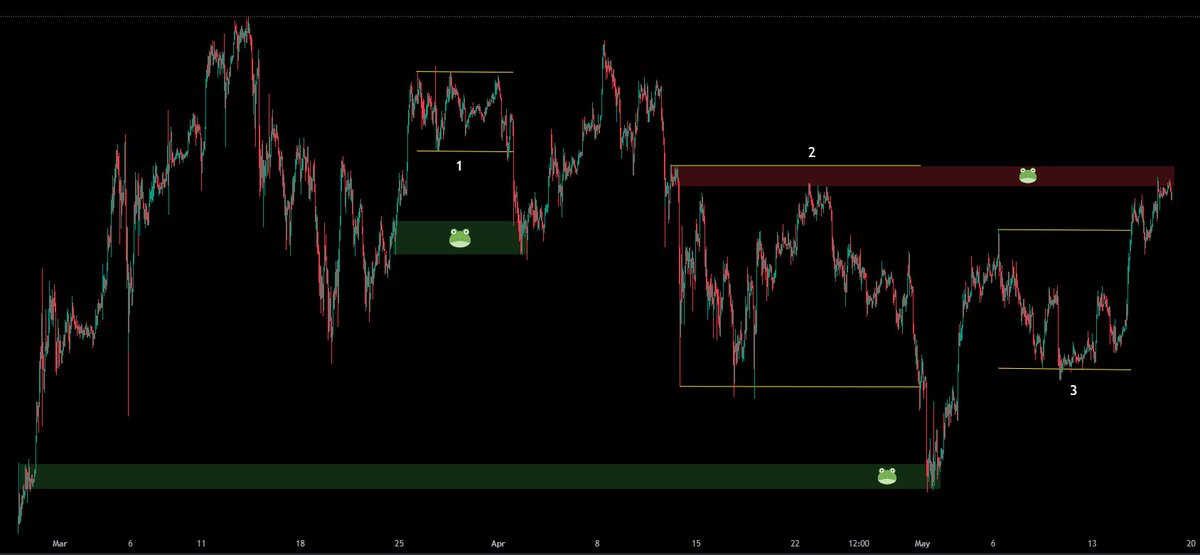
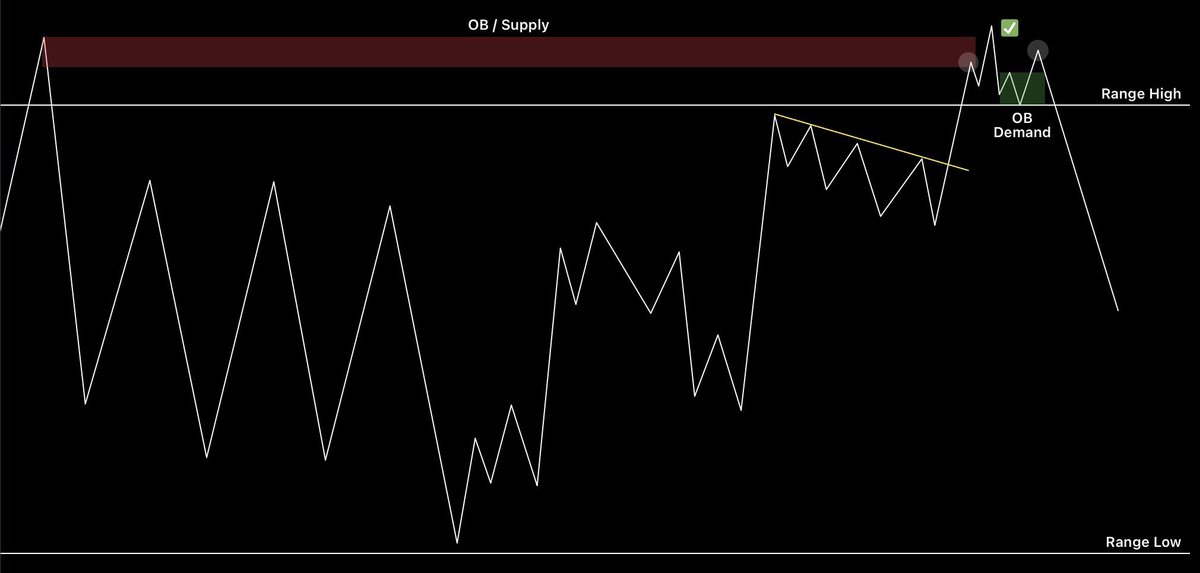
8. Failed Auction Model📈
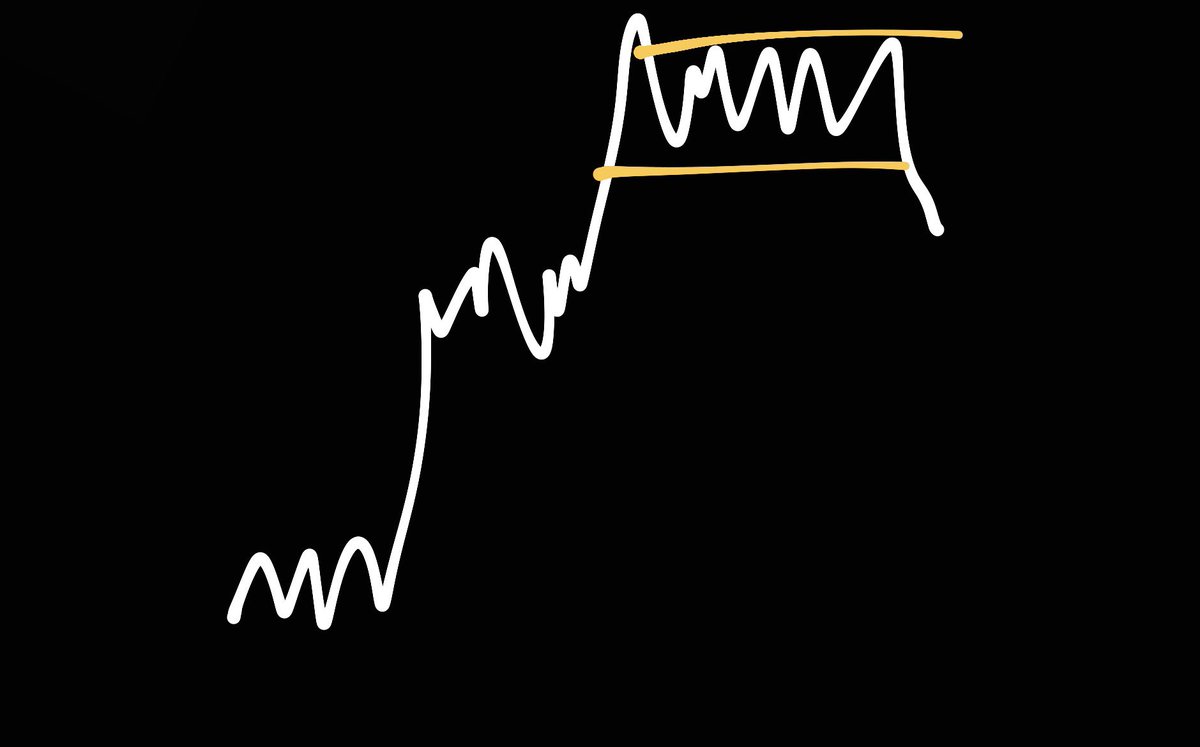
This model is a cautionary tale and an advanced version of Model 5. Have you ever entered a trade where all the signs for a breakout are there—the trend is strong and your confirmation seems solid—but the trade ends up failing and looking something like a sharp "V" reversal? This is often because you've overlooked a crucial detail from the past.
The Cause: Neglecting Past Trend🕵️♂️
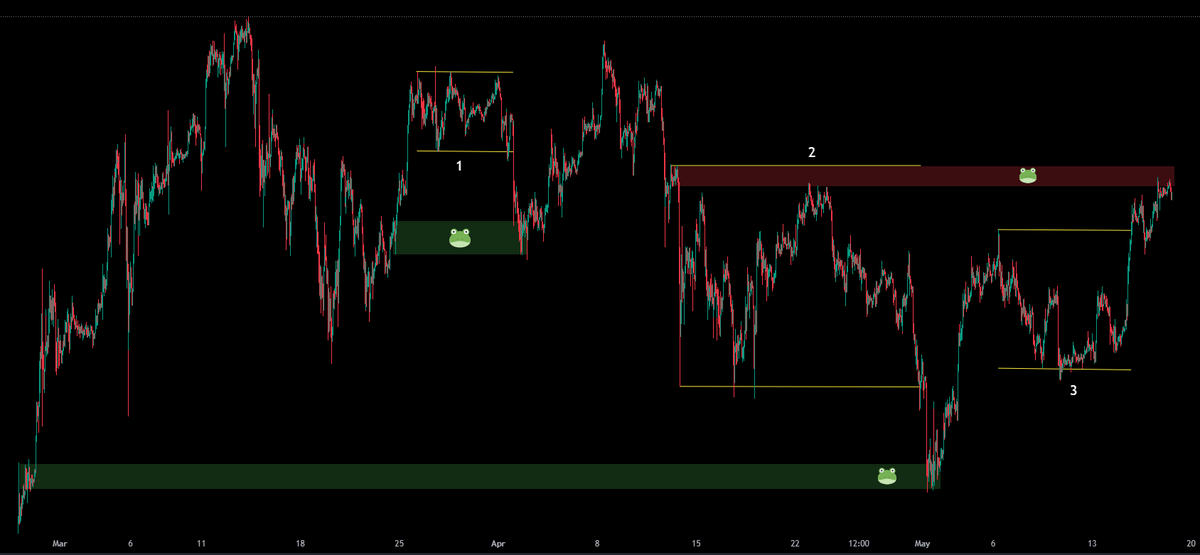
The reason for a "failed auction" is simple: even though you are focused on the most recent momentum, you have neglected the higher timeframe (HTF) trend that led to the current price action. In this scenario, there's likely a significant Higher Timeframe Order Block (HTF OB) or Supply Zone located just above your range high breakout.
An Order Block (OB) is an area where a large institution placed orders, and a Supply Zone is an area where there is a concentration of sell orders. These zones act as strong areas of resistance.
Your price breakout hit this powerful HTF resistance, and it failed to break through.
How to Avoid a Failed Auction🙅♂️
The lesson here is simple: you cannot enter a long trade unless the price successfully breaks through this higher timeframe resistance. Trading in these situations is extremely risky because you are essentially going against a powerful, pre-existing trend on a larger scale.
This model teaches you to always check for significant OBs or Supply Zones on higher timeframes before entering a breakout trade.
If you see one, you must wait for the price to break through it before you consider a long entry.
The inverse of this scenario—trading a powerful reversal off a higher timeframe level—is covered in Model 12.
9. Trading with Momentum Model📈
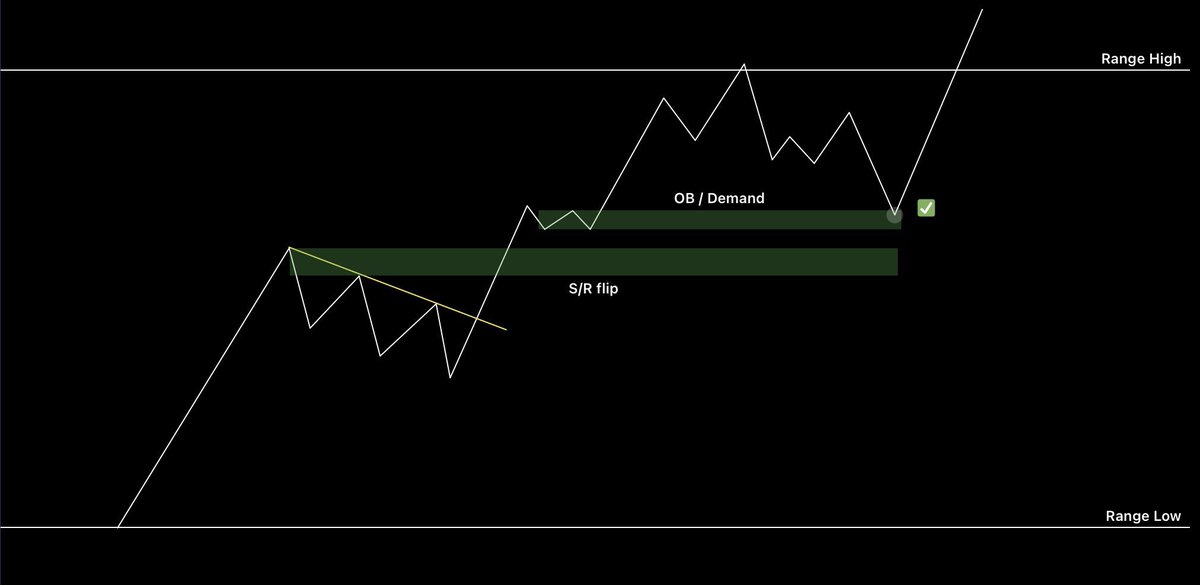
This is one of the easiest setups to spot, yet it's one of the most frequently missed by traders of all experience levels. This model teaches you to trade with the prevailing force of the market—momentum—instead of relying on an obvious support/resistance (S/R) level.
Why the Obvious Entry Can Be a Trap 🪤
When you look at a chart without any markings, your first thought for an entry after a trendline break is likely to be a retest of the S/R level. However, for an S/R level to be valid, it needs to show a balanced ratio of a continuing trend versus a retracement.
In this specific scenario, if the price were to come back down to the S/R level, it might show a small bounce. But it would likely break down eventually. Why? Look at how much the price moved after the trendline break. It wouldn't make sense for buyers to step in again at that obvious level after sellers have pushed the price down with so much force. The momentum has shifted.
The Correct Entry: Following the Momentum🏃♂️
The right approach is to continue with the momentum. Look for an Order Block (OB) or Demand Zone that is present slightly above the obvious S/R level. This is where the real buying power is concentrated, and it's the more logical place for the price to retrace to before continuing its move.
Entry: You'll place your entry at this less obvious OB/Demand zone.
Invalidation: Place a hard stop-loss just below the S/R level. If the price were to fall below this point, it would signal a failed continuation, as more than half of the trend's momentum would have been absorbed.
10. OB over OB Model📈
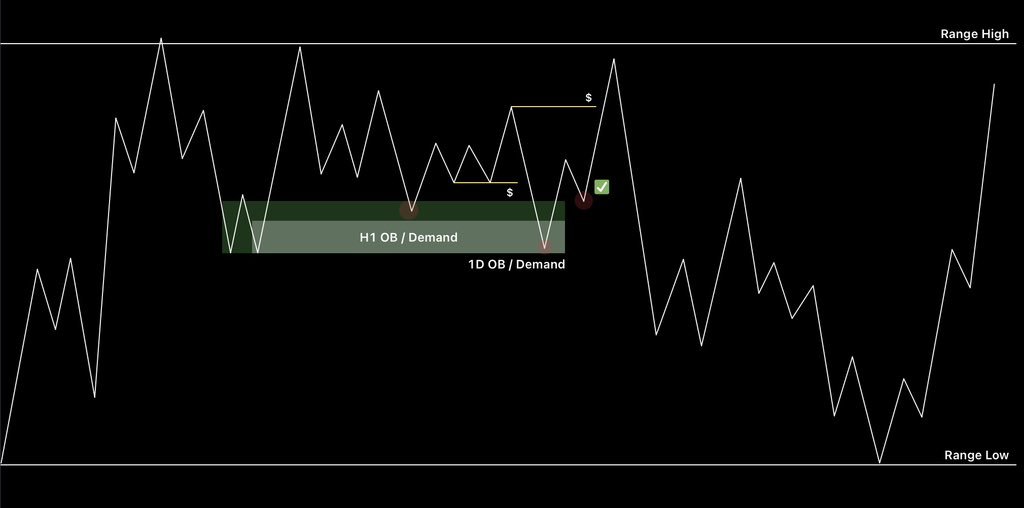
This model focuses on a unique and rare setup where Order Blocks (OB) or Demand Zones are stacked on top of each other. While charts with these "clustered areas" can look confusing, they actually present a rare opportunity for a high-reward, high-probability trade.
The Strategy: Layered Confirmation
The key to this model is identifying a layered approach, starting with the highest timeframe and working your way down.
👉Identify the Higher Timeframe (HTF) OB: First, find a major Order Block or Demand Zone on a higher timeframe chart. This is your primary area of interest.
👉Wait for Mitigation: Wait for the price to come down and mitigate this HTF OB. "Mitigation" means the price touches or enters the OB, filling the orders within it.
👉Identify the Lower Timeframe (LTF) OB: After the mitigation, the price will likely chop around above the HTF OB, creating "poor lows." Now, you'll look for a smaller, lower timeframe (LTF) OB or Demand Zone that has been created inside this chopped area. This LTF OB is the one that will be swept next, using the concepts from Model 2 (Equal Lows Sweep) and Model 4 (Range Low Sweep).
Invalidation and Target
Since you have two layers of confirmation—the HTF OB and the LTF OB—you can set your risk and reward with high precision.
👉Place Your Stop: Place your stop-loss order just below the low of the Higher Timeframe OB. This gives your trade enough room to handle any wicks or minor fluctuations, and if the price breaks below this point, your entire trade idea is invalidated.
👉Target: Set your profit target at the nearest supply zone or Buy-Side Liquidity (BSL) level. Since you have a strong setup, you can aim for a high reward-to-risk ratio.
11. AMD or PO3 Model📈
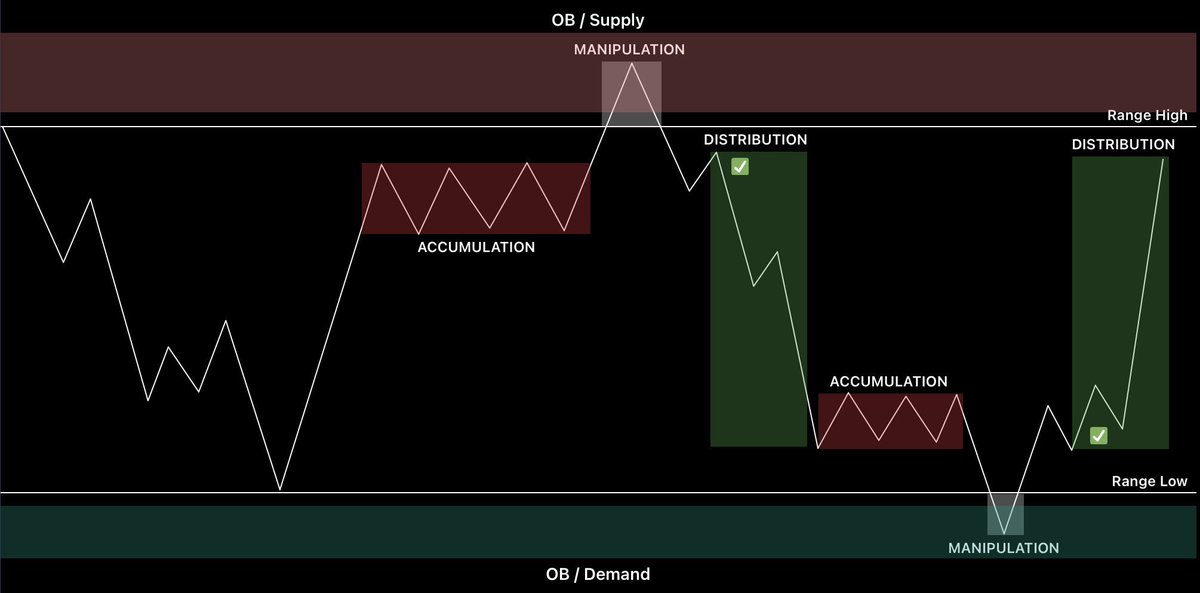
Have you ever been on the wrong side of a trade, only to see the market reverse completely and leave you with a losing position? This model explains a common market cycle that can help you avoid this and potentially profit from it. The Power of 3 (PO3), also known as Accumulation, Manipulation, Distribution (AMD), describes a three-phase market cycle often seen in price action.
The Phases of AMD📊
Accumulation: This is the first phase, where large institutions are quietly building a position (buying or selling). On the chart, this looks like a period of consolidation or sideways movement.
Manipulation: This is the phase that often catches retail traders off guard. It's a quick price move in the opposite direction of the intended trend. The purpose is to trigger stop-losses and grab liquidity. This is where you can apply the concepts from Model 4 (Range Low Sweep) and Model 8 (Failed Auction) to understand how the manipulation is designed to tap into an Order Block or Demand/Supply Zone.
Distribution: This is the final phase, where the price moves in the intended direction. This is where the large institutions release their positions for a profit. This is the 360-degree trend reversal you're looking for.
The Strategy: Trading the AMD Cycle
The best way to use this model is to wait for the manipulation phase to complete and for the price to show clear signs of a reversal. You can either:
Wait for the price to fully move into the Distribution phase. This means you have confirmation that the manipulation is over and the new trend has started.
Enter Inside the Distribution Phase: Once you have a clear signal that the manipulation is over (e.g., a sweep and reclaim, or a successful retest of an OB/Demand zone), you can enter the trade.
Place Your Stop-Loss: Place a hard stop-loss order just below the low of the manipulation phase. This is a logical place to exit if the intended reversal fails.
Target: Aim for the opposite side of the range. If you're trading a long setup, your target would be the high of the previous accumulation or a new high.
12. Supply Flip Model📈
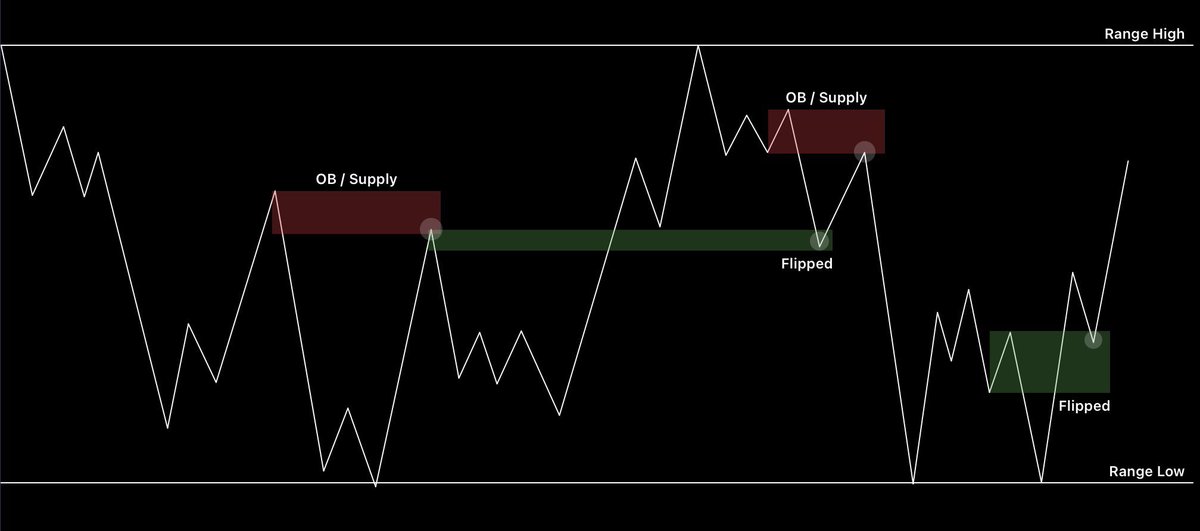
As a spot trader, there are times when the overall market trend is so bearish that no long trades seem to make sense. This model provides a strategy for a "counter-trend" trade—a scalp—when the price shows a sign of a temporary reversal in a downtrend.
The Strategy: Flipping Supply🔄
The core of this model is to wait for a significant supply zone to "flip" and turn into a support level. A supply zone is an area on the chart where a concentration of sellers is present, pushing the price down. A "flip" is when the price breaks through this supply zone and then retests it from above, turning it into a demand zone.
Wait for the Flip: The first step is to wait for both a Lower Timeframe (LTF) and a Higher Timeframe (HTF) Order Block (OB) or Supply Zone to be successfully broken through. This shows that the sellers' strength is weakening.
Look for Confirmation: Once the price breaks above these supply zones, you need a confirmation that they have flipped. This is often a retest of the zone from above. This retest provides a strong signal that the supply has now turned into demand and can act as a support level.
Entry: You can enter a long scalp trade on this retest. A scalp is a very short-term trade designed to profit from a small price movement.
Target: Your target is the next nearest resistance level. This is where you would expect sellers to step in again and halt the upward movement.
Invalidation: Managing Risk🚫
Since this is a counter-trend trade, risk management is crucial.
Stop-Loss: Place your stop-loss order just below the first rejection point of the supply zone. This is the low point of the retest. If the price falls back below this level, it indicates that the supply flip failed.
Manual vs. Hard Stop: The user notes they often use a manual stop to "absorb any wicks." This means they watch the trade closely and only exit if the price closes below the stop-loss level on a candle, rather than getting stopped out by a temporary wick. This requires active monitoring but can prevent premature exits.
If you found these models helpful, please consider liking and retweeting to share them with others!
I'd love to hear about your experiences and results after testing these strategies. You can share your testimonials by making a quote tweet, which will allow me to easily find your feedback.
For daily market analysis and trade setups, you can turn on both tweet and reply notifications.
👉The content from these models is also available in video form at the following link: youtube.com/watch?v=4yRRev…
• • •
Missing some Tweet in this thread? You can try to
force a refresh

