shadcn Profile picture
Dec 12 6 tweets 2 min read Read on X
Introducing shadcn/create – Build your own shadcn/ui

Customize Everything. Pick your component library, icons, base color, theme, fonts and build something that doesn’t look like everything else.

Now available for Next.js, Vite, TanStack Start and v0.
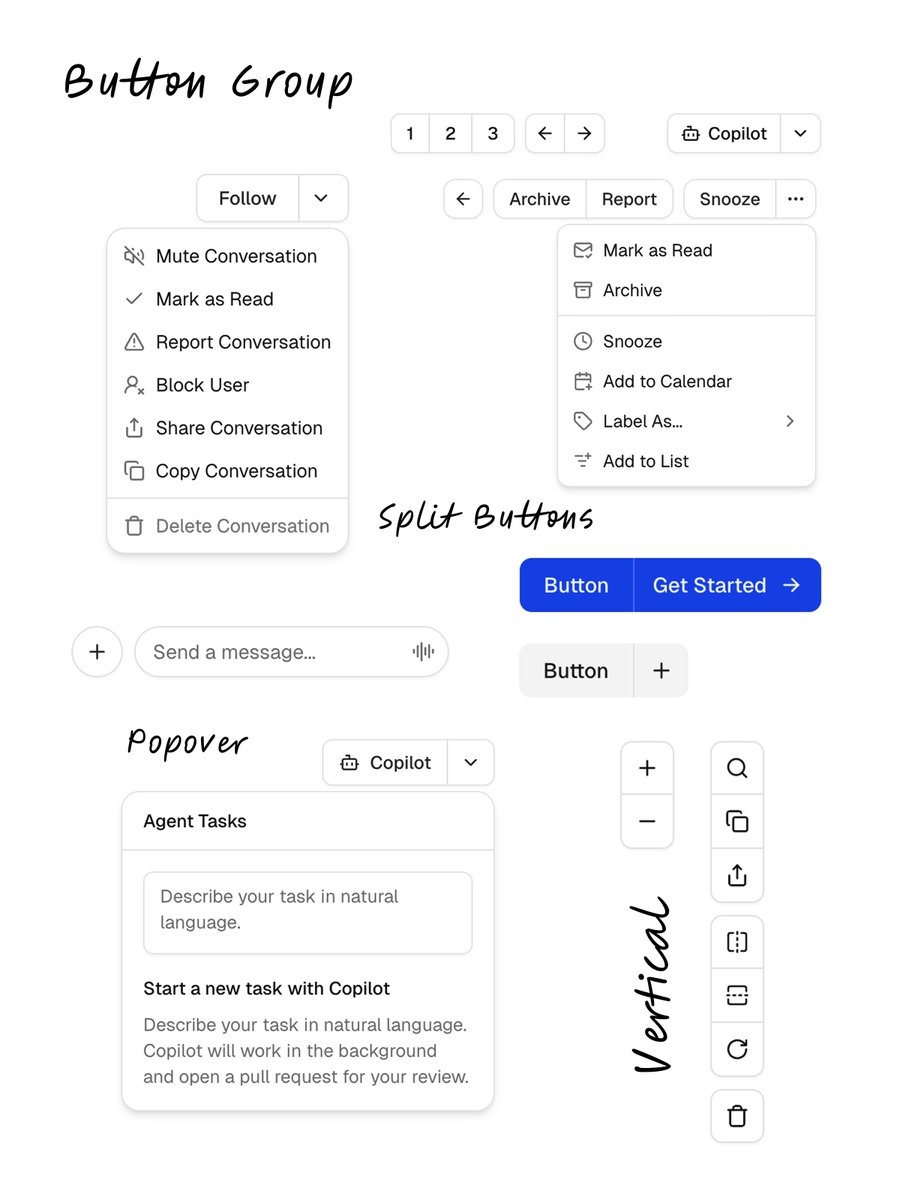
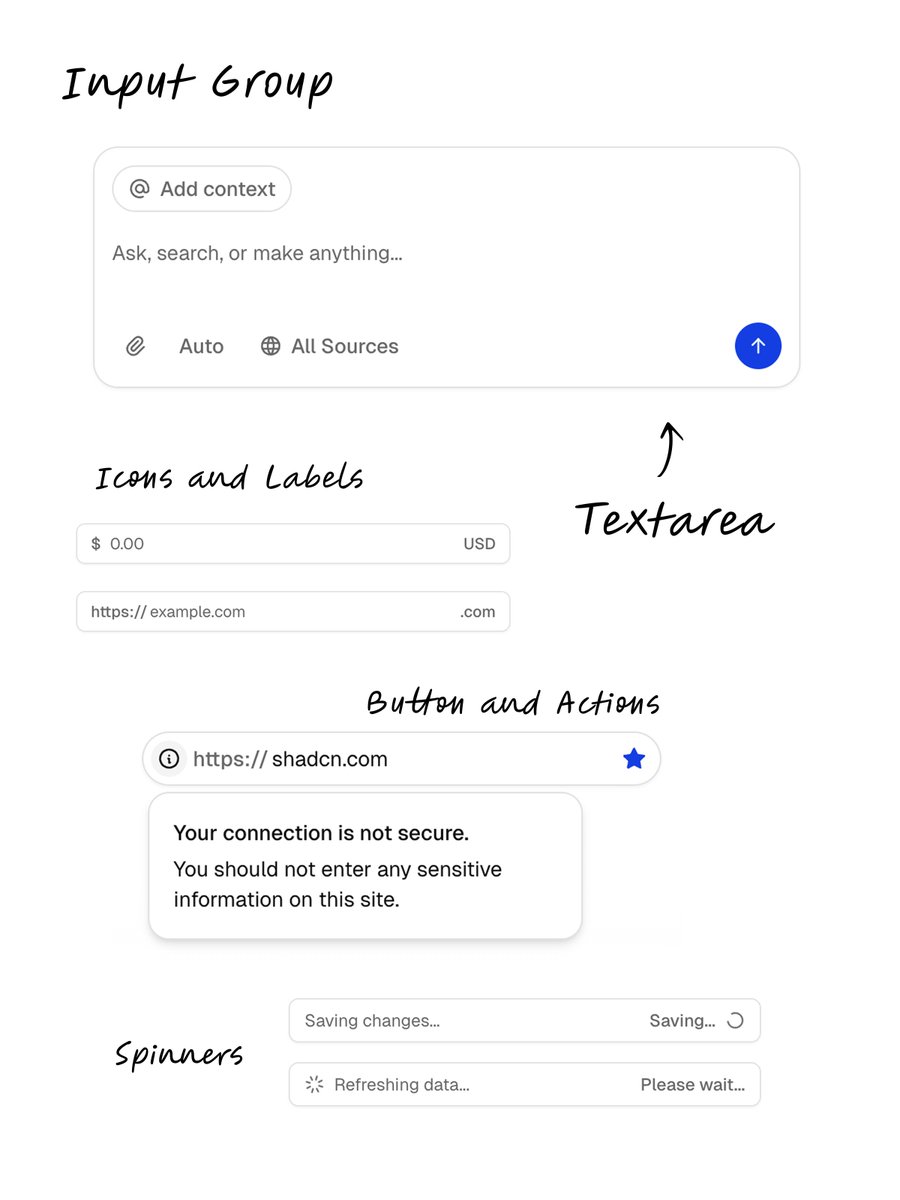
From the very first commit, the goal of shadcn/ui has been to give you solid defaults: spacing, color tokens, animations, accessibility, and let you take it from there.

Tweak the code. Add new components. Change the colors.

We’re making this even easier with npx shadcn create.
Start with a component library: Radix or Base UI.

We rebuilt every component for Base UI, keeping the same abstraction. They are fully compatible with your existing components, even those pulled from remote registries.

When you add components, we auto-detect your library and apply the right transformations.Image
We’re also adding 5 new visual styles, designed to help you build something unique.

1. Vega – The classic shadcn/ui look.
2. Nova – Reduced spacing for compact layouts.
3. Maia – Soft and rounded, with generous spacing.
4. Lyra – Boxy and sharp. Pairs well with mono fonts.
5. Mira – Compact. Made for dense interfaces.
This goes beyond theming.

Your config doesn’t just change colors, it rewrites the component code to match your setup. Fonts, spacing, structure, even the libraries you use, everything adapts to your preferences.

The new CLI takes care of it all.
Go give it a try. Click +New Project on

A special shoutout to the @base_ui team for building an incredible component library. Their work made it easy to build everything without breaking the abstraction. Huge.ui.shadcn.com

• • •

Missing some Tweet in this thread? You can try to force a refresh
 

Keep Current with shadcn

shadcn Profile picture

Stay in touch and get notified when new unrolls are available from this author!

Read all threads

This Thread may be Removed Anytime!

PDF

Twitter may remove this content at anytime! Save it as PDF for later use!

Try unrolling a thread yourself!

how to unroll video
  1. Follow @ThreadReaderApp to mention us!

  2. From a Twitter thread mention us with a keyword "unroll"
@threadreaderapp unroll

Practice here first or read more on our help page!

More from @shadcn

Oct 3
New components. This time it’s the boring stuff. The things we rebuild over and over. Made into components.

Button Group, Field, Input Group, Empty States, Item.

They compose beautifully and handle the common patterns we reach for every day.

Let’s take a look ⬇️ Image
Let’s start with Button Group. Highly requested.

Perfect for action groups, split buttons, and more. Works horizontally, vertically, and you can even nest them. Image
Input Group lets you add icons, buttons, text, you know, all those little bits you always need around your inputs.

Supports inline and block alignments. Works with input and textarea. Image
Read 8 tweets
Jul 19
Here’s the app idea. But first the problem:

- Our conversations are scattered across apps
- Answers are wall of text. You only care about 1-2 lines
- Copy-pasting useful parts is tedious
- And good luck finding where you ask what

Coppermind is a small...(continues in thread). Image
Coppermind is a small app you open & forget. It runs in background.

Find something useful? Select. Tap Shift twice. Instantly added to a note.

(Demo showing ChatGPT on the left and Coppermind on the right)
It works everywhere: browser, Mac app, your code editor, terminal, anywhere.

You can keep adding from any app and Coppermind will stitch everything together.
Read 6 tweets
Apr 30
Introducing the registry mcp. One command to make any component registry mcp-compatible.

Your Design System. Now with AI. Zero config.

We've got a lot to cover. Let's get started. ⬇️ Image
1/10 - Here’s a custom registry I built for testing. It has custom components, color tokens, fonts, everything you'd expect in a design system.
2/10 - The registry also has a registry:style. This is where we’ve list the custom tokens & css vars to be set up when you init a project.

We’ve also added a @cursor_ai rule. The rules instruct the llm how to setup providers, fonts and even next.config.ts.
Read 10 tweets
Apr 17
shadcn is the top comment here. Thank you. Here's why I call it a way to build your component library and NOT a component library.

"If you start a React project without shadcn/ui today, you will end up with shadcn/ui or something that looks like shadcn/ui"

Let's take a look ⬇️ Image
We'll start a new project with React and Tailwind. Every React project has a button. Let's add one. Image
Next, we need a dropdown menu. HTML does not come with a customizable dropdown menu. So we do what we've all done: look for a component library that has one, install it and wrap it.

Let's add the x-ui component library. Image
Read 8 tweets
Aug 30, 2024
Introducing the new CLI.

Install anything from anywhere—add components, themes, hooks, functions, animations, and generated code to your apps.

This marks a major step forward in distributing code that both you and your LLMs can access and use.

Let’s take a look.Image
First up, the CLI now has support for all major React frameworks out of the box: Next.js, Remix, Vite, and Laravel.

And when you initialize a new app, we update your existing Tailwind files instead of overriding them.
A component now ships its own dependencies. Take the accordion, for example—it can define its own Tailwind keyframes.

When you add it to your project, we’ll update your tailwind.config.ts file accordingly.

If a component needs recharts, new theme colors, and a hook, we can scaffold everything into your app.
Read 6 tweets
May 19, 2023
Introducing the Form component. Build accessible forms using react-hook-form and Radix UI.

◆ Composable & Accessible
◆ Validation using Zod
◆ Full control over markup
◆ Styled using Tailwind CSS
◆ Complete code examples
◆ Copy/Paste into your apps

ui.shadcn.com/examples/forms Image
The Form components use Radix's composable API under the hood.

It works with Input, Checkbox, Radio Group, Select, Switch, Combobox…everything.

Give it a Zod schema and it will automatically handle validation and error message rendering using the <FormMessage /> component. Image
The FormItem component takes care of generating unique ids for labels and inputs.

It sets the correct aria attributes such as aria-describedby and aria-invalid during validation.

You can also provide your own htmlFor and id if you want full control. No magic. Image
Read 6 tweets

Did Thread Reader help you today?

Support us! We are indie developers!


This site is made by just two indie developers on a laptop doing marketing, support and development! Read more about the story.

Become a Premium Member ($3/month or $30/year) and get exclusive features!

Become Premium

Don't want to be a Premium member but still want to support us?

Make a small donation by buying us coffee ($5) or help with server cost ($10)

Donate via Paypal

Or Donate anonymously using crypto!

Ethereum

0xfe58350B80634f60Fa6Dc149a72b4DFbc17D341E copy

Bitcoin

3ATGMxNzCUFzxpMCHL5sWSt4DVtS8UqXpi copy

Thank you for your support!

Follow Us!

:(