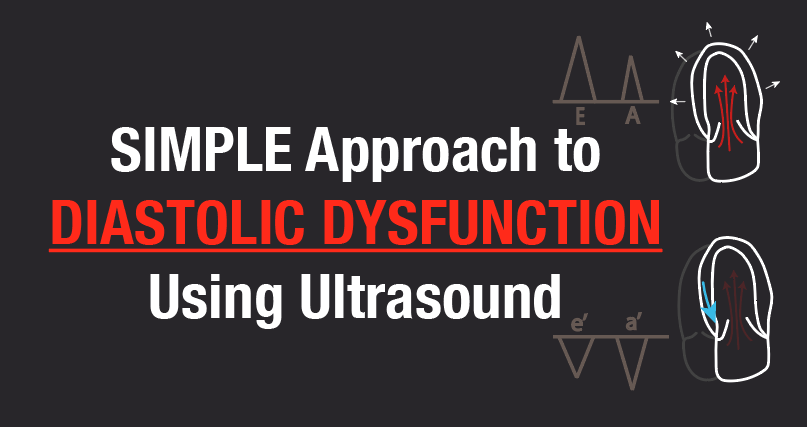
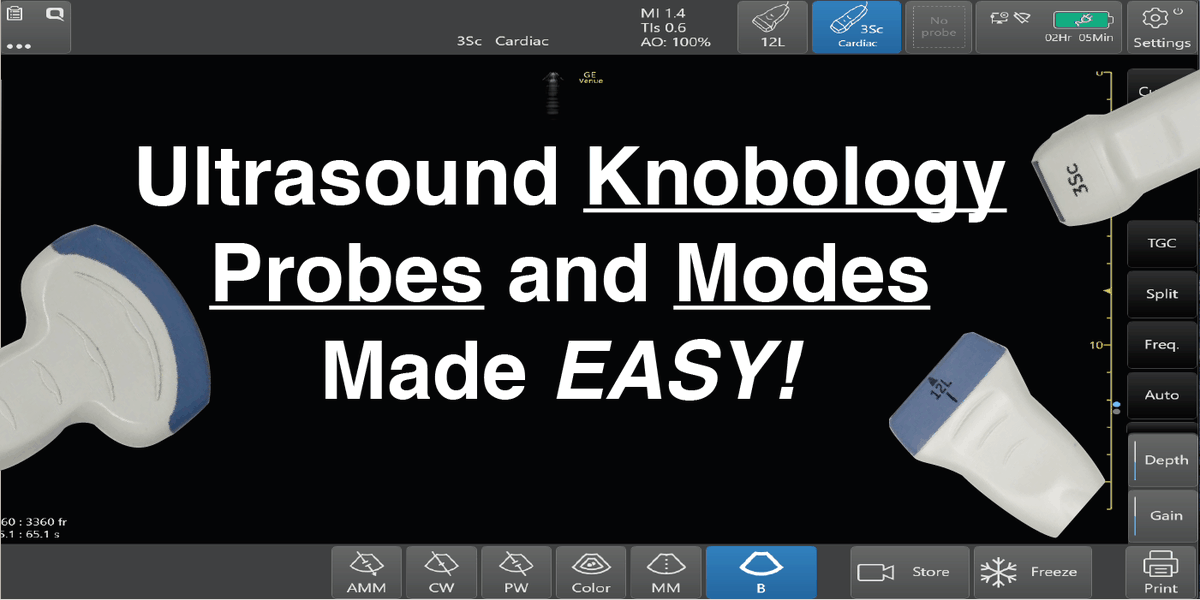
Having trouble figuring out Ultrasound Knobology, Probes, Modes?
Master #POCUS settings including probe movements, orientation markers, ultrasound planes, B-mode, M-mode, all Doppler settings, and MORE!
New Blog Post! 👉🔗pocus101.com/knobology
#medtweetorial👇(1/27)
Master #POCUS settings including probe movements, orientation markers, ultrasound planes, B-mode, M-mode, all Doppler settings, and MORE!
New Blog Post! 👉🔗pocus101.com/knobology
#medtweetorial👇(1/27)
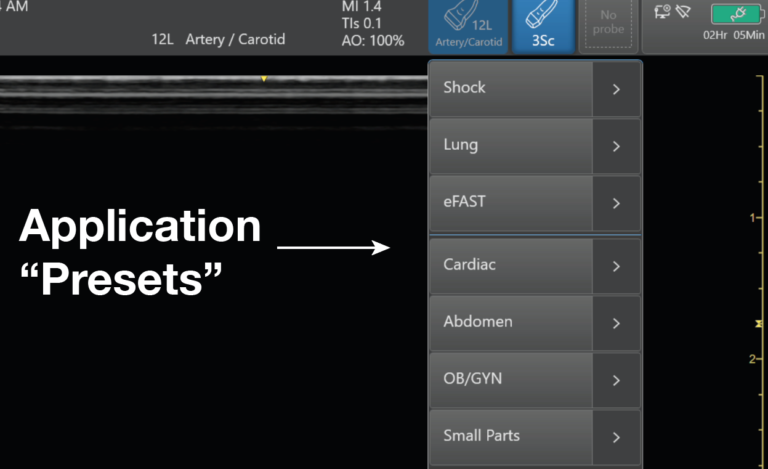
(2) Before choosing your ultrasound probe, always ask yourself:
• What application am I using this for?
• How deep are the structures?
• How big or small of a footprint do I need?
• Does it involve a procedure?
• Does it involve a cavity?
👉🔗pocus101.com/knobology
• What application am I using this for?
• How deep are the structures?
• How big or small of a footprint do I need?
• Does it involve a procedure?
• Does it involve a cavity?
👉🔗pocus101.com/knobology

(3) Handling the ultrasound probe and proper movement is essential to obtaining optimal ultrasound images. Learn the Essential Movements:
•Sliding
•Tilting
•Rotating
•Rocking
•Compression
👉🔗pocus101.com/knobology
•Sliding
•Tilting
•Rotating
•Rocking
•Compression
👉🔗pocus101.com/knobology

(4) SLIDING involves moving the entire probe in a specific direction to find a better imaging window.
This is usually used to find the best window, move to different areas of the body, or to follow a specific structure (such as a vessel).
👉🔗pocus101.com/knobology
This is usually used to find the best window, move to different areas of the body, or to follow a specific structure (such as a vessel).
👉🔗pocus101.com/knobology
(5) TILTING or FANNING the ultrasound probe involves moving the transducer from side to side along the short axis of the probe.
Tilting will allow visualization of multiple cross-sectional images of a structure of interest.
👉🔗pocus101.com/knobology
Tilting will allow visualization of multiple cross-sectional images of a structure of interest.
👉🔗pocus101.com/knobology
(6) ROTATING the ultrasound probe involves turning the transducer in a clockwise or counterclockwise direction along its central axis.
Rotation is most commonly used to switch between the long and short axis of a specific structure.
👉🔗pocus101.com/knobology
Rotation is most commonly used to switch between the long and short axis of a specific structure.
👉🔗pocus101.com/knobology
(7) ROCKING the ultrasound probe involves “rocking” the ultrasound probe either towards or away from the probe indicator along the long-axis.
Rocking allows you to help center the area of interest. This is also referred to as “in-plane” motion.
👉🔗pocus101.com/knobology
Rocking allows you to help center the area of interest. This is also referred to as “in-plane” motion.
👉🔗pocus101.com/knobology
(8) Compression with the ultrasound probe involves putting downward pressure on the probe to evaluate the compressibility of a structure or organ of interest.
👉🔗pocus101.com/knobology
👉🔗pocus101.com/knobology
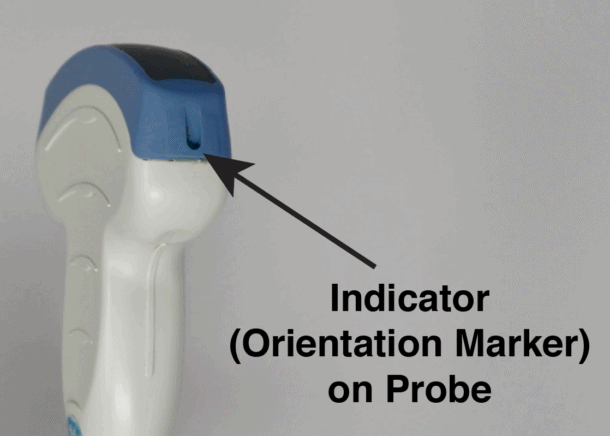
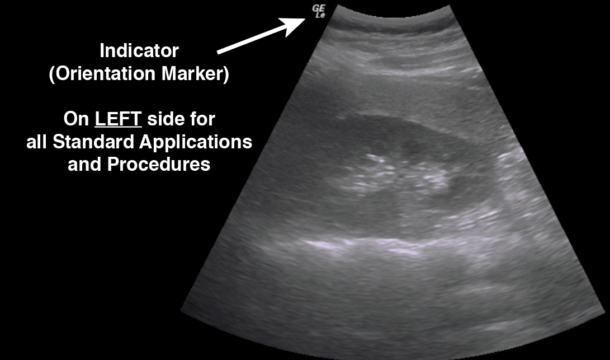
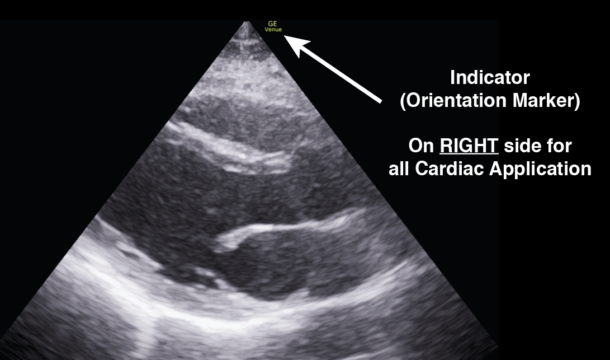
(9) Understand how the Indicator (orientation marker) on the probe correlates with the ultrasound image.
Standard: Left side of the screen
Cardiac: Right side of the screen
👉🔗pocus101.com/knobology
Standard: Left side of the screen
Cardiac: Right side of the screen
👉🔗pocus101.com/knobology
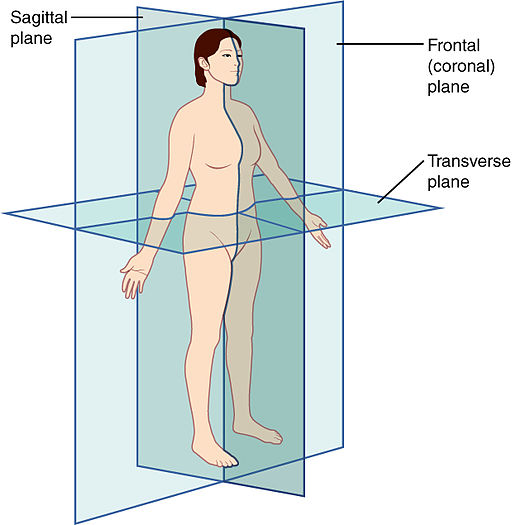
(10) Understand the imaging planes: Sagittal, Transverse, Coronal, and Oblique.
👉🔗pocus101.com/knobology
👉🔗pocus101.com/knobology
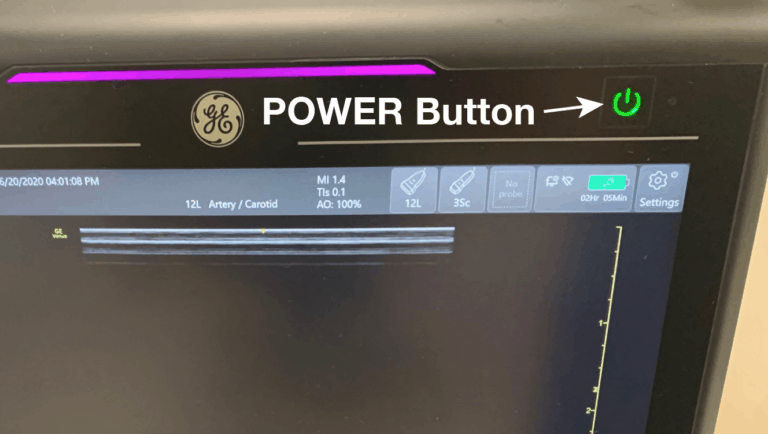
(11) Learn a stepwise approach to B-mode Knobology:
1.Power
2.Probe/Transducer
3.Preset
4.Depth
5.Overall Gain
6.TGC
7.Focus
8.Freeze/Measure/Save Image
👉🔗pocus101.com/knobology
1.Power
2.Probe/Transducer
3.Preset
4.Depth
5.Overall Gain
6.TGC
7.Focus
8.Freeze/Measure/Save Image
👉🔗pocus101.com/knobology
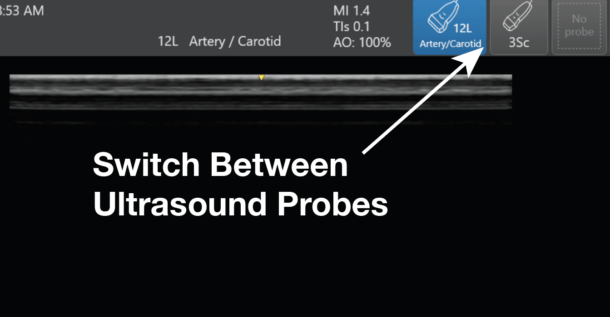
(13) Step 2: Select the correct Probe/Transducer. Picking the wrong transducer for an application is a fatal flaw!
👉🔗pocus101.com/knobology
👉🔗pocus101.com/knobology
(15) Step 4: Select the correct Depth.
The rule of thumb is to only use as much depth that is necessary to see your structure of interest.
👉🔗pocus101.com/knobology
The rule of thumb is to only use as much depth that is necessary to see your structure of interest.
👉🔗pocus101.com/knobology
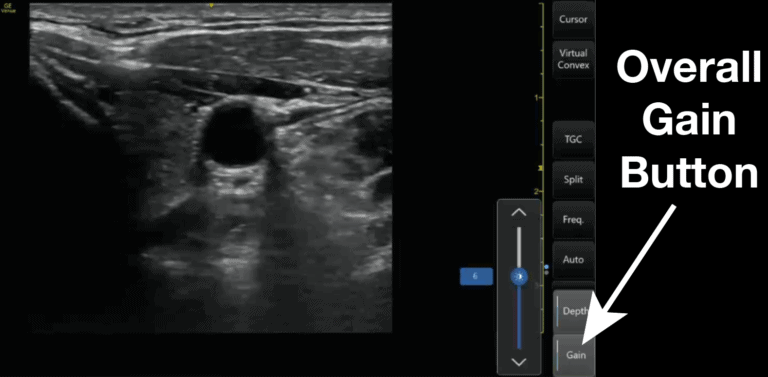
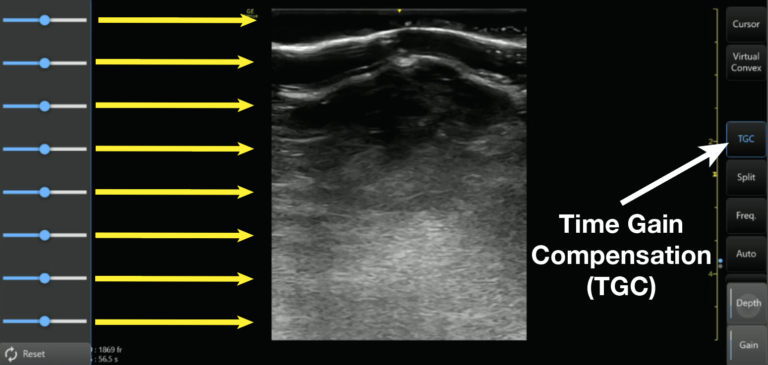
(17) Step 6: Optimize Time Gain Compensation (TGC).
Adjusting the TGC allows you to adjust the gain at almost any depth of your ultrasound image The top rows control the nearfield gain and the bottom rows control the far-field gain.
👉🔗pocus101.com/knobology
Adjusting the TGC allows you to adjust the gain at almost any depth of your ultrasound image The top rows control the nearfield gain and the bottom rows control the far-field gain.
👉🔗pocus101.com/knobology
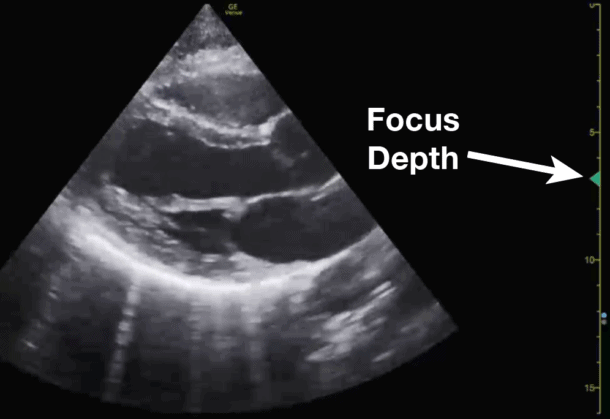
(18) Step 7: Optimize the Focus.
The last ultrasound setting you can use to optimize your image is by adjusting the focus. Focus concentrates your ultrasound waves at a specific depth of the image to maximize the resolution at that depth.
👉🔗pocus101.com/knobology
The last ultrasound setting you can use to optimize your image is by adjusting the focus. Focus concentrates your ultrasound waves at a specific depth of the image to maximize the resolution at that depth.
👉🔗pocus101.com/knobology
(19) Step 8: Freeze, Measure, Save Buttons.
These are optional buttons, but sometimes you may need to freeze an image, measure a structure, or save some images.
Here is a brief video on how to do that by measuring the LVOT Outflow tract Diameter:
These are optional buttons, but sometimes you may need to freeze an image, measure a structure, or save some images.
Here is a brief video on how to do that by measuring the LVOT Outflow tract Diameter:
(20) Okay now let’s go over all of the “Other Modes” you will ever need:
•M-mode
•Color Doppler
•Power Doppler
•Pulse Wave Doppler
•Continuous Wave Doppler
•Tissue Doppler
•Wall Filter, Steer, Angle Correct
👉🔗pocus101.com/knobology
•M-mode
•Color Doppler
•Power Doppler
•Pulse Wave Doppler
•Continuous Wave Doppler
•Tissue Doppler
•Wall Filter, Steer, Angle Correct
👉🔗pocus101.com/knobology
(21) M-mode is defined as a motion versus time display of the B-mode ultrasound image along a chosen line. The motion is represented by the Y-axis and time is represented by the X-axis.
👉🔗pocus101.com/knobology
👉🔗pocus101.com/knobology
(22) The most common Doppler mode you will use is color Doppler. This mode allows you to see the movement of blood in arteries and veins with blue being away and red being towards the probe.
👉🔗pocus101.com/knobology
👉🔗pocus101.com/knobology
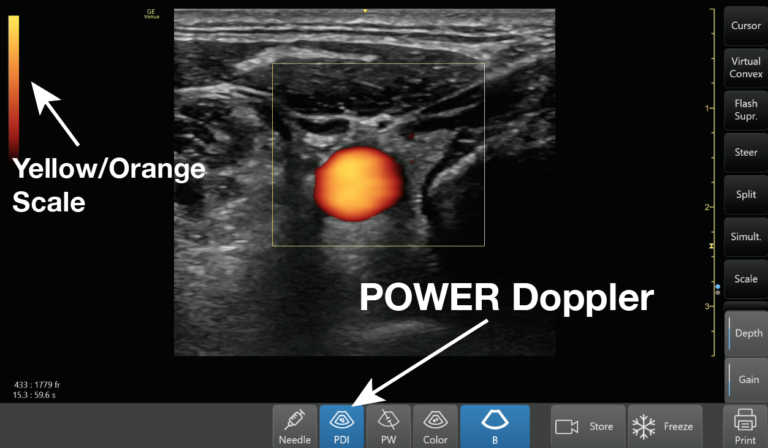
(23) Power Doppler shows up as yellow/orange color signifying the amplitude of flow. It is more sensitive than color Doppler and is used to detect low flow states such as venous flow in the thyroid or testicles.
👉🔗pocus101.com/knobology
👉🔗pocus101.com/knobology
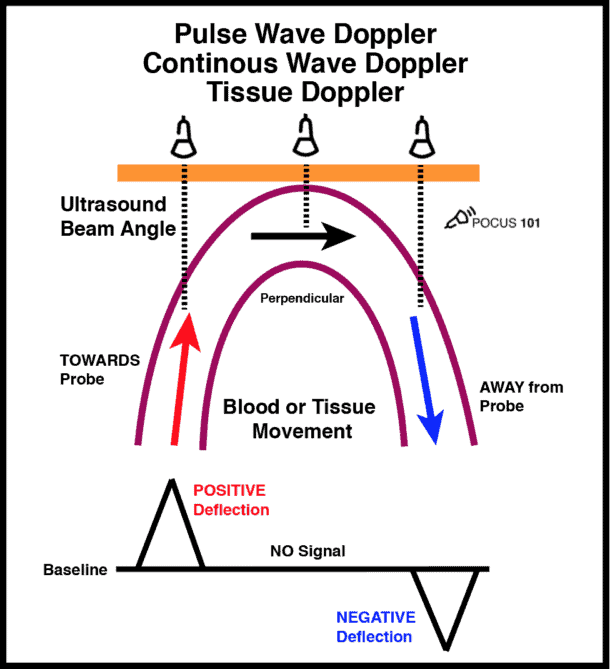
(24) Pulse Wave (PW) Doppler allows you to measure the velocity of blood flow at a single point using the sample gate.
The con of PW Doppler is aliasing with high velocities.
👉🔗pocus101.com/knobology
This video using PW to measure the LVOT VTI:
The con of PW Doppler is aliasing with high velocities.
👉🔗pocus101.com/knobology
This video using PW to measure the LVOT VTI:
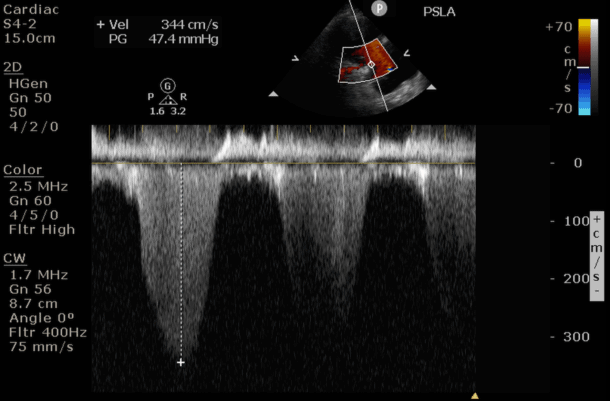
(25) Continuous Wave Doppler is very similar to pulse wave Doppler except it does not alias and can detect very high velocities (> 1000cm/second).
CW is the optimal choice for high-velocity applications such as valvular stenosis and regurgitation.
👉🔗pocus101.com/knobology
CW is the optimal choice for high-velocity applications such as valvular stenosis and regurgitation.
👉🔗pocus101.com/knobology
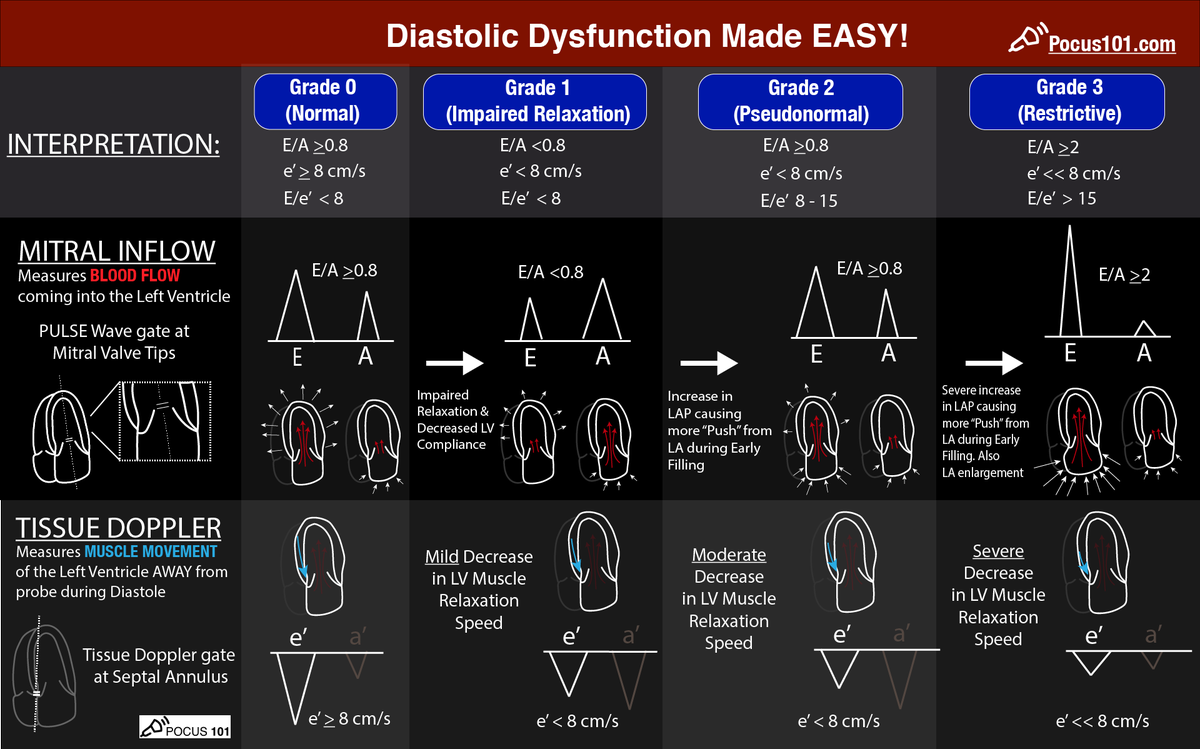
(26) Tissue Doppler is just another form of Pulse Wave Doppler that allows you to measure the much slower speeds of tissue/muscle movement (1cm/s – 20cm/s).
👉🔗pocus101.com/knobology
👉🔗pocus101.com/knobology
(27) Optimize your Doppler Settings:
1. Wall Filter: decreases low-velocity signals.
2. Steer: Adjust Color Doppler box Angle
3. Angle Correction: Correct the angle of your PW sample gate
👉🔗pocus101.com/knobology
Video demonstration:
1. Wall Filter: decreases low-velocity signals.
2. Steer: Adjust Color Doppler box Angle
3. Angle Correction: Correct the angle of your PW sample gate
👉🔗pocus101.com/knobology
Video demonstration: