@QuPath #tweetorial part 2... this time it's (almost) all annotations. 1/20
#bioimageanalysis #digitalpathology #opensource #javafx
https://twitter.com/petebankhead/status/1295744964383694848?s=20
#bioimageanalysis #digitalpathology #opensource #javafx
I say 'almost all', because I need to mention the command list early: with 'Ctrl + L' you get a searchable list of everything in the menus.
Having told you that, I can now ignore the menus & focus on shortcuts - safe in the knowledge you can find things if you need them. 2/20
Having told you that, I can now ignore the menus & focus on shortcuts - safe in the knowledge you can find things if you need them. 2/20
(If you *really* like the command list, you can turn it into a command bar and give it a special place at the top of the viewer... but I probably wouldn't unless I broke my 'L' key.) 3/20
Anyhow, annotations.
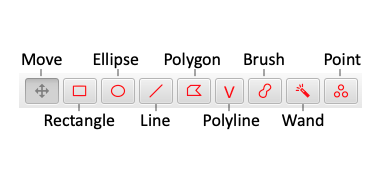
QuPath's annotation tools hang out on the top left of the toolbar & all have quick shortcuts to activate them. 4/20
QuPath's annotation tools hang out on the top left of the toolbar & all have quick shortcuts to activate them. 4/20

*Most* of the time, you should have the 'Move' tool selected (to avoid annotating by accident).
Beside it live the rectangle, ellipse & line tools to draw... well, rectangles, ellipses & lines.
The 'Shift' key constrains their shapes if needed. 5/20
Beside it live the rectangle, ellipse & line tools to draw... well, rectangles, ellipses & lines.
The 'Shift' key constrains their shapes if needed. 5/20
But there are more tools, with lots of tricks & shortcuts to use them efficiently.
For example, there are polygon & polyline tools - which switch to become freehand tools if you feel like dragging the mouse for a bit... 6/20
For example, there are polygon & polyline tools - which switch to become freehand tools if you feel like dragging the mouse for a bit... 6/20
...a zoom-dependent brush (which quickly toggles to an eraser with the 'Alt' key)... 7/20
...a color-sensitive wand (also zoom-dependent, can become an eraser & incorporates any color transforms)... 8/20
...and optional snapping to avoid overlaps & help create dense annotations (press Ctrl + Shift when using the brush or wand).
These tricks are part of the reason QuPath is often used for #deeplearning annotation. 9/20
These tricks are part of the reason QuPath is often used for #deeplearning annotation. 9/20
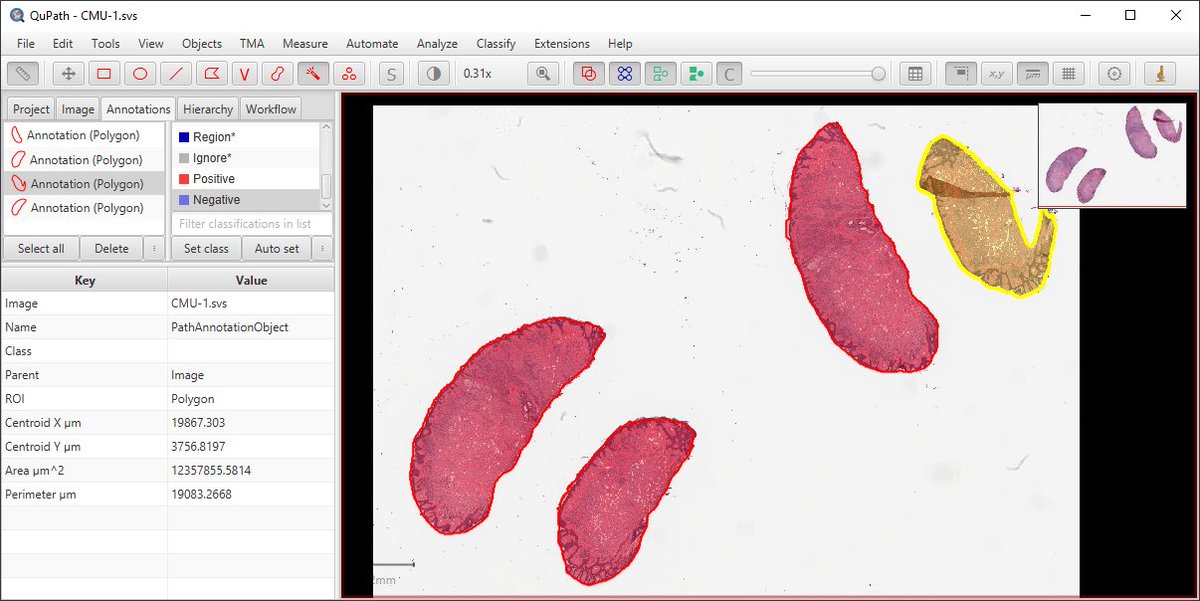
Toggle the display of annotations by pressing 'A' (or the toolbar button), or whether they are filled with 'Shift + F'.
If an annotation is selected, it remains displayed even when the others are hidden. 10/20
If an annotation is selected, it remains displayed even when the others are hidden. 10/20
If you're not sure what other options you have, bring up the 'Command list' & start typing.
This helps find commands to duplicate, merge, split, fill or expand annotations.
Note: You can contract too - just use a negative expansion. 11/20
This helps find commands to duplicate, merge, split, fill or expand annotations.
Note: You can contract too - just use a negative expansion. 11/20
Once you know what's there, you can get creative.
For example, expand a line with 'Remove interior' selected & then split the result to get bands of a fixed width inside & out (perhaps after cleaning up the ends a little bit).
Handy for tumor margins, for example. 12/20
For example, expand a line with 'Remove interior' selected & then split the result to get bands of a fixed width inside & out (perhaps after cleaning up the ends a little bit).
Handy for tumor margins, for example. 12/20
Under the 'Annotations' tab, there's a list of all the annotations for the current image.
Measurements for the current selected annotation are shown at the bottom. 13/20
Measurements for the current selected annotation are shown at the bottom. 13/20

Tip: press Enter with an annotation selected in the viewer to set its name & color*.
You can also 'lock' annotations to avoid accidentally editing them. Locked annotations can still be deleted (press 'Backspace').
*Or right-click it in the list & choose 'Set properties' 14/20
You can also 'lock' annotations to avoid accidentally editing them. Locked annotations can still be deleted (press 'Backspace').
*Or right-click it in the list & choose 'Set properties' 14/20
Names are displayed on the image (hide them by pressing 'N'), and descriptions appear as tooltips. 15/20
By default, selected annotations are in yellow.
If you want to select more than one, you can:
* choose them in the list
* click with the 'Move' tool selected & the 'Alt' key pressed
* turn on 'Selection mode' with the big 'S' button and draw around the ones you want 16/20
If you want to select more than one, you can:
* choose them in the list
* click with the 'Move' tool selected & the 'Alt' key pressed
* turn on 'Selection mode' with the big 'S' button and draw around the ones you want 16/20
I say 'by default', because lots of QuPath is customizable. Click the cog wheel to change the preferences... using the search bar to find what you need. 17/20
When you're done, choose 'File -> Save' (or Ctrl + S, or agree when QuPath asks) & your annotations are saved.
No need to specify where: because you definitely followed the tip in the last tweetorial (right?) QuPath will store them in your project. 18/20
No need to specify where: because you definitely followed the tip in the last tweetorial (right?) QuPath will store them in your project. 18/20
https://twitter.com/petebankhead/status/1295744979328016385?s=20
That should be all you need to keep your annotations inside QuPath.
If you need to get them *out*, there's a whole section in the docs describing ways to export them... as GeoJSON, WKB, WKT, binary images or labelled images. 19/20
qupath.readthedocs.io/en/latest/docs…
If you need to get them *out*, there's a whole section in the docs describing ways to export them... as GeoJSON, WKB, WKT, binary images or labelled images. 19/20
qupath.readthedocs.io/en/latest/docs…

• • •
Missing some Tweet in this thread? You can try to
force a refresh


