I have 4 email addresses on my Gmail Business account with 2 different domains, like this:
busra@company1.com
hello@company1.com
busra@company2.com
hello@company2.com
But I'm only paying for 1 account, 6$/month.
I'll show you how you can set this up, too, in 12 steps. 👇🏼
busra@company1.com
hello@company1.com
busra@company2.com
hello@company2.com
But I'm only paying for 1 account, 6$/month.
I'll show you how you can set this up, too, in 12 steps. 👇🏼
1. Go to admin.google.com and authenticate your paid account. Google always first shows me my private @gmail.com account to authenticate. If it does that to you, too, that's the wrong account. You really need to switch to the business account and authenticate/log in there.
2. On the admin panel click "Domains".
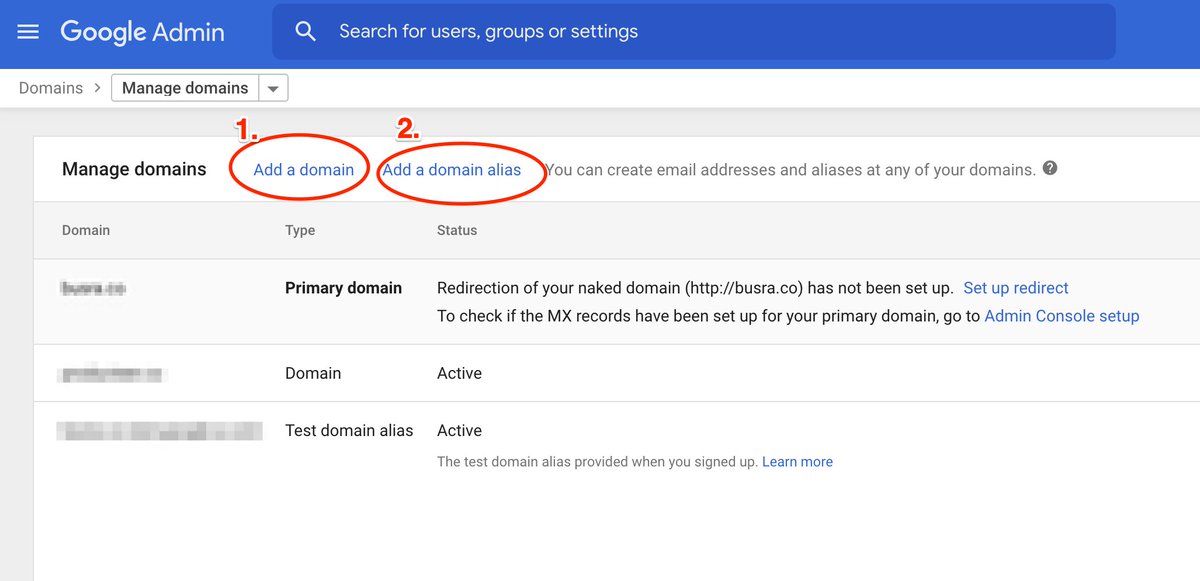
3. On the next page click "Manage Domains". Now you'll see 2 options to choose from: "Add a domain" and "Add a domain alias".


3. On the next page click "Manage Domains". Now you'll see 2 options to choose from: "Add a domain" and "Add a domain alias".


4. Add a domain, if you have a different set of users per domain. For example Ann is working for business A, Leo for business B. Ann would get the email address ann@businessA.com, Leo would get leo@businessB.com. In this case you'd pay for each user added to each domain. 

Google takes different per user prices depending on the plan you select. If you're on the Starter plan and pay 6$/user/month, you'd have to pay 6$/month for Leo for adding him to the business B domain. In total, you'd pay 18$/m in total for you, Ann and Leo for 3 email addresses. 

5. You already have Business A email address and want an email address for Business B, too?
Add the domain alias @businessB.com. You’ll be able to use both busra@businessA.com and busra@businessB.com. If you have teammates in Business A, they'll get new email addresses, too.
Add the domain alias @businessB.com. You’ll be able to use both busra@businessA.com and busra@businessB.com. If you have teammates in Business A, they'll get new email addresses, too.
E.g. you work with Ann and Leo in Business A and add the domain alias for Business B. You would have set up these email addresses: ann@businessA.com, ann@businessB.com, leo@businessA.com, leo@businessB.com, busra@businessA.com, busra@businessB.com 

In this case you don't need to pay anything for the additional email addresses. You could use 6 email addresses while paying 18$/m in total for you, Ann and Leo, and all of you belong to the same workspace. If you're solo you won't pay anything extra to your 6$/m.
6. In both cases, you'll first add the new domain in the popup and click "Continue & verify ownership".
7. On the next page you select your domain provider, and then follow the steps that Google shows you. You'll need to go to your provider's site and do some settings.


7. On the next page you select your domain provider, and then follow the steps that Google shows you. You'll need to go to your provider's site and do some settings.


8. Once you've done the work on your provider's side, you go back to Google's screen with the instructions and click "Verify". It can take some minutes to get the verification. If you see that verification has failed just try again and again a couple minutes later.
9. Once the verification went through, you follow the instructions here: support.google.com/a/answer/14003… to set up MX records for G-Workspace on your domain provider's side.
Once this is done, the setup is basically finished. Now you need to make your users able to use the new domain.
Once this is done, the setup is basically finished. Now you need to make your users able to use the new domain.
10. If you've selected "Add a domain", you go again to admin.google.com and click "Users". Click on the user's name, then click on "User information". Here you can add the new email address like in here "example@newdomain.com". Don't forget to hit "Save"!!! 


11. After this step, or if you've selected "Add a domain alias", go to your Gmail inbox. Go to Settings (the ⚙️ icon) -> See all settings -> Accounts and click "Add another email address". Enter the new email address in the blank field and click "Continue". That's it! 


12. You can go back now to your inbox. When you compose a new message, you can now select between the different email addresses.
Enjoy your new email address!
Enjoy your new email address!

• • •
Missing some Tweet in this thread? You can try to
force a refresh


