How to Expose Multiple Containers On the Same Port
First off, why you may need it:
- Load Balancing - more containers mean more capacity
- Redundancy - if one container dies, there won't be downtime
- Single Facade - run multiple apps behind one frontend
Interested? Read on!🔽
First off, why you may need it:
- Load Balancing - more containers mean more capacity
- Redundancy - if one container dies, there won't be downtime
- Single Facade - run multiple apps behind one frontend
Interested? Read on!🔽

Docker doesn't support binding multiple containers to the same host port.
Instead, it suggests using an extra container with a reverse proxy like Nginx, HAProxy, or Traefik.
Here are two ways you can trick Docker and avoid adding the reverse proxy:
1. SO_REUSEPORT
2. iptables
Instead, it suggests using an extra container with a reverse proxy like Nginx, HAProxy, or Traefik.
Here are two ways you can trick Docker and avoid adding the reverse proxy:
1. SO_REUSEPORT
2. iptables
Multiple Containers On the Same Port w/o Proxy (I)
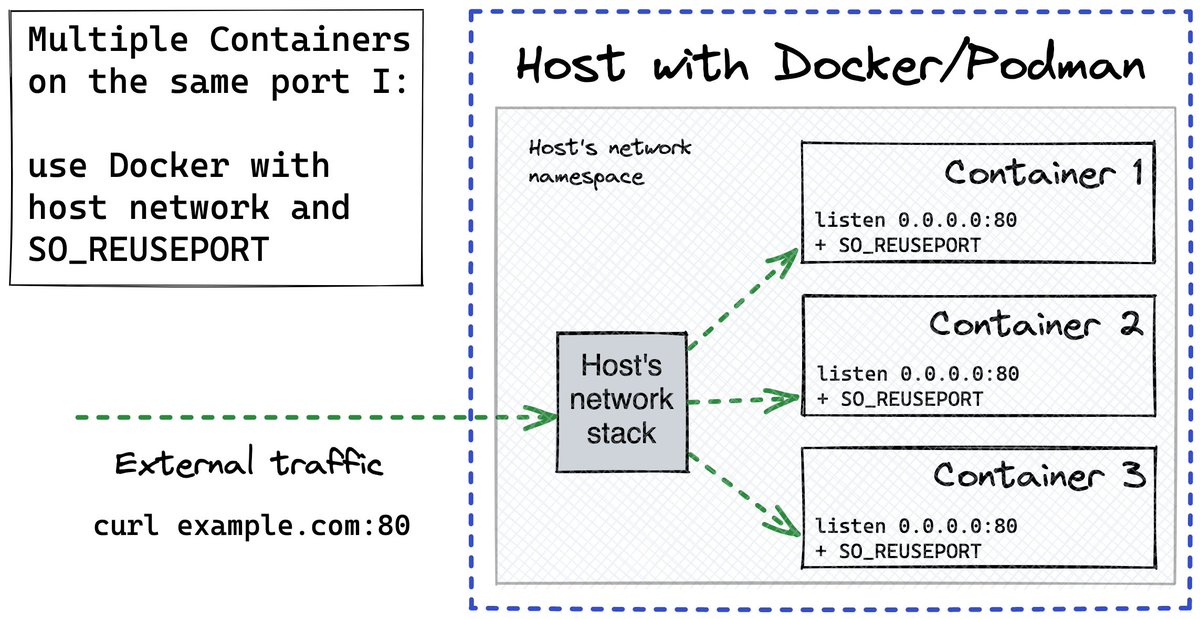
1) Use SO_REUSEPORT sockopt for your server sockets
2) Run containers with `--network host` and the same port
SO_REUSEPORT allows binding diff processes to the same port.
--network host puts all containers on one network stack.
1) Use SO_REUSEPORT sockopt for your server sockets
2) Run containers with `--network host` and the same port
SO_REUSEPORT allows binding diff processes to the same port.
--network host puts all containers on one network stack.

Multiple Containers On the Same Port w/o Proxy (II)
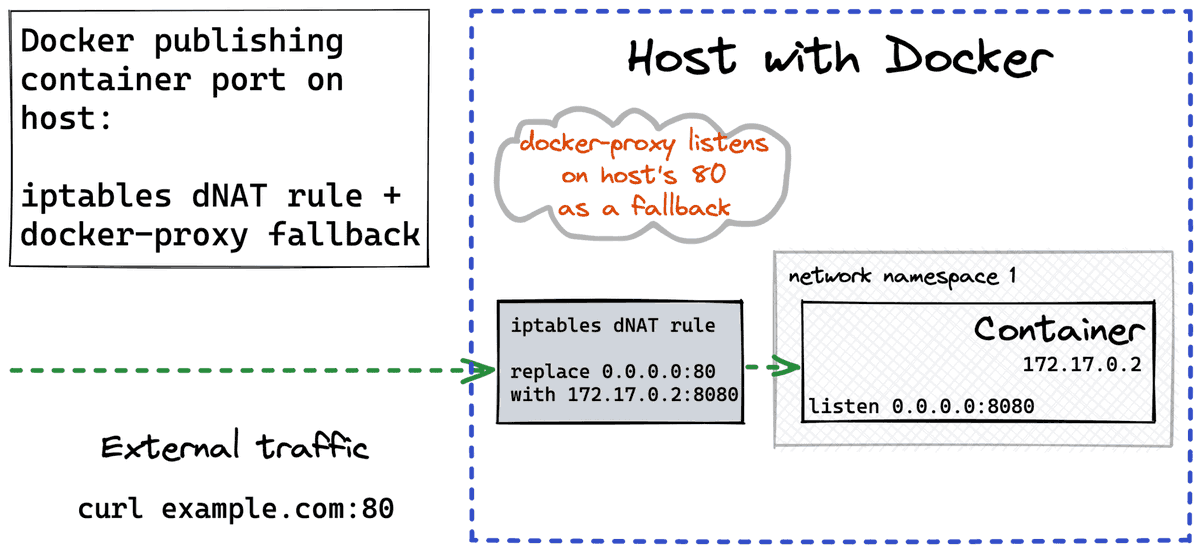
`--network host` reduces containers' isolation. Here is an alternative that keeps containers in separate network namespaces.
1) Pick an ip:port on the host
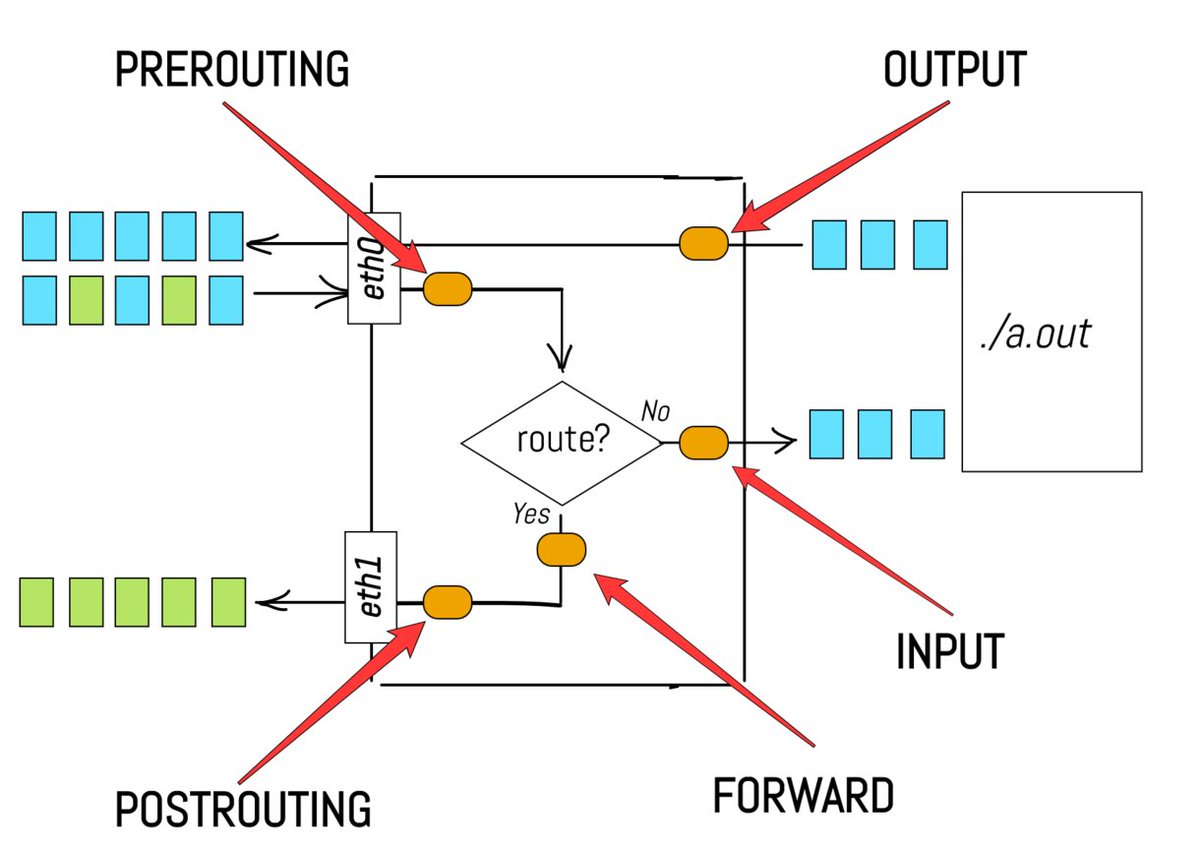
2) Replace (ip:port) in packets with (cont_ip:port) using iptables NAT
`--network host` reduces containers' isolation. Here is an alternative that keeps containers in separate network namespaces.
1) Pick an ip:port on the host
2) Replace (ip:port) in packets with (cont_ip:port) using iptables NAT

Check out this article for working examples of both techniques.
Continue with the thread to learn how to expose multiple containers on the same port with a reverse proxy. 🔽
iximiuz.com/en/posts/multi…
Continue with the thread to learn how to expose multiple containers on the same port with a reverse proxy. 🔽
iximiuz.com/en/posts/multi…
SO_REUSEPORT and iptables pros:
- no overhead
- you feel like a hacker
SO_REUSEPORT and iptables cons:
- almost no control on load balancing - only weights
- you have to be a hacker...
For more flexible load balancing and extra peace of mind, you can use a Reverse Proxy 🔽
- no overhead
- you feel like a hacker
SO_REUSEPORT and iptables cons:
- almost no control on load balancing - only weights
- you have to be a hacker...
For more flexible load balancing and extra peace of mind, you can use a Reverse Proxy 🔽
Multiple Containers On the Same Port with Reverse Proxy
You can use
- Nginx
- Apache
- HAProxy
- Envoy Proxy
- Traefik (my favorite)
- etc.
A proxy can work on L4 (TCP, UDP) or L7 (HTTP, or others).
HTTP proxy allows routing different requests to different upstream containers
You can use
- Nginx
- Apache
- HAProxy
- Envoy Proxy
- Traefik (my favorite)
- etc.
A proxy can work on L4 (TCP, UDP) or L7 (HTTP, or others).
HTTP proxy allows routing different requests to different upstream containers

Multiple Containers On the Same Port - Dynamic Service Discovery
If the set of upstream containers is volatile, you'll need to update the proxy config on the fly.
For Nginx, you can use github.com/nginx-proxy/ng….
But Traefik does it right out of the box!
iximiuz.com/en/posts/traef…
If the set of upstream containers is volatile, you'll need to update the proxy config on the fly.
For Nginx, you can use github.com/nginx-proxy/ng….
But Traefik does it right out of the box!
iximiuz.com/en/posts/traef…
• • •
Missing some Tweet in this thread? You can try to
force a refresh


