KGVs - Survivability Beyond Armour.
Clearly, battleships are known for their extensive heavy armour. But there's a lot more that goes into ensuring that they can remain combat capable if damaged.
I thought it would be interesting to highlight a few aspects.
(1/23)
Clearly, battleships are known for their extensive heavy armour. But there's a lot more that goes into ensuring that they can remain combat capable if damaged.
I thought it would be interesting to highlight a few aspects.
(1/23)

Firstly, unit machinery and sub-division. The main propulsion machinery was divided across 8 compartments. 4 boiler rooms, each with 2 boilers, and 4 engine rooms.
These formed pairs, which were a self contained unit that drove 1 shaft.
(2/23)
These formed pairs, which were a self contained unit that drove 1 shaft.
(2/23)

Cross-connections were possible, so in case of breakdown or action damage you could form new 'units' with the functioning machinery. e.g. "A" boiler room could be connected to "B" engine room as a unit.
Or just for convenience in times of peace.
(3/23)
Or just for convenience in times of peace.
(3/23)
Electricity generation was also well sub-divided - the 8 generators were split across 7 comparments.
6 were powered by steam from the boilers, and the other 2 were diesel powered units. Each had the same output.
(4/23)
6 were powered by steam from the boilers, and the other 2 were diesel powered units. Each had the same output.
(4/23)

Policy as of mid 1938 was that a ship's full action load should be able to be met continuously from 75% of the installed generators. If just 50% of the generators were functioning, this should allow the ship's full action load to be met for 15 minutes.
(5/23)
(5/23)
Lastly on machinery, the Main Armament was powered by hydraulics. The hydraulic pumps were 4 in number, and also widely distributed, to avoid a single hit taking out multiple pumps.
(6/23)
(6/23)

It's all well and good for the ship to be capable of moving, but there needs to be somewhere to command the ship from.
The KGVs had 4 such positions. The Compass Platform (the bridge) was the usual spot, but the Conning Tower two decks below could be used as well.
(7/23)
The KGVs had 4 such positions. The Compass Platform (the bridge) was the usual spot, but the Conning Tower two decks below could be used as well.
(7/23)
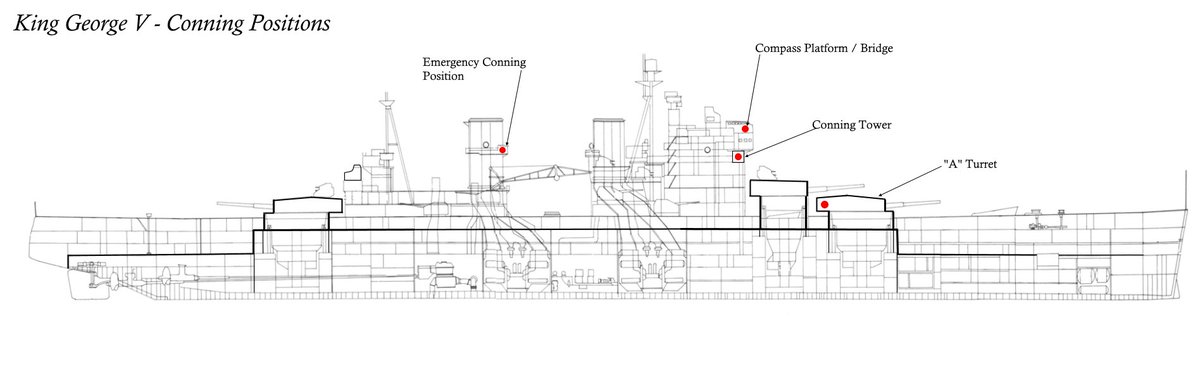
The Conning Tower was only given 3-4" of armour though, for splinter protection, and was close enough to the bridge that both could be knocked out by 1 hit.
So an emergency position was built onto the aft funnel, and manned during action just in case.
(8/23)
So an emergency position was built onto the aft funnel, and manned during action just in case.
(8/23)
Finally, in extremis, there was a navigating compartment inside of "A" turret. This was at least properly armoured, but the idea that a ship could be conned from inside a turret was considered an absolute last resort at best!
(9/xx)
(9/xx)
But the ship is not (normally) steered from the conning positions! There are 4 steering positions.
The primary action position is the Lower Steering Position, deep in the ship under armour.
(10/23)
The primary action position is the Lower Steering Position, deep in the ship under armour.
(10/23)
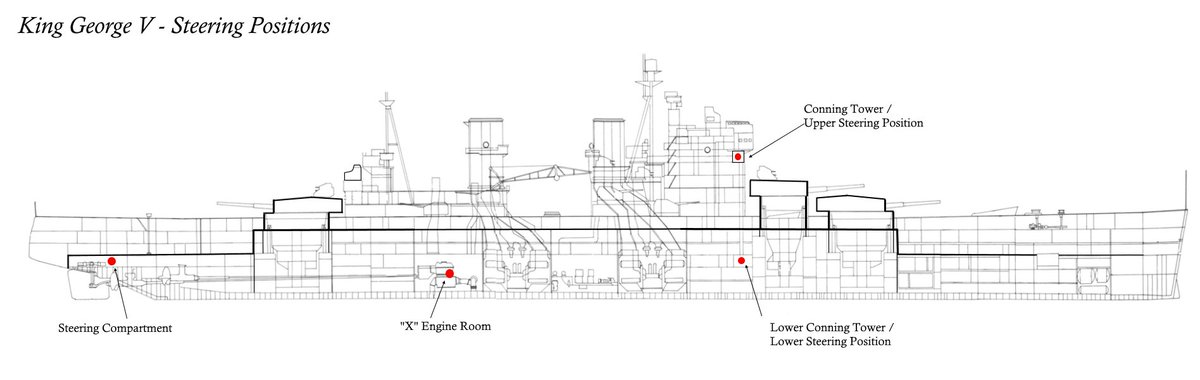
The Upper Steering Position was intended for convenience when cruising, or entering armour. Some Captains preferred it, as it was less vulnerable to underwater damage than the lower. But some Captains disliked it, and the equipment was removable if desired.
(11/23)
(11/23)
In an emergency, steering could be done both from "X" engine room and from the steering compartment itself.
The mechanisms were duplicated - one running down either side of the ship - for redundency.
The steering gear was connected to 3 motors - only 1 was required.
(12/23)
The mechanisms were duplicated - one running down either side of the ship - for redundency.
The steering gear was connected to 3 motors - only 1 was required.
(12/23)
Fire control is clearly vital to a battleship staying combat capable. This confusing diagram attempts to show the redundency in the Main Armament Fire Control System.
(13/23)
(13/23)
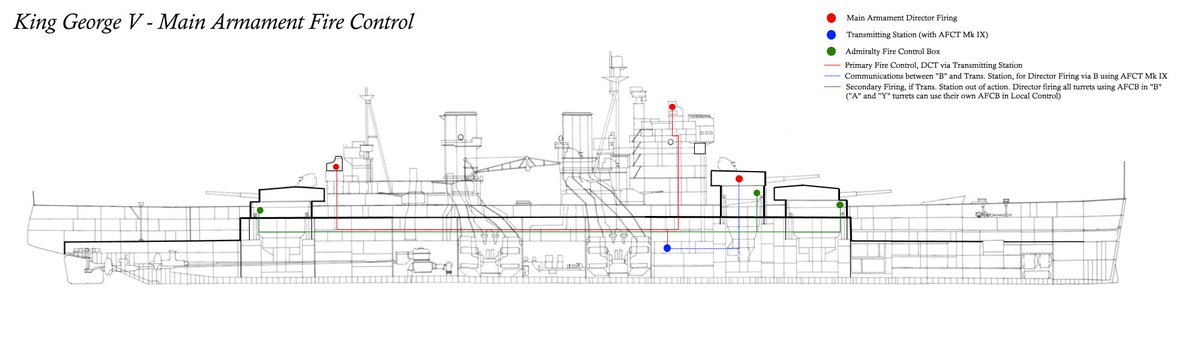
The heart of the system was the Admiralty Fire Control Table Mk IX, buried deep in the ship under armour.
This was usually directed from the forward Director Control Tower (DCT), which was atop the main superstructure.
(14/23)
This was usually directed from the forward Director Control Tower (DCT), which was atop the main superstructure.
(14/23)
This did not have a 360 degree view though, so the aft DCT covered these blindspots. It also served as a back up generally, and had 3" of armour.
3" wasn't proof agaisnt direct hits, so there was a risk that both could be knocked out.
(15/23)
3" wasn't proof agaisnt direct hits, so there was a risk that both could be knocked out.
(15/23)
For this scenario communications were provided between "B" turret and the Transmitting Station, to enable the continued use of the powerful AFCT Mk IX with director firing.
(16/23)
(16/23)
If the Transmitting Station was knocked out, or unavailable, "B" turret could control the entire main armament via a separate set of cables and it's own Admiralty Fire Control Box - a much simplified fire control computer.
(17/23)
(17/23)
Finally, "A" and "Y" turrets also had a Fire Control Box, to be used in local control in the worst case, or if the armament needed to be fired against multiple targets - known as 'Quarters' firing.
(18/23)
(18/23)
To touch upon the Secondary Armament, each side of the ship had 2 secondary directors, 2 low angle fire control systems and 2 high angle fire control systems. Any turret could use either.
(19/23)
(19/23)
For damage control the ship has 2 fire mains. The lower runs under the armour decks, the upper below the main deck.
There are 6 vertical feeders connecting the lower main and the upper main.
(20/23)
There are 6 vertical feeders connecting the lower main and the upper main.
(20/23)

For the lower main, there are isolating valves at least every 44 ft. The upper main is divided into 11 sections, with the longest being 85 ft.
The mains are supplied from 11 x 50-ton pumps and 10 x 75-ton pumps (5 electric, 5 diesel).
(21/23)
The mains are supplied from 11 x 50-ton pumps and 10 x 75-ton pumps (5 electric, 5 diesel).
(21/23)
Pumping capacity is also key to keeping a ship afloat. As can be seen in the attached table, pumping arrangements were quite extensive.
Many of the 350-ton pumps were cross-connected, in case of action damage.
(22/23)
Many of the 350-ton pumps were cross-connected, in case of action damage.
(22/23)

Finally, crew. While pressures on accomodation may have changed this during the war, at least as designed there was a 7.5% supernumary allowance in the authorised war complement. This meant an additional 100 men or so.
A lot more to survivability than armour thickness!
(23/23)
A lot more to survivability than armour thickness!
(23/23)
• • •
Missing some Tweet in this thread? You can try to
force a refresh