
Working on a video about displacing/bump/normal mapping Generated Normals. Will still be a few days because its really complicated >_<
If anyone can explain Surface Gradients in layman's terms, or knows how to do something like dFdx in Eevee nodes, it'll go faster 😬
#b3d #bnpr
If anyone can explain Surface Gradients in layman's terms, or knows how to do something like dFdx in Eevee nodes, it'll go faster 😬
#b3d #bnpr
Okay that ended up taking AGES to figure out. But I now have working (mostly) Normal and Bump map groups that can take any input Normals and tangents, which means they can work on Generated Normals, which means I can now move ahead with the project and next video...
#b3d #bnpr
#b3d #bnpr
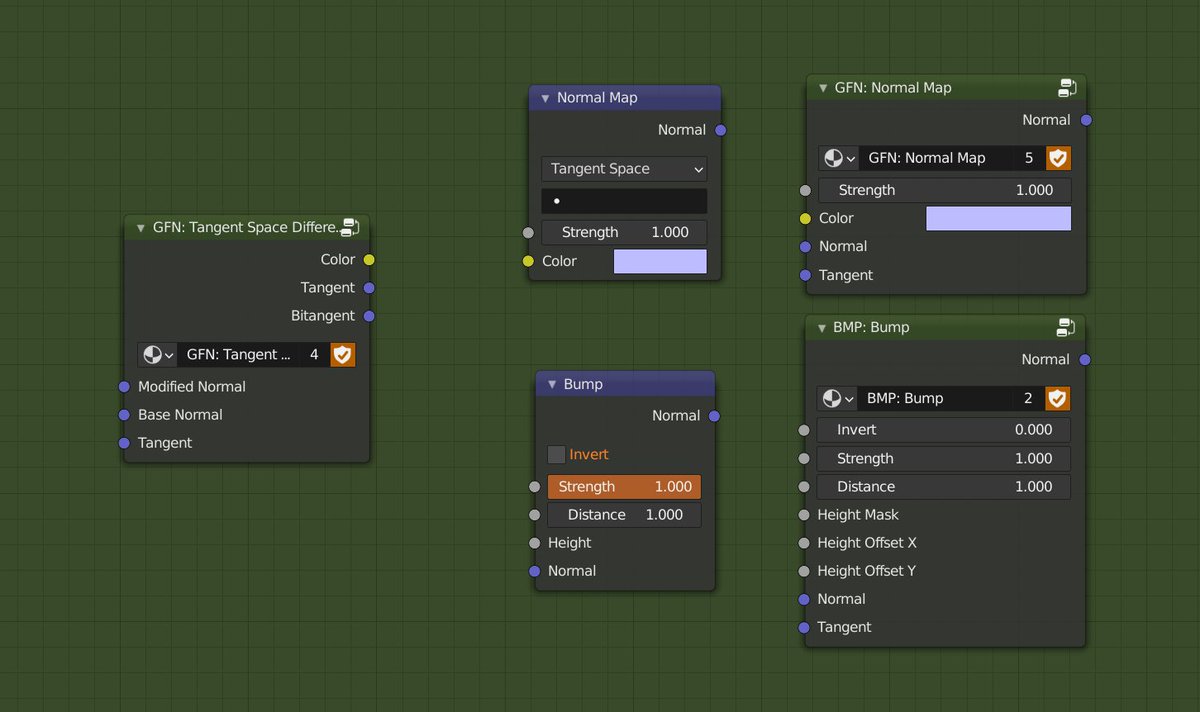
Eevee and Cycles not having access to dFdx/dFdy, or any option to run GLSL expressions, is a giant hassle. The good news is that, in the process of figuring all this out, I've learned a lot of GLSL and will be able to do this stuff properly in Malt soon. #b3d #bnpr
The purpose of doing this has been to get away from the mesh showing when using the Bump Map node. These mesh artifacts are caused by the way it generates its Tangent/Bitangent. It uses partial derivatives on Position, which effectively isn't smooth shaded, like True Normal. #b3d

Normally these little issues aren't enough to matter. But they are in the Normals, and we're working with Toon Shaders, which are super bad about showing every tiny defect in the normals. And its an anime face, which needs to be clean and hold up under scrutiny in closeups.
Okay, after several more setbacks it is all working. Here's a comparison of the regular bump node and my group that fixes those circular ridges, and also more subtle mesh showing through (don't mind the GIF artifacts.)
Now I can start on the video finally! #b3d #bnpr
Now I can start on the video finally! #b3d #bnpr
I've got the full Surface Gradient workflow now. This gets the difference between 2 Normals in a form that can be added together, so you can combine normal changes from any source. Think of it like a common exchange format for Tangent Normal maps, Object Normals, etc #b3d #bnpr
And here's a group to get the Tangent Space Difference (same as baking a tangent map) between any Normals. And also my own Normal Map group so you can use any Normals, and tangents other than UVs. And also a node to go straight from Tangent Map to Surface Gradient #b3d #bnpr
Here's an example of taking a Tangent Map Decal image texture (of a cone, baked on a plane), apply it as a Normal map to the base mesh normals, get the SurfGrad of it, then add that to the SurfGrad of the fake Object Normals to have it effect those instead #b3d #bnpr
With these tools (and also Bump Map group) we've got more than we need to add more detail to our Generated Face Normals.
Here's some of the nodes, and the source for this Surface Gradient stuff: jcgt.org/published/0009…
#b3d #bnpr
Here's some of the nodes, and the source for this Surface Gradient stuff: jcgt.org/published/0009…
#b3d #bnpr


Radial Tangents! But, unlike the usual node, you can feed them whatever inputs you want. The base node is hardcoded to always use Generated Texture Coordinates and the mesh's Base Normals. Generated Coords often don't work well, as they are based on the bounding box #b3d #bnpr
These Radial Tangents are handy for getting Tangents for Bump Mapping, or for Object Space Tangent Normal maps between Generated Normals. No UVs or mesh info required. #b3d #bnpr

Adding some detailing to the face now with Bump Maps. Easy to control since its all procedural! Figuring out the brow/eye socket shapes is tough though. Still getting the hang of working with these. But the tools themselves are working. #b3d #bnpr
Another handy tool to have when controlling height maps/masks/gradients. I'll be using this to ease height maps. The regular RGB curves cant be used properly for this because it does some sort of texture resampling of the input, which causes artifacts in bump mapping. #b3d #bnpr
Uneven topology doesn't mean you shouldn't be able to have clean UVs. It is often easier to model your UVs as a separate mesh and then transfer them, rather than trying to use the very limited UV tools on the real mesh itself. #b3d #bnpr #Blender3D
Very clean UVs despite complex face topology thanks to transfer from simpler mesh. Good for procedural textures. Layout mesh loops, then adjust its own UV layout. I put under the chin and the top of the forehead to take less space. Most of face is .1-.8 range. Easy. #b3d #bnpr


A useful group for working with UVs. Easily mask to a specific range of the UV map via Map Range, and mask unused areas. This can be done with the Mapping node, but its not very intuitive and doesn't handle values below 0 or above 1. #b3d #bnpr #Blender3d
Here's a second UV map where key areas of the face have been unwrapped flat and put in regular .1 intervals (or .2 for larger sections.) The node group lets you grab only one at a time. This makes it very easy to map procedural gradients onto that section of the face. #b3d #bnpr
Normal map decals! Model the shape you want with a ton of subsurf/smooth, bake the Normals, then slap it on your other mesh. Adjust with Mask. In this case, I'm putting it on the clean Object Space Normals. This also works with Tangent Normal maps, but is more complex #b3d #bnpr
Another Normal Map decal test, this time for the brow ridge. Mesh shrinkwrapped and smoothed, then baked as a Tangent Map from the Generated Coords. Then masked and combined via Surface Gradients. The nodes are complex, but its a What You See Is What You Get workflow #bnpr #b3d
You can get clean shading with clean topology mesh and tons of subsurf+ smooth. And you can transfer it back to the original, but only if there's enough subsurf. Otherwise Smooth Shading Interpolation messes up the shading again. Solution is bake it to a texture! #b3d #bnpr
The problem is Smooth Interpolation creates shading issues when a mesh isn't perfect quads. The transfer mesh is nice because the topology is more even. The base mesh can only receive thenice shading if it has enough verts. Other normal editing can only go so far for same reason.
Make a simplified+smoothed version of key face details, transfer normals to mesh, bake to texture. It works on the nose and inner eye area, but not on the cheeks. So simply mask it so the clean Generated Normals are on the cheeks (mask could use work still) #bnpr #b3d
Clean masks are hard. You can transfer a UV based mask. Quality isn't great without subsurf, performance is bad with. But its enough to eyeball it and model your gradient mask. Bake to texture for full quality. Using it to mask between Generated Normals and Decal #b3d #bnpr
You can get a lot of improvement with good old Cycles Bevel node. Here's the base face, with beveled normals, and with bevel+subsurf. It is very slow and noisy, but you can throw a ton of samples and denoising at it and bake it to a Tangent Normal Map. #b3d #bnpr


You can chain Data Transfer modifiers to project Normals through a series of meshes, which gives a Tangent Normal style workflow. With this, you can model clean vertex Normals as mesh in stages to avoid complexity. Then crank the subsurf and bake! #b3d #bnpr
You can fix a lot of DataTransfer modifier's issues by using Topology mode. When you don't have matching topo, do the transfer on flat meshes to reduce issues. Bonus: it looks freaky! The Flat Face is made with the TexTools addon from a UV map. #b3d #bnpr
But wait, it gets stranger! We can chain Transfers to model our Normals in steps. The main face shape is defined, and then details added to it, kind of like Tangent Normals. And since Normals are Face Corner data, we can even split edges and still topo transfer! #b3d #bnpr
• • •
Missing some Tweet in this thread? You can try to
force a refresh


