
Happy Monday Twitter fam!
A lot of folks have made a new year's resolution to get started on #nocode and learning @bubble
To help you hit the ground running, here's a crash course of the different layout types in the new responsive engine (with examples at the end!) A thread 🧵
A lot of folks have made a new year's resolution to get started on #nocode and learning @bubble
To help you hit the ground running, here's a crash course of the different layout types in the new responsive engine (with examples at the end!) A thread 🧵

Last year, Bubble introduced 4 new layout options: Rows, Columns, Align to Parent and Fixed.
These are part of what's known as flexbox - a layout method that gives you a lot of flexibility in structuring web pages and organizing elements.
These are part of what's known as flexbox - a layout method that gives you a lot of flexibility in structuring web pages and organizing elements.
These options make designing in Bubble much simpler, but they may be hard to grasp at first.
It's first important to understand that these options define how content *inside* a container is organized.
Here's how each of them work:
It's first important to understand that these options define how content *inside* a container is organized.
Here's how each of them work:
1: Row:
If you place a group on the page and set the layout to 'Row', all the content inside that group will be arranged one-after-the-other (i.e. elements will be organized in a row). The diagram illustrates what this would look like:
If you place a group on the page and set the layout to 'Row', all the content inside that group will be arranged one-after-the-other (i.e. elements will be organized in a row). The diagram illustrates what this would look like:

These elements could be visual elements like text or images, or groups that contain other elements inside them.
Whatever the case, since the parent container is set to row, they will be organized in a row.
Whatever the case, since the parent container is set to row, they will be organized in a row.
If an element is particularly wide, it would cause the other elements to shift down and begin in a new row.
This may make the elements appear to be stacked in a column, but they're not. It's just that the other elements can't fit into the first row, so they'd begin another
This may make the elements appear to be stacked in a column, but they're not. It's just that the other elements can't fit into the first row, so they'd begin another

2: Column
The column layout organizes elements one-on-top-of-the-other (i.e. stacked in the form of a column)
The diagram illustrates what this would look like.
Regardless of how narrow elements are, they would be stacked in this way.
The column layout organizes elements one-on-top-of-the-other (i.e. stacked in the form of a column)
The diagram illustrates what this would look like.
Regardless of how narrow elements are, they would be stacked in this way.

3. Align to Parent
Align to parent allows you to place elements in a specific section of a container.
It essentially divides a container into a grid with 9 areas. You can then choose the area placement (e.g. top-left) by clicking the element then choosing its position.
Align to parent allows you to place elements in a specific section of a container.
It essentially divides a container into a grid with 9 areas. You can then choose the area placement (e.g. top-left) by clicking the element then choosing its position.


Bubble refers to these areas as 'nonants' since there are 9 of them.
(A smaller grid with 4 areas is called a quadrant. The use of 'nonant' refers to the fact that this grid has 9 areas)
Elements added in a container with this layout automatically align to the nearest nonant.
(A smaller grid with 4 areas is called a quadrant. The use of 'nonant' refers to the fact that this grid has 9 areas)
Elements added in a container with this layout automatically align to the nearest nonant.
While this layout can provide flexibility in how objects are placed, if objects are placed in the same nonant, they will lie on top of each other (not stacked, like a column, but overlapping).
So be mindful of that.
So be mindful of that.
4. Fixed
As the name implies, a fixed layout allows you to set the container to a specific width, and once set, this width will be fixed.
This means it won't be responsive, so if the page (or the element's parent container) changes width, the element remains the same width.
As the name implies, a fixed layout allows you to set the container to a specific width, and once set, this width will be fixed.
This means it won't be responsive, so if the page (or the element's parent container) changes width, the element remains the same width.
Elements placed in a fixed container can be dragged around (kinda like how the old responsive engine works). They use absolute positioning.
Examples:
When building out a page or app, you'll likely use multiple variations of these layouts.
To illustrate, I've broken down a couple of pages from popular websites and how I imagine they are structured.
Row/Column are the most commonly used, so those are the main focus
When building out a page or app, you'll likely use multiple variations of these layouts.
To illustrate, I've broken down a couple of pages from popular websites and how I imagine they are structured.
Row/Column are the most commonly used, so those are the main focus
Uber:
This is a section from Uber's homepage (Kenya)
The blue lines represent groups set to 'column'.
The orange lines represent groups set to 'row'.
This is a section from Uber's homepage (Kenya)
The blue lines represent groups set to 'column'.
The orange lines represent groups set to 'row'.
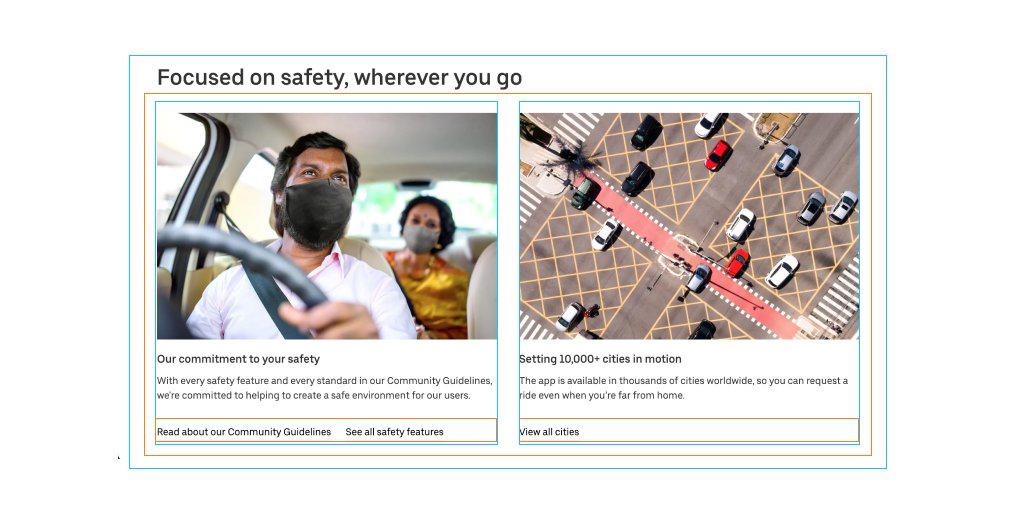
The largest (parent) container is set to column.
So the title stacks on top of the orange group container.
The groups placed inside the orange container sit next to each other - i.e. row.
Inside *those* containers, the elements - image, then text - are stacked: i.e. column.
So the title stacks on top of the orange group container.
The groups placed inside the orange container sit next to each other - i.e. row.
Inside *those* containers, the elements - image, then text - are stacked: i.e. column.
Linkedin:
Again,blue lines ='column' and orange = 'row'.
Here the Linkedin page is set to row (yes pages can be customized as well since pages are also containers).
There are 3 groups inside the page, each set to column (because the contents inside them are stacked).
Again,blue lines ='column' and orange = 'row'.
Here the Linkedin page is set to row (yes pages can be customized as well since pages are also containers).
There are 3 groups inside the page, each set to column (because the contents inside them are stacked).

Of course, the page can be broken down into more column/row groups (and there certainly are more), but to highlight those would make this thread impossibly long :D.
But essentially this shows how elements could be organized using flexbox and rows/columns.
The more you explore different sites and think of how the elements are grouped together/organized, the more the new responsive engine makes sense, and the more you appreciate flexbox!
The more you explore different sites and think of how the elements are grouped together/organized, the more the new responsive engine makes sense, and the more you appreciate flexbox!
I hope you found this thread helpful!
If you did, drop a like and a retweet on the first tweet in this thread!
You can find this thread (and my previous tutorial threads) saved here:
threadsby.me/its/shikuwango…
If you did, drop a like and a retweet on the first tweet in this thread!
https://twitter.com/shikuwangombe/status/1478035698796036097?s=20
You can find this thread (and my previous tutorial threads) saved here:
threadsby.me/its/shikuwango…
And follow @shikuwangombe for more @bubble no-code tutorials and threads :).
For more long-form tutorials, subscribe to my newsletter howtobubble.substack.com
Happy Bubbling!
For more long-form tutorials, subscribe to my newsletter howtobubble.substack.com
Happy Bubbling!
• • •
Missing some Tweet in this thread? You can try to
force a refresh


