⚡️ Day 79 ⚡️
⚡️ Let us discuss JSX and rendering in React.
⚡️ I tried my best to explain each term with an example.
A thread 🧵
#100daysofcode
⚡️ Let us discuss JSX and rendering in React.
⚡️ I tried my best to explain each term with an example.
A thread 🧵
#100daysofcode

1. what is React?
--> A JavaScript library for building user interfaces.
--> React will efficiently update and render(make) just the right components when your data changes. (we will see it in the last of this thread).
--> we will study more about React in our coming threads.
--> A JavaScript library for building user interfaces.
--> React will efficiently update and render(make) just the right components when your data changes. (we will see it in the last of this thread).
--> we will study more about React in our coming threads.
2. What is JSX?
--> const element = <h1>Hello, world!</h1>;
--> In the above line, we defined a const and assigned a value to it.
--> The value is neither a string nor an HTML.
--> Then what is it?, it is nothing but JSX.
--> JSX is very much used in React.
--> const element = <h1>Hello, world!</h1>;
--> In the above line, we defined a const and assigned a value to it.
--> The value is neither a string nor an HTML.
--> Then what is it?, it is nothing but JSX.
--> JSX is very much used in React.
2.1 JSX continue
--> JSX is called "syntax extension to JavaScript".
--> We used JSX because it includes markup and JavaScript in the same expression.
--> If we want to use JavaScript expression then we will use it inside curly braces(e.g {name} ).
--> JSX is called "syntax extension to JavaScript".
--> We used JSX because it includes markup and JavaScript in the same expression.
--> If we want to use JavaScript expression then we will use it inside curly braces(e.g {name} ).
2.2 JSX examples:-
1. const name = 'Tejinder';
2. const element = <h1>Hello, {name}</h1>;
--> First expression in JavaScript Expression.
--> Second expression is JSX expression, if we want to use 1st expression in the second expression then we will use curly braces.
1. const name = 'Tejinder';
2. const element = <h1>Hello, {name}</h1>;
--> First expression in JavaScript Expression.
--> Second expression is JSX expression, if we want to use 1st expression in the second expression then we will use curly braces.
3 What is rendering?
--> Like in JavaScript there is DOM and we display and control elements using DOM.
--> Similarly React has its own elements and DOM.
--> Render means to put an element inside the root element.
See the code snippet
--> Like in JavaScript there is DOM and we display and control elements using DOM.
--> Similarly React has its own elements and DOM.
--> Render means to put an element inside the root element.
See the code snippet
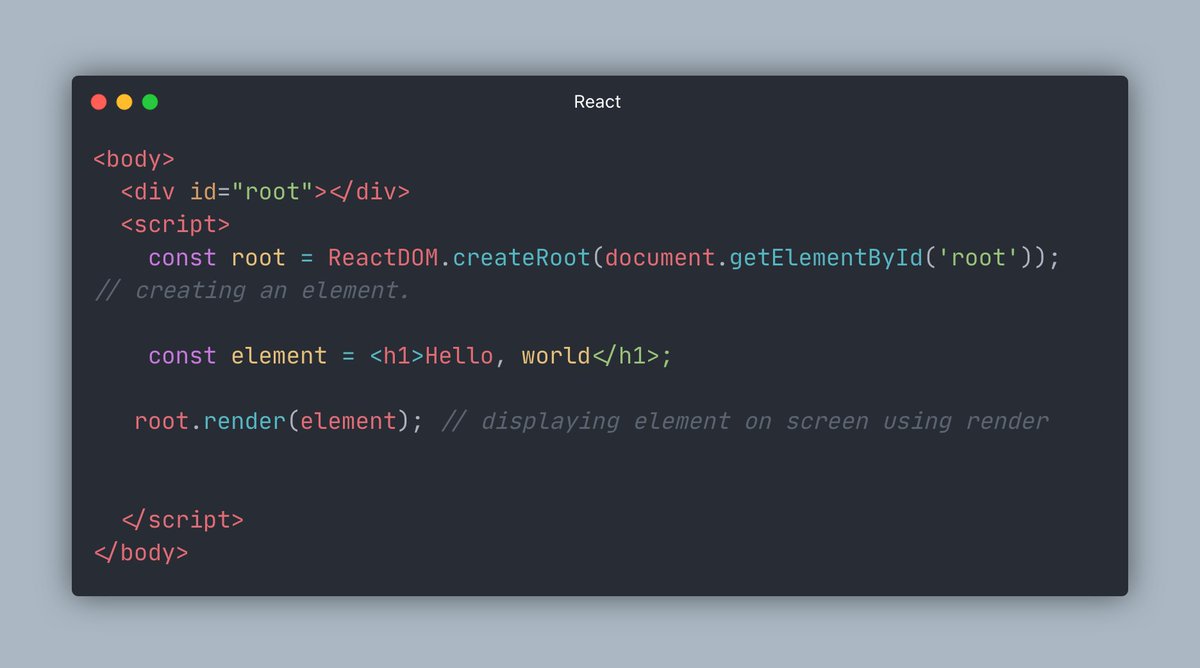
3.1 Updating the rendered Element:-
Let us First create a root element:-
const root = ReactDOM.createRoot(document.getElementById('root'));
Let us First create a root element:-
const root = ReactDOM.createRoot(document.getElementById('root'));
3.4 Now we will create JSX with one "div" and two "h" tags.
See the snippet.
--> new Date().toLocaleTimeString(); this is nothing but JavaScript.
See the snippet.
--> new Date().toLocaleTimeString(); this is nothing but JavaScript.

3.5 Now we will make a function and wrap JSX in this function.
see the snippet.
--> we also include the root. render(element) in function so that time will update at the given interval as set by
setInterval(tick, 1000);
see the snippet.
--> we also include the root. render(element) in function so that time will update at the given interval as set by
setInterval(tick, 1000);

3.6
--> In the last step we will call the function every 1sec using setInterval(tick, 1000);
--> Now if we inspect the h2 heading we come to know that only time is changing not the whole element.
--> It makes the process faster to check the bug if any occur.
--> In the last step we will call the function every 1sec using setInterval(tick, 1000);
--> Now if we inspect the h2 heading we come to know that only time is changing not the whole element.
--> It makes the process faster to check the bug if any occur.

If you like this make sure to:
Follow me @tejinder_id for web development-related tweets.
Thank you so much for staying to the end of this thread.
Follow me @tejinder_id for web development-related tweets.
Thank you so much for staying to the end of this thread.
• • •
Missing some Tweet in this thread? You can try to
force a refresh