
Wanna learn how I did these ripples and foam using "fake" decals? Might be a long thread but gunna go through it step by steps. There's a few things to cover first before we get to the COOL bits though! #gamedev #unrealengine #gameart
🧵Below!
🧵Below!
The first thing to figure out is how to take an actor's position/rotation/scale and hook it up to a material. Then we can use that data to compute properly aligned uvs, and sample a texture, like this cute squirtle. This happens all in the material!
So lets first look at the material. We can compute transformed uvs pretty easily! Just subtract the decal pos from wp, run it through a rotator (no idea about why it needs 8*pi though!), and divide it by the scaling...and we got some nice uvs! Running through a frac to visualize! 

This is great, but adjusting those pos/rot/scale values in the material is lame. So instead we can create a BP, and use an actor to drive those values! My BP looks like this. Creating a DMI so we can edit material params, and then sending values to the material!

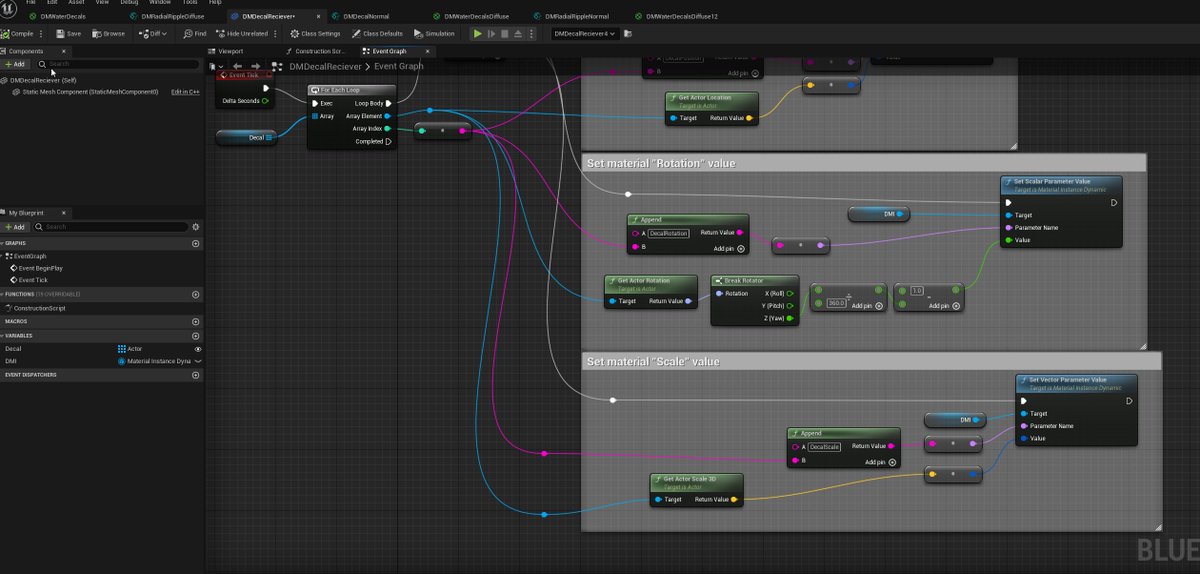
Note; you have to press play for the material to actual get the values from the actor (but you could hook this up to tick in the editor if you wanted. Not going to talk about that though!)
I've used an array of actors, and I append the element num onto the material param name
I've used an array of actors, and I append the element num onto the material param name
This means we can easily drive multiple decals in the same material, and we can read in the data (if it exists) by just added more material paramters...named "DecalPosition0", "DecalPosition1", etc..!
So now with that all set up, if we make a new actor in the scene, assign it to our actor array and press play.. we have some uvs that we can move and scale and rotate as we move around an actor!
We can use these uvs to sample a texture, but we get Squirtles tiling forever, so to solve this we need to mask away the texture everywhere except for the ONE Squirtle that is right under our gizmo.
We can do this by creating a BOXMASK. Can play with the bounds and edge falloff to make the mask larger or have softer edges, but for now we want it to match up perfectly to our texture space!
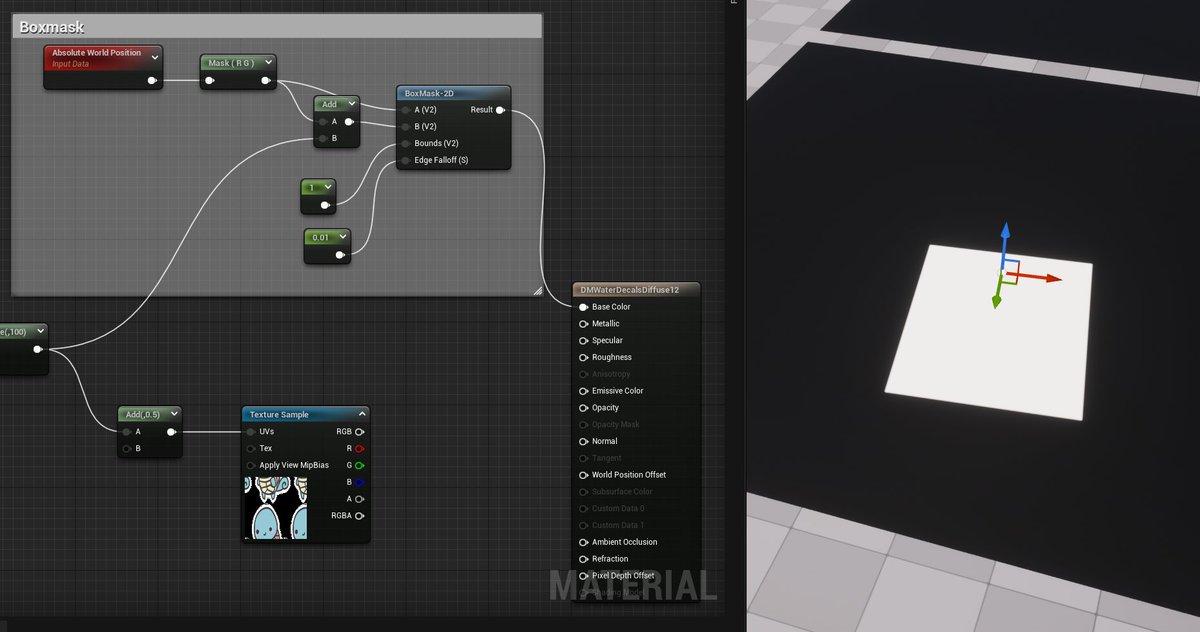
Then, since this mask is based on our transformed uvs (so it rotates and scales with our actor!) we can use it to control where squirtle shows up. What I like to do is take this mask, mul it by the texture.a, and use that in a lerp to control where the sqirtle color is!
That's now you do just a normal diffuse decal! Ideally, you wrap up this code into a MF, and then you can easily layer in multiple decals together, chaining lerps and being driven by our array of decals and the data we are passing in!
(to be continued tomorrow)
One neat trick to add some interesting watery motion is to just sample a scrolling noise texture (I'm using the LowResBlurred from engine content) and use it to offset the uvs before we sample our decal. Gives us this nice wobble! (this effect looks great on the radial ripples!)
Now that we have a rect decal, lets POLARIZE it. This is super simple, run the uvs through a VectorToRadialValue node before sampling the tex! We're gunna mask this with a sphere instead of a box too, so we can remove the boxmask bits for now.

With these polar coords, we can do the same thing we do to normal uvs. Offset them to scroll, or divide them to tile. We can add our wiggle back, and add a divide after the polar coords to control how many repeats we get. Lets only add our wiggle to uv.g, so we wiggle radially!
Important thing to note, we need to keep our polar tiling to whole increments, otherwise our tiling texture will no longer tile properly (and you'll see seams!) Adding scrolling, you can see how we are starting to get something that could be used for ripples...
Getting a mask for our texture is actually even easier with polar coords, we can just use the g coord which is "linear distance" or distance from the center! We can smoothstep it to adjust the sharpness too! Just have to grab the uvs AFTER we wiggle so our mask wiggles too!
So we have a mask, and we have replaced squirtle with just some perlin noise texture. Making it flow outwards looks pretty good already! But instead of just masking the texture out, we should DISSOLVE it as it moves outward too. This looks much more interesting!
And for fun, we could hook up our Smoothstep.max input to the scale.z value we are bringing in from our actor. This means you can control the foam dissolve amount with the scale gizmo in the scene!
Just playing with the tiling, scroll speed, and mask dissolve, you can see we can get some pretty interesting effects!
That's it for diffuse decals! The big reason I'm using this method is bc it allows me to put "decals" on translucent surfaces, so you can use it for things like foam, or even floating leaves on water. Can use it on regular meshes too for things like tattoos on characters, etc!
Could also use this diffuse decal to drive some other material output, like WPO! Use decals for controlling a heightmap (water waves maybe? 👀) or other kinds of effects. Anyways, next lets play with NORMAL MAPS! I've returned to the rect dec, turned off the panning and extras..

If we just sample a normal map instead of a diffuse texture, and plug the output into the normals...we get something that looks pretty okay. (using the "ReferenceNormalMap" from engine content). Note: on the final lerp we need to lerp to (0,0,1), the default "no normal color"
ITS A LIE THOUGH! These normals are NOT correct. See how when we rotate this decal the highlight/shadows move WITH the decal, it's as if the light is moving too...but this is NOT what should happen. The highlight should stay in place! We can see this when visualizing ndl too!
Fortunately, there is a way to fix this (and it did take me a bit to figure out), but the answer is the RotateAboutAxis node, to rotate our normal map directions as we rotate our decal. This "corrects" our normal map! We just bring in the DecalRotation from our actor and 1-x it!
I do want to note that the RotateAboutAxis returns a DELTA, and not the actual vector rotated. Which is really weird and is never explained anywhere except for in an old epic games forum post I found. Since it's a delta, to get the "correctly rotated vector", we just add it back
WeeeeeEEEeee proper normals!
So lets POLARIZE it and get some nice outward ripples. The major thing to note here is that we have an additional rotation amount per fragment when in polar coords. We have our normal "decal rotation" controlled by our actor, but also another rotation [0,1] for the polar angle!
If we hook our polar coords back up, remove our boxmask, and adjust our polar tiling to be 6 repeats we get something like this...and again we can see the specular highlight move around incorrectly when we rotate our decal. Bc we need to take into account the polar angle too!
It's a bit easier to see when visualizing lighting with ndl. Note how the shadows don't stay in place!
Math to the rescue! If we add in our polar angle we get something that looks much better (and should be correct-er!)
So now...if we swap our debug normal texture to something more wave like, hook up to the normal output, and maybe turn our wiggle noise back up a bit... RIPPLES
Lastly, we can hook our spheremask back up, and use that to control a lerp between our ripple normals and "no normals" (a color of (0,0,1)) to get the nice blending on the edges!
Now lets take a moment to turn it into a WATER surface. Change the shading model to Single Layer Water. Set up the SLW output. These are some settings I like to use.

Also set opacity to 0 so we can see through the water, give it some refraction (and set the material refraction to "Pixel Normal Offset". Play with the metallic and roughness to find something watery. I also changed the normal map to "T_Water_TilingNormal_Waves_02".
We can add some "standing ripples" by panning two normal maps in opposite directions, and use that as the base normals. Looks pretty cool :)
So that's all the INFO I got for you! What I do is keep each decal type in a MF (one for each rect, polar, and flipbook diffuse, and then a variation of each for normals) and then chain them together. Hooking up a radial diffuse and radial normal to the same actor, etc :)
• • •
Missing some Tweet in this thread? You can try to
force a refresh


