Ghislain Girardot Profile picture
Oct 20, 2022 24 tweets 8 min read Read on X
#UnrealEngine #UE4 #UE5
Cute simplistic trees are available as a Tier 2 reward on my Patreon :) Have a look at the thread below to see how they were made ⬇️
0/22 First of all, some technical stats: Each tree is ~3K tris for LOD0. 2 draw calls per tree (one material for the leaves, one for the trunk). 2*1K textures (one normal map, one mask). ~160 pixels instructions for the foliage material.
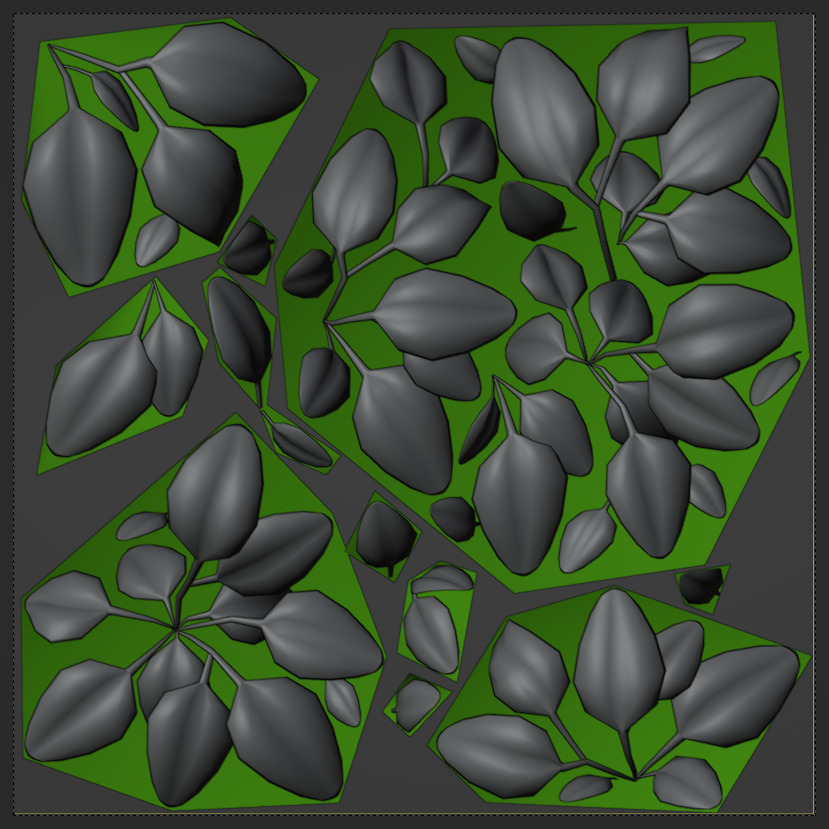
1/22 It all begins with the leaf texture creation. There's many ways to do this, I tend to model a single leaf in 3D then group a bunch of them together like so. Image
2/22 Then I build my leaf cards out of these clumps. Image
3/22 Here I also added some extra leaves at the edges to not only use this texture for the leaf cards but also as a tilable texture Image
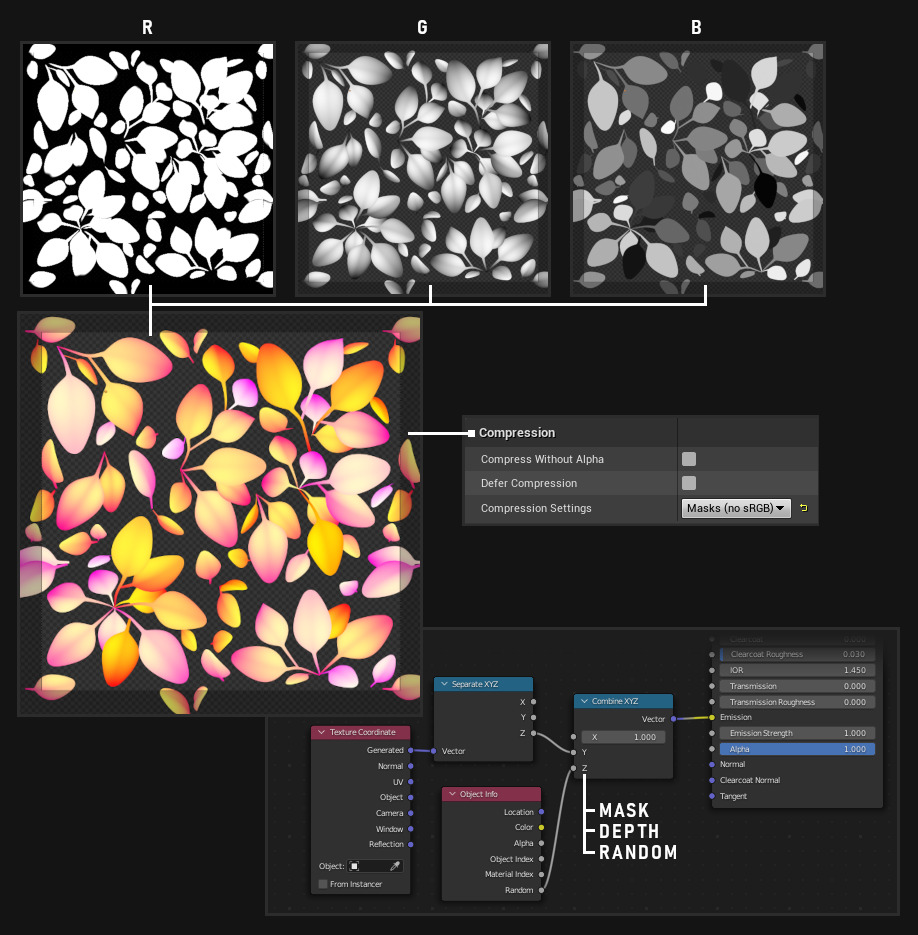
4/22 I bake a mask texture in Blender using a simple shader: it combines the opacity mask in red channel, depth in green and random value per leaf in blue channel (make sure to use the proper compression settings in UE for such RGB mask textures) Image
5/22 A normal map is also easily generated using a simple shader in Blender Image
6/22 The tree mesh is built using three simple inflated shapes to create a "layered shell". You can save some triangles on the inner shells because they don't really affect the silhouette and don't need to super closely match the outer shell. Image
7/22 In the first UV map I unwrap those shells the traditional way, nothing fancy here. There will be a visible seam but it's not super noticeable. There's trick to hide such seams but here I kept the asset & UE material simple, so we'll have to live with it. Image
8/22 In the second UV map I used a simple projection from side view to bake the height (useful to create local gradients in the shader!). I also scaled each "shell layer" uvs to 0 in X and shifted them in the UV map so I can build a "shell gradient", from inside to outsite. Image
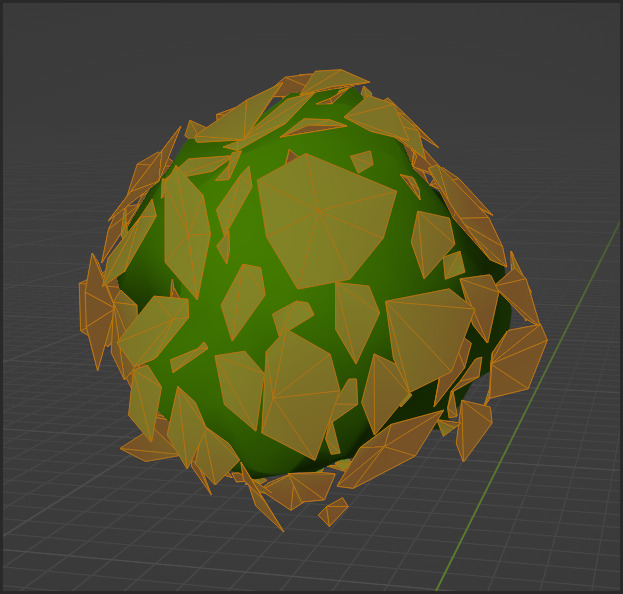
9/22 Always mess with the normals when it comes to stylized rendered foliage :D Here I used a simple sphere to project the normals and have a smoother looking shape Image
10/22 Place some leaf cards here and there to build a more interesting silhouette and make the tree fluffier. Use the same custom normal trick as shown above. Image
11/22 Here again, for the cards, I used a side view UV projection for the second UV map to bake the height. Then shifted randomly each leaf card in X to bake a random value (which may be useful to drive some colors & randomization in the shader) Image
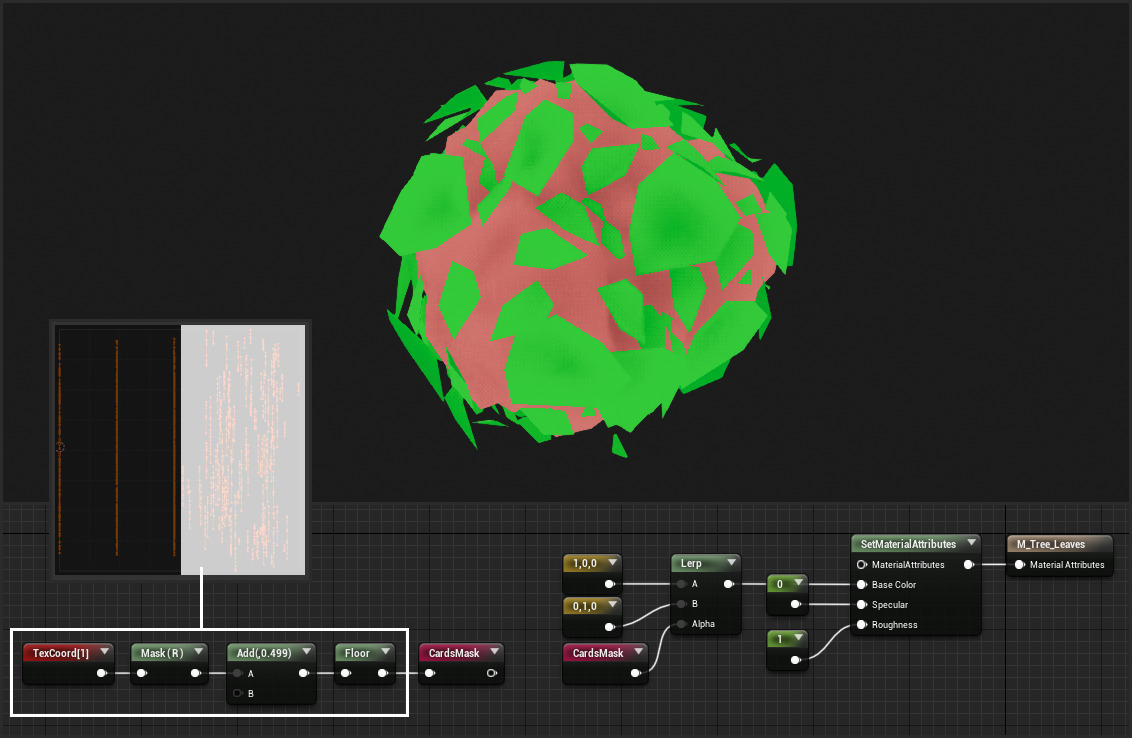
12/22 The second UV map in the end looks like this. It's split in two so I can easily mask cards from the shell meshes using simple maths... Image
13/22 ... like so! I built a bunch of masks and gradients out of that second UV map. Here I can isole cards from the inner mesh and drive some logic with it, like here lerp a debug color. Image
14/22 That "CardsMask" is used to sample my mask texture in two different ways for the opacity mask. As-is for the cards and in a tiling manner for the shell meshes (thus having made the texture not only an atlas for our cards but a tilable texture as well) Image
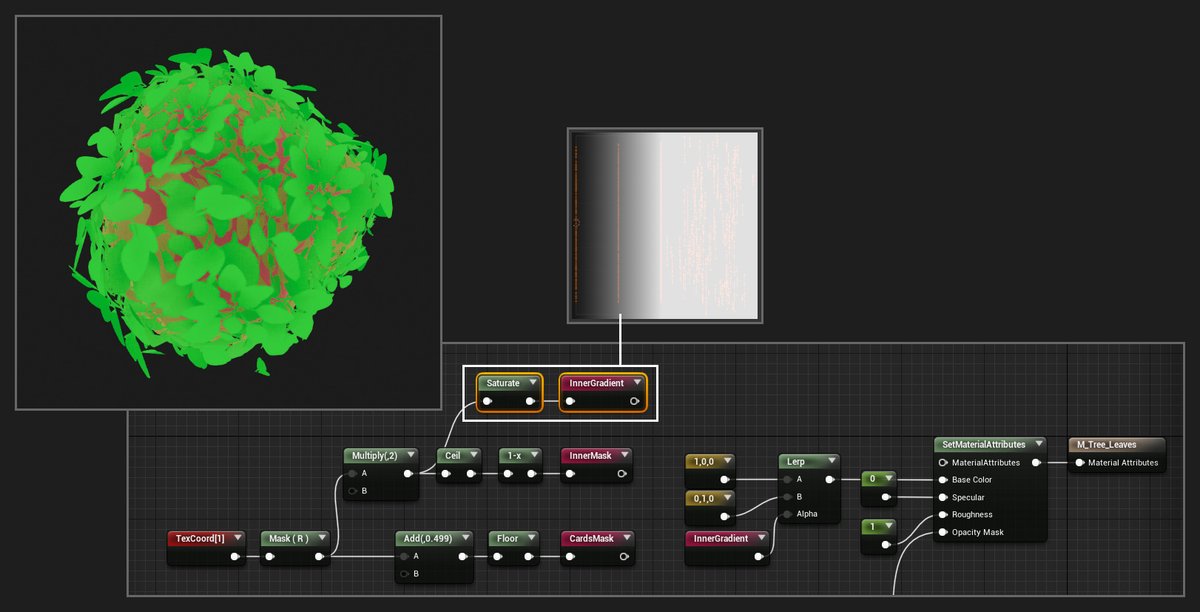
15/22 Now I don't want the most inner shell to still have some masked pixels so I'm building yet another mask using the second UV map to isole that most inner shell... Image
16/22 ... and use it to force an opaque material on that last shell. I don't want to be able to see-through the foliage, however dense it is because I may be able to see the tree trunk poking through the bottom which may not look great. Image
17/22 I also derive a shell gradient from that second UV map. Very useful to drive some colors and make the inner part of the tree darker to give it depth and add a fake occlusion effect. Image
18/22 I also have that top/down local gradient! Very useful to drive colors. Image
19/22 And voilà, I kinda have all the tools I need create my simplistic stylized look. It doesn't hold too well up close but it gets the job done from a distance :)
20/22 Things to try: top/down albedo gradient, top/down SSS color gradient, fake rimlight (dot product between the pixel or vertex normal and camera vector. You may use the top/down gradient as a mask as well to fade out the rim light on the bottom). Be subtle with the normal map
21/22 Lower the specular of your material to push the saturation. Also don't forget Post Process Volumes which can of great use to push the saturation & contrast. Be careful though, it'll affect your whole scene :)
22/22 Thanks for reading! You can support me on my Patreon and find all kind of cool UE projects: patreon.com/GhislainGir

• • •

Missing some Tweet in this thread? You can try to force a refresh
 

Keep Current with Ghislain Girardot

Ghislain Girardot Profile picture

Stay in touch and get notified when new unrolls are available from this author!

Read all threads

This Thread may be Removed Anytime!

PDF

Twitter may remove this content at anytime! Save it as PDF for later use!

Try unrolling a thread yourself!

how to unroll video
  1. Follow @ThreadReaderApp to mention us!

  2. From a Twitter thread mention us with a keyword "unroll"
@threadreaderapp unroll

Practice here first or read more on our help page!

More from @GhislainGir

Jan 14, 2023
#UnrealEngine #UE4 #UE5 #UETips
Here's one WPO trick I used to create this night sky.

The challenge was to create subtle per-star lens flares that would always face the camera and remain straight, exactly like billboards. 🧵⬇️
To create star billboards, each star would need to rotate around their own pivot point to face the camera but pivots are all lost once exported to a single mesh... :(
... I could bake pivots in UVs but that'd actually be overkill here! I don't actually care about the precise XYZ position of each star... 🧐
Read 14 tweets
Jan 12, 2023
Heya! I'm back😇Was good to take a break from work and socials a bit, but it's time to get back to work!

I guess I'll start 2023 showcasing how to efficiently create a sharp-looking night sky using a single 512x512 16bits texture and 3 cheap materials. Vista mesh has ~5k tris.
- Sharp stars.
- No visible tiling.
- Artistic control.
- Flickering effect.
- Custom lens-flare effect on hero stars.
- Nebula. ImageImageImage
That wasn't planned but I needed a night sky and then I thought it'd make a good subject for a quick YT video while I work on more time-consuming incoming projects :D
Video shouldn't be too long to produce so I'm hoping for a release in two days?
Read 4 tweets
Dec 10, 2022
#UnrealEngine #UETips #UE5
You can use a Procedural Mesh Component or Geometry Scripting to iteratively slice a given mesh, render the generated cap and composite the result into an atlas texture to generate a distance field/volume texture ⬇️
I was lazy and used the good old procedural mesh component because it's what I know and it's easy. Do a loop and slice a mesh a little bit further each time (based on the object's bounding box and amount of slices to generate). Capture the cap using a scene capture component... Image
...and composite the captured texture into the atlas render target using an additive material that renders that texture at a specific XY tile. Image
Read 4 tweets
Oct 10, 2022
#UnrealEngine #UE4 #UE5
Dunno why I love to prototype random stuff in BP so much. It's 5am, what am I doing🤪I guess this could be used to generate random positions with random radius and no overlaps. Blueprint graphs below ⬇️
Tick event to see the simulation progressing. Clear & Generate Circles are two functions callable in-editor. Image
Spawn logic Image
Read 6 tweets
Sep 7, 2022
#UnrealEngine #UE4 #UE5 #UnrealTips
1/7 Translucency see-through trick that might be useful... sort-of? This is usually done with custom stencil/depth (which has its benefits) but using a translucency material allows you to cheat a bit...⬇️
2/7 First we'll make a translucent material that has Depth Test disabled. Then we're going to sample the SceneDepth and recompute the world position of anything that was occluding our view... Image
3/7 ... then get the squared distance (cheaper) from that scene world position to the camera and compare it with the squared distance of our own position to the camera. If ours is higher, means we're behind something! We can then get a binary mask with an if statement.
Read 7 tweets

Did Thread Reader help you today?

Support us! We are indie developers!


This site is made by just two indie developers on a laptop doing marketing, support and development! Read more about the story.

Become a Premium Member ($3/month or $30/year) and get exclusive features!

Become Premium

Don't want to be a Premium member but still want to support us?

Make a small donation by buying us coffee ($5) or help with server cost ($10)

Donate via Paypal

Or Donate anonymously using crypto!

Ethereum

0xfe58350B80634f60Fa6Dc149a72b4DFbc17D341E copy

Bitcoin

3ATGMxNzCUFzxpMCHL5sWSt4DVtS8UqXpi copy

Thank you for your support!

Follow Us!

:(