
#UnrealEngine #UE4 #UE5
Cute simplistic trees are available as a Tier 2 reward on my Patreon :) Have a look at the thread below to see how they were made ⬇️
Cute simplistic trees are available as a Tier 2 reward on my Patreon :) Have a look at the thread below to see how they were made ⬇️
0/22 First of all, some technical stats: Each tree is ~3K tris for LOD0. 2 draw calls per tree (one material for the leaves, one for the trunk). 2*1K textures (one normal map, one mask). ~160 pixels instructions for the foliage material.
1/22 It all begins with the leaf texture creation. There's many ways to do this, I tend to model a single leaf in 3D then group a bunch of them together like so. 

2/22 Then I build my leaf cards out of these clumps.
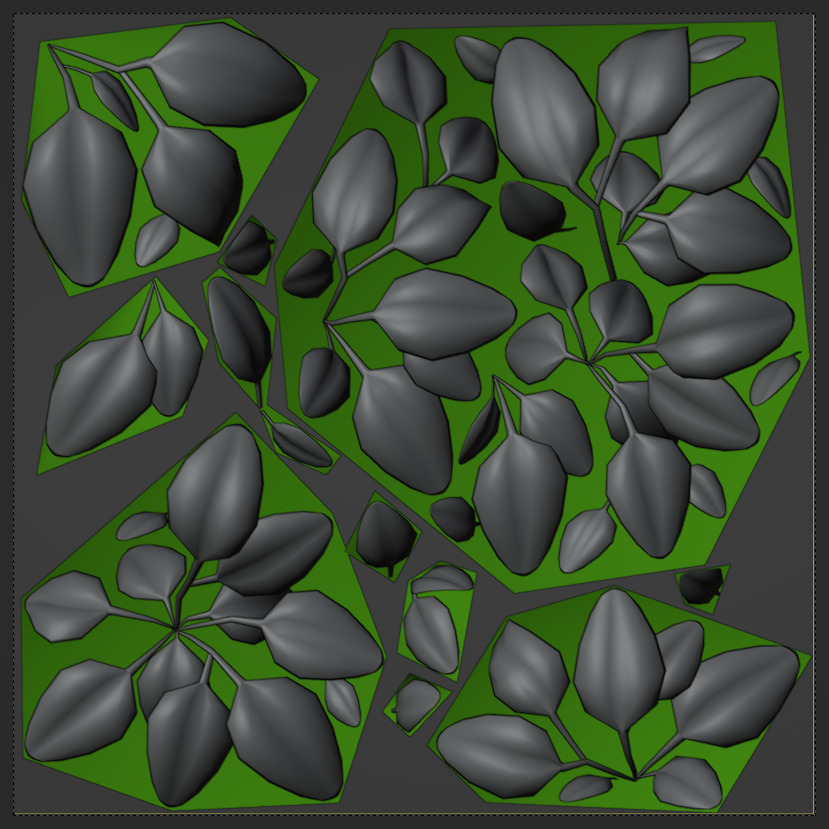
3/22 Here I also added some extra leaves at the edges to not only use this texture for the leaf cards but also as a tilable texture

4/22 I bake a mask texture in Blender using a simple shader: it combines the opacity mask in red channel, depth in green and random value per leaf in blue channel (make sure to use the proper compression settings in UE for such RGB mask textures)

5/22 A normal map is also easily generated using a simple shader in Blender

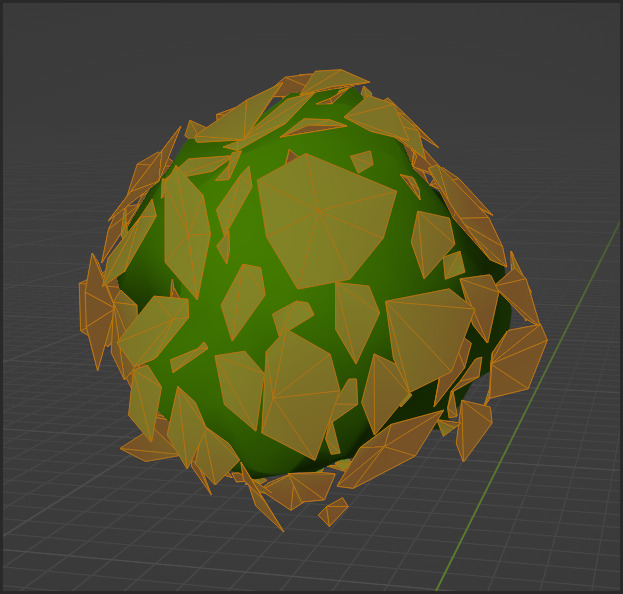
6/22 The tree mesh is built using three simple inflated shapes to create a "layered shell". You can save some triangles on the inner shells because they don't really affect the silhouette and don't need to super closely match the outer shell.

7/22 In the first UV map I unwrap those shells the traditional way, nothing fancy here. There will be a visible seam but it's not super noticeable. There's trick to hide such seams but here I kept the asset & UE material simple, so we'll have to live with it.

8/22 In the second UV map I used a simple projection from side view to bake the height (useful to create local gradients in the shader!). I also scaled each "shell layer" uvs to 0 in X and shifted them in the UV map so I can build a "shell gradient", from inside to outsite.

9/22 Always mess with the normals when it comes to stylized rendered foliage :D Here I used a simple sphere to project the normals and have a smoother looking shape

10/22 Place some leaf cards here and there to build a more interesting silhouette and make the tree fluffier. Use the same custom normal trick as shown above.
11/22 Here again, for the cards, I used a side view UV projection for the second UV map to bake the height. Then shifted randomly each leaf card in X to bake a random value (which may be useful to drive some colors & randomization in the shader)

12/22 The second UV map in the end looks like this. It's split in two so I can easily mask cards from the shell meshes using simple maths...

13/22 ... like so! I built a bunch of masks and gradients out of that second UV map. Here I can isole cards from the inner mesh and drive some logic with it, like here lerp a debug color.
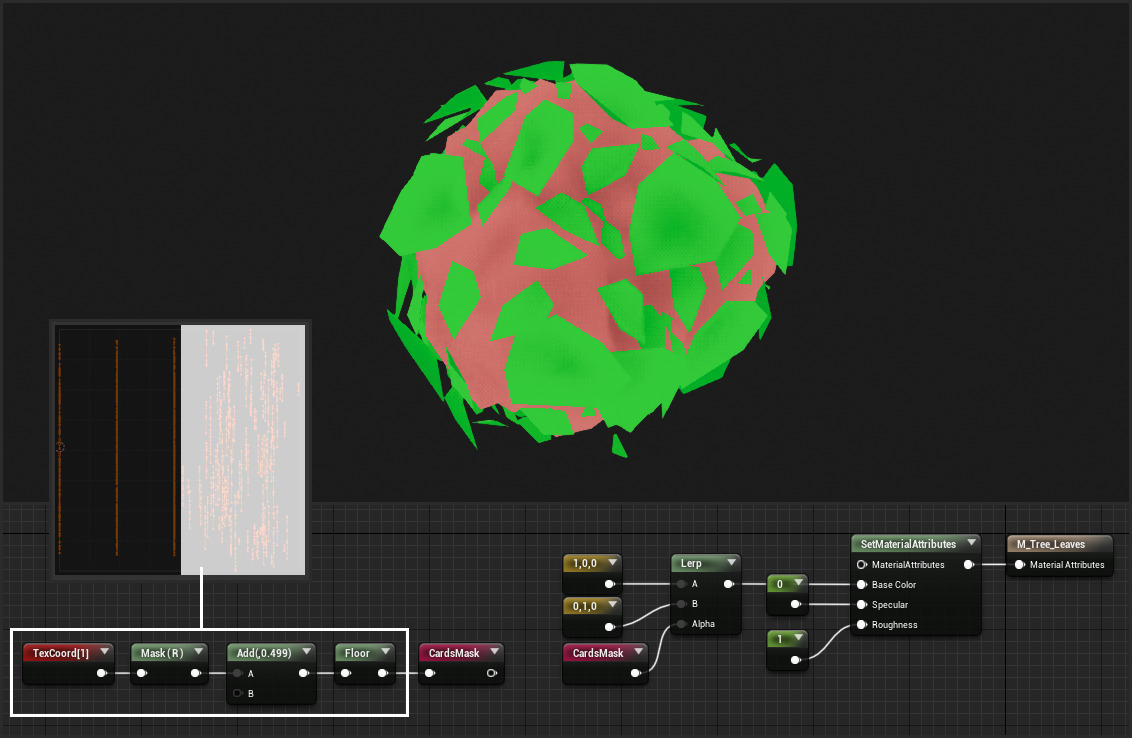
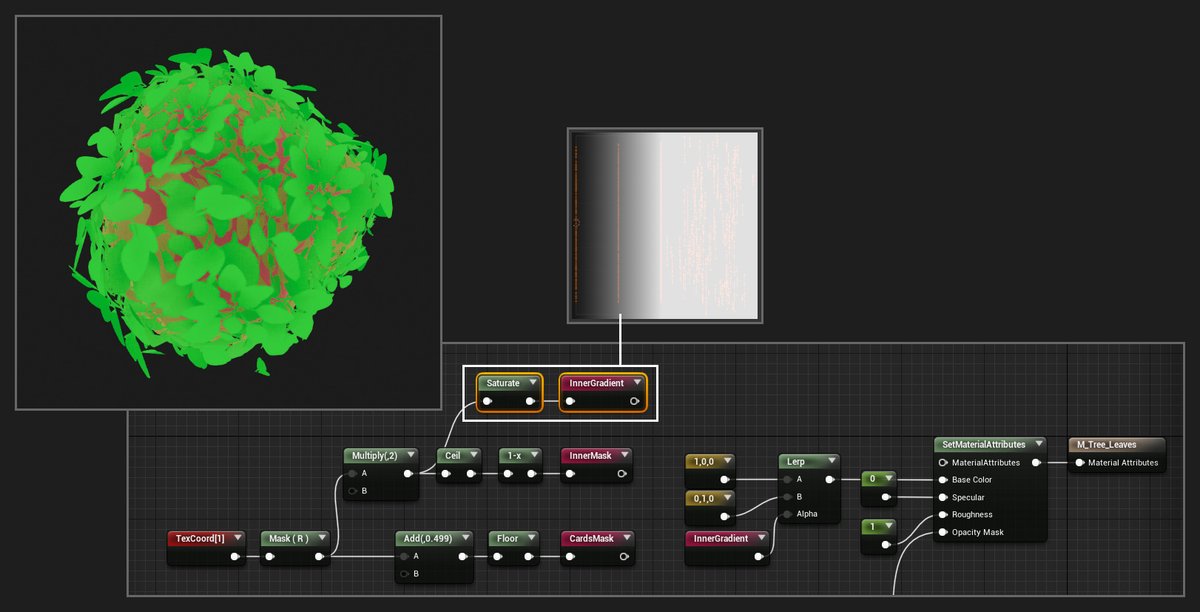
14/22 That "CardsMask" is used to sample my mask texture in two different ways for the opacity mask. As-is for the cards and in a tiling manner for the shell meshes (thus having made the texture not only an atlas for our cards but a tilable texture as well)

15/22 Now I don't want the most inner shell to still have some masked pixels so I'm building yet another mask using the second UV map to isole that most inner shell...

16/22 ... and use it to force an opaque material on that last shell. I don't want to be able to see-through the foliage, however dense it is because I may be able to see the tree trunk poking through the bottom which may not look great.

17/22 I also derive a shell gradient from that second UV map. Very useful to drive some colors and make the inner part of the tree darker to give it depth and add a fake occlusion effect.
18/22 I also have that top/down local gradient! Very useful to drive colors.

19/22 And voilà, I kinda have all the tools I need create my simplistic stylized look. It doesn't hold too well up close but it gets the job done from a distance :)
20/22 Things to try: top/down albedo gradient, top/down SSS color gradient, fake rimlight (dot product between the pixel or vertex normal and camera vector. You may use the top/down gradient as a mask as well to fade out the rim light on the bottom). Be subtle with the normal map
21/22 Lower the specular of your material to push the saturation. Also don't forget Post Process Volumes which can of great use to push the saturation & contrast. Be careful though, it'll affect your whole scene :)
22/22 Thanks for reading! You can support me on my Patreon and find all kind of cool UE projects: patreon.com/GhislainGir
• • •
Missing some Tweet in this thread? You can try to
force a refresh


