
A breakdown thread of how to make a simple sky-occlusion system. I'm using this to block snow/rain from showing up on surfaces inside caves, under trees, in houses. Also can be used to mask particles! #gamedev #unrealengine #gameart
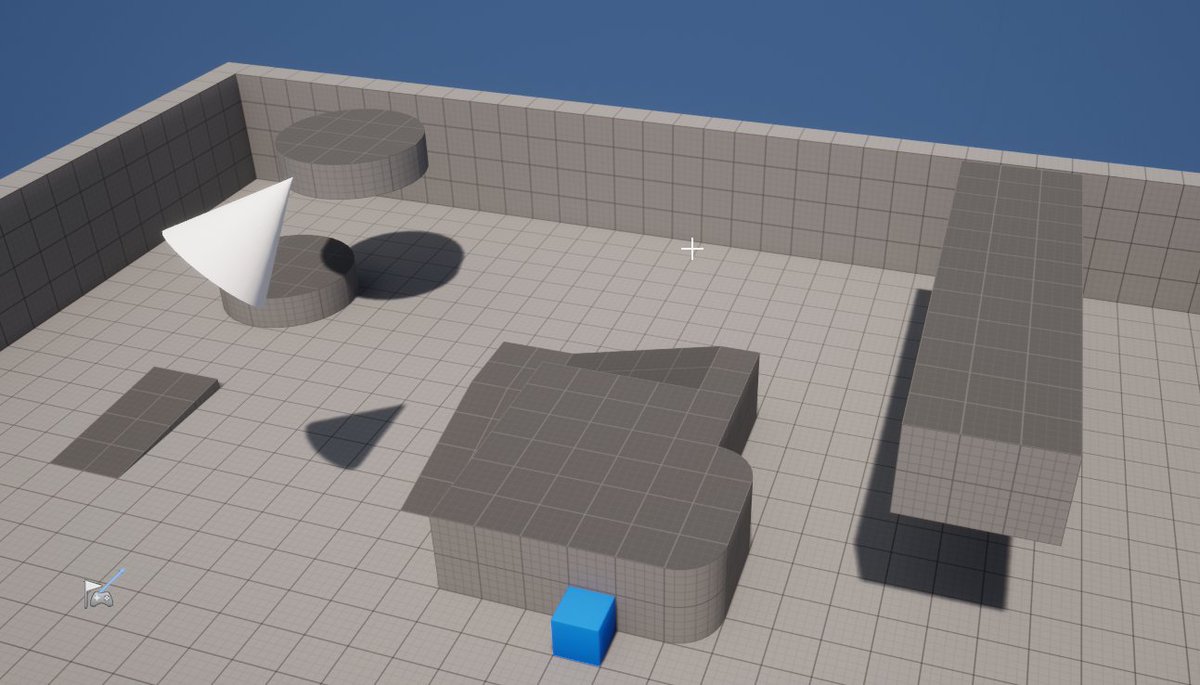
Starting from the third person template. Just moved up some of the geometry so we have something to stand under and act as a sky blocker. The heavy lifting of this effect is done by a SceneCapture2D, so lets add one of those too 
The SceneCapture (going to shorten it to SC from now on) needs to have a rotation of (0, -90, -90), and also lets place it at (2000,2000,2000), which is approximately the center of our scene. Lets also set the capture source to "Final Color (LDR) in RGB"

A few more settings; Set projection to "Orthographic", Ortho width to "10000" and also disable ALL of the Show Flags except for: General - Landscape, Static Meshes, Translucency, Advanced - Instanced Static Meshes, Nanite Meshes, PP - Local Exposure, and Hidden - Post Processing

So now we have an ORTHOGRAPHIC top down scene capture, that will capture our entire scene. We turn of a lot of the show-flags do stop our SC from capturing things we don't need, so it gives a bit of a perf boost! (We don't need lighting, for example!)
So now lets create a Render Target, and assign it to our SC so it can render into it. Changing our RT format to RTF R32F, because we only need the R channel to store data. As soon as we drop it into the SC, our scene shows up in the RT!

So at this point you might ask "Dylan, why is our RT only single channel (R), but we set our SC to render FINAL COLOR in RGB! WHY??". Shouldn't we use the Scene Depth capture? Turns out the Scene Depth capture is kind of weird, and ultimately we want scene height so...
We do this by giving our SC a post process, that just writes out the raw scene height to the RT! Create a new PP material, throw in worldpos.z into emission, and assign that to the Rendering Features/Post Process Materials slot on our SC! With this PP our RT changes a bit!

Now our RT is storing the RAW scene height! So we can just align this RT in worldspace to our objects so they match up, and then sample it to compare if we are below the stored height! So lets align it!
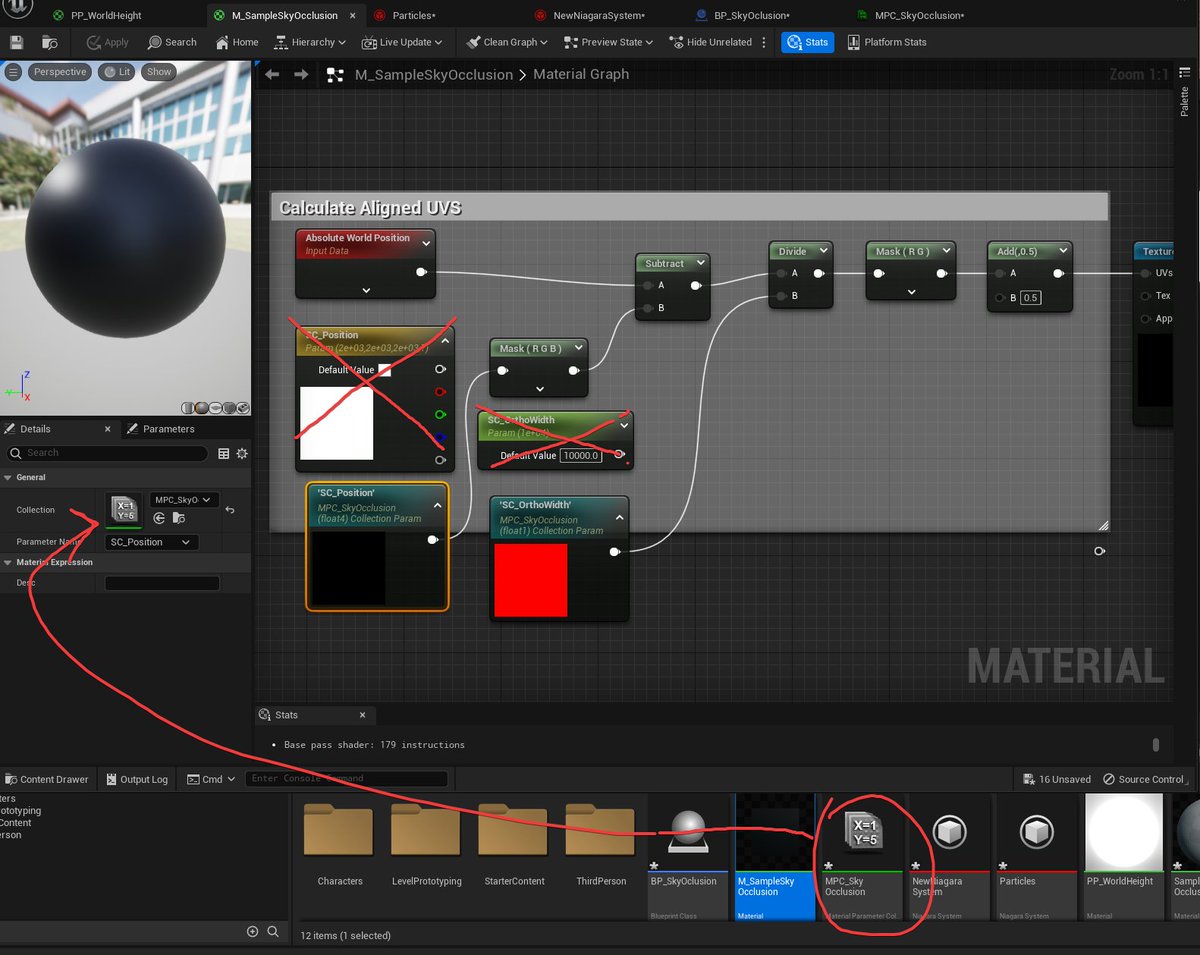
We create our material, assign it to the floor, and then do a little bit of math to calculate uvs that line up. Be sure to put in the right SC_Position, and SC_OrthoWidth, otherwise it won't line up! Use these UVS to sample our RT!


Right now, our material is just outputting the raw depth, so anything above 0 is just white, but if we compare this depth to the depth of the pixel we're rendering, we can find out if it is above or below, and properly mask!
So all that if is doing is returning 0 or 1 depending on if the ground surface is above or below our stored RT height. Bias is just a small value to offset the height if you want! Now we can use this mask to control a lerp or whatever you want in a material!
We can use this same material and throw it on some particles too!
Right now, the SC doesn't move, and so the area that is captured is always the same area. If you were to run 10000 units away, the capture wouldn't follow you...so lets fix that! We are going to do this with a simple blueprint that just moves the SC with the main camera..
We also are going to use a Material Parameter Collection, so lets create that first and add two variables for it, one scalar for OrthoWidth, and one Vector for the SC position. In our BP we are going to set the values here, and then in our material we can get these set values!

Next, create a BP with parent class actor. Add a new variable of type "Scene Capture 2D Object Reference" and set it to public and compile. Drag this BP into the scene, and assign the SC in our scene to our BP variable.

Here is our BP! Getting the player camera position, and moving our SC to match that position every tick. Also storing this new position in the MPC for our material to use in the aligning process. Also lets just hardcode our OrthoWidth in the MPC (forgot to do this earlier!)


If we press play and run around, we can see that our SC IS moving when our player moves, but now it's not aligned! This is because our material is still using the old (hardcoded) position when trying to align, but this position changes when we move now...so lets fix that!
We just need to swap out our two variables to use Collection Parameters instead (the ones we set in the MPC)
Aligned! But it's a bit WOBBLE-Y. This is because the SC is being positioned at values that when we try and align the RT it is "between pixels" so it kind of jitters around, but we can fix this by snapping the camera position in our BP to a nicer value!
We can do this by adding in a "Vector Snapped To Grid" node, and for our "In Grid Size" we use "1/(RT Size)*(OrthoWidth)", which evaluates to 39.0625 for me. (thanks to @GhislainGir for this trick!). Compile it, press play and....

NO MORE JITTER!
A few notes; You could in BP begin play get the RT Size and SC Ortho Width and store them in the Material Parameter Collection instead of hard coding values. You probably should actually, but for brevity I'm skipping this step for now. Will fix this up at the end!
Additionally, You can change the RT size to be smaller/larger if you want. Smaller should be faster, but more pixely. The SC is also set to capture EVERY frame, which is probably unnecessary. Lets edit the BP to only recapture once the player moves some distance away
On the SC, uncheck "Capture Every Frame" and "Capture on Movement" and in our BP add this code. This checks to see if the current camera pos is at least X units away from the last capture position, and if so, recapture and store that as our latest position.
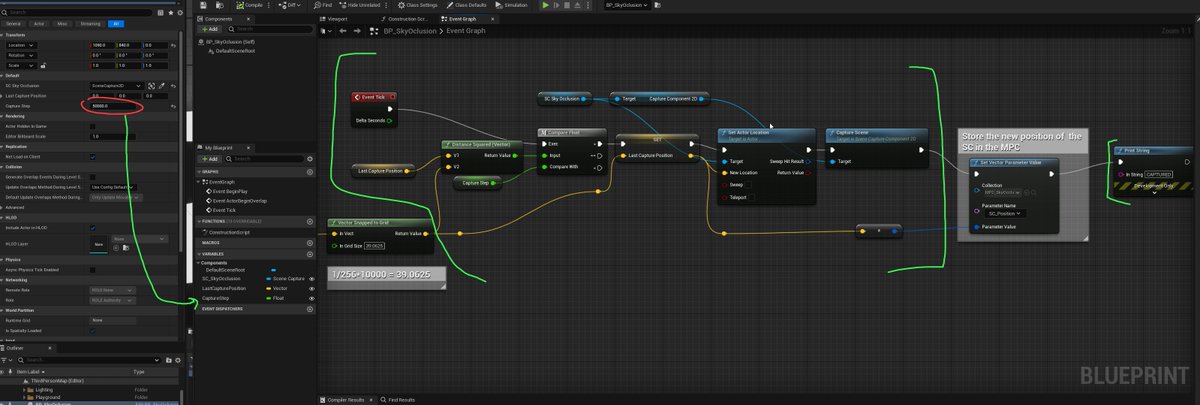
We added a print to display onscreen every time the SC recaptures, and you can see now it's every second now instead of every frame, this is much nicer on your framerate! The drawback here is that any blockers that move won't be picked up in the RT until the next capture happens
Sampling the mask on the player!
OK THATS ALL FOR NOW. May put together a ramble-y youtube video today also, but feel free to ask questions or offer suggestions if you have them!
YT version here:
• • •
Missing some Tweet in this thread? You can try to
force a refresh


