
This weekend, I upgraded our game engine's renderer to support PBR — check out how big of a difference it is!
This is a thread full of the steps (and missteps) I took along the way.
#rustlang #gamedev
This is a thread full of the steps (and missteps) I took along the way.
#rustlang #gamedev

Most of the techniques I implemented this weekend came from the Filament PBR docs: google.github.io/filament/Filam…
as well as from Hotham (github.com/leetvr/hotham), a game engine built by my friend @Kane_rogers!
as well as from Hotham (github.com/leetvr/hotham), a game engine built by my friend @Kane_rogers!
The first thing we had to do was get all of the PBR material information into the engine and start sampling it in our shaders.
Adam, the test character we've been using, is not designed for PBR and the new material parameters are NOT hooked up right. He looks worse than before!
Adam, the test character we've been using, is not designed for PBR and the new material parameters are NOT hooked up right. He looks worse than before!

Next, I adjusted our global lighting to use ✨Physical Units✨ and... got immediately blinded by the sun being 120,000 times too bright.
Someday, I'll come back to the physical units problem, but for now, I just turned down the brightness of the sun by a few orders of magnitude.
Someday, I'll come back to the physical units problem, but for now, I just turned down the brightness of the sun by a few orders of magnitude.

After the sun crisis was resolved, I started iterating on how we mapped the material parameters into all these lighting equations I stole from Filament.
I don't think this character's suit is made of red teflon, so something must be up. Enter: the Standard glTF PBR Test Spheres!
I don't think this character's suit is made of red teflon, so something must be up. Enter: the Standard glTF PBR Test Spheres!


I fixed where the wires were crossed with the red suit guy. I think he's going to be our new test player character.
It's easy to get parameters mixed up, especially when the Metallic-Roughness texture actually stores them in the other order. Oops!
It's easy to get parameters mixed up, especially when the Metallic-Roughness texture actually stores them in the other order. Oops!

I imported the Khronos "Damaged Helmet" model to see where we were at. I used our engine's shader hot reloading to flip back and forth between our old and new material models.
Even with just metallic-roughness and direct lighting, things look a lot better!
Even with just metallic-roughness and direct lighting, things look a lot better!


Next, I took a bit of a detour. A longstanding issue our engine has had is the lack of mipmaps.
If you look at the horizon in pictures I've posted before, you can see that the grass is super noisy. That's the moiré effect, and the fix is to generate and use mipmaps.
If you look at the horizon in pictures I've posted before, you can see that the grass is super noisy. That's the moiré effect, and the fix is to generate and use mipmaps.
I added KTX2 texture support to our engine and used github.com/leetvr/squisher — a tool that generates bootleg glTF files with KTX2 textures — and suddenly, mipmapping!
I had to bodge our texture loading at first, so here are before/after screenshots where everything is grass.
I had to bodge our texture loading at first, so here are before/after screenshots where everything is grass.


I used the new KTX2 support to redo our skybox implementation. Gone are the days of loading 6 PNG files for cubemaps!

Then, I was added support for emissive textures. This ended up being really easy and I took some screenshots of the helmet in the dark.
I think there's some future work to do here with bloom once we have an HDR pipeline. For now, it'll work!
I think there's some future work to do here with bloom once we have an HDR pipeline. For now, it'll work!

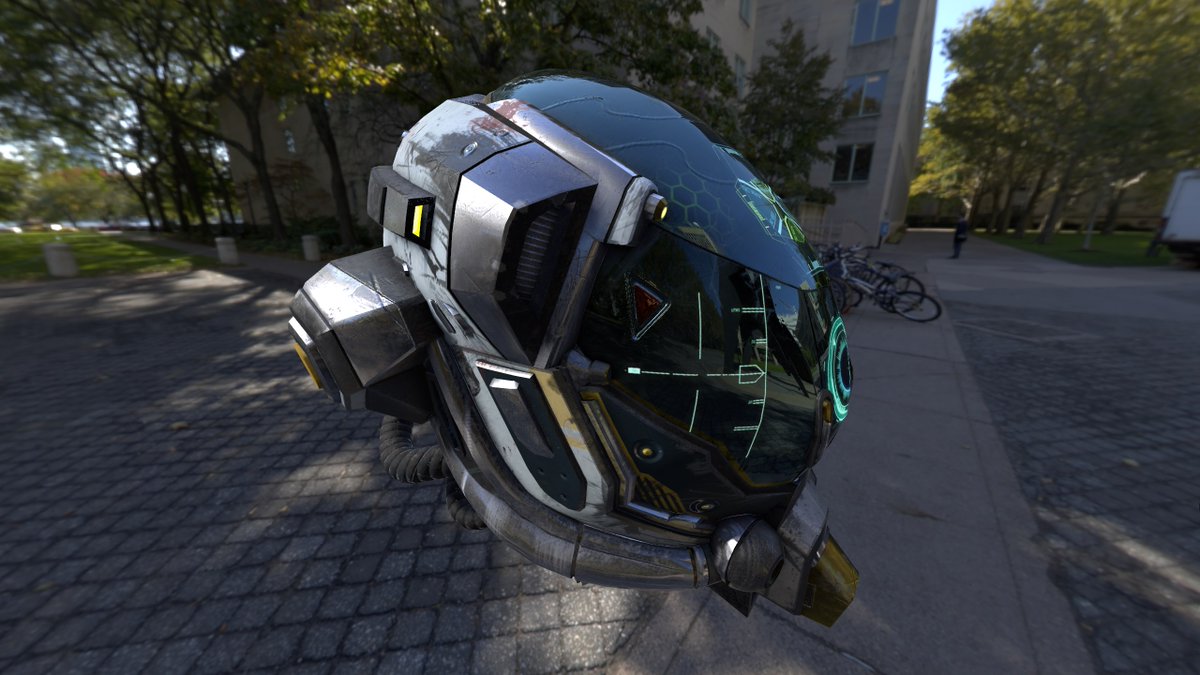
A big task on the roadmap was to implement indirect lighting.
Image Based Lighting (IBL) is a technique involving sampling lighting information from cubemaps to compute indirect lighting. I pulled an IBL image from Hotham and suddenly the helmet started looking like this:
Image Based Lighting (IBL) is a technique involving sampling lighting information from cubemaps to compute indirect lighting. I pulled an IBL image from Hotham and suddenly the helmet started looking like this:

The IBL I used looked like it was taken in the middle of a photography studio. There aren't a lot of details, it's black and white, and it's really bright.
But... now we had reflections! The helmet suddenly became shiny and that was really exciting.
But... now we had reflections! The helmet suddenly became shiny and that was really exciting.
The final bit of material information to hook up was the ambient occlusion texture. It adjusts the amount of indirect lighting an object should receive in a given spot.
It helps add detail to the nooks and crannies of an asset on the very small scale. It's pretty subtle!
It helps add detail to the nooks and crannies of an asset on the very small scale. It's pretty subtle!


Finally, I found a reasonable HDR image online and wrestled with PVRTexTool to generate a new IBL.
I tweaked our lighting a bit more and... boom! The final result:
I tweaked our lighting a bit more and... boom! The final result:

I learned a ton about rendering and lighting during this project.
This was my first time implementing these features in a renderer and it was a lot easier than I expected. There's a lot more to learn and do, but this is a great foundation for our future work.
This was my first time implementing these features in a renderer and it was a lot easier than I expected. There's a lot more to learn and do, but this is a great foundation for our future work.
• • •
Missing some Tweet in this thread? You can try to
force a refresh


