Ridd Profile picture
20 Jun, 10 tweets, 4 min read
There's a right way and a wrong way to use variants in @figmadesign.

When used correctly, they can be the most powerful part of your entire workflow.

These are the 5 steps I do for every single component I create 👇
01 — Create a "base" component

This will function as the single source of truth for all of your variants. So include everything you think you'll need.

I like to follow this naming format 👇

".base—[ComponentName]"

(using a . in front of the name hides it from your libraries) Image
02 — Duplicate your .base component 2x

Careful... don't duplicate it once, and then duplicate that new instance the 2nd time.

Both instances must come directly from the .base component to preserve all of your overrides when you switch between variants in the future. Image
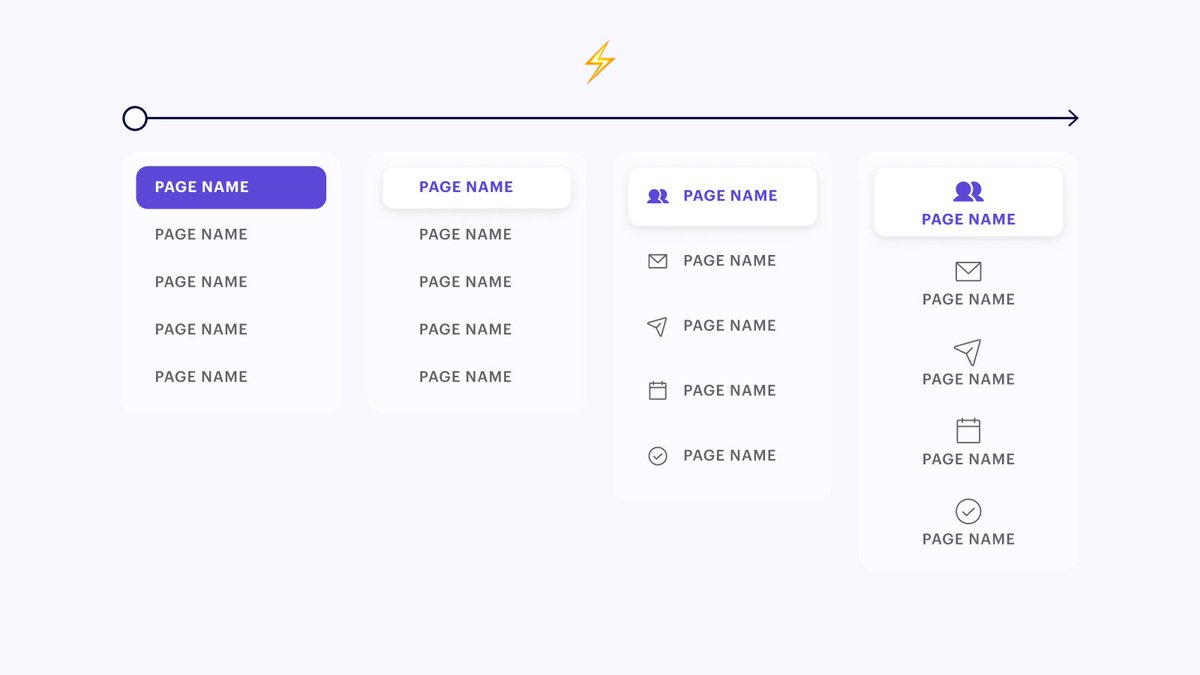
03 — Create new main components out of your two instances

If you know what your variant names will be you can go ahead and change them now.

For web projects, I'm almost always starting with "Default" and "Hover". Image
04 — Select your two new main components and hit "combine as variants" in the right panel

At this point you can make your style overrides too!

Notice how I'm hiding/showing the button and icon depending on the state? This is why you include everything you need in your .base 👍 Image
05 — Now you can create the rest of your states like normal and all new variants will be tied back to the original .base component without you having to do a thing 👏👏👏 Image
Two benefits to tying everything back to the .base—Component 👇

First = one source of truth.

Let's say I want to update the spacing or add an element to my lesson cards. Now I have a single knob to turn and my changes reflect across every state of the component all at once.
Second = preserving overrides

Have you ever switched between variants and all of your text or color overrides disappeared? It's the worst, I know.

Using a .base component that lives outside of your variants list ensures that never happens again 👍
If you enjoyed this and want to take more deep dives into Figma make sure you get on the list for @figmaacademy👇

figma.academy
I also created a Figma playground + video lesson that walks you through the entire process.

You'll get to see a more complex example showing just how powerful variants can be with nested .base components 💪

figma.com/community/file…

• • •

Missing some Tweet in this thread? You can try to force a refresh
 

Keep Current with Ridd

Ridd Profile picture

Stay in touch and get notified when new unrolls are available from this author!

Read all threads

This Thread may be Removed Anytime!

PDF

Twitter may remove this content at anytime! Save it as PDF for later use!

Try unrolling a thread yourself!

how to unroll video
  1. Follow @ThreadReaderApp to mention us!

  2. From a Twitter thread mention us with a keyword "unroll"
@threadreaderapp unroll

Practice here first or read more on our help page!

More from @Ridderingand

24 Jun
Building complex nested components is one of my favorite parts of working in @figmadesign

I love seeing how people think about the building blocks!

So this is me peeling back the curtain and showing you exactly how I built this menu component below 👇
First, let's visualize where we are going.

There's a lot happening here... 😳 Specifically, there are many different levels that future changes can be made within this component.

So let's start building with our smallest possible legos 👇 Image
01 // `IconType` component

We know that we'll have an icon for each question type and we know that we'll be wrapping them into an `IconType`to display in our rows.

So let's start here.

Pro tip: use the same layer names inside to preserve overrides when switching color 💪 Image
Read 8 tweets
8 Jun
How we organize components is one of the biggest missed opportunities for designers

Stop putting everything in bloated files and start creating systems that benefit your entire team.

Here's my strategy for organizing components for Maven 👇
I like to think about components as falling into one of three categories:

01 — Design System
02 — Product-Level
03 — Flow-Level

Let's look at each category and then I'll detail how they fit into the larger organization 👇
01 — Design System Components

These are top-level components that are used across many projects in your organization.

Most of the time these are simple atoms/molecules that become part of larger, more complex components:

ex: buttons, inputs, icons, etc.
Read 17 tweets
2 Jun
I've created the foundations of a component/library system that I'm quite proud of at Maven.

It decreases the # of levers I need to pull to make changes so that we can iterate more quickly in the early days

Here's a little peak under the hood of a real-world example 👇
We're in the early stages of building an admin dashboard so we're making changes left and right...

My goal is to make those changes only one time so I can be as efficient as possible

For example, we realized the other day we wanted to decrease the sidebar width 👇
Think about how many frames you can have in a dashboard... easily 100+! I just started and already have 30+

If I only have a sidebar component, my layout breaks in all 30+ mockups as soon as I change the width 🤦‍♂️

Here's how I updated every layout automatically 👇
Read 13 tweets
27 May
How to iterate at the speed of light using components ⚡

A simple 4 step process that I use 20+ times a day 👇 Image
If you're like me, you spend a good amount of time tweaking the design of component groups while trying all sorts of different approaches.

But most designers I talk to don't use components until AFTER they pick the final design direction.

I'm here to propose a better way 👇
But before we get into the details... here are the two goals of this workflow:

1. Create a bunch of iterations side by side for easy comparison

2. Work as efficiently as possible (don't make the same design tweak twice)

Ok now that we got that out of the way... let's dive in👇
Read 8 tweets
15 Mar
I like to think of portfolio projects as a recipe video you'd see online🥙

It starts with a beautiful visual of the finished plate to draw people in.

And then 95% of the video documents how you make the dish from scratch.

Here's a list of questions to help fill in that 95%👇
There's been a lot of Q&A around portfolio pieces in @shiftnudge recently. So I decided to compile some question prompts into a bit of a list.

Not every project produces answers to all of these questions. But hopefully, these spark some ideas of your own.

Let's take a look 👇
TEAM/PROJECT INFO

Who was the project for?
What was your role on the team?
What were you directly responsible for?
How did you collaborate with other team members?
What business context is needed to understand the project?
Read 11 tweets
7 Feb
I truly believe learning @webflow is one of the best investments you can make as a product designer

It's a master class in understanding how your @figmadesign UIs will ultimately be built.

So I created an animated walkthrough of the 5 main things I've learned from Webflow 👇
01 — Webflow teaches you how to think in terms of responsive units.
02 — Webflow teaches you exactly how to use Flexbox in your interfaces (and is the perfect extension to the new @figmadesign auto-layout updates).
Read 7 tweets

Did Thread Reader help you today?

Support us! We are indie developers!


This site is made by just two indie developers on a laptop doing marketing, support and development! Read more about the story.

Become a Premium Member ($3/month or $30/year) and get exclusive features!

Become Premium

Too expensive? Make a small donation by buying us coffee ($5) or help with server cost ($10)

Donate via Paypal Become our Patreon

Thank you for your support!

Follow Us on Twitter!

:(