Fellow film tech nerds, if you can't get enough of the ol' Vitrum Cepa this holiday season, settle in for a LONG #NerdyFilmTechStuff post on the lighting rigs we built for the heightened, theatrical, impressionistic lighthouse effect in @RianJohnson's #GlassOnion.
The effect was not merely a random/offhanded thing that we just set spinning and allowed to hit the set whenever chance determined -- rather, every time it occurs, it's pointedly designed to look a certain way and to happen with precise timing to punctuate the drama of the scene. 

We wanted distinct hard edges to the sweep of the light. Even though the edges of the beam of a real lighthouse would be blurry, we wanted very crisp leading and trailing edges...
...so that its motion across the screen would be distinct and the audience would get the visceral sense of the broad sweeping light's progress within the limited view of the rectangle of screen space.
There were also many other attributes that Rian and I wanted from this effect that demanded a much more complex and nuanced solution than just panning a light over the scene. We were after:
- The ability to control in fine increments the speed of the sweep and the duration of the time between sweep-on and sweep-off -- including the ability to adjust these two attributes separately from one another.
- Extremely sharp shadows: not only for the hard leading/trailing edges mentioned above but also to project distinct shadows onto walls and to project ripply glass patterns onto actors/objects.
- Multiple lighthouse rigs had to be controlled together in a single cue with fine tuned control over the offset between rigs. So 2 or 3 rigs would appear to be a single beam: the sweep of one would dovetail seamlessly into the sweep of the next for perceptual continuity.
- Not only fine/precise control, but also reliable repeatability so that cues could be designed with complexity and precision during set-up and then confidently repeated on demand, take after take, at the push of a button during shooting.
- The ability to continuously trigger the cue without winding up cables that would then have to be unwound before the next take.
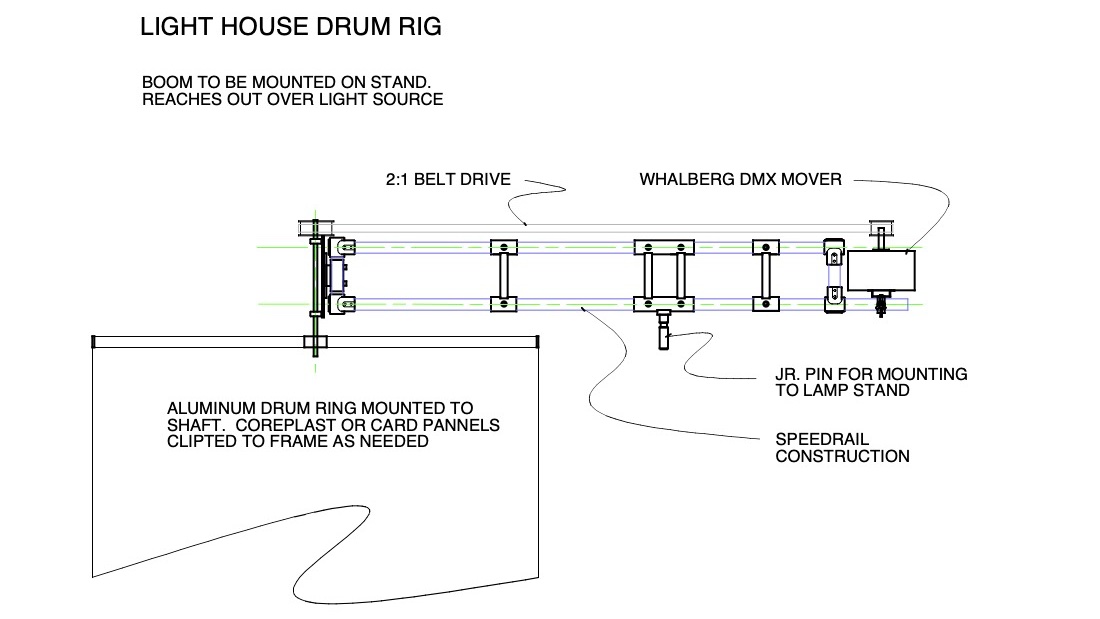
And so began the fun interdepartmental effort of designing these rigs, each of which was comprised of a large fresnel lamp inside of a a spinning drum with a variable aperture. The drum's rotation was driven by...
...a drive belt connected with a 2-to-1 gear ratio to a motor that could be controlled over DMX (the standard protocol for for the remote electronic control of lighting). The DMX signal was in turn controlled by purpose-built custom software.

It took a lot of specialized engineering and just plain hard work to make these lighthouse rigs what they were. Here is a (non-exhaustive) list of credits:

The drum with adjustable aperture, mounting rig, and drive mechanism designed by Key Grip Pat Daily. Assembly, fabrication, and mainenance by Best Boy Grip Andy Simmons. Welding by Rigging Grip Filip Mlandenovic. Automation expert Scott Fisher helped find/source DMX movers.
Illumination by gaffer Carlos Baker and team. (In most cases, it was a large incandescent fresnel-style lamp with the lens removed to increase sharpness, but in some cases it was an HMI.)
The DMX-controllable motor was a product made by Wahlberg Motion Design in Denmark.
The DMX-controllable motor was a product made by Wahlberg Motion Design in Denmark.
Custom code for the control software was written by myself and by Eric Cameron, long-time close collaborator in coding and in color pipeline development/management. And MadMapper was used for sending the control signal over sACN.

PS: forgot to explicitly mention an obvious but important demand we had for the design of the rig that was a big part of the engineering puzzle. It had to be shrouded so as not to kick light back onto the set when the beam isn't hitting (so when it's "off" it's really off!).
• • •
Missing some Tweet in this thread? You can try to
force a refresh