1/20 Bringing your #Bitcoin node, wallet, & miner back into one cohesive device with the @FutureBit Apollo.
This thread is the short version of a more detailed guide that can be found on the @BitcoinMagazine website:
bitcoinmagazine.com/guides/how-to-…
This thread is the short version of a more detailed guide that can be found on the @BitcoinMagazine website:
bitcoinmagazine.com/guides/how-to-…
2/20 The Apollo is a full #Bitcoin node running Bitcoin Core v22.0.0. It's also a Bitcoin miner equipped with 44 ASIC chips capable of producing ~3Th. Built on a 6-core CPU, 4GB RAM, 1TB SSD platform. The Apollo can go from delivery to hashing in 15-minutes & IBD in 2 days. 

3/20 The Apollo runs quietly at ~25dB, installs by plugging in a couple cables & configures in a few clicks, very easy for a broad user base that may not want to manage the +80dB noise & +150° F temps of industrial-grade miners. This enables getting hash power into many hands.
4/20 Hear it straight from @FutureBit founder, @JStefanop1 as we discuss solo mining block finds & decentralizing hash power:
bitcointv.com/w/f33d38Y2a383…
bitcointv.com/w/f33d38Y2a383…
5/20 This guide covers:
- Unboxing
- Connecting to a mining pool
- Configuring the Apollo node to be the backend for a #Bitcoin Wallet
- Connecting @SparrowWallet to the Apollo
- Unboxing
- Connecting to a mining pool
- Configuring the Apollo node to be the backend for a #Bitcoin Wallet
- Connecting @SparrowWallet to the Apollo
6/20 Ships in an inconspicuous brown box, no stickers, logos, or anything #Bitcoin related on the outside. Consider using a P.O. Box. Inside, sealed in the factory-packaged box, is the foam-packed controller, power supply, & instruction card. 


7/20 No assembly required. Simply ensure the microSD card is seated underneath, plug in the 6-pin power supply connection, & connect the power cable. 


8/20 There is a range of connection types, you can connect a monitor, keyboard, mouse, WiFi adaptor, & more. Power it on, initial configurations start automatically. If using a monitor directly, you'll be greeted with a login screen once the setup is finished. PW = futrurebit123 


9/20 I used the Ethernet connection option and remote access for this guide. Just get the Apollo's local IP address from your router & type it into a web browser from a computer on the same local network.
You'll be asked to set the mining pool URL, username, & passwords.
You'll be asked to set the mining pool URL, username, & passwords.

10/20 Considering the Apollo uses less than 200 Watts, I chose to take a gamble on solo.ckpool.org they have solved 5 blocks so far in 2022, winner takes 98% of the entire block reward (subsidy + tx fees). Username is your #BTC address. Hashing in less than 15-minutes. 


11/20 @slush_pool is a great option to start with too if you would prefer to see a steady stream of sats. Configuration is pretty much the same, copy/paste pool URL but use your Slush Pool username instead of your #BTC address. They have a feature-rich dashboard. 

12/20 You'll use the password you set for the Apollo to log into your dashboard. In the Miner tab you can see your vitals like hashrate, temp, & fan speed.
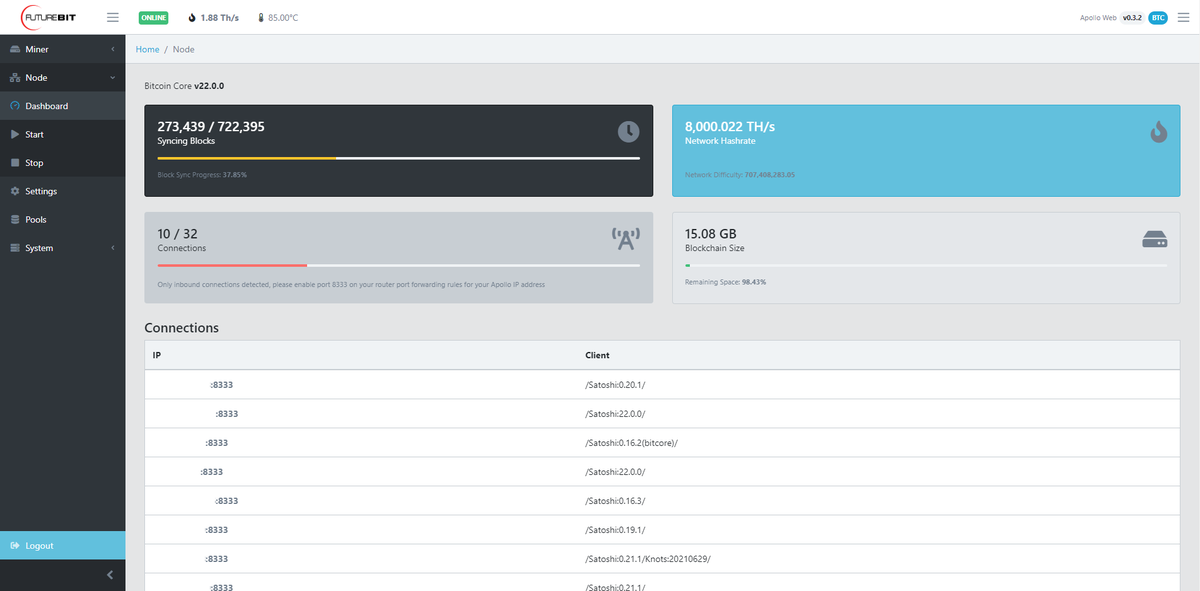
In the Node tab, you'll notice that the Apollo is already downloading the entire #Bitcoin blockchain from block 0.


In the Node tab, you'll notice that the Apollo is already downloading the entire #Bitcoin blockchain from block 0.


13/20 The Initial Blockchain Download (IBD) will take ~2-days, so leave your Apollo in "ECO" mode until this process completes. Then you can go to Settings and change it to "balanced" to start getting a little more hashrate. 

14/20 Now you can install @SparrowWallet on your desktop and configure the Apollo to talk to it remotely. From your desktop, you'll want to establish an SSH connection with the Apollo and modify the bitcoin.conf file so it can handle Remote Procedure Calls (RPC). 

15/20 UN=futurebit PW=futurebit123
The Apollo runs on an Armbian Linux distro.
DO NOT RUN THE UPDATES, it will brick your device, you'll have to re-flash the factory image. This is a known issue that will be corrected in a future update, read: bitcointalk.org/index.php?topi…
The Apollo runs on an Armbian Linux distro.
DO NOT RUN THE UPDATES, it will brick your device, you'll have to re-flash the factory image. This is a known issue that will be corrected in a future update, read: bitcointalk.org/index.php?topi…

16/20 All you have to do is run the commands:
`cd /opt/apolloapi/backend/node`
Then:
`sudo nano bitcoin.conf`
That opens bitcoin.conf. Add the following:
`rpcbind=127.0.0.1`
`rpcbind=192.168.69.16` (Apollo IP)
`rpcallowip=127.0.0.1`
`rpcallowip=192.168.69.12` (desktop IP)
`cd /opt/apolloapi/backend/node`
Then:
`sudo nano bitcoin.conf`
That opens bitcoin.conf. Add the following:
`rpcbind=127.0.0.1`
`rpcbind=192.168.69.16` (Apollo IP)
`rpcallowip=127.0.0.1`
`rpcallowip=192.168.69.12` (desktop IP)

17/20 Then hit `ctrl + x` to exit, `y` for yes, and `enter` to save. Now you can exit your SSH session by running the `exit` command.
Back in the web dashboard, click on the Reboot button in the left-hand side menu. This will shutdown & restart the Apollo & save the changes.
Back in the web dashboard, click on the Reboot button in the left-hand side menu. This will shutdown & restart the Apollo & save the changes.

18/20 Back on your desktop, open @SparrowWallet navigate to File>Preferences.
Select the Server tab, then Bitcoin Core option, enter the Apollo IP address, select User/Pass using futurebit/futurebit. Test connection. You should get the green check mark, then close that window.

Select the Server tab, then Bitcoin Core option, enter the Apollo IP address, select User/Pass using futurebit/futurebit. Test connection. You should get the green check mark, then close that window.


19/20 You can now use @SparrowWallet as a hot wallet, for Whirlpool CoinJoins, for a watch-only wallet with an air-gapped hardware wallet, or more. All configured to use the @FutureBit Apollo as the backend node. Plus the Apollo is hashing away quietly for non-KYC sats :) 

20/20 There will be more developments in store for the Apollo so be sure to follow @FutureBit on Twitter for announcements and check out their website to order an Apollo for yourself. Now your node, wallet, & miner are together in one cohesive device.
futurebit.io
futurebit.io
• • •
Missing some Tweet in this thread? You can try to
force a refresh


