,
109 tweets,
29 min read
Read on Twitter
I wasn't well so finishing the tiling took a 2 week hiatus. This is also the hardest section, matching the joints at either end of the last bare wall, particularly as you tile from bottom and joints are at top 

To get it right took a lot of measurements, and a long wooden batten to support a line of tiles. This line is at eye height so important to get it nice and straight

The wall has a slight warp in it, and the floor isn't level, so we can try hide where the tiles have to skew slightly to accommodate the variations at the top and bottom
I'll take that for a match

Nobody will ever know that those are 3mm spacers, but the other 98% are 2mm...
Slowly but surely filling in all the little bits where previously there were no tiles


3.5 boxes of tiles left! We bought 1,000 (1/3 tonne) so 850 laid, 150 to go! Out of grout (more to buy). Out of adhesive and onto another big new bag...
Skirting boards arrived today too. A simple rounded profile. Bought these sooner than I need them because I know they come in from Belgium 😞

This stuff is great though. Hardened polyeurethane so it's waterproof and has no imperfections. Is light, semi-flexible, easy to cut, goes up with glue, pre-primed and ready to paint. Have used it for cornicing before.
Big issue I have is that there's a ~5cm drop in floor height from front of bathroom to the rear, so going to have to trim off the bottom to get the top to align good with the tiles, which are near perfectly on the level
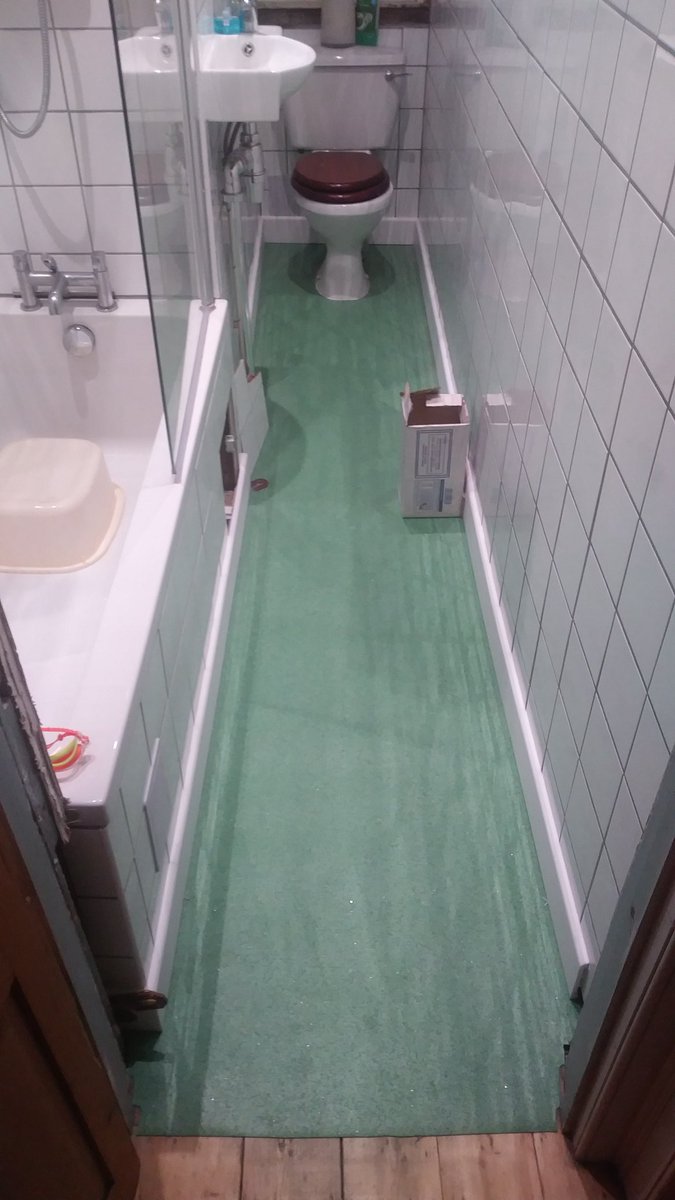
An advantage of a small bathroom is that you can floor it with offcuts on the cheap. We've gone for this tastefully green industrial bathroom safety flooring - the squintness of the room would make trying to match a repeating or geometric patterned flooring a nightmare

More tiling tonight. It's slow going when there's lots of cut tiles at the join with the ceiling to do. Lots of measuring, cutting, test fitting, then it's one tile at a time, adhesive on the back, up, stick, spacers, down, rinse, lather, repeat
The good news is I counted up how many tiles to go and it's about 40, hlaf of which will be cut, and there's 2 boxes (44 each) and a pile of offcuts left. Pleased I got the estimated numbers quite so right - 1 box spare at end is 5% extra so quite tight for any catastrophes
This dang wall is almost done though! I've yet to count how many tiles it's taken...

When I say nearly done, theres still a ton of grouting to go...
Twenty. Eight. More. To. Go. 😗 (but all of them are cut tiles, including 3 complicated L or curve cuts 😐)


999-ish down. One. More. Tile. To. Go! (But I need to move that light cord rose, so not tonight)

Forgotten how much I hate grouting...
I still hate grouting... But I've improved my technique certainly. A slightly less dry mix. Less grout on the float, wipe more off with the float rather than sponge... Anyway, I'm almost done now. 1 more section to go


And then infinite buffing with a microfibre cloth
ERMAGERD! The grouting is finished!

Still haye grouting...
I also knocked my beautiful tile panel off onto a set of pliers and broke a tile 😩😤

I guess that means we're doing silicone sealant tomorrow
Moved this fella so I could slot the last tile behind. I don't think it's sunk in yet that there is ONLY NO MORE TILING TO DO! 😀

It's funny. Normally as you approach the end of a project the relative pace drops. I've had quite the opposite, it's all coming together. I only thought I'd have the tiles finished by tonight, never mind grouted
So let's move on! Up next, vinyl flooring!

My great aunt worked in a Penicuik papermill and taught me the invaluable life lesson of rolling paper (or vinyl) against the rolled direction to flatten it out

I have decided that a career as a floor layer does not beckon

But a few hours hugging the toilet bowl later...

I'll take that for a first attempt


Sorry for the picture of my feet, but we have NEVER had a nice bathroom floor in our 4.5 years hete and this is a special moment 😘

The vinyl will sit here for a week to acclimatise to the ambient temperature and moisture, before it is stuck down. Then the skirting boards can go on and hide everything that the eye shouldn't see
I've never got on with silicone sealant spreaders, but I've much to seal so thought I'd spend a few quid and try being a sealant ninja

All I can say is that I'm a total convert. Perfect results and super quick and easy to use. No more pissing about with masking tape and getting sticky hands! 👍

Because I love the new silicone spreader so much, and becauae I'm utterly tragic, I re-did the kitchen worktop this evening

And now everyone else is in bed, time to try sticking down the bathroom flooring!

What is this? A spreader for ants?

The polyeurethane skirting is braw. Light, flexible and cits wuickly and cleanly with chop or coping saw 👍


You'll have it cut, mitred and ready to fix in no time

The joints between the skirting sections use one glue to weld them together. The glue to stick them to the walls comes in caulking gun tubes. 1 of each is more than enough for this room.
Thanks to @edintoollibrary for the lend of the chop saw!
Looking good 😁


Held off the floor to allow for an expansion/sealing joint of silicone
Access hatches for the stop taps


No muss. No fuss. It's the way forward. No more warped pine, filling holes or treatingvthe knots so they don't stain through. A few hours work and the whole room is done
Also it's totally impervious to moisture unlike that MDF stuff (which has its place. Just nowhere near a bathroom)
Given I had to break up the damaged tile panel, I'm taking the opportunity to improve the design


Rotated by 45 degrees the central tile gives same support but now also reinforces the metal plates of the magnetic catch
That's a pretty well done concealed panel, if I say so myself!

Silver fox

I don't normally look this sophisticated, I was just giving the ceiling a light sand in preparation for painting
To paint on fresh plasterboard, you first need a coat of watered-down paint (aka a mist coast) to prime the surface. The paint can will tell you the dilution ratio, this is very important for skin-forming satin/softsheen paints

The dilution helps the paint particles soak in to and bind with the substrate. Otherwise your paint will sit *on* and not *in* the boards. Moisture in a bathroom will get in behind the skin of the paint and cause it to blister and flake off
For doing where the ceiling meets the wall, a "cutting in" brush will make it a sinch and keep things neat. It has a wedge-shaped profile and the tip is angled for getting cleanly into the corners

It doesn't look like much, but it's done! 2 more coats should be swell. 2 thinner coats are *always* better than 1 thicker coat. It looks better and will last better


To be honest think it's going to need a 4th coat


In my "workshop" this morning

Routing, sanding and jigsawing the food to box in the door frame


Er. Wood!
This mean looking fella is a dowel cutter. It cuts dowels (obvs!) I'm using them to fill the screwhead holes in the door frame. I couldn't nail it as nails aren't so useful when there's a void between pieces you're joining or there's a twist that needs flattened

It's fairly simple, but you will need a press for your drill to get them started otherwise the bit just skites across your workpiece (I have a wee clamp-on thing, also great where you need a perfectly straight and true hole drilled, like in the side of a door)


A cutter like this makes a mess when it comes out the back of your workpiece ("bloom"). Not so important here but you can stop this by clamping another piece on the back.

End result - lots of dowels of exactly the same wood as the door frame

Dip the dowels in PVA and lightly tap home with a mallet. They'll squish slightly and fill the void. Make sure to wipe up excess PVA that squeezes out otherwise and varnish or stain you put on the wood won't look right

When the glue is dry you can take the excess off with a hand plane or sharp chisel and sand it flush
Getting there...

Shelf installed. Screwholes plugged with dowels and sanded flush


And a first coat of woodstain to match (ish) the door and mirror surround

This morning I'm mainly prepping the grey and bare would for painting. Painting is all about the prep really. Tune away now if you don't want my prepping tips.


You should never just slap paint on paint. You'll get a bad finish that doesn't last so long. If you have a good (painted) surface, free from blemishes, the very least you need to do is dust it down and wash with sugar soap
It's nothing to do with sugar, although it usually comes as sugar-like crystals you mix into solution. It's a sodium-based alkaline that removes dirt, greasy and tarry deposits on you paintwork leaving it chemically clean
You should really also give the surface a gentle sand with a light grit sandpaper to remove any surface nibs (bits of hair or dust that got on the paint), brushmarks or runs of paint. This is important on a gloss surface as it also mechanically roughens the surface
(Water-based paints, especially silk finishes, direct onto gloss will often just peel or bubble right off if you pick at them)
So. Sandpaper grits. What's that all about then? The grit is a number. The lower the number, the rougher and larger the surface particles. The rule of sanding is "go up through the grits" i.e. start low and work up to bigger numbers.

L-R in that photo is 40 grit (super-duper rough, you won't normally need this), 80 (a good general starting point), 120 (a reasonable mid-point) and 320 (very fine). Usually I'd finish on 150 for painting. 3 steps of paper is usually fine to prep a bad, previously painted surface
The grey stuff has been sanded. It's in a door frame so I'm not looking for a cabinetmaker quality of finish. You can see the white where nibs have been sanded out and also the silk surface is dulled down indicating it's mechanically roughened

The raw wood between the grey paint and the varnished wood has been scraped clean as the paint was blistering off, and sanded. As it's bare wood it needs primed. A primer is a chemical treatment for your surface that helps adhere the actual paint to the wood (or metal etc.)
Most unpainted surfaces need some form of primer. For this sort of thing a general purpose primer is fine. This is also an undercoat. Undercoat is not primer! Primers may be clear. Undercoat is a pigment-dense paint that visually blocks out what's beneath

The possible ways to prime and/or undercoat wood are enormous. Take care on exterior woods and spend a bit more money and care on your primers and paints. It's worth it in the medium term. Anyway. Back to the job in hand.
2 light coats of this stuff (after washing with sugar soap!) should suffice. A very light (150 grit or higher) sand inbetween is useful too. You will then be ready to get your actual paint on
Thankyou for coming to my lecture on sandpaper.
Oh I almost forgot to say. It isn't made from sand. Or glass. It's generally aluminium oxide or silicon carbide for the really heavy duty grits. Also, don't be stingy. Accept when it's worn and move on to another puece. You'll get a much better, faster finish
In case you were wondering and I'm sure you are, I managed to drop my phone on Saturday onto the tip of the electric screwdriver, so it's currently in bits in a repair shop trying to coax it back to life. Hence there's been no updates.
Which is a shame as I had just finished taking pictures and even a video of painting window sashes as the latest update. In the meantime I've finished that window in its entirety, and a whole lot of siliconing, and made more shelves, and done a lot of varnishing
Ooh, I have my phone back! Which means I can post some of the fascinating pictures of painting a sash window that I had just taken when I broke it.
The humble sash window. Actually a really clever piece of engineering and (properly maintained) one that will last multiple lifetimes

The basic premise is that there is a "case" (the wooden frame) inside which sit two glazed sashes that can slide past eachother so that the window opens. The sashes are balanced by lead or iron counterweights hidden inside the case, which makes them easy to open and holds them so
Problems occur with old hemp ropes that rot and fray, and the counterweights snap them and drop into the bottom of the case (if you're unlucky they drop even further!), or when newer, thicker glass is put into the sash the old weights aren't sufficient to counterbalance
There's a vital feature of sash windows in tenement housing, which is the "Simplex System". It allows you to detach the lower sash and swing it in for cleaning and gives access to the top sash. Before that people would literally fall out windows to their deaths cleaning them
Part 1 of the system is a clutch for one of the counterweight cords. You pull the cord down and out and the clutch catches it and locks it.


Part 2 is a detachable section of staff bead, locked in place with a little brass finger turn.


Part 3 are the Simplex catches, into which 2 large screws in the lower sash can be sat, these take the weight of the sash and allow it to swing inwards now that the cord has been loosened.

Part 4 is this cast iron plug in the end of the sash cord, which sits in a rebate in the lower sash, you simply pull it out to detach the cord

The lower sash is now free, and you can pull down the upper sash to safely work on it from the top and bottom.


You can now paint your sash windows! With a steady hand and a "cutting in brush" you can do this without masking tape. You can shave any excess off the glass with a razor or Stanley knife blade (obviously not on a frosted pane, so for bathrooms you'll need to go freestyle
This isn't an indepth guide to preping and painting a sash window, that's a whole other thread in its own right. Suffice to say, you got to think about the painting order. Paint from the top down, don't paint bits you might need to touch to move a sash or that you'll rub against
This particular window was totally stripped, fixed primed and given a quick paint a few years ago. I really just had to clean it up, do a little bit more priming and undercoating and then get going. I did the rest of the house in a water-based silk, but for bathroom went gloss
Other things I did this week when my phone was in for repairs. 1. A threshold strip

2. Loads more sealant applied. I'm so super-impressed with the smoothing tool I even re-did some of my earlier finger-smoothed attempts

I made and varnished this natty shelf to an in-house design. I'm not much of a woodworked so I'm quite pleased with these slot joints. The uprights are fixed into the wall, screwheads concealed by the shelves which are held in only by the joints

I've tried to be very economical with the job but went nuts and spent £35 on a solid oak toilet seat in Screwfix. Truly now a throne room.

I'll be damned if getting the seat to sit straight and not slide wasn't one of the hardest jobs of the whole project. Nobody designs toilet seat fittings imagining there will be very limited access at either side
That was 3. 4. I put this shelf up here for some trailing plants to grow on

And yes that rose needs screwed in, but need my Dad to replace a cable in it first. The top of the window case also needs filled and painted
5. Fitted a pipe collar where the cistern supply comes thrpugh the wall. These cost 20p and keep out draughts and potential insect or even rodent visitors. They also look good. Use them

And that, pretty much, is that


There is of course the small matter of this to put right. But technically this is a different room 😋