
A quick #gamedev hand painted texture lesson.
For this tip I am going to be using a character taken from Vampire Bloodlines... which is an old game that uses the source engine.
This is the female tremere player character imported into Blender. Again, this is not my work.
For this tip I am going to be using a character taken from Vampire Bloodlines... which is an old game that uses the source engine.
This is the female tremere player character imported into Blender. Again, this is not my work.

Here is a quick paintover done in photoshop to show a possible direction the textures can go. I wanted to show how values, lighting directions and contrast can be used to give hand painted models more form and unity.

And side by side. What I would like you to do is squint at the pictures.

So if you look at the large areas of light and dark, you can see the face feels low contrast and the body has rather high contrast. There also also lights hitting some spots but not others- the legs from the front, arms from side at elbows and booooooooobs from top.

Now see my paintover- the light is more evenly diffused with the focus on the face. If you squint you can see the basic curving masses of the body

Now, I want to point out that the original artwork was done at a time when NOBODY understood these techniques. I understand they were also under crunch, so totally not hacking into them.
It was about this time that Kenneth Scott hit the scene with his incredible work on...
It was about this time that Kenneth Scott hit the scene with his incredible work on...
...Daikatana and Quake III that we started to see global lighting being applied right to hand painted textures.
I taught myself by cracking open quake pack files and looking at the textures he painted.
I used the same tricks to win the texture job on Unreal Tournament 04
I taught myself by cracking open quake pack files and looking at the textures he painted.
I used the same tricks to win the texture job on Unreal Tournament 04
Incidentally, even though your character is in T pose, model your sleeve as if the arm is down by your sides. This should be backwards not down.

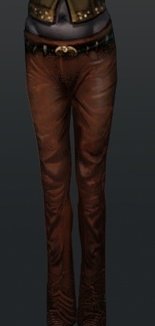
Also not the gradient from top to bottom of the leg. This actually helps make up for the fact the characters do not shadow cast onto themselves.
This contrasted version again shows how I am using larger softer shading to define the masses. Smaller, crisper, sharper shadows for the details and to define borders between materials.

When I texture, I tend to work from a flat even mid tone, then work the large soft shading first in greyscale.
When this reads from a distance I go in closer and start detailing.
Then once the general values are right, I do recolouring and work from there.
When this reads from a distance I go in closer and start detailing.
Then once the general values are right, I do recolouring and work from there.
Hope that helps you make awesome hand painted stuff.
And remember, always think about the character posed in its most common stance NOT T pose when hand painting lighting.
Big props to the Bloodlines team- I am still enjoying the hell out of it.
And if Paradox wanna do a Bloodlines remastered whilst we all wait for 2, I am sure I could get a team together ;)
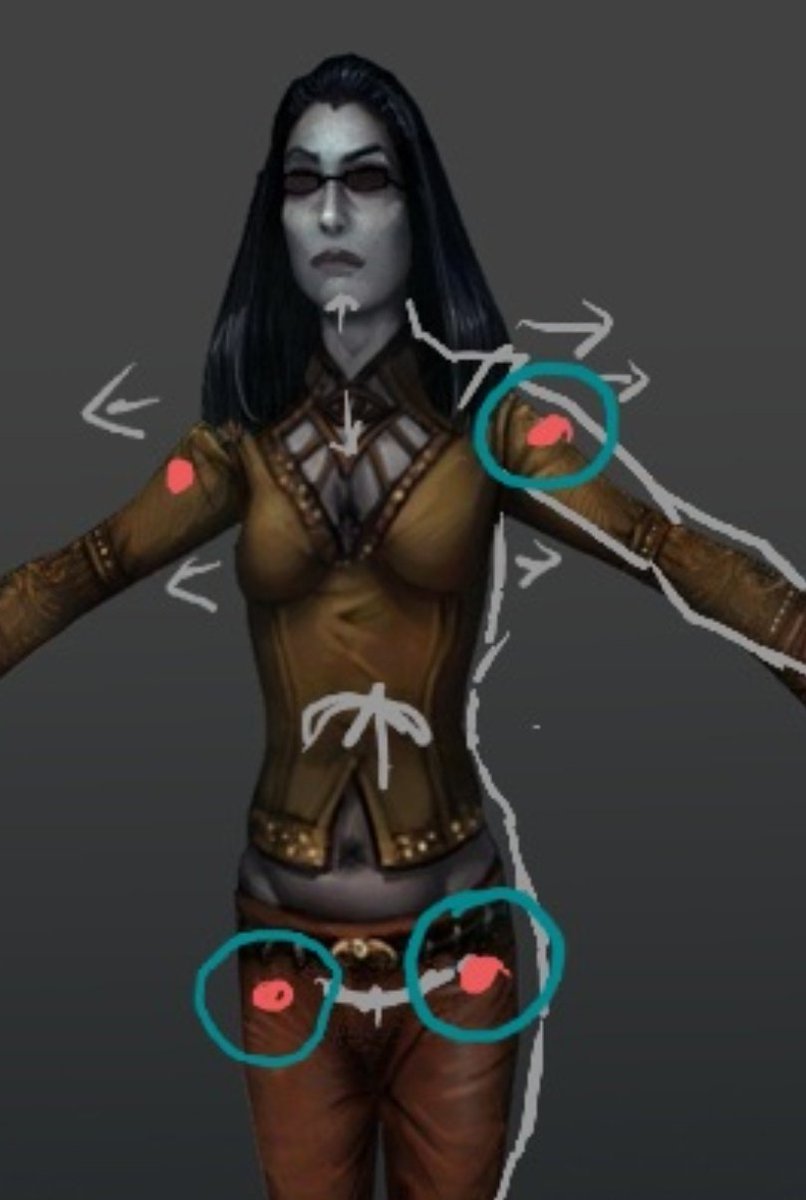
Second lesson from looking at the models from Bloodlines is the weight assignment on the models shows little skill- or was a big rush job.
The groin here is weighted to the leg joint, and bleeds over to the right i improved it on the left, however the hip bone...
The groin here is weighted to the leg joint, and bleeds over to the right i improved it on the left, however the hip bone...


Placement is too far out to the outer edge of the hip bone. This may be where the actual hip pivots on a human, but you want it more central to the thigh for game falloff deformation.

See how this causes a levering effect where the mass of the leg swings out? If it is placed where I put the lil skull you would have the leg compress more naturally.

As the joints are fixed to the red dots, I want the skin closer to the circles. Nudging the mesh wider would help here, lifting the groin a little too.
It's always a good idea to look at your characters in the game camera and tweak the proportions to feel right through this distortion.
Sometimes you need to exaggerate things to work well on screen.
Sometimes you need to exaggerate things to work well on screen.
Tip #4 For those asking to see the texture back in the engine, note this is what we call a "paintover".
A paintover is a fast way to test out ideas and give notes to artists. You paint over a 2d image.
It isn't a texture yet.
A paintover is a fast way to test out ideas and give notes to artists. You paint over a 2d image.
It isn't a texture yet.
Before I start texturing, I do this so I can get a good look and feel.
For example, what if we say that all the textures for the game have a slight blue ambient? Or what if we make the vampires a little more green hued?
I can use this to set up palettes and material looks.
For example, what if we say that all the textures for the game have a slight blue ambient? Or what if we make the vampires a little more green hued?
I can use this to set up palettes and material looks.
If I went ahead and retextured this character, I would first fix some other things.
The model uses a lot of separate materials and textures. The hair has three separate textures, the glasses have two, the bow in the hair is yet another.
This makes more work for the renderer.
The model uses a lot of separate materials and textures. The hair has three separate textures, the glasses have two, the bow in the hair is yet another.
This makes more work for the renderer.
I would first combine the materials and UV shells so they only need to switch materials a few times, rather than dozens to render a character. This significantly lowers vertex count in memory too.
This means I would first adjust the UV map layouts for those parts, combining the glasses and hair clip and moving them to one texture- most likely the face and hair.
I would also mirror some of the UVs for things like ears.
Next I would adjust the shoulder seams as the...
I would also mirror some of the UVs for things like ears.
Next I would adjust the shoulder seams as the...
...player characters are viewed mostly from third person view. So I can hide the seams on the shoulders from that angle by matching up the uvs with more accuracy. We have far better unwrap tools these days, and 3d painting tools. The original was done using...
...montages of photographs in photoshop. There are seams where seperate materials with different textures meet up at different texel densities.
The hair is made up of three textures. You can see the seams.
The hair is made up of three textures. You can see the seams.

Since I saved a load of memory and verts, I could go in and use that to add some more edges. The hair is blocky at the base here, I would be free to add some hair cards and shape it.
(I made hair and face textures just like this during this era too. Everyone did.)
(I made hair and face textures just like this during this era too. Everyone did.)

Again, I am not bagging the modelling or texturing. They did a great job.
The skin weights I will criticise though, and whoever did them missed out on using the modellers carefully placed edges- meaning many limbs fold poorly despite being modelled to fold well.
The skin weights I will criticise though, and whoever did them missed out on using the modellers carefully placed edges- meaning many limbs fold poorly despite being modelled to fold well.
If you look at my paintover, I have the hair come to a sharper edge at the front, and add a widows peak. A few vert cuts would add this geo, which I saved from combining materials.

But wait... why does combining materials save vertex data?
Okay that needs its own thread... but the gist is that to support a material change, or a smoothing group, your 3d model is secretly broken up into different meshes.
So every seam between doubles the verts.
Okay that needs its own thread... but the gist is that to support a material change, or a smoothing group, your 3d model is secretly broken up into different meshes.
So every seam between doubles the verts.
Every sharp edge, every uv seam, every material switch- that is a duplicate of those verts.
That is why polycount isn't as good an indicator of a meshes expense as the UV count.
That is why polycount isn't as good an indicator of a meshes expense as the UV count.
By making the hair one continuous mesh referencing one texture, I have reduced the effective vertices by, at a guess, 28 to 50.
It also reduces the draw calls and state changes of the character.
It also reduces the draw calls and state changes of the character.
Soooo as you see, there are a few days of work between paintover to finally being able to see my changes in the engine under lights.
;)
;)
Then there would be some additional fuckery to try and get a good import, point the text files to the right textures and then adjusting sharpness and contrast in context.
Once done, I could then proceed to applying the same rules to other characters. I would have a "pipeline"
Once done, I could then proceed to applying the same rules to other characters. I would have a "pipeline"
By which I mean, a set of steps, techniques and tools for churning out the work.
When exploring texturing styles, you also need to think of the pipeline. Often a substance preset, a smart material or some prepainted parts can be set up to help you.
When exploring texturing styles, you also need to think of the pipeline. Often a substance preset, a smart material or some prepainted parts can be set up to help you.
Why UV and texture sixteen suits when you can share the mesh parts and copy pasta then adjust?
Why do this with dozens of hands? You can dedicate a part of the texture that always has the hand and just copy paste the mesh components into that space
Why do this with dozens of hands? You can dedicate a part of the texture that always has the hand and just copy paste the mesh components into that space
Well gosh darn, that is a lot of talking. I am getting thirsty talking. Why not treat me to a bag of O neg from the bloodbank?
ko-fi.com/dellak
ko-fi.com/dellak
And if the original artists come forward, give them a lovely tip too. You can grab Bloodlines on steam- just be sure to get the unofficial patch and the clans expansion that adds several hours of side quests.
Want a little more teachin'?
Okay, and again, remember this is a very old asset and it was made during a time when tools where very basic.
Okay, and again, remember this is a very old asset and it was made during a time when tools where very basic.
Okay so there is a noticeable difference in texel density from the face to the lace covered decolletage. The face is 512x512 across but the neck is only a small fraction of a 512 map- approximately 32 pixels across.
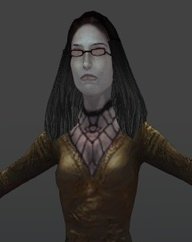

In this era we would slap down a photograph of a face, project the texture using a planar map from the front then sort of smoosh stuff out to get this. We didn't have great unfold tools at this stage.

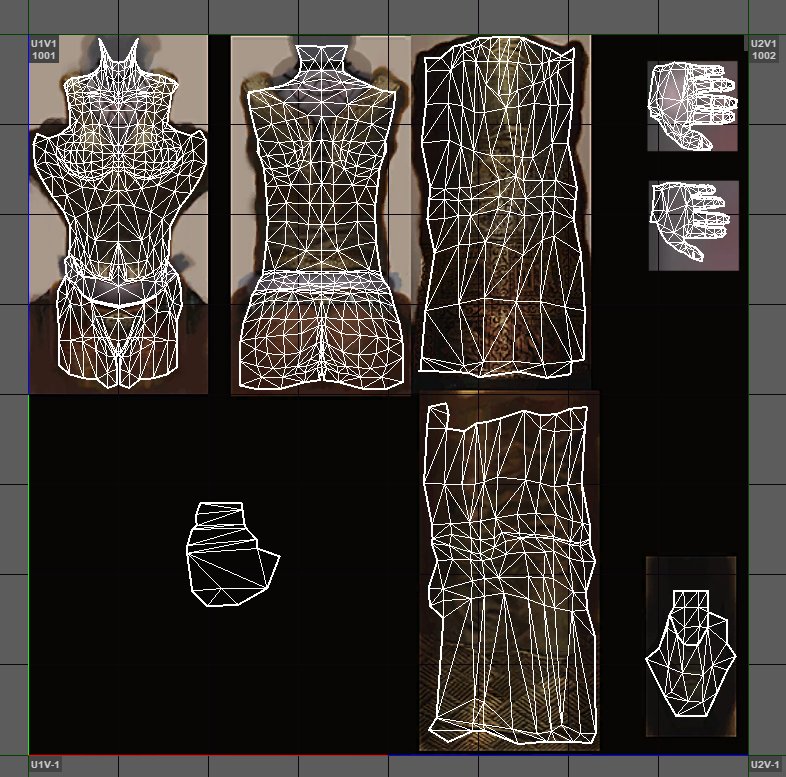
There are very large areas of the texture unused. The black spaces are just wasted data, and a great opportunity to up the detail on the character without upping the texture sizes at all.

By carefully cleaning up the geometry, I freed up a lot of vertices and uvs. Combining this with reducing the materials from 14 draw calls (3 hair, 1 barette, 6 eye elements, 1 body, 1 face, 2 glasses ) to 3 (head, lenses and body) and only two texture look ups- things go vroom

Remember, this is rendering in source engine- that is very old and has memory limitations that modern engines laugh at. So by saving every scrap I can, I give myself room to do better work on the things that count without machine going boom.
Those twelve draw calls reduced to 3, spread out across all the characters results in a BIG difference- so your measley 6 dancers in the club can actually be cranked up.
And now a quick retexturing in photoshop over the old texture. Just the face and a quick pass on the eyes, just to show the difference next to the original asset.
Note I can have rounder eyes and eye sockets because I saved a bunch on the sides and back of the head.
Note I can have rounder eyes and eye sockets because I saved a bunch on the sides and back of the head.


To really push the look up, I could take the mesh into zbrush, sculpt a high res version and bake it onto the low- this would allow me to use fake lighting in Substance Painter to do first passes. I wouldn't output a normal map- just a color pick with the lighting baked in.
for the eye I just painted a little reflection and added shadowing. The engine can't do much sophisticated stuff with the eyes.

Incidentally I just mirrored the face for now whilst i get the look right- then I will mirror and alter the off side.

Personally I have the fronts of the ears always on the face texture- and only put a seam for the backs of the ears. But I am just playing with what exists in the game.
So how am I doing folks?
I find fixing old assets up a great way to teach people. Do you like that technique?
I find fixing old assets up a great way to teach people. Do you like that technique?
• • •
Missing some Tweet in this thread? You can try to
force a refresh


