
,
118 tweets,
27 min read
Read on Twitter


well, there it is 

with the exception of the dishwasher (which won't be in until monday) and various things hung on the wall over the next few weeks, this kitchen is done.
it's funny, while kitchens are generally considered the biggest and most involved home remodeling project, we got it nearly all done in about a week. I guess a lot of that is owed to Ikea for *literally and deliberately* attacking this specific problem with gusto
I didn't want to go into details during the process so I'd have a clean timeline, but god this kitchen was a fucking MESS
Let me just take you through it one by one because FUCK this SUCKED but idk maybe you'll enjoy my Problem/Solution Goofus/Gallant
so first, let's get this out of the way: the floor is THREE layers of linoleum. why? probly because every consecutive owner discovered that the BOTTOM layer is glued down with asbestos, said "fuck that", and nailed a new layer over it.
(technical note: vinyl, not linoleum. real linoleum is a poured surface, durable beyond measure, great for commercial applications, and I'm pretty sure it was rarely if ever used in houses)
because of the linoleum situation, there's a 3/8" drop from the "floor" to the plywood underlayment that sits on the subfloor, which was under the old, awful cabinets.
the old cabinets were fucking horrible. I can't find a good picture of the old kitchen (I went through three years of phone photos with no luck) but you can look at the very first post in this thread. They were cobbled together 1/4" plywood, definitely handmade. Weak and shitty.
I ripped them out with a mallet and a prybar and threw them out the window, good riddance. The moment I did that I found out that there was a 2" gap in the wall plaster. Why? Fucking beats me.
Sidebar: Our house was built on top of what's called "rock lath." I have no explanation for this horrible garbage. It's proof god doesn't guide our actions. Basically in the early 20th c. some homebuilders would put up drywall... then just fucking plaster over it.
Modern drywall comes in 4x8 sheets. This stuff was like 2x4 sheets and was INTENDED to be used as underlayment for plaster. I have no explanation for it. I wish whoever came up with it had died young.
The shit is miserable to work with. Plaster alone sucks. Mix it with drywall for an INCH THICK WALL that dulls any non-carbide blade that touches it and you have basically some Hellraiser torture dimension shit. Rock lath can gobble my chode vigorously.
So there was a 2" gap in the wall, exposing the insulation and outer sheathing from end to end of the room. No idea why, but obviously someone thought "sealing the house with a countertop backsplash is responsible ^_^" and didn't patch it. we have fucking self respect though
We figured we'd chalkline an inch above and below, cut a clean line, then install a 4"x10' patch. Had to remove the faux wooden paneling first though. Pried up a piece, and - aha! It's 2004-stamped Ikea tongue-and-groove flooring with ASBESTOS TILE ADHESIVE UNDERNEATH
of course our kitchen was an asbestos clusterfuck! of course it was! natch! we were shocked when the paint here wasn't lead and the plaster wasn't asbestos based; it couldn't have lasted
asbestos is supposed to be harmful primarily in *extended* contact. so we soaked the adhesive in water, put on masks, cut two inches above and below the coated area, and tore it all out in the largest pieces we could
the damage is done, hope I don't get that 'thelioma. shudder. so, putting that behind me
the only patch material we had for the huge gaping hole was 5/8" drywall. i knew the wall was 1" thick but daria successfully convinced me that buying a 1/2" sheet and stacking it was a bad idea, because you can mud a depression up to grade but you can't do the opposite
Question Qorner: The fuck does this mean
Answer: walls are rarely flat. when you install drywall, especially when you're making it mate with a hand-trowled plaster treatment, it's often higher or lower than the mating wall. you solve this with goop.
Answer: walls are rarely flat. when you install drywall, especially when you're making it mate with a hand-trowled plaster treatment, it's often higher or lower than the mating wall. you solve this with goop.
drywall mud has the consistency of mud. you slop it on the wall in great big ugly lumps and smooth it out. it dries into essentially the same thing that drywall is made of, except in whatever shape you pushed it into. it's a highly skilled job that i'm not good at.
I could explain further or you could hit the bong, smash this link and spend 20 minutes having your fucking mind blown. do what god wants you to
in my case i had a 1" slab of plaster, another 1" slab, and 10" or so of 5/8" drywall in between. If I was good, i'd have brought that entire 5/8" area up to the same level as the rest. But 1) I'm not good 2) I already had three electrical boxes attached to that wall. Fuck that
So now there's a 3/8" depression in that wall. Do I give a shit? Look around
in this spot near the window, I had to cut an L-shaped piece of drywall. No matter what I did it wouldn't fit; it kept rocking back and forth.
turns out, under that insulation there was a ~2" drain vent pipe that sat proud of the fucking studs. I don't even understand how.
turns out, under that insulation there was a ~2" drain vent pipe that sat proud of the fucking studs. I don't even understand how.

That's what this was. I had to carve a tunnel into the drywall patch to make room for the pipe and elbow. It worked perfectly; the patch screwed down nice and flat.


Sidebar: If you remember doing home improvement with your dad in 2005 you might wonder how the fuck I got such a clean cut. <PBS voice> this is made possible by my Milwaukee clone of the Fein Multimaster

ever break your arm? remember the doctor cutting the cast off with a saw that just vibrated, so it couldn't cut you? turns out that little vibration won't cut skin but it'll cut *EVERYTHING ELSE*. Fein figured this out and it revolutionized how contractors work
the Multimaster and derivatives use a blade that just jiggles imperceptibly, but it'll cut straight into drywall, wood, nails, grout. You can just press the blade straight fucking in, it's unreal. There's nothing else like it.

It allows you to do cuts that were, and are, literally impossible with any other tool. There's *nothing* that could form the channel I made in that drywall except a Multimaster. It's fucking wild that nobody figured this out (as far as I can tell) until the 2000s
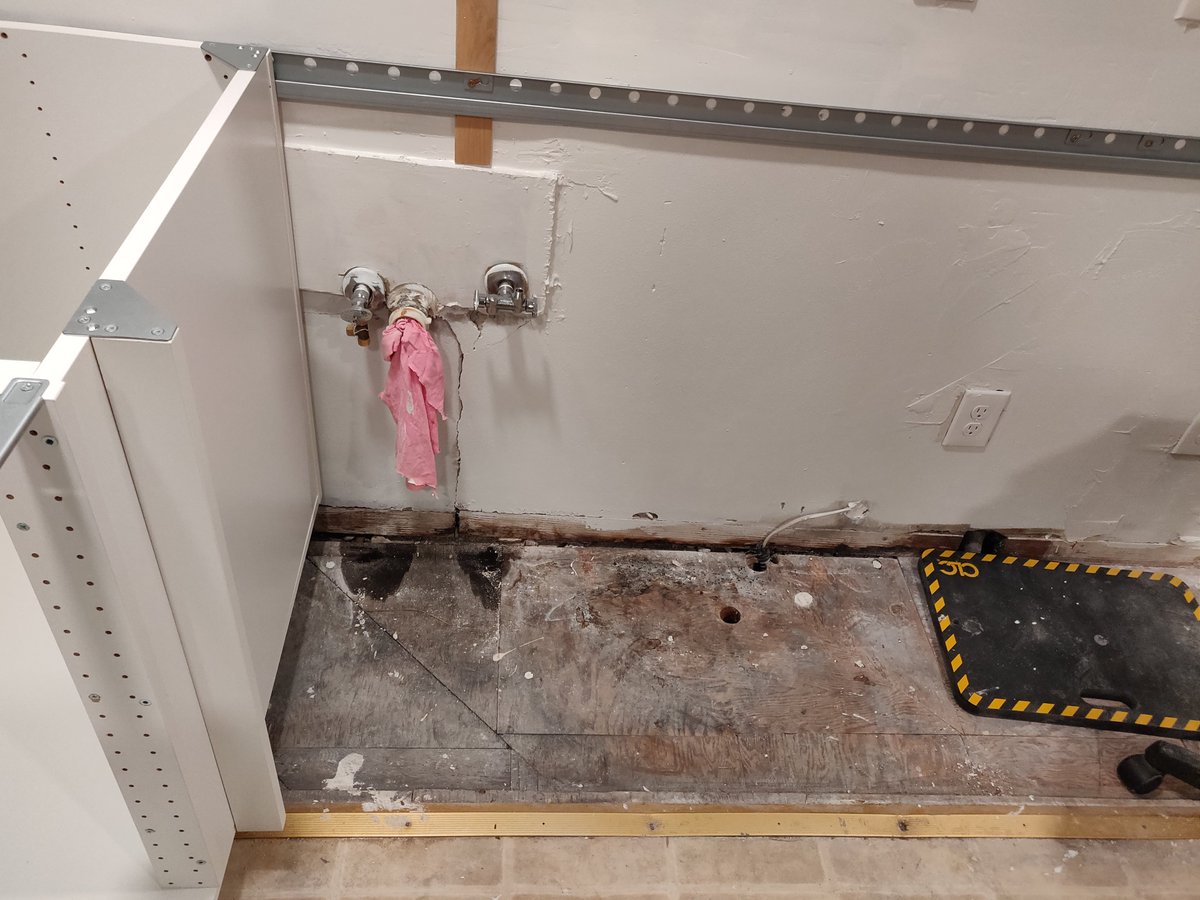
Plumbing is also a message from God and the message says "I never loved you"
The plumbing under the sink has leaked - both supply lines and drain - since we moved in. Let me fucking explain this shitshow.
The plumbing under the sink has leaked - both supply lines and drain - since we moved in. Let me fucking explain this shitshow.

<deep breath, exhale>
Long story short, we realized about three DIY drain repairs ago that something was horribly wrong with our sink. We'd install a brand new drain, it would be an IMPOSSIBLE PAIN IN THE ASS to install, and two weeks later it was leaking
Long story short, we realized about three DIY drain repairs ago that something was horribly wrong with our sink. We'd install a brand new drain, it would be an IMPOSSIBLE PAIN IN THE ASS to install, and two weeks later it was leaking
Turns out sometime in the 70s, plumbing codes were changed to permit (apparently) MUCH deeper sinks, and to accommodate this they lowered the standard height for drain outlets by like 4"? Our plumbing predates that. Our sink DIDN'T.
We had a 90s-2000s sink and a 40s drain line, and they were literally, physically, mechanically incompatible. They weren't meant to interface, so there was nothing on the market that could get that sink to connect to that drain without enormous amounts of tension on the fittings
I don't want to get into this because it'd be 40 posts, but: drain plumbing is a mistake. There's no reason for it to be as bad and stupid as it is. It's like one group of people designed All Plumbing In All Industries, and then a bunch of weekend warriors designed drains
We already knew we needed to get our entire plumbing ripped out and replaced, and ONE benefit of our tiny house (it's barely larger than a town house) is that all the plumbing exists in a single, like, 5x5' area. But it's still a pain and we HAVE to get a plumber.
The leaking plumbing is actually what spurred us to do this entire kitchen remodel because we had a chicken-or-egg situation for the last year. We weren't sure how to get the plumbing done without immediately rebuilding the kitchen, and vice versa. We decided to Just Do It.
The sink started leaking fast and wouldn't stop, and in a fit of rage me and daria agreed to just rip it all out and come what fucking may. We figured, since the sink would be moving like 6" to the right, it might relieve some of the strain on the drain pipes.
SPOILER: IT DID
SPOILER: IT DID
there were two other plumbing problems. first, the water pressure on the cold side was a miserable trickle, which seemed to get worse every time we turned the water off and back on. second, turning the water off didn't, uh, work.
We knew the shutoff valves were bad, and we'd agreed not to touch them. We have iron supply pipes here. Removing the valves could cause the pipes to crumble to rust.
Halfway through, we're both looking at the valves, and we have the same thought. "We should replace them. dammit"
Halfway through, we're both looking at the valves, and we have the same thought. "We should replace them. dammit"
so I went to the hardware store, got two new shutoff valves. cranked off the old ones with bated breath, hoping the pipe didn't crumble to dust. sure enough, the end of the threads has rusted away to an EXCITING taper
But the threads were intact, so I pressed on, but before replacing the valve I ventured to stick a finger in the pipe
Iron supply pipe is 1/2". At least 1/4" of this pipe was encrusted with rust and scale. I broke it loose with a screwdriver. It was like pebbles falling out
Iron supply pipe is 1/2". At least 1/4" of this pipe was encrusted with rust and scale. I broke it loose with a screwdriver. It was like pebbles falling out
I broke a shitload of rust out of the pipe, vented it a little, PTFEd the threads, spun on the new valve praying the threads wouldn't turn to pudding; they held, and it passed the pressure test. No feeling like it. Sex doesn't compare
Sidenote: My main water valve is also fucked. It doesn't shut off the water in the house when you crank it down because (presumably) it's chock full of scale. So how did we do this without flooding the kitchen? By cranking it down as hard as we could, then turning on the bathtub
The bathtub comes first in the supply line so water took the easier path to an exit and we only got a drip out of the sink nipples. That's a win for team bramble
we mudded the wall, let it dry overnight (grudgingly - "20 minute mud" my fucking ASS) and painted
oh lord
oh lord, deliver me
drywall mud and paint are the true word of god. they forgive our sins.
oh lord
oh lord, deliver me
drywall mud and paint are the true word of god. they forgive our sins.
you gotta look close, but this is one and two coats of paint. the second one covers up all our errors. it allows us to leave the man we murdered in the ditch in Branston and make a new life in a new town
now, to complete the story about the plumbing, please take a gander at this
are you liking the spacing between the shutoff and the cabinet. does it make you feel good
are you liking the spacing between the shutoff and the cabinet. does it make you feel good
what if i told you the sink cabinet was gonna be another 3/4" added on to that left side
how would you feel
how would you feel if it looked like this
how would you feel
how would you feel if it looked like this

bringing the riding crop down on the ass of my sub as I snarl "do you like this? do you?" they take too long to respond so i smack the crop against the side of the cabinet, knocking the shutoff valve partway into the closed position. i ask again, "do you like this?" they whimper
i took measurements and during the design phase I calculated that the stackup of cabinets would line up EXACTLY as shown above. i'm extremely lucky that it did. I'm not really sure what I would have done if it didn't, but I would have needed to see a priest after
To cut to the chase, the plumbing worked out from this point onward. It's a LITTLE awkward, but the extra 8-10" gave us all the breathing room we needed. No leaks!

Let's address the electrical
Big sigh
Big sigh
It's funny. Between electrical and plumbing, I'll pick electrical every time. One of them can kill you, one just gets you wet and damages stuff on the floor. i'll take the one that kills you.
This house is from the mid 40s. It was originally wired with knob-and-tube. Sidebar for those who don't know: That means the wiring was all pairs of single conductors nailed to opposing 2x4s in every wall cell


We had it rewired a few months ago. All the knob-and-tube is dead and we have a *beautiful* new batch of romex, all nicely labeled and MOSTLY 20-amp rated.


We didn't have the kitchen ripped out when the electricians were in so they had to work around the cabinets. We're not exactly sure how much to blame that for this.

we THINK that the leftmost cable is from a post-70s retrofit that added three-wire outlets to the kitchen. To be clear, this was run *through* the cabinet. we had to cut the cabinet out from around it. Carefully.
the middle one is, as far as I can tell, 2019-era work done by our electricians. I don't blame them. The circumstances were tough. But christ. Surface wiring. I'm not sure if they were allowed to do that, but we asked them to do the nearly-impossible.
let's also hear it for that center piece of romex - the yellow one jumping across the studs to the rightmost box. Apparently our electricians managed to fish a cable through a HIDDEN GAP IN THE PLASTER. Clever, if... possibly illegal.
With the cabinets removed and the holes on the wall accessible, it STILL ended up taking probably an hour to fish the wires through correctly. I wasn't able to do it perfectly, so I still have this - romex entering a hole in the wall through a thick layer of RTV silicone

Question Qorner: Is this illegal?
Answer: Probably. As far as I can tell this only matters if I sell this house, which will - I'm not joking - foreseeably only happen if I die, at which point it'll be bulldozed and replaced with awful town houses. I don't care.
Answer: Probably. As far as I can tell this only matters if I sell this house, which will - I'm not joking - foreseeably only happen if I die, at which point it'll be bulldozed and replaced with awful town houses. I don't care.
Let me also take a moment to tell you about "old work boxes"
God these are delightful. FUCK these things.
God these are delightful. FUCK these things.
when you put a switch or outlet in a wall, you need a box to enclose it. These boxes are extremely standard. they're like uhhhh 4"x2.5" or thereabouts. When you build a new house you attach them like this - either nailed or screwed into a 2x4.


That's called "new work." Generally, after the walls go up for the first time, you can't use "new work" boxes. There's nowhere to swing a hammer or get a screw in. The solution is "old work" boxes
old work boxes are completely reasonable but ALSO should be outlawed by the geneva convention and like... think of some other treaties. get back to me. they're crime in a small package.

the idea is that you flip those two plastic flaps inwards, push the box through a hole in the wall, then turn the screw, flipping the flap upwards, then pulling it towards the box until it pinches the drywall


this is not worse than the normal ways we mount one hundred and ten volt electrical wiring and outlets in our houses. you shouldn't be scared of how dubious this is, because we put the least amount of effort into how we handle high voltage in house walls.
That doesn't make it any less Satanic, in the bad way, the "i think i will cause problems on purpose" way
Bringing this back to my kitchen, all the outlets in that wall were mounted in old-work boxes, but even though I was installing brand new drywall and could use new-work boxes, I didn't fucking want to. So I didn't.
Let's not talk about how shitty I am with wiring. I got it done.
By the way, this is the diagram of the drywall patch. i turned this fuckfest of measurements into two patches that fit on the first try except for margins around the windowsill and nobody can blame me for that
By the way, this is the diagram of the drywall patch. i turned this fuckfest of measurements into two patches that fit on the first try except for margins around the windowsill and nobody can blame me for that

anyway, so, the IKEA cabinets
I've looked at cabinets from normal hardware stores (home depot, mclendons, etc) and they seem to be MDF carcasses preassembled with pocket joints that simply sit on the floor. that's legit, that's legit,
I've looked at cabinets from normal hardware stores (home depot, mclendons, etc) and they seem to be MDF carcasses preassembled with pocket joints that simply sit on the floor. that's legit, that's legit,
trouble is, you have to worry about floor. we have 3/8" of asbestos to worry about, and I didn't fucking want to. we also have a very small house - we don't have room to stage a kitchens worth of preassembled cabinets, let alone a vehicle to transport them
the IKEA cabinets mount on a rail at the rear top, which is a terrible approach. sucks. miserable. mechanical disadvantage. bad. also, it's what we went with, because it's fucking fine and it makes sense
i def have the overbuilding bug, but the reality is you *probably* shouldn't sit on your kitchen counters, and if you don't do that then the maximum load is somewhere south of 100lbs. The IKEA rail system is awkward with irregularly-spaced studs, but can absolutely hold that
the big advantage is that it hangs 4.5" off the floor. you take up the slop with adjustable plastic legs. It's... well, I wish IKEA had built them a little more robustly, I can't lie, but this works. It's shitty until you finish it and then it feels just fine.
The legs happen to land PERFECTLY in the middle of the threshold between the subfloor and the linoleum. It's the worst possible outcome, but it's one contact point instead of several inches of MDF I have to fight with, so this is completely acceptable. It worked out.
I SUSPECT that the IKEA mounting system also allowed me to dodge a few other bullets
The walls are not square. DId I need to tell you that? Doubtful. It's an old house. Houses made before the 70s were not square.
The walls are not square. DId I need to tell you that? Doubtful. It's an old house. Houses made before the 70s were not square.
I think if I'd had to bolt preassembled cabs to the walls I would have had serious problems with gaps. Because the IKEA cabs only have two touch points each, I suspect that forgives a lot of sins in the wall construction. I can tell you the mounting rails are bent to hell.
There was no getting around the issues this presented for the countertops, though.
As noted separately, the countertops are 1" solid oak, which IKEA has on sale for $80 per 8' slab. Absolutely obscene prices, but they're being discontinued so hop on it fast.
As noted separately, the countertops are 1" solid oak, which IKEA has on sale for $80 per 8' slab. Absolutely obscene prices, but they're being discontinued so hop on it fast.


What I found out in the end is that the kitchen is actually a parallelogram. the two "side" walls are angled in the same direction away from the "center" wall, creating the following situation

The left and right cabs are square to themselves, but sit at the same angle. Putting a slab on each of them was straightforward: it touches the wall one one corner, and the other is 1/4" away, and I fill the gap with RTV silicone. Simple
Everything in the kitchen comes to a head at one specific point and moment: when the countertops touch. The countertops are the "hero" of your kitchen, and however punk you are, you're going to have a hard time accepting non-flat, non-level, non-flush countertops
Brass tacks: kitchen counters are benches for precision work. You wouldn't accept a big fuckoff ridge in the middle of an optical or jeweler's bench, and you wouldn't accept one in a kitchen. The countertop *has* to be pristine or you can't work on it.
Gaps between the counters are more or less unacceptable. However, aesthetically speaking, it's *extremely* hard to accept a countertop that isn't level with the cabinets it sits on.
Geometrically speaking, after aligning the center chunk of countertop to the cabinets, it disagreed with both the left and right counters, which sat at angles to it. To fix this, I had to jigsaw (ouch) and sand that chunk into a parallelogram.
A few different ways to solve this would have been to shim out the side cabs to square them with the center, or to sand the center counter into a perfect parallelogram matching the odd angles of the side cabs. Trouble is, that's tedious and I was tired.
So I got it close with the jigsaw, then brought it in with 30 minutes of 60 grit random orbital sanding, then pounded it into place with a mallet. Fits perfectly.
You can see the legacy of this decision in the joints, where the left one is tight as a virgin asshole and the right has a widening 1/4" gap. I filled it with silicone, then we put a coffee maker on top of it. So the joints are flawless


The philosophy of this entire project was, basically: "If we moved into a house and it was exactly like this, would we have any complaints?" And, at this point, the answer is no. All the mistakes, all the halfassery was tuned to the level of investment we have in this.
We cut some corners. There are things we could have done better. Thing is, none of us gives a shit about having some perfect fucking Mercer Island mcmansion with 90 degree angles between absolutely everything.
People talk shit on "DIYers," and that's valid. When we moved in here, there was some HORRIFYING "handyman" work. But that was on ANOTHER level - as in, "wall decor made of random stacks of drywall chunks, discarded trim and exterior siding"
But the project we did here was largely utilitarian with a few exceptions for aesthetics. Our kitchen was fucking useless. We didn't want to pay five digits in labor to have it squared up. Now we have a galaxy of improvement, and it's all absolutely Good Enough
The lack of squareness doesn't matter. the fact our sink fittings are 10" off-center from the sink doesn't matter. the gaps in the counter don't matter. our kitchen works for us now
anyway. it's done. look at this. how could it be possible. i can't believe it myself


KITCHEN
NOW WITH 30% LESS ASBESTOS
NOW WITH 30% LESS ASBESTOS


