
This is not to say all we need to do is electrify transport and build renewables, we should also be looking to radically reduce car ownership and miles driven, and to radically increase miles by 🚲 🛴 🚶♂️🚃 🚊 and 🚌.
Nails arriving tomorrow so time for a bit of cleaning before putting the floorboards down. Not much use in having the low-dust house (airtight and filtered fresh air through the MVHR) if there’s a load of dust right under the floorboards! #Passivhaus #EnerPHit 


Making some more holes so I can measure exact distance between studs so @Drew_Carr_ can finalise the downstairs window sizes.
What on earth is building paper anyway? Just waxy paper? Does anyone still use it?
What on earth is building paper anyway? Just waxy paper? Does anyone still use it?

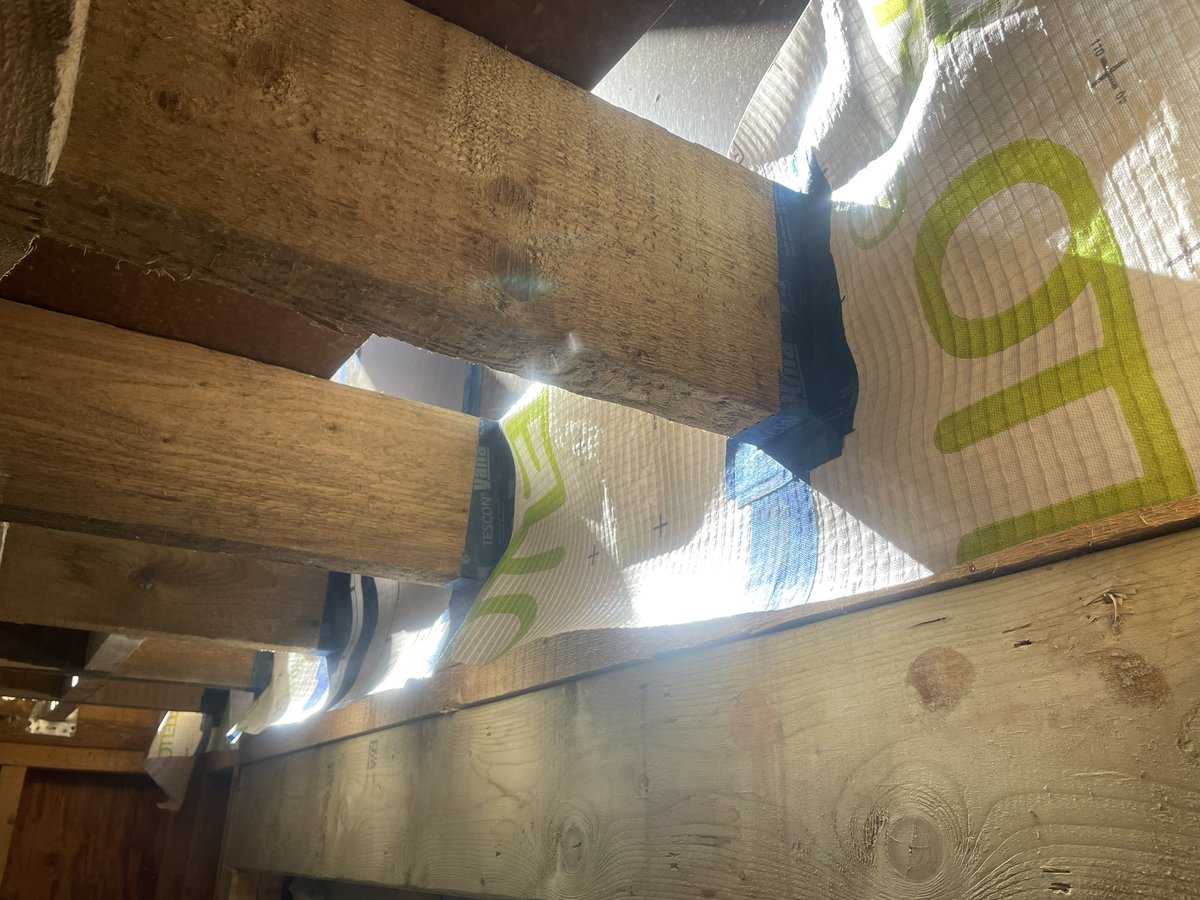
Reminder that my windows have no lintels, including some pretty big ones! My roof appears to be levitating 😳 @BethWilliamsSE


This stuff, lining the walls in our kitchen, is minging.
Also, does plasterboard normally smell floral when you cut it, or is that a olfactory memory of the previous occupants penchant for those perfumed vapourisers you put on top of radiators?
Also, does plasterboard normally smell floral when you cut it, or is that a olfactory memory of the previous occupants penchant for those perfumed vapourisers you put on top of radiators?


Nails still not arrived so I’m working out the order these boards need to go back in. Glad I marked them up when I lifted them!

And in the continued absence of nails I may as well lift a few more boards. Feels like a while since I did this last! 😩

Couple of days away for @johngilbertarch strategy day and a climbing comp with the eldest, nails have arrived, looks like that’s my Sunday sorted.

Bit of a stop start day with having to sort a few things before floor boards can start going down, but it’s happening at least. I’ve slept in narrower ledges than this in the mountains so should be grand for visitors next weekend! 🤣😳

Ten boards done, feel like I’ve been climbing an El Cap aid route. That might be it for the day, time to cook dinner 🥘 and finalise the window/door order.

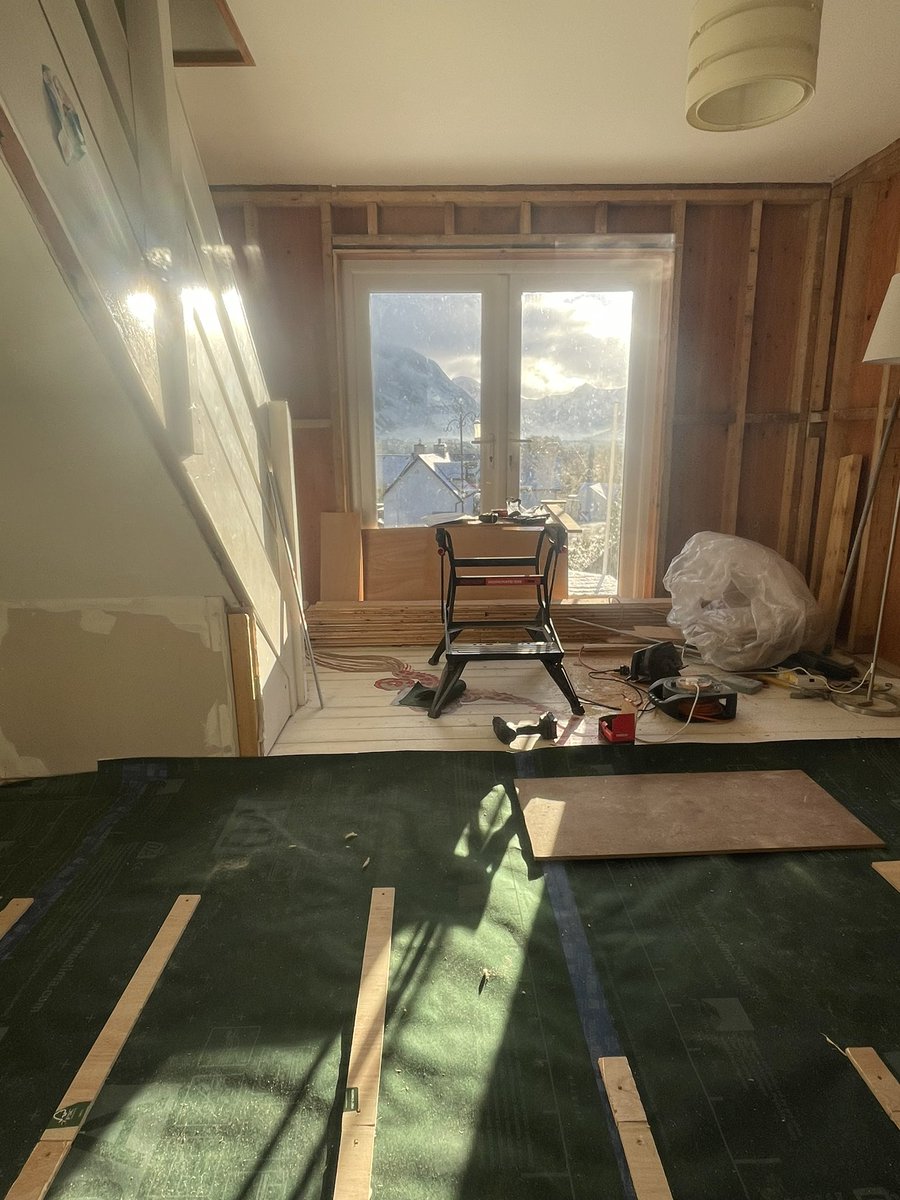
Amazing moonrise this evening over #BenNevis. Looking forward to having this view from my bedroom when the retrofit is done. Currently have close up view of an evergreen tree from bedroom!

Blows my little mind that when we’re done with the 🏡 this small (1.5kW) radiator will be more than large enough to heat the whole house*. #Passivhaus #EnerPHit
*We won’t be heating it with this (getting a heat pump), this is an interim solution for broken heating in our Airbnb.
*We won’t be heating it with this (getting a heat pump), this is an interim solution for broken heating in our Airbnb.

Had some help this afternoon. Amazing how much faster two people are than one!
Slightly concerned that I haven’t found any air bricks yet, surprised too as can feel air movement under the floor. Anyone got any experience retrofitting air bricks? #Retrofit #EnerPHit #Passivhaus
Slightly concerned that I haven’t found any air bricks yet, surprised too as can feel air movement under the floor. Anyone got any experience retrofitting air bricks? #Retrofit #EnerPHit #Passivhaus

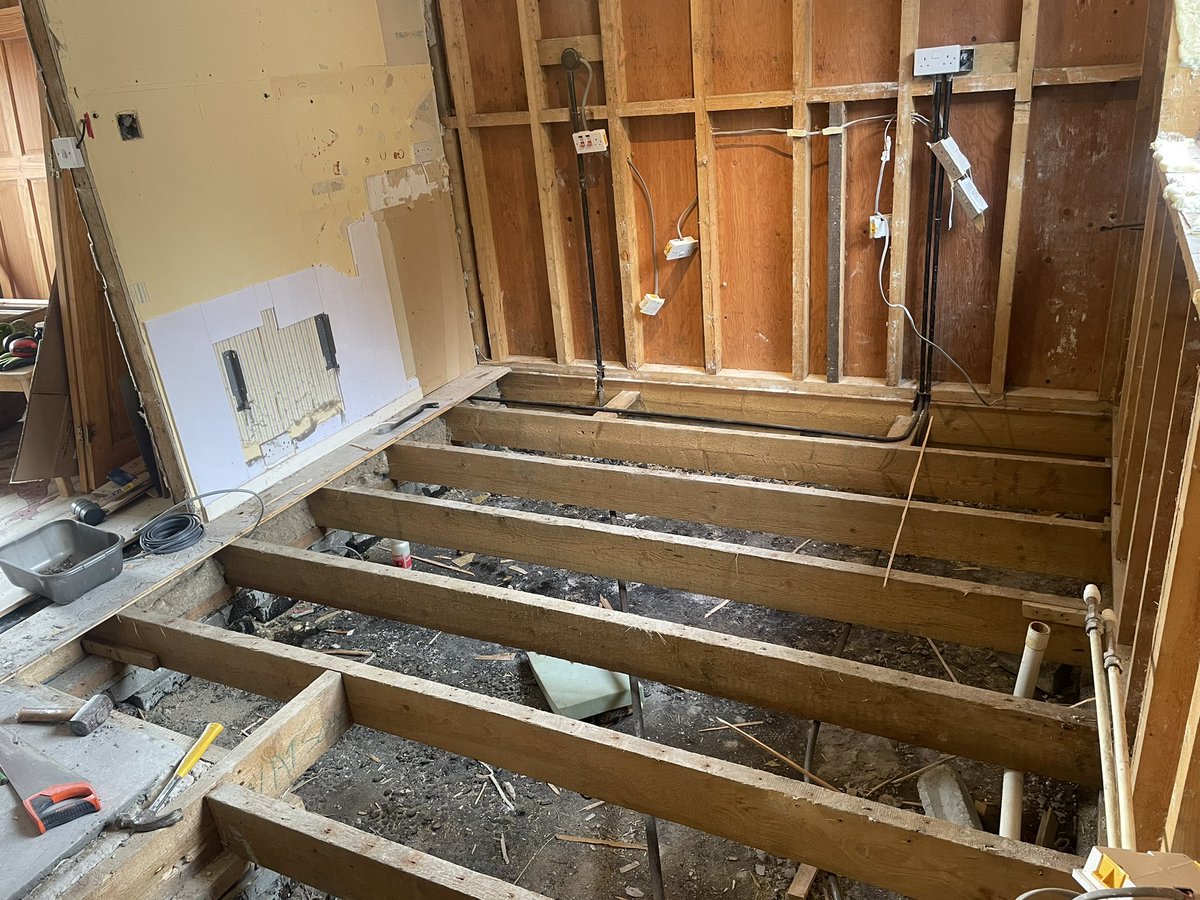
Should’ve done a before and after shot, here you go! For those who advised me about electrics the other day (@AR_Clarke and @the_woodlouse amongst others I’ve prob forgotten) 🙏 a million. String idea definitely not a goer, have loomed it up ready for electrician to connect.


Forgot to take any photos of it though! Discussed it with electrician and agreed how I’d do it. Glad you asked about the string @the_woodlouse, otherwise I’d’ve finished the floor thinking it’d be fine and got a nasty shock at the end!
Had a friend visiting this weekend so had to posh the room up a bit! 🤣🤣🤣
Pleased with how the boards are looking, think they’ll look good after sanding and oiling.
Pleased with how the boards are looking, think they’ll look good after sanding and oiling.


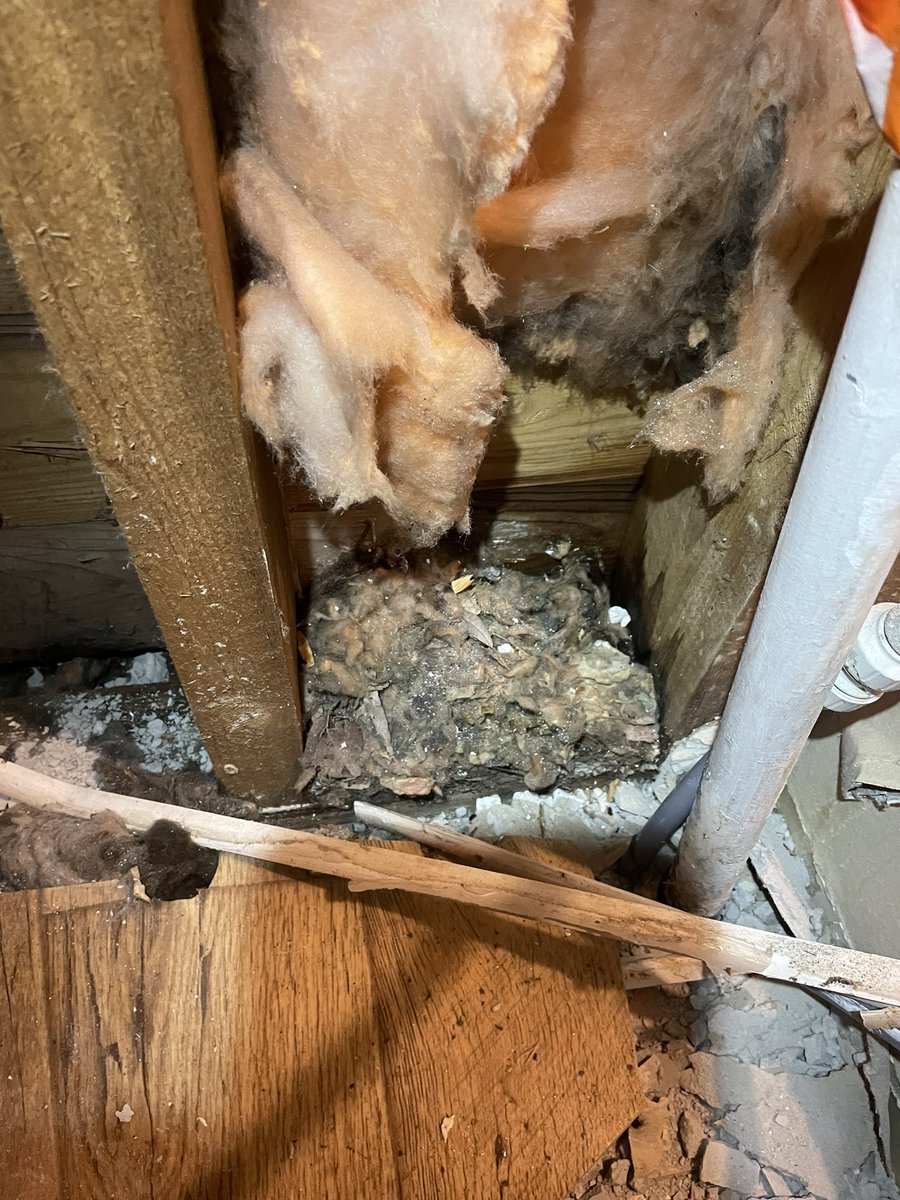
Last few days on it has mostly been prepping 4 insulating next side; lifting boards, taking crap out of the floor void, trying to decide if I need to add more vents and buying ply. The rusty box shown here was for historic warm air heating, & was blocking one of the air vents 🤦♂️

Adding a few more boards and taking a few more away!
Last photo shows 🐁 highway into house! 🤣
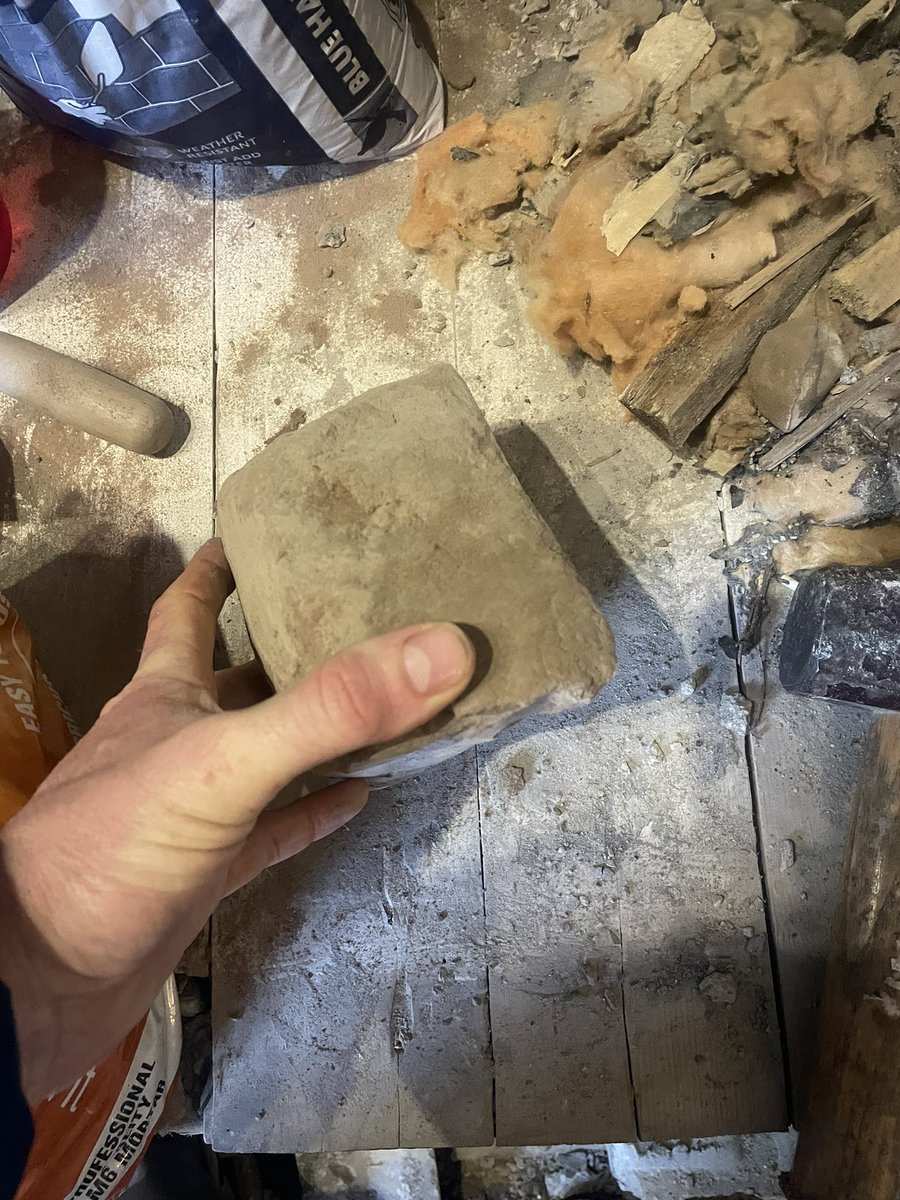
Anyone know what that board is? I’ve been careful not to disturb it in case asbestos…
Last photo shows 🐁 highway into house! 🤣
Anyone know what that board is? I’ve been careful not to disturb it in case asbestos…


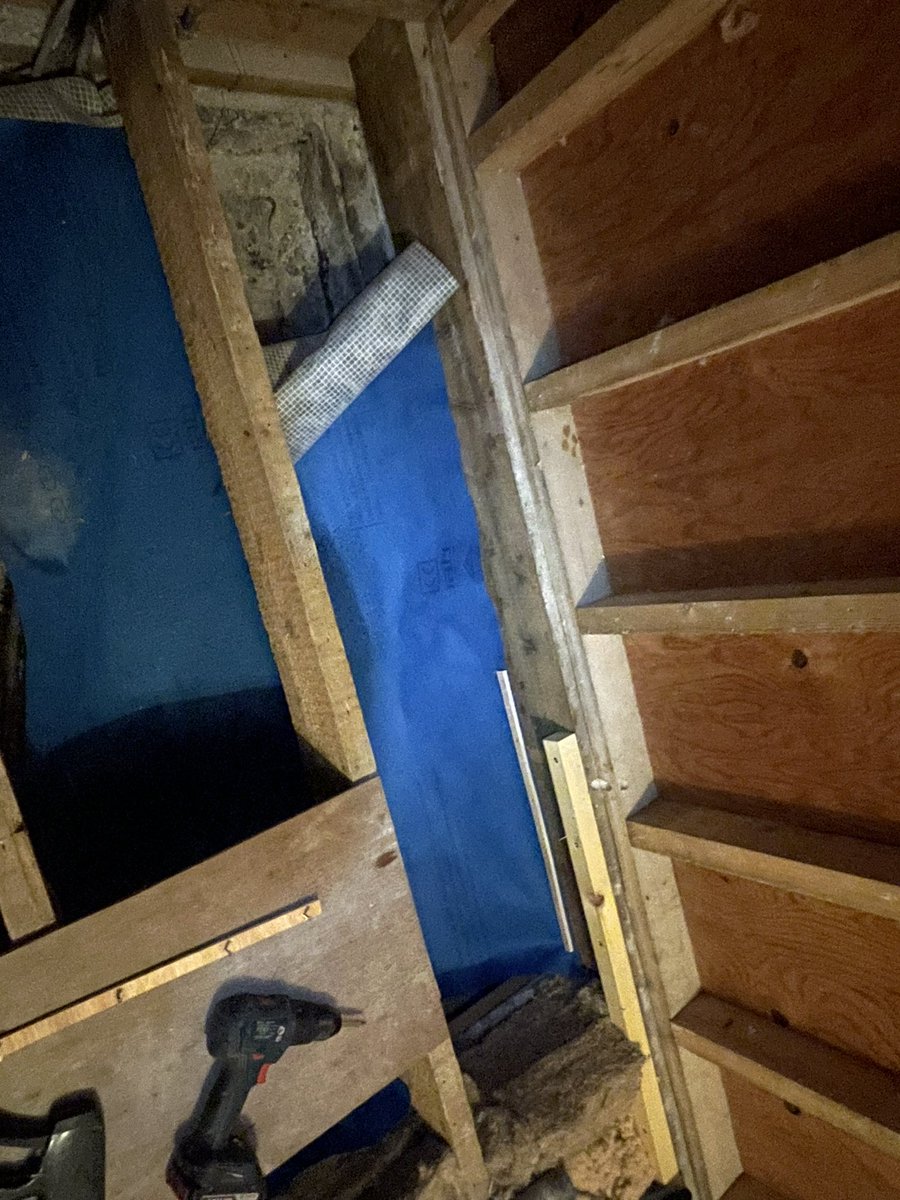
Gonna have to come up with a different insulation strategy for the floor in the window alcove; not enough depth for what I’ve done on rest of floor and need to ensure I maintain good ventilation on the cold side of the insulation. Got a few ideas.

Laughed when I saw this insulation. Dutifully laid in place, but with a ventilated space between it and the room. 🤦♂️

Wonder if I’ll be able to complete floor insulation without losing internet!?! 🤣🤣🤣

Bit of dampness below red line here, none above. Need to find my moisture meter to establish just how serious, but no sign of decay. No obv cause either. What are my options, beyond improving sub-floor ventilation (which intend to do)? Need to re-read my @AECBnet retrofit notes!

Good bit of building physics going on here. Plasterboard is foil-backed, which acts a vapour barrier. Mould generally pretty bad, but especially bad in bit with⚡️ socket. Socket installation has compromised what little airtightness there was allowing warm, moist air into wall. 🤢


Pretty sure you’re not meant to do this with your cable runs!

Or leave your sockets not fixed to anything like this.

Predictable but still impressive lack of shits given about airtightness around the window. “Oh aye, we’ll put double glazing in, it’ll make a huge difference, you’ll be much cosier”

Each of these 15mm batts of insulation is held in place by two nails. That’s much more work than what I will replace it with (friction fit 100mm). All that effort for so little benefit. Nuts.


Thankfully no white mould on the boards behind the insulation this time.

Had a bit of help for an hour after work today so did some more ripping off plasterboard. Got the radiator off too.


Really looking forward to this as a window seat. Nice spot to read a book with a little glimpse down to the loch.


Not quite as bad as Nick’s experience, only one 🐁 skeleton found in wall so far. Gonna have to sort some serious mouse-tightness!
https://twitter.com/nickhobson25/status/1442603578397544452


Joist extensions going in. Going to thin to 100mm in the window alcove to maintain ventilation in solum (cold side of insulation) of this small space for moisture robustness.

🐁 🐀 proofing the air bricks. Should stop the wee blighters!


Good bit of progress today, membrane to hold insulation, some 🐁 and 🐀 proofing and a bit of watching the kids whizz round the park on their #cyclocross bikes.


Currently living with no heat as I’ve disconnected radiators. It’s a glimpse for me of just how tough living with #fuelpoverty must be. Takes days for clothes to dry out, would be super hard without a tumble drier, cold all the time (13° in bedroom!). And it’s only just October.
Makes you hostile to kids going out and playing in wet weather cos you know getting shoes dry will take days. Impacts on pretty much everything you do.
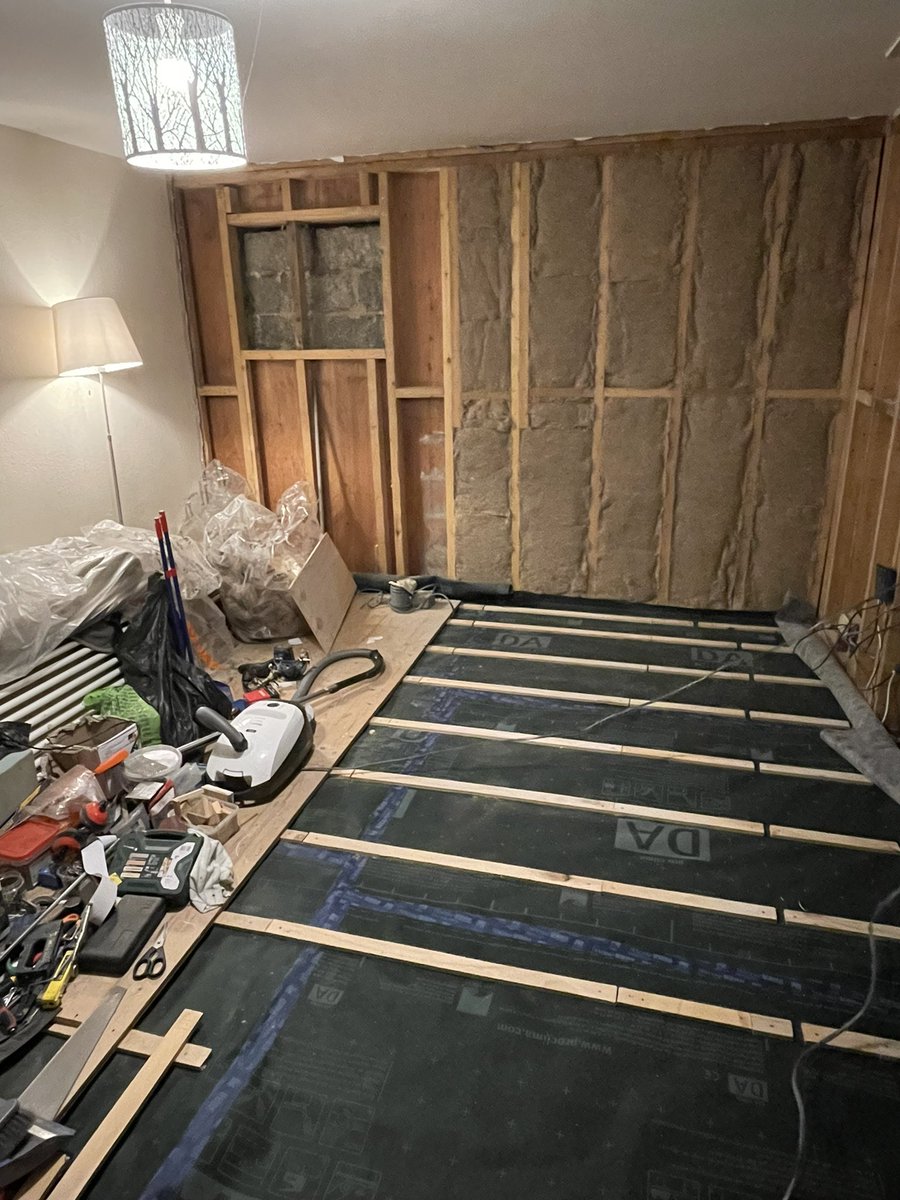
Not a lot of spare time today so only managed to get one more bay done. Now done 4 and a half. Another 3 to do and then I can insulate, make airtight and start laying floorboards back down. Will hopefully have enough floor for the room to be useable again soon. 🤞🏼

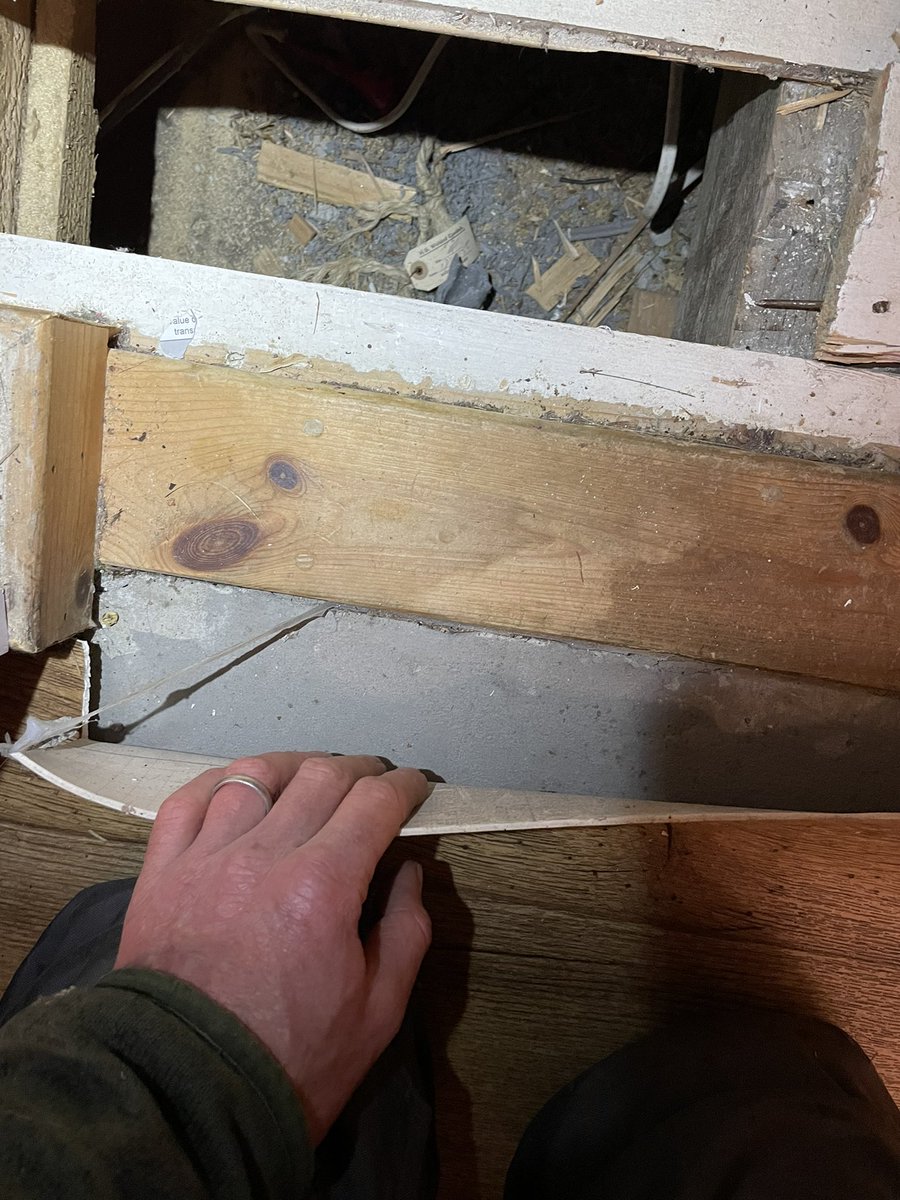
Think I might have decided there are enough vents under my floor, took 90 minutes with an SKS drill to make this hole in my poured concrete foundation. Ooft. Will try and prep another bay or two for insulation tonight, aiming to put floorboards back down on Thursday.


There are at least 2 vents in this room, probably 3, so I think it’s ok.
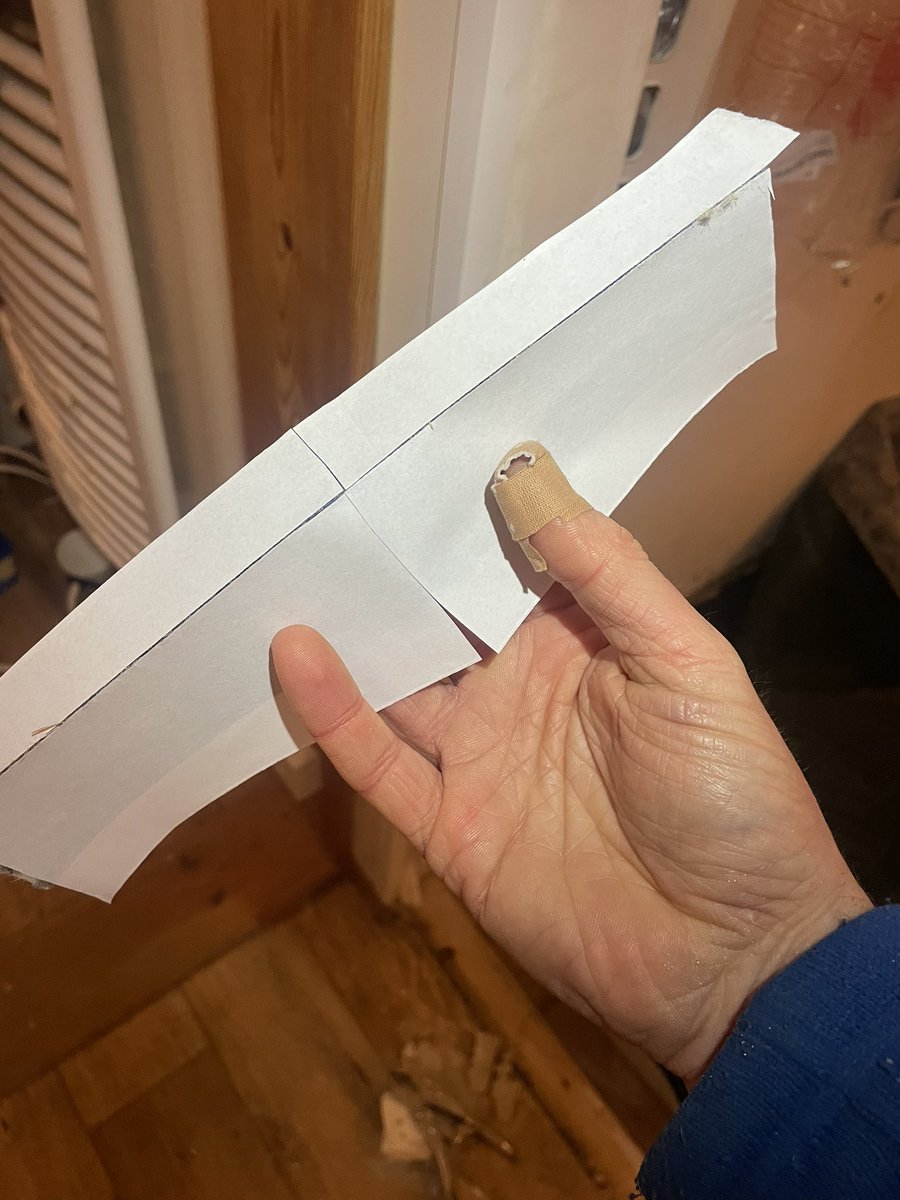
Bit of thinking needed here to make junction to wall perpendicular to joists work well. Worked on paper but in 3D got to ensure wind-tight membrane is reasonably tight, clear of foundation and well sealed. 🤔

Backing myself into a corner…

Pretty pleased with how join to wall went. Near enough, wind tight, clear of founds and vents, tight enough to hold insulation well without sagging. 👍
One and half bays to do, plus the dwangs for the edge detail, then I can start insulating. Time to turn in for the night.
One and half bays to do, plus the dwangs for the edge detail, then I can start insulating. Time to turn in for the night.


This should say ‘neat enough’! 🤦♂️
Just had test results back for this board. It’s Chrysotile (white asbestos). Damn. Not what I needed. Had intended to break up and remove, now need to decide whether to leave in place (only dangerous if disturbed) or pay specialists to remove. 🤕

Keeping well away from asbestos for now, finishing off this floor edge detail. Note to self: should’ve put in dwangs before platform, had to finish nails off with a nail punch!🤦♂️

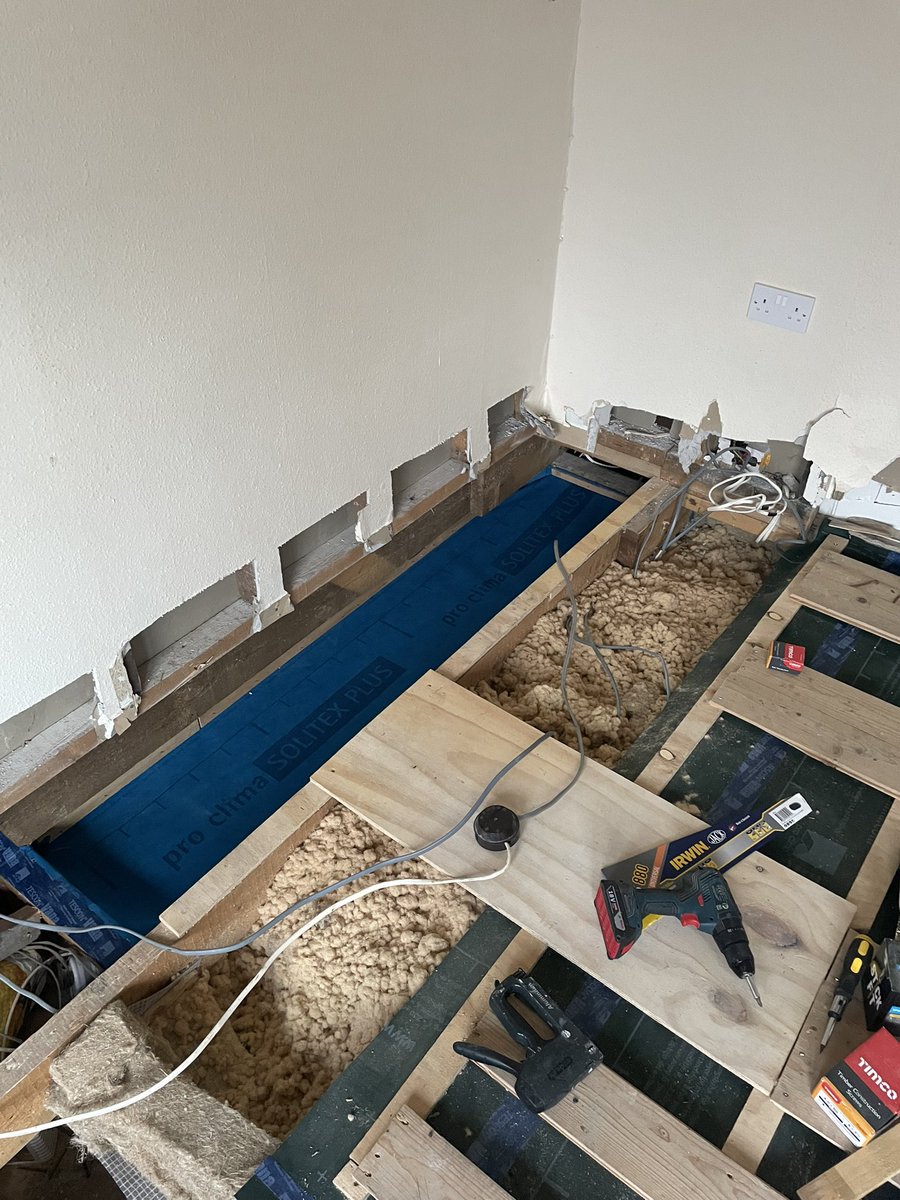
I’ve generally tried not to work late on the house as I can’t keep that up for long, but I’ve someone coming to help me tomorrow so I wanted to do all the fiddly 1-person jobs tonight. Membrane in ready for insulation tomorrow. 😮💨


Careful with that drill! Put a hole in membrane, had to patch it.


Ooft, big afternoon with a friend, and the kids for a bit, getting insulation and airtightness membrane in. Floorboards go back tomorrow.


First job this morning undoing some of what I’ve already done; mistakenly taped this membrane over joists I hadn’t yet insulated 🤦♂️
Then a bit of tidying and vacuuming and ready to start putting floorboards back down.
Then a bit of tidying and vacuuming and ready to start putting floorboards back down.


Next job build this to help speed up all the small site jobs. More of a head scratcher than I was hoping for!

Couple of floorboards down, lunch had, house empty for the afternoon so time for 🚀
Reckon this bench+clamps will save me a lot of hassle and risk to fingers! Seem to do a lot of cutting small bits of wood and ply!
Reckon this bench+clamps will save me a lot of hassle and risk to fingers! Seem to do a lot of cutting small bits of wood and ply!

I’ve mostly been able to reinstall my floorboards without big gaps, but didn’t manage here. What are the options for filling this, purely for aesthetics?

Getting there. Time for a cuppa ☕️

Greyed planks are where wood burning stove was. Living room should feel a lot bigger without it, especially for kids running around and having to avoid hard, sharp and sometimes very hot metal corners.

Good last few hours. Am 1.5 boards away from wall, but slight complication about what to do with gap from historical warm air heating terminal. Think I know what I’ll do but needs some fresh brain in morning.
Had some very welcome help from a stormtrooper to finish the day!
Had some very welcome help from a stormtrooper to finish the day!


Not much time to spend on #Retrofit today. Detail at edge to thin board to allow for wall insulation took a bit of thought but I think I’ve got something that will work.
Still a bit of tidying to do before I can get a 🛋back to give us a bit more room during school hols! 😳😳😳
Still a bit of tidying to do before I can get a 🛋back to give us a bit more room during school hols! 😳😳😳


May look like all I’ve done this afternoon is tidy, but every nail in that photo is now a few mm below the surface of the board, to allow sanding (a long way off yet) and kids playing ‘non running-around’ games. Sofa going back in when rain stops long enough to allow it!


Amused to find this behind one of our radiators.
Reminded me that we came to look round the house before buying it turned out the seller had googled me and so knew I was eco minded. They proudly showed me this behind the radiators!
Reminded me that we came to look round the house before buying it turned out the seller had googled me and so knew I was eco minded. They proudly showed me this behind the radiators!

Board seen here under joists has asbestos in it. Currently getting quotes to remove it but I think solution will prob be to cover it up, with warning for whoever uncovers it in future placed both on top of it (under insulation and membrane) and under flooring (above insulation).

Trying to remember to get photos for #Passivhaus certification as I go. Need to provide evidence I’ve done what I said I’d do (or account for differences), and do to a really high standard, to eliminate the #PerformanceGap

Occasionally batts are the perfect width, but in an old 🏠 it’s more usually it’s a choice between squashing them slightly, which causes a kink in the insulation (1st pic) or cutting a bit off, which risks cutting too much off and having to fill in gaps with off cuts.


Not sure what to do now. Can’t insulate right up to window openings until have new windows in as need to add studs. Can’t add insulation board internally till I open up ceiling. That might have to wait till after imminent visitors have left and we’ve moved out of the house.

Bit of gap filling to finish the day. Time for a cuppa.


Living for a while with no heating in an unimproved 🏠 makes you realise how tenuous the provision of a vaguely healthy living environment is in most 🏡, & how it’s completely dependent on chucking loads of heat at the problem. #FuelPoverty #FossilFuels
#Passivhaus solves this.
#Passivhaus solves this.


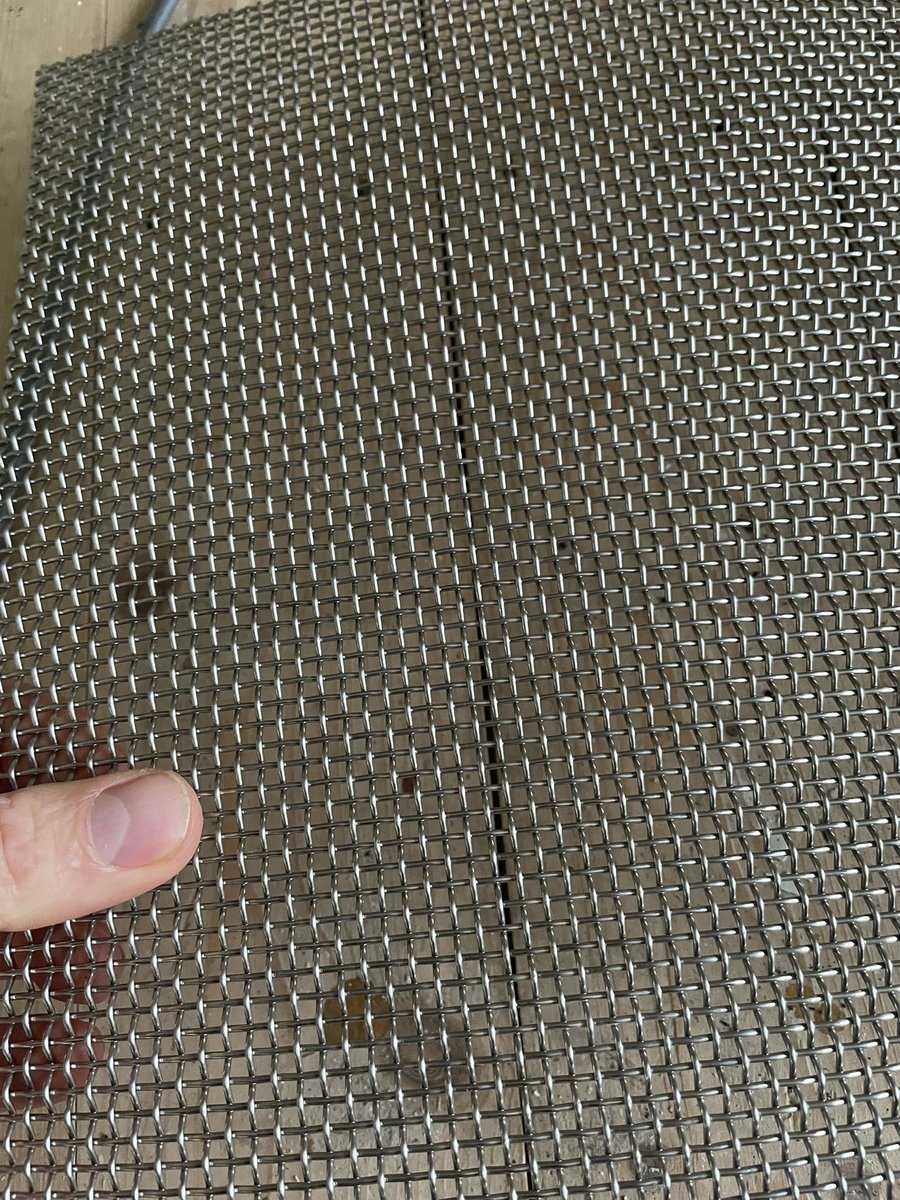
Nice holiday by the sea, biggest waves I’ve seen in a while (ever? Didn’t climb that day!). Bit anxious to get started again. Bit of mouse proofing before bedtime. Mostly to test out method before doing rest of it tomorrow.


Should stop the wee blighters. 🐁 🐀
Fiddly work though, roll of wire mesh wants to jump around and rip you to shreds at any moment. Hopefully can be quicker tomorrow as I’ve another 6 of these to do! Time for 🛌
Fiddly work though, roll of wire mesh wants to jump around and rip you to shreds at any moment. Hopefully can be quicker tomorrow as I’ve another 6 of these to do! Time for 🛌

Bit quicker today but it’s still a right faff. Should of looked harder for mesh that was the right width, instead of having to do multiple small bits. Done nearly 4 bays now. Rest might have to wait till tomorrow.

Gonna finish up there. Find that if I work on it too late I can’t sleep, which then means I can’t get up and start work early, which means I can’t finish early to work on retrofit etc etc vicious 🚲
Early to bed for me tonight.
Early to bed for me tonight.
🐁 mesh all down. Time to get the membrane in this bay window but of the floor. Plenty of ventilation coming under the floor here, wind-tight layer will be important to stop wind washing of insulation.

Getting connection right between deep (280mm) and less deep (100mm) insulation at window bay.


That’s enough for today. Four of these bits ready for insulation tomorrow or Monday (will be installed better than currently in picture! 🤣). This will be the least well insulated bit of entire envelope, only 100mm of insulation compared to 280 in rest of floor & 180 in walls.
Considered replacing this bit with a solid floor to avoid this thermal bridge, but there’s a lot of ventilation coming into the floor void here (v important), and I would’ve had to deal with the asbestos. Think this is best solution; ventilation maintained & asbestos contained.

It’s a relatively small area (2.7m x 0.6m), and it’ll be covered by a window seat, so I think impact on thermal comfort should be tolerable.

Need to prep 4 bikes for the annual ‘Fort to Fort’ (Augustus to William) tomorrow. Treated myself to some new shoes after ~18 years of service!

I’d say on evidence so far airtightness taping is much easier than handlebar taping! 🤣 #Passivhaus #cycling


Have seen the container architecture light and decided to drop the #EnerPHit #Retrofit plan for our house and move the family into this green beauty instead 😉

Sorting the insulation join between loosefill woodfibre and hemp+jute batts where thins from 280 to 100mm.

Added membrane in one more bit, should be able to finish these three tonight (the blue ones). Other two will have to wait for some more 🐁 mesh as I didn’t have quite enough.

There’s a lot of air coming in under the membrane here at bay window (marked w/ red arrows). Important to make sure this gets under main part of floor from the bay where sub-floor is much less deep. Careful detail will ensure good air path under insulation (second photo).


Here’s the detail with the membranes joined up with airtightness tape. Both membranes are same, one on left is wrong way up! I assumed they had to go that way for breathability cos that’s way they go on walls &roofs, turns out it doesn’t matter & easier to stick on blue side. 🤦♂️

Done for tonight. Time for a 🍵 📖 🛌 😴


More often than not the batts aren’t quite the right size. I’m keeping a bag of scrappy off cuts for squeezing in around the window frames to minimise the installation thermal bridge.

Surprise! For me anyway. Floor in kitchen has concrete screed, presumably over timber boards like in rest of house. Is that likely? Gonna give me a bit of a headache getting the boards up…
Short evening of work on the house after an interesting chat with @AR_Clarke about optimising heat pump operation in #Passivhaus homes.
Started opening up floor under stairs then stopped as not 100% sure about my strategy for joining floor of rooms either side of stairs. Needs more 🤔 and some ✍️
So finished membrane in penultimate joist-space of bay window (waiting on 🐁 mesh to finish last). Enough for now.
So finished membrane in penultimate joist-space of bay window (waiting on 🐁 mesh to finish last). Enough for now.


Mini 🧵 within a 🧵
This is Clementine (name chosen by the kids). #CatsOfTwitter #EnerPHitCats #CatsOfPassivhaus Clem has to be kept in the house at night as she’s a savage 🐦 hunter, but she also likes to snuggle on the beds of the humans, which bothers the humans trying to 😴
This is Clementine (name chosen by the kids). #CatsOfTwitter #EnerPHitCats #CatsOfPassivhaus Clem has to be kept in the house at night as she’s a savage 🐦 hunter, but she also likes to snuggle on the beds of the humans, which bothers the humans trying to 😴

Up until now I’ve only lifted boards in living room, last night I also started under stairs in kitchen. Clem loves going under the floor, presumably because it smells of 🐁. She quickly discovered she could do subterranean laps of the 🏡, entering in kitchen & emerging in living.
So at bedtime we locked her in kitchen as usual. 30s later she padded upstairs & arrived in our bed looking very pleased with herself. So I took her back down & put the boards loosely back to keep her out of floor. That lasted 2min till she knocked a board out & trotted back up.

So I made a bit more effort at blocking the hole (1st pic). Just as I was drifting off into the land of nod I heard a tinkling bell and up she hopped onto our bed, where she stayed for the rest of the night. She’d figured out how to push one board out of the way (2nd pic)!


We’ve moved out (into our Airbnb cabin) and I’ve moved on to another room! Hoping/feeling like work will be much quicker on empty rooms! Thankfully carpet came up much quicker as no carpet grippers or staples unlike in sitting room.
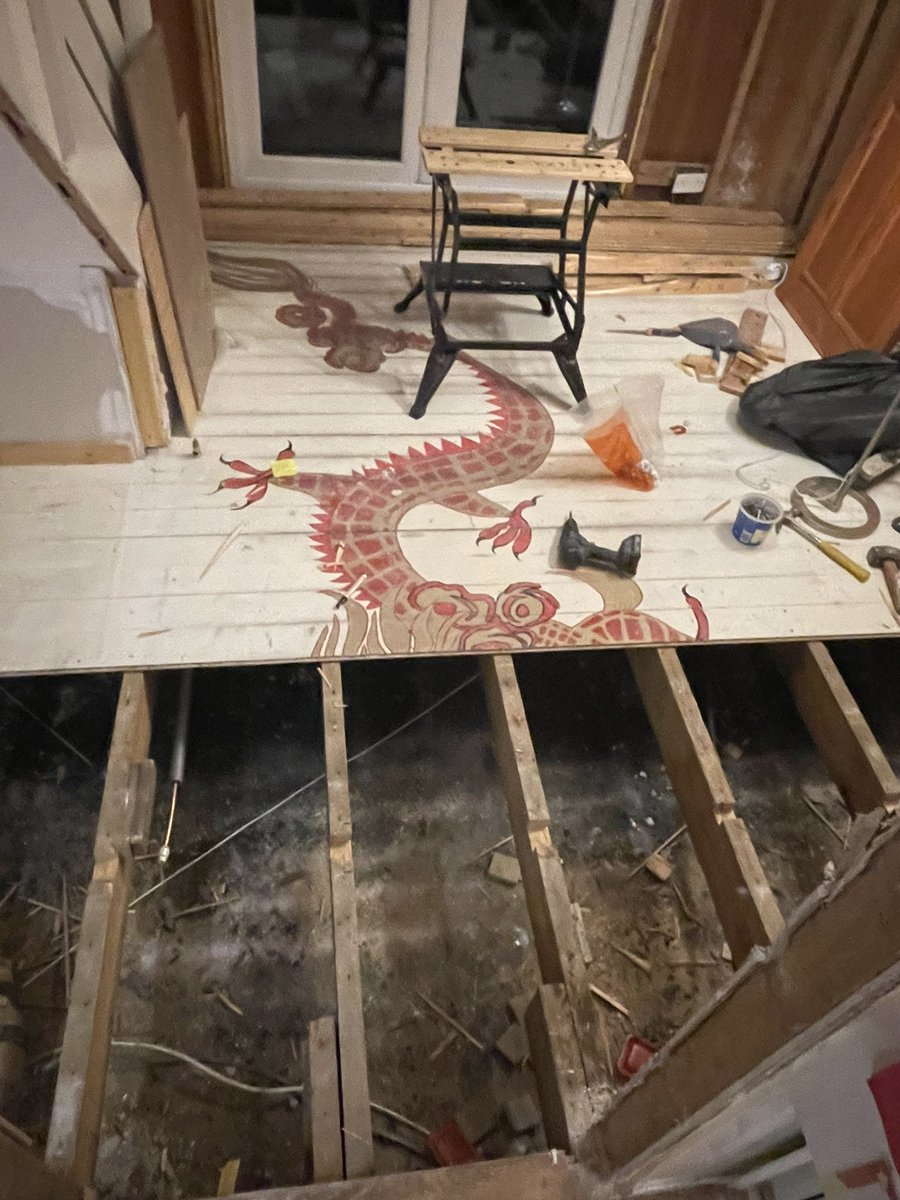
Revealed some interesting art work on the floor.


Kids very excited that we’ve discovered ‘the last dragon’ (Riya and the last dragon currently a favourite). ‘Can we keep the dragon when the floor goes back?’ Parents not quite so keen.

Plasterboard coming off gable wall. Quick with a bit of know how from someone who’s done it before (got a friend helping me today).
Not as mouldy as the other gable!

Yum yum, mould *and* mouse droppings!
Whenever I find stuff like this I think of all the people who told me I should just stick foam-backed plasterboard up and be done with it. 🤢
Whenever I find stuff like this I think of all the people who told me I should just stick foam-backed plasterboard up and be done with it. 🤢

Productive afternoon and evening working with a pal. Removed a carpet and found a 🐉, stripped two external walls of plasterboard and insulation and removed the wall under the stairs to allow me to lift the floorboards (Sunday’s job I guess, few days away now).


Trip to the recycling centre required tomorrow.

Early start this morning so I can also fit in a local 🏃♂️ race (me and kids) then more on floor and a bit of 💻 work later on for @johngilbertarch.
Getting the first board properly up is tricky and takes ages. Hopefully next ones should be fast.
Getting the first board properly up is tricky and takes ages. Hopefully next ones should be fast.


Back on it. Bloomin’ having to remove door frame to get rest of first board up without damaging it. No biggie as this wall is going, but hadn’t planned to do it myself (builders coming in to sort beam when open up between these two rooms - wall is load bearing.
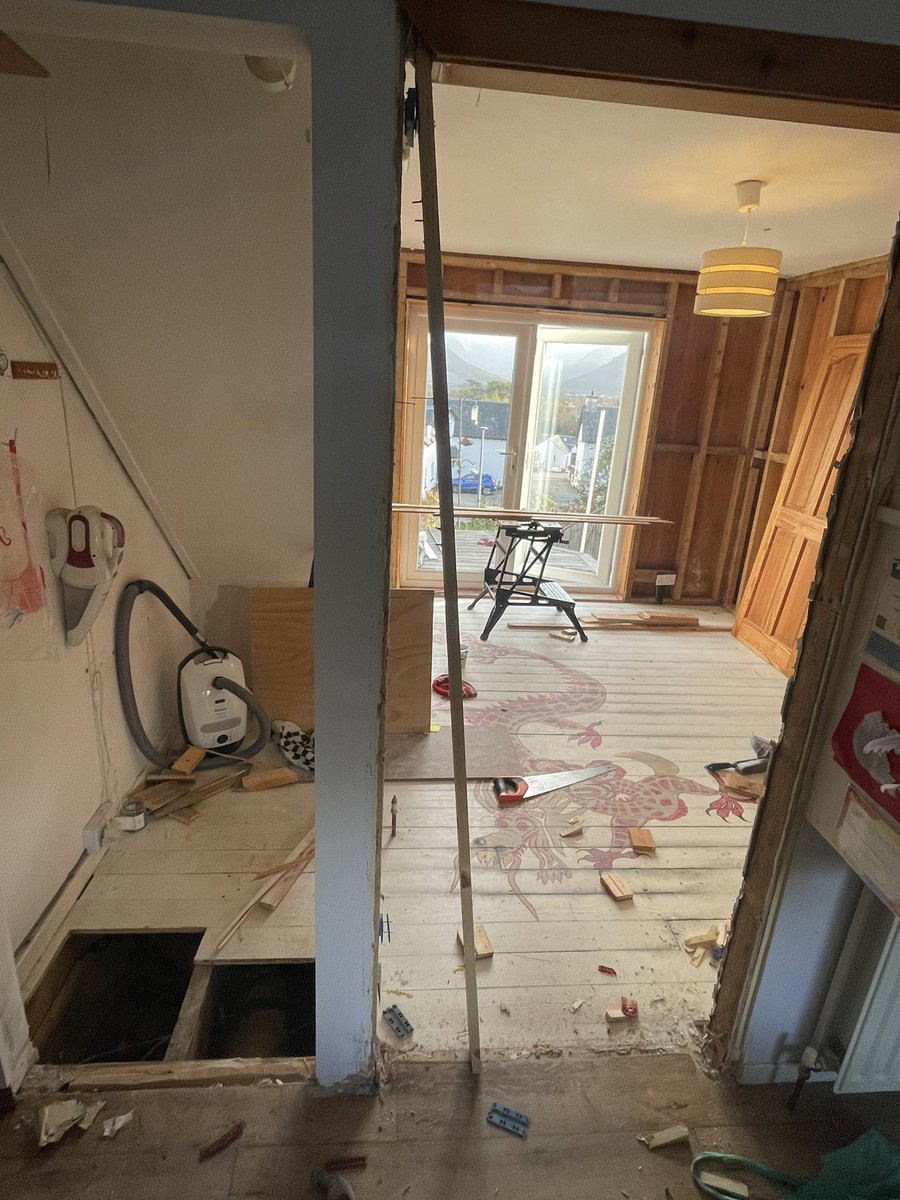
Done. Time to crank up the pace and see how many of these I can lift before I’m out of time today.

Definitely faster. Now got some heating pipes to remove. Fun and games.
The dragon has been beheaded!
Right, that’s where I wanted to get to today. Time for other things.

After yesterday’s big visible progress this afternoon has been more like solving parts of a big jigsaw puzzle that won’t be completed for a few weeks, both physically in the house and in my head (working out how I’m going to do next bit).
Knocked out a few board ends from under the partition ready for under-partition detail, balked at tidying required b4 starting that (ht @RobbieBellshaw) and finished last of bay window mouse and wind proofing, ready for insulation (but not likely to get it for a few weeks).


Wonder how airtight these joints are (our Airbnb cabin that we’re living in while I #EnerPHit our house). Not very I’m guessing. #Passivhaus

Waiting on the electrician to come and sort some stuff before I can finish under-partition detail so instead this evening I’ve been sweeping floor void, fixing notches in joists and extending them ready for membrane and insulation.

Still waiting on electrician so having to squeeze jobs in that can be done his morning. Getting back to putting in the membrane. These joists seem a bit further apart than in other room, some ‘only just’ stretches to get 3 bays done out of the 150cm width of membrane.


Been out most the day. Starting on the dwangs to support floorboard edge detail. This is the most bastard awkward job getting skew nails in while making sure dwang stays right height.
Nice moonrise tho.
Nice moonrise tho.


That’s enough for today. Day at 💻 tomorrow catching up with WUFI course and some work on a #Passivhaus school. Having to up my game massively to juggle busy work, family & #retrofit. Gonna feel like I have tonnes of time for 🏔 & family when I’m done with the 🏡!

This #EnerPHit #retrofit sometimes feels like an elaborate version of the kids book ‘A Squash and a Squeeze’.
🏡 too small? Plan more space as part of retrofit & in the meantime move into small Airbnb cabin.
🏡 too small? Plan more space as part of retrofit & in the meantime move into small Airbnb cabin.
Life too busy? Decide to plan *and do* much of the work yourself, even though you’ve zero DIY experience.
Hopefully this’ll be me when we’re done!
Hopefully this’ll be me when we’re done!

Now we’re not living in the 🏡 I figured leaving windows tilted open would be enough to keep clothes from going mouldy. Wrong!
Figured no moisture from us (breathing, cooking, showering etc) and more vent would more than make up for lack of heating.
Clearly I missed something.
Figured no moisture from us (breathing, cooking, showering etc) and more vent would more than make up for lack of heating.
Clearly I missed something.


Ideas for what it could be:
Residual moisture in building fabric, 🪑& clothes (this room has always had damp problem, gets stuffy overnight even w/ trickle vents open).
🤔 Not sure what else it could be. Either 👆 or a gap in my understanding of how this stuff works.
Anyone?
Residual moisture in building fabric, 🪑& clothes (this room has always had damp problem, gets stuffy overnight even w/ trickle vents open).
🤔 Not sure what else it could be. Either 👆 or a gap in my understanding of how this stuff works.
Anyone?
Alternative theory: humidity frequently >80% (~approx threshold for mould growth) and temps mild enough currently that mould can grow, even if ventilating very well.
Early start this morning. Keen to get to a point where the floorboards are going back this weekend. Onwards!

Been enjoying listening to @kilianj climate athlete academy podcast (open.spotify.com/show/2v8mo7EQm…) while retrofitting this morning. @jimmann23 episode was a highlight. Keep up the good work guys!
Tricky detail fixing membrane in a few bays (left picture). Usually much simpler (right picture). Thanks for the socket set @BenThompsonCM!


That’s enough for before breakfast. This photo looks very similar to the first one from this morning but actually all the membranes are fixed now, they were mostly just hanging ready to be fixed when I started. Now got to do under partition detail which will be tricky. 🥣 first!

All the bays done with wind-tight membrane now, need to do detail to hold floorboard ends at partition and wall edge, then I can start chucking insulation in. Nice to see progress!

Partition coming along nicely in between playing Star Wars with my daughter and moving clothes into the shipping container on our drive!

Had to put skew nails in one end as ruined two nails going in from other side of joist (which is usually much easier). Think there was a knot in the dwang I hadn’t spotted…


Bit more squeezed in after dinner with a bit of help from a friend. Edge and partition detail nearly complete, insulation going in. Time for 🛌


Bit of early morning tidying (spent a lot of time yesterday looking for stuff!), cable rerouting (again!) and working out how to deal with the very corner of the room here. Figured something out that’ll work.
Time for 🥣, then a 🚴 race for the kids and a 🏃♂️ race for me.
Time for 🥣, then a 🚴 race for the kids and a 🏃♂️ race for me.


One day the house will be finished and I will be able to enjoy these hills again properly. 😢

This last dwang/noggin in the corner was tricky. Bent two nails despite drilling pilot hole (knot?) so ended up putting one in from above.
Is there a way of getting long (100mm) chunky (4.5mm) nails out if they bend? Claw on hammer and crowbar no good as nails too long.
Is there a way of getting long (100mm) chunky (4.5mm) nails out if they bend? Claw on hammer and crowbar no good as nails too long.

Bit of insulation in some gaps that will be difficult to get to then finished this off. Noggins/dwangs plus big chunky bit of timber to hold vertical load (footfall and partition above), 12mm ply to go over it all (once insulation+airtightness in) to provide diaphragm strength.


All but one bay filled, a bit of thinking needed for the last one, otherwise a couple of fiddly jobs then airtightness and floorboards. Progress.


Not much time this pm, worked out how to reroute a cable (need to get all cables out of floor but maintain power to house, not easy when wiring is a haphazard mess!) & chopped a radiator pipe to free up a hole for cable! Tired after yesterday though. #Earlynightsareclimateaction
Getting the airtightness membrane under the partition wall. Will try and get this detail finished tonight so can start putting floorboards back tomorrow.


There’s going to be a proper fiddly bit of airtightness taping to be done under the partition where it meets to other partition wall.


Cleaned up surfaces ready for fiddly airtightness detail under partition, added another width of membrane then careless crowbar injury ends play for now. Time to spend a bit of time with my mum who’s visiting.


Managed to figure out a good way of doing this tricky detail.


Ply tying these two joists together at partition so boards don’t have to go under.

Floorboards going back down today hopefully.🤞🏼

New roll of Vana day!

Still no floorboards. The mountains were calling and I had to go…


Cracking sunset.

Woke up fretting about a few instances where batten holding membrane is fixed very close to edge of membrane (trying to squeeze 3 bays out of 1.5m wide membrane, & joist spacings irregular). This is holding insulation off the ground so v important. Did a test rig, seems fine.

Ready for floorboards though.

Another cracking day here.
This is first airtightness detail I’m expecting to leak a little. Several leaky buckets inside each other here (two separate attempts to close hole) Can’t figure out a better way. Hopefully not too bad. 🤪


My wife’s up there now. ❤️ 💪 🏃♀️

Enough for today. A dozen boards down.

Done as much as I can in sitting room. Time to get going on dining room.


Some of these are too short to span between joists so will need replacing (have some spare from where window seat is going to go and can floor with chipboard as will be hidden). Hopefully can keep dragon intact!


First two boards down. Family stuff now though.

Slow work as quite a few replacements needed to be carefully cut from spare boards, but so far have managed to keep the dragon 🐉 intact. 🤣


Enjoyed listening to @the_woodlouse and @JNaturalBuilder (buildingsustainabilitypodcast.com/why-should-we-… ) while prepping floor for more boards. Have got to crux of retaining dragon, wasn’t able to keep lengths to meet joists. Some thinking required…


Does anyone have experience of joining two boards where one is too short? Fix something to underside? I have 12mm of space to play with between board and membrane. 12mm ply screwed into underside of boards? Metal plate doing the same?
Think this should work. Feels solid underfoot, no different to other boards, tongue of next board should help stabilise it further. Coincidentally this board is screwed down to be liftable since it’s where cable runs, so if it doesn’t work longer term can lift and replace.


Dragon slowly re-emerging! Can’t put more boards back till I’ve lifted the rest of boards in this room so I’ll call it a night there. Tomorrow: tidying up, punching nail heads under boards then lifting some more boards. Gonna be some interesting airtightness where stair lands.

Nails punched, room tidied (including kids favourite hidey hole under the stairs), time to get breaking stuff (lifting boards) again.


Only one more board lifted, tricky as double nailed through board rather than tongue. Time for other stuff.

Oh I got hidey hole out too. Also a bit tricky.

Back at it today after a weekend off. Going to leave the boards under where the stairs lands, and tape membrane under to maintain the airtightness line. Going to be tricky!

Got nearly all the remaining boards up in my dining room/living room (some boards run through the doorway). Cobwebs 🕸 always a good sign of air movement - here cos of sub-floor vent.


Done very little in last few days, but got all afternoon & two new podcasts (@the_woodlouse with @JNaturalBuilder on building with straw (podcasts.apple.com/gb/podcast/bui…) and @TransitionShow on expanding electricity transmission (xenetwork.org/ets/episodes/e…) so bring it on!
Getting this off is a right git. Need to get it off to complete wall edge detail to hold floorboards (and airtightness membrane) out of cold part of wall (here’s one I made earlier).


Adding some membrane before dwangs/noggins and new edge bit.
Wanted to get further than this today but still good to see some blue stuff going in again. Been a few weeks. Time to take the kids to running club in the pissing rain. West coast life! 🌧 💨

Up early this morning to get this edge detail finished (photos show sequence). Time to sort the bikes for kids 🚴 club then back on it. Should be able to get floorboards back down to edge of green airtightness membrane next, then start insulating rest of floor.


New bike day for my eldest. New bikes are always lovely! @neviscycles

Note to self; make sure all bits of membrane are same length to avoid having to bodge together off cuts like this.

Bit stoppy starty but got 5 more floorboards down, including a tricky joint not over a joist. Easier this time as I saw it coming so could put a length of 12mm spanning between the joists. Dragon coming back together. #EnerPHit #Passivhaus


Up at the 🏡 working out what needs to be done tomorrow. Had a dig around by the old warm air heating duct. Ventilation under the floor is really important to ensure timbers don’t get damp & rot. Heating terminal, which is prob original (‘75), blocks one of underfloor vents. 🤦♂️


Clearing out the floor void so I can start putting the membrane in, insulate and finish off the living room and dining room.


Ugh, looks like this vent (which was previously blocked by air heating terminal) is also blocked on outside. 😑


Getting the cables out of the floor and tidying up before putting membrane under each bay. Need to mouse-proof some vents first though.


Had forgotten what a pain of a job this was. Getting masonry plugs around air vent so can cover with 🐁 proof mesh.

Family production line; getting the ply extensions on the joists to allow an extra 100mm of insulation & meet the #EnerPHit component method U-value of 0.15 W/m2K. Kids actually really useful if pick right job for them: eldest marking out correct dims, youngest handing me nails.


Detail at floor-external wall junction perpendicular to joists. Keeping membrane clear of DPM.


Spent a while thinking about the best way to achieve airtightness under where the stairs land. Having my kids helping me with this was really useful (don’t worry they were enthusiastic participants). Lot of tape but I think this should work. #Passivhaus


Productive afternoon with a friend helping out. Finished airtightness ‘skirt’ around stairs, removed one side of a doorway and added membrane and insulation to 5 bays. 7 more to do but trickier where goes under stairs.


Only had an hour this afternoon, but feels important for morale to get at least a bit done each day. Last mouse protection for this side of 🏡 in & put most of the ply extensions under the last joists. Finish extensions and add membrane tomorrow, floorboards back at weekend? 🤞🏼

Squeezed a couple of hours between @johngilbertarch work this morning and meetings this afternoon. Membranes ready on each joist to be fixed with battens.

Getting the wind-right membrane (blue) under the stair airtightness ‘skirt’ (green) pretty awkward. Should’ve left finishing the airtightness till I’d completed the wind tight membrane. Sequencing lessons.


Enough for today. Four more bays complete, 3 more to do tomorrow. Then edge details, insulation, airtightness and resurrecting the dragon!


Up and at it his morning as hoping to get back out into the hills with the kids later. Fiddly and annoying job extending membrane where I’ve cut it slightly too narrow to span between joists.


Two more bays to finish. Run out of screws… 🙄

Plans for getting loads done on the house this weekend derailed by exceptional weather in the 🏔
Great family mini adventure sleeping out. Phenomenal moonlight.
Great family mini adventure sleeping out. Phenomenal moonlight.


#astronomy peeps. Any idea what these three planets in a row are? 1730 last night, looking SW from Aonach Mor to Ben Nevis.

Onwards. Time to batten the last two membranes into floor then add insulation.

Very fiddly taping to ensure membrane is wind-tight *and* air path under it is maintained with chance in levels. More air coming in here than anywhere else I’ve found under floor so keen to maintain that airflow under the insulation.

Getting insulation packed in under the stairs. Another time I’ve been glad to be using loose-fill insulation. Think it would’ve been fiddly to do well with batts.


#WinterSolstice2021 has got me thinking about importance of daylight. I've not previously been too bothered by SAD but this year has been different. Cabin we're staying in while I #EnerPHit 🏠 is not well lit. Glad retrofit will improve daylighting in 🏡 - all rooms well daylit.


Squeezed a bit of edge detailing in while listening to my @johngilbertarch colleague Barbara dropping some #retrofit knowledge. open.spotify.com/episode/1i7YhZ…

Had a week of 🌫with no🌞 down visiting family in Derbyshire. Got back to #Lochaber in time for some rays yesterday. Back on the #Passivhaus #EnerPhit #retrofit now, edge detail for boards by stairs ✅, time to insulate all this. Hopefully boards back down in next few days.


I’m between Lego with the kids been getting the insulation in. Nearly done with that, then airtightness membrane and floorboards.

In between…
Good rule of thumb when looking at insulation is to ensure there are no gaps bigger than 3mm anywhere around them. No gaps at all better still!

Finished off the insulation and getting the airtightness membrane down.


Trickiest bit of taping under the wall was getting the membrane clean (tape sticks better without dust). Managed that ok though. Also a little fold in the membrane ‘skirt’ around the stairs that needed an extra bit of tape to block off air path.


Measure twice, cut once. First bit of membrane was too long so I cut next one 10cm shorter. Slightly too short 🤦♂️. Will need to add another strip to allow me to tape this to the new window frame.

Getting there. Time for lunch.


Edge detail at partition to hold floor together at linear join (boards previously went under wall), then a short 🏃♂️ with my son. Time to see if I can get a few floorboards down before the day is out. That’d feel like progress.


Seems like I may have been tired/distracted when numbering these boards. 🤔 🤦♂️

Sorted, my numbering is all over the place!

Complicated butt joints/dragon alignment/cable run faffing meant first board back down for a while will have to wait till tomorrow. Ho hum.
Few boards down this morning. For some reason this feels more like progress than getting membranes and insulation in! Quite fiddly with the dragon…

There’s more effort going into saving this dragon than real endangered 🐘 🦏 🦒 I’m not even sure if we actually want it!


Have made it back to the stairs. I’m going to have a bit of a gap between boards to fill with a feather here. Should maybe have started at the stair as a fixed point rather than other way round. Should be less faffing with joining up small bits of board for a while now. 🏃♂️first.

Original target was floor in dining and living room finished by Christmas. Good weather put paid to that. Not going to make new year either ☹️ oh well, maybe before the 3rd? Time for 🎈 🥂 🎉 happy new year everyone! Hopefully this thread will be done before 2023! 🤣

Dragon coming back together!

Some fiddliness this morning resulting from two different types of 12mm ply being different thicknesses (one closer to 11mm, the other closer to 13mm), and the edge detail I built to abut the stairs being a few mm too low.


Not sure what I’ll do to neaten up this join, maybe skirting board? Ideas welcome. I had wanted to push the boards much closer but I couldn’t cut the full depth of the post as it was full of nails.

Moved back to living room now. Needed to re-thread this cable as layout changed slightly & what I’d left previously wasn’t long enough. Not sure I’d do the 12mm higher floorboards with cables underneath if I was doing it again. Added to ‘not sure this was optimum solution’ list!


Insulation and airtightness finished on main bit of floor now, 12mm spacers on joists added, few more floorboards going back on after lunch. Thankfully no dragons to battle with in here! 🤣🐲

Some good progress this morning. Hopefully go ‘through the doorway’ and finish up main bit of floor (not bay window) today. Time for a 🏃♂️ and to help rest of family off to Edinburgh.

All slowed down quite a bit with linking the two rooms. Big gap to fill at a later date.


Trying to piece together last bits of jigsaw and make sure I’ve enough in-tact bits of floorboard to make it work. 🤔

Having to do quite a bit of these bracing bits of 12mm ply where ends of floorboards no longer line up with joists. Fiddly and slow but passes the bounce test and hopefully should allow me to not have to buy any more boards (would be super annoying for 1 or 2 boards).


Nearly missed this hole in the airtightness line (from where I put then removed a screw), that would’ve been about 1/20th of the total leakage area on one of @MarkSiddallRIBA’s projects! 🤣 #Passivhaus


That’s enough for today. Slower than I’d hoped so not quite finished floor, but the dragon is complete again, except for gap that will be dealt with later.


Nearly there. Half a board to do then finished. Need to stop 4-8cm from wall as going to be adding 40mm of insulation and a service cavity.

Many thanks for the late Christmas gift @passivhausnews, these have been keeping energy levels high on my #EnerPHit project!

Good to get a bit of sunshine, first time for a while!

Last half board to fix (top left of photo) It’s going to be quite tight with nails! 🤞🏼


Done. Time for a run before sunset. Literally used the last nail. Would’ve had one spare but it buckled on 2nd to last joist!


Now that I’m done with the floor in the living and dining room (well, got to bury nail heads with a nail punch & tidy up), thoughts are turning to the rest of ground floor (kitchen and utility room). Don’t think we’ll go for exposed boards in there because cooking spillage & mud.
But I think I will use the existing boards as the structure.
What are good options for easy to clean, splash proof, low env impact, healthy (low VOC I guess that means, but maybe more to it than that) coverings for timber floors?
#Passivhaus #HealthyHome #IndoorAirQuality
What are good options for easy to clean, splash proof, low env impact, healthy (low VOC I guess that means, but maybe more to it than that) coverings for timber floors?
#Passivhaus #HealthyHome #IndoorAirQuality
Bit of moving mess from one room to the other and sorting this morning, before starting on the kitchen and utility rooms. Hopefully should let me use the sitting room as home office too, and increase the amount of daylight I get!


One tidy room. Also knocked all the nail heads under the surface ready for sanding (though that won’t be for some time yet). Time for a trip to the recycling centre, then starting on a new room. Gulp!

There used to be a door here, not sure when it was filled in. When it was insulation was put in right up against block work, no ventilated cavity. Result = lots of damp and mould. Would be fascinating to take this apart with whoever did it.


Had a bit of a break from Twitter as life was all getting a bit busy. That’s clearing a bit now so I’ll restart my #EnerPHit #retrofit mega thread. Done quite a bit in last few days. Allow me to share a few of many ‘they did what!?!’ moments.

First of all the wall next to the previously mentioned former doorway, and under the toilet window. Lots of mould, no big surprise there.


Removing the insulation (15mm!) revealed the studs were sheathed not with ply as in the rest of the house, but with floorboards! Not only that but the studs had been extended to push wall out. Looking externally blockwork looks new here, I guess it was originally a timber finish.


But when they blocked up the doorway they also added an external blockwork wall outside this bit, but with insufficient space between it and the original timber wall. = damp problem at base of wall. Also a gap big enough for both thermal and mouse bypass!

Wherever you find cobwebs you know there is air movement. People often worry about making their homes too airtight, but air movement from the warm side to the cold side often means damp and mould. This is air leaking under window cill.


Today’s ‘they did what?!?’ moment was realising that the weird bit of wall between the porch and the main house was not original, and when they put it in they didn’t insulate it. So there’s an uninsulated wall between the cold porch and the main house. More mould. 😋


Next mystery, to be solved this week, is why there is a square section of concrete in the floor where everywhere else is suspended floorboards. Is it solid? If so it’s going to be a total pain to sort out. 😳😳😳

Today’s ‘they did what?!?’ is this glazed door installation. Timber has been used to close the cavity & the frame is sitting outside the studs. The door has effectively been installed outside the thermal envelope. Sketch plan to show what I think is there. #EnerPHit #Passivhaus


Also, given there are holes in the cavity closet ther is a direct connection between the ventilated cavity and the indoor space. Breezy! 🌬
Also risky from a fire safety point of view, as I understand it.
Also risky from a fire safety point of view, as I understand it.

Turns out when they built this new wall between house and porch they did add a small amount of insulation, but it was for keeping mice out rather than heat in. Doesn’t look like it worked very well though… 🐁


I’m not feeling very optimistic about what I’m going to find when I pull one of these boards up… suspect there’s going to be a full depth concrete block that needs dealt with. 😬 😱

Lifted this board and thought ‘ooh, there’s actually some insulation’ then remembered that I put it there, from the other side of the partition… 🤣🤦♂️

Yup, full depth, but seems to be made of blocks so maybe once too is broken up it’ll come out without too much difficulty.


Too = top
Right, moved a couple of kitchen cabinets & worked out roughly what’s going on under floor. That’ll do for today. Bit of 1970s wallpaper uncovered behind the cabinet. Although maybe not original, unless I was wrong in my previous deduction that weird entrance was a modification.


Up and at it early this morning. Feeling daunted by how much still to do before builders start on windows and upstairs. Car full of waste plasterboard and timber ready for a recycling trip run.

Still a bit puzzled as to why the mould is much worse in these two bays. Getting cooled by proximity to soil vent pipe?

Quick trip to recycling centre turned into an epic. I was just getting annoyed at irony of folk leaving engine running while doing the recycling, then got back into my car to find it wouldn’t start…
Some sort of key-car communication breakdown. Rescue vehicle on its way… 😱🤦♂️
Some sort of key-car communication breakdown. Rescue vehicle on its way… 😱🤦♂️

Well today hasn’t been the whirlwind of getting house stuff done that I’d hoped for. 4.5h spent stuck at recycling centre with a car that would turn on but not let me drive. The last hour with this going constantly. Still not sorted, but I’m home at least.
Back on it for half hour before playing ‘frustration’ with my daughter. Feel like I’ve been playing frustration all bloody day! 🤣
Toilet cistern overflow, open to air both inside and outside the house. Another single item that will be more leakage than the whole of Larch corner. This will be coming out, but needs an angle grinder so will have to wait till later. #Passivhaus @MarkSiddallRIBA @WoolleyMick


Got it out.


“Hey lads, there’s a risk condensation will form and drip from these pipes, or they’ll leak, what shall we do?”
“Stick a bit of polythene over the sole plate, that’ll sort it”.
😳😳😳
“Stick a bit of polythene over the sole plate, that’ll sort it”.
😳😳😳

Stripping the last ground floor window so I can get accurate dims for @G_B_Store window order. Pleased I did as structural opening is actually quite a bit bigger than estimated before stripped it back - installation packed out with timber under cill.


This installation is even worse than the one I tweeted about a few weeks ago - frame is completely in line of block work instead of timber frame (thermal bridge) and no attempt to close cavity for either draught proofing or fire safety. Don’t think window is even that old. 😳😳😳

Clearing out clothes from 🏡. Found this T shirt from when I raced for 🏴 at a home intnl in 2005/6. But main memory is that I wore it when I ran the Cuillin ⛰ record a year later. Bit horrified to see I was promoting fossil fuels! 😳luckily I only saw 4 people the whole way. 🤣

Morning taking the kitchen out with my nephew. Good progress. Should be able to start stripping the walls this afternoon. Got a proper storage problem though…


Some excellent airtightness details 🤣🤣🤣, and some mould.


Another one for uou @BethWilliamsSE, stud notched to fit socket. It’s not like it’s holding the roof up or anything…


Usual mix of mouldy and not so mouldy, mouse eaten and not so mouse eaten, mapping well to the spaces where air and mice have access via sockets and electrical conduit into the floor.

Good to get another wall stripped before bed. Lots of non-compliant wiring here I believe!


Sod it we decided to do most of another too. Good progress today. Big clear up (backlog as haven’t had a car to get to dump, friend is helping tomorrow with a pickup) then hopefully get some floorboards up tomorrow.

Does expanding foam do this with age or is this rodent damage?

Starting to think this indent at entrance is original (feels quite old when I take it apart. Seems crazy to build like this though - more wall to build, more heat loss, less floor area.


Floor starting to come up, plus a view down the ventilated cavity.


Waste water/sewage question. Given that when I’m done floor will be airtight and wind tight, it’ll be annoying to ever have to lift it up. How do I redo (or do I not need to?) these waste water pipes to minimise risk they’ll ever leak? Not sure yet where final exit from bldg is.

Damn just realised I should probably be cautious about there possibly being asbestos in this concrete plinth. Had planned to get it out with a breaker this afternoon…

Cube of concrete in otherwise suspended floor. Big headache 🤕

Kitchen floorboards all up. Few electric headaches to sort then start getting membranes in again on first few bays before have to deal with waste water headaches.
More concrete that’s gonna need removing, and possibly testing for asbestos first. 😖

Managed to get breather membrane into one bay. Edge detail tomorrow then insulation. Avoiding tackling asbestos problem for now!


Edge detail going in this morning.

Edge detail done. Plan for day: bit more insulation in then some mouse proofing, then membrane two more bays then thinking about what to do about concrete/asbestos risk and waste water pipes. Every day’s a school day!

Decent day yesterday, finished edge bay, did one more & started prepping a 3rd, and prepped a load of joist extensions & battens with my son.

Up early this morning re-reading asbestos CPD notes. Poured concrete doesn’t appear on list of products likely to contain asbestos, think I might be ok to crack on with breaking up these blocks of concrete…


Game on…

Wife and kids came up to sort some stuff which put paid to loud dusty stuff for a while so membraned another bay then did a bit of concrete breaking, then dinner cooking and kids club runs. Getting another 15 minutes of breaking in now.


Big job!

There’s a lot of crap in this concrete.

That’s enough for tonight. Seems quite a lot softer under first 20cm so I’m hopeful it’ll be quicker when I restart. Wonder when my teeth will stop vibrating? 😬

Time to get a shovel on this. Gonna need a lot of rubble bags!

Got excited when broke through and thought it was hollow underneath, then realised it’s actually just some of the old warm air heating ducting. Not hollow underneath I don’t think. 😥

I could do with some more of it coming out easily like this.
Time to cook dinner.
Time to cook dinner.


Had some help this afternoon so made some good progress. First concrete block is out, got another bay membraned and started insulating. Gonna be a structural headache about how to rebuild the floor here.


Paused the retrofit for a rare alpine day in Lochaber yesterday, on the ⛷ with my kids and various friends. Very social up there when the weather’s like that!
Not sure how much I’ll do today but hopefully get this wall down.
Not sure how much I’ll do today but hopefully get this wall down.


Hmm, stripping both sides of this wall revealed some electrics that I didn’t know was there. Will have to wait for electrician to come round and move consumer unit before fully removing these two walls. Gonna cut the bottom off them to allow me to continue with the floor.


Puking child stops work for today. ☹️
Not the DIY I’d wanted to be doing this evening, but the electric hob in our Airbnb cabin (where we’re staying while I #EnerPHit the house) had a small electrical fire last night, so I’m taking it out and replacing with induction hob from the house (which I recently took out).

Any tips for removing back plates of IKEA kitchen cabinets so I can access socket for hob? Was easy when removed hob from kitchen as didn’t have to be too careful with units as was replacing anyway.

Hmm, induction hob is a couple of mm wider than old hob and cable much thicker. Not gonna get this finished tonight, needs some thought.

Scene of yesterday’s small electrical fire in the hob. Explains why I could see flames through the glass! Any ideas why it would do this?

Work on house derailed a bit recently by illness (son’s) then hob breaking then ⛷
Fitting a wee bit in this morning before some @johngilbertarch work this afternoon to catch up from yesterday’s skiing. Can hopefully sort out some of👇mess of missing joists (where concrete was).
Fitting a wee bit in this morning before some @johngilbertarch work this afternoon to catch up from yesterday’s skiing. Can hopefully sort out some of👇mess of missing joists (where concrete was).

This mortar looks alarmingly like 🐶 💩 !

Do I need to wait for the mortar below each course to set before I lay the next course? #Retrofit #DIY

Two courses of dwarf wall laid, now need to wait for timber to dry out before I add it (on top of new DPM) as need to tape wind-tight membrane holding insulation to it. Also out of 💦 so can’t make any more mortar (burst main today!). Time for lunch then @johngilbertarch work.


Hmm, seems my handiwork from yesterday was mostly wasted. Damn. Got a bag of ready mixed mortar mix for free cos half of it had got wet and solidified already, assumed rest of it was fine and I only needed small quantity…
Guessing that assumption was wrong and I mostly just put wet sand between the blocks 🤦♂️ that would explain colour @the_woodlouse!
This is the solid bit already in bag.
Most frustrating bit of doing stuff myself isn’t being slow & having to learn, it’s having to do stuff twice.
This is the solid bit already in bag.
Most frustrating bit of doing stuff myself isn’t being slow & having to learn, it’s having to do stuff twice.
Cracking day here. Thankfully got out for a 🏃♂️ up a hill earlier. Time to re-lay this dwarf wall, with mortar rather than just sand this time!

Still got that 🐶 💩 colour to it. Hopefully there’s a bit more cement in it this time!

Not had a lot of days like this this winter.

Not the neatest job but should do the trick, and better than what I did the first time (even if the mortar had worked). Reminds me of my grandad’s story of leaving the only copy of his PhD thesis in a taxi and having to rewrite, was all the better for it apparently!

Addendum: it was my grandad’s MD not his PhD (he didn’t do a PhD).
Ugh, not sure I have the stomach for more of this shit.

Paranoid about leaving important tools under the new floor. This pencil is the most important I’ve found so far!

Not setting this time either. Last time I thought it was cos all cement had gone off (bag leaked & got wet) but this seems just same. Was quite cold when I did it but pretty sure above the 5° min recommended on pack. Could it be that? Will leave overnight and see how is in morn.
Apparently it’s meant to be red/brown (mkmbs.a.bigcontent.io/v1/static/B081…) so that’s maybe not so alarming. But also plenty of folk having problems with it being too sandy and not setting. Will warm room today and see if that fixes it, otherwise redo mixing own 3:1 sand:cement mortar. 😠
Beautiful morning from office (in half-retrofitted living room). For now we occasionally get this beautiful frost on outside of windows because there is no heating on. In future we’ll get similar because super insulated @G_B_Store windows let so little heat out.

Emptied out all of ready mixed mortar. Seems very homogeneous, so unless that’s hard to determine by eye I don’t think the mortar problem is a mixing problem. So it’s either a dud batch with too much sand or it’s just taking ages to set.

24h after laying. Hard to push against but crumbles when rub at it. Opinions? Remember manufacturer says colour should be red/brown so don’t worry about that.
Thanks to @davemacleod09 for asking me question about M6 that sent me hunting for info and finding out this stuff is usually this colour.
Wow, fixed windows really are a tonne cheaper; specify them wherever you don't need opening! Only 2 modest sized Progression on 1st floor of our 🏠 can be fixed, but would save us £800 compared to opening (33% cheaper). #Passivhaus #EnerPHit
Now just how much is being able to clean them easily (first floor remember) worth?...
New foundation bit coming along nicely. Decided mortar was ok, seems to be hardening up nicely. Thanks @RobbieBellshaw !


What was a block of concrete can now be insulated properly as part of our suspended floor.

Could be that first slab was just a warm up. Should know better what to do second time around though…

First new bay in a while. Gonna get more complicated where they stop being simple single joist spanning whole distance.


Robbie did an awesome shift on this slab. Bulk of the heavy work here done I hope. I’ve been doing some fiddly membrane origami. Time for food, relax and bed. Passivhaus 🏊♀️ pools again tomorrow.


Not a lot of time today but keen to do a little bit each day to keep (psychological) momentum. Finished one fiddly bay and nearly another mini one.


Finishing touches to these bays. Quite pleased with how this is going now.


There used to be a lot of thermal mass here. There will soon be a lot of insulation instead! highlandpassive.com/index.php/how-…


Started the day with a bit of sliding with my eldest son, then some retrofit. Taking out last of floorboards then building a base to support end of flitch -beam that is going to replace wall when we make it open plan.


We’re going to remove this wall to make it open plan between kitchen and dining room. Currently the wall isn’t actually sitting over the foundation wall (close, but not quite), hence new strong bits above foundation wall at each end.


Top tip. Don’t buy wood that is 2.5cm bigger than you need.

Doing some more breaking of this slab at the rear entrance to house. Electricity conduit (have switched it off) and waste pipes cast into concrete, is that usual?

Some good structural bodging for you @BethWilliamsSE.
I thought this joist (pic 1) was sitting on foundation wall. It’s not, quite (pic 2), it’s just supported at each end as shown in pic 3, and it’s holding up the ends of 4 other joists as shown in pic 4!
I thought this joist (pic 1) was sitting on foundation wall. It’s not, quite (pic 2), it’s just supported at each end as shown in pic 3, and it’s holding up the ends of 4 other joists as shown in pic 4!


Thankfully coming out in big chunks.

Rest of this should come out easily I think. And I think I know what I’m going to do with the door threshold and waste pipe.

All ready for repurposing in @BenThompsonIS’s driveway (not the sledge or timber).

Loaded up another few rubble bags and dig out at least some of the doorway to same level of rest of floor. Bit by bit…


Complete lack of attention to air and wind tightness on existing living room window installation very evident when the wind blows (turn the volume up). All I’ve removed so far is the plasterboard. There’s some sort of membrane but it’s evidently not been taped to the 🪟 frame.
Bit more digging out the floor under the main entrance this evening. Keen to make some progress this weekend.

Amazingly the white waste water pipe (kitchen sink, dishwasher and washing machine) doesn’t seem to be properly connected to the main waste pipe at all. This could’ve been damaged while removing but looks longer term than that. Yum!
Presumably this grey pipe connects to the sewer somewhere. What should I expect to find if I keep digging down? Do I need to?

Good how this ventilation brick was just hurried under concrete!

*buried
Got the level here to about same as rest of solum. Think next jobs is going to be removing floorboards in rest of this kitchen/utility side of house.


Definitely time to stop using the toilet in the house till this is fixed! Guessing it wasn’t quite as bad as this till I properly decoupled it or else rubble would’ve been a lot wetter.
This is just the taps running, btw.
This is just the taps running, btw.
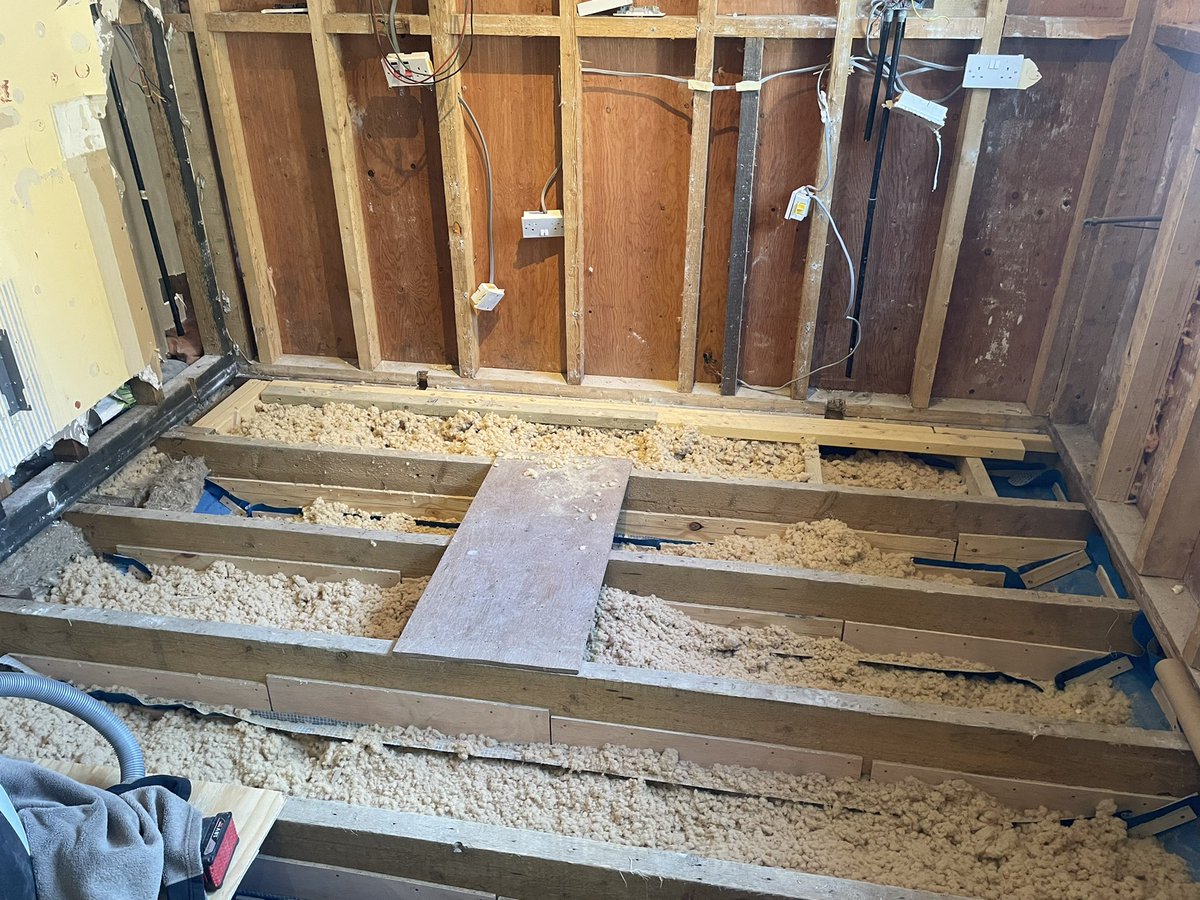
Morning spent lifting floorboards. Interesting discoveries; Heating pipes going through bottom of wall to oil boiler will be a good opportunity for more solum vent. Not sure what the person who put this little bit of insulation over the pipes was thinking. Nice bed for 🐁 though!


This plastic covering to the kitchen floorboards. Reckon I can just peel it off and sand later? Opinions on oiled floorboards for the kitchen?


Bit of tidying then some more floorboards up. Hoping to get all these up plus a load of rubble to friend’s driveway today.
Late to the party I know, but I’ve been enjoying @GeorgeThePoet’s podcast while I work. Absolutely outstanding. bbc.co.uk/sounds/brand/p…
Late to the party I know, but I’ve been enjoying @GeorgeThePoet’s podcast while I work. Absolutely outstanding. bbc.co.uk/sounds/brand/p…

Stead progress. Dining room, where I’ve already finished the floor, piling up with stuff. Need to be more ruthless about what I take to the dump!


Stop start day juggling family and retrofit but have got all the boards up.

Anyone got any idea why they would’ve built the floor different around this old door opening, joists span floor elsewhere but extra few sleeper walls here to form a square and deeper solum under threshold.

Similar around the other entrance, subsequently filled with rubble and concrete, or maybe at time of build, no idea why in either case.

Been thinking about what to do with base of old door detail here. Bottom of cavity elsewhere is much lower so moisture doesn’t sit next to timber, as it can here. Previously exacerbated by insulation being flush to blockwork. Need to put in a full height stud & breather membrane.


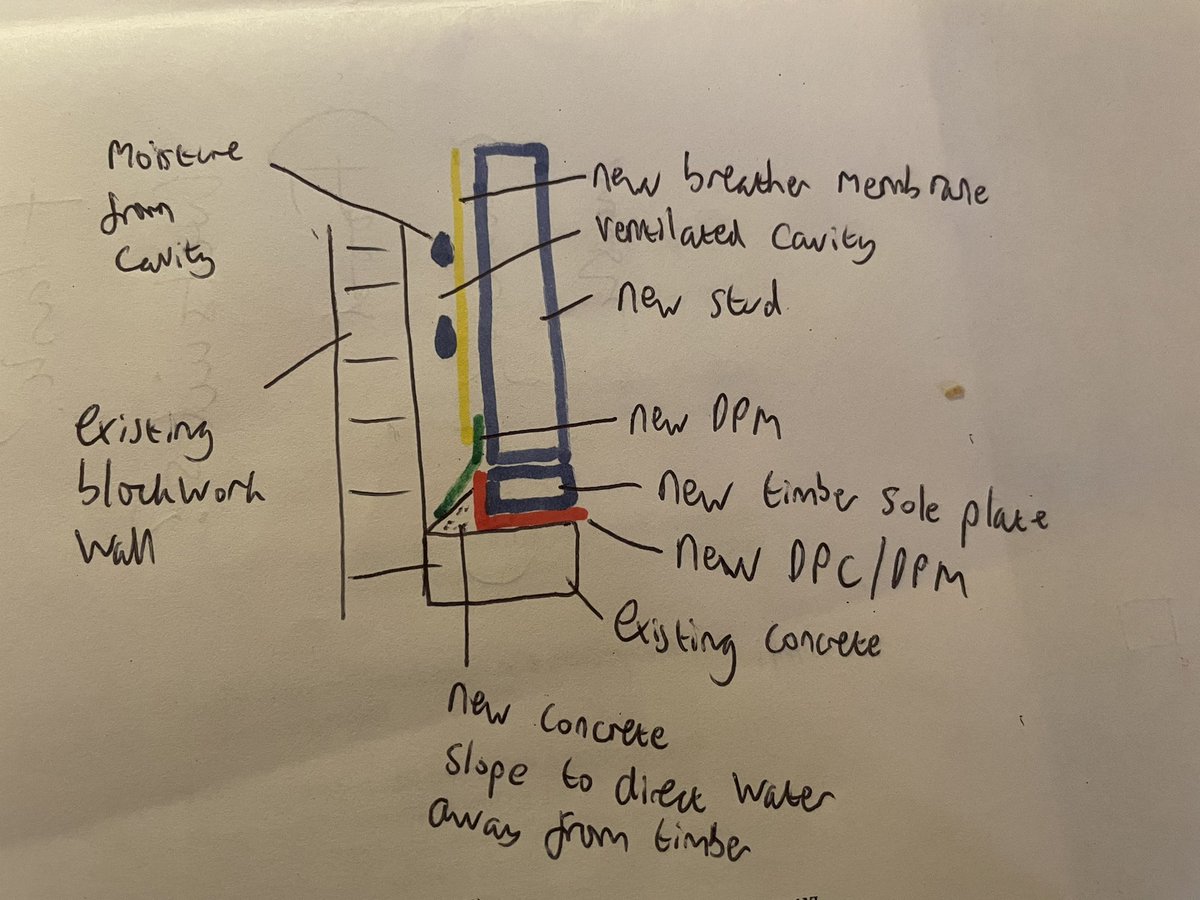
I think this should work. Take out existing frame, put in a DPM, build a little sloping bit of concrete to direct water away from timber, and carefully overlap breather membrane and another DPM to direct away any water running down breather membrane.
I’m removing all the heating pipes from under the floor. 2 questions:
- how are you supposed to dispose of the water from heating systems?
- need to remove and dispose of old oil boiler and tank. Guessing that’s a ‘call a plumber’ job?
- how are you supposed to dispose of the water from heating systems?
- need to remove and dispose of old oil boiler and tank. Guessing that’s a ‘call a plumber’ job?

Today’s ‘every day’s a school day’ moment was cutting one of the pipes to the oil boiler. Took a couple of complete soakings before I realised it was mains supply for hot water, not closed circuit for radiators 🤦♂️🙄. Incoming mains water now off and I’m listening to Wet Leg.


Presence of cobwebs a good indicator of airflow. Larger cobweb suggests hole for heating pipes does more to vent floor than dedicated air vent. Not surprising looking at outside part of it, small slits, half of them covered by render.


Building a little dwarf wall this evening to allow me to turn this section, previously a concrete slab, into an insulated suspended floor.


Long shift this evening. Bit of help from the kids, completed new joists for suspended floor that was previously concrete, got electrics out of floor void (well @RobbieBellshaw did) and prepped a load of ply joist extensions and battens for insulating.


Early start clearing crap from solum, adding joist extensions and sorting some temporary electrics.
In other good news the tiles over kitchen floorboards are not asbestos. Happy days.
In other good news the tiles over kitchen floorboards are not asbestos. Happy days.


Getting back up to speed with membrane installation. There are a lot of little things that help this to go smoother and I forget them in between each bout. There are a lot of bays to do but I can’t do some of them till plumber has been (remove oil boiler and sort waste plumbing).


Cracking weather so I’m avoiding looking out the window too much so I don’t go green with envy.

Four more joists extended. More membraning after lunch.

Couple more bays membraned, couple more sections prepped for when plumbing done. Run out of Solitex so that seems a good place to stop for today.


Massive egg whisk is out again for the insulation.

Adding 280mm of very fluffy insulation where there was previously only draughty floorboards still feels very visceral. This is going to make such a huge difference. It’s going to be a completely different house to live in.

Few more bays filled after work today.


Couple more bays filled and started laying the airtightness membrane. Bit patchy for now as I’ve run out of the membrane holding the insulation so there are lots of gaps for now.


Going to be taping penetrations through the floor rather than grommets (soil pipes, waste water from sinks, incoming water) so I thought I’d practice. Learning points: cut tape into thinner strips, tape onto curved surface before flat surface, careful of creases. Might do a 2nd.

This is like a version of ‘floor’s lava’ for grown ups.

Getting there. Another two bays done. Time for a bit of airtightness then cooking.

When I did the living room floor (months ago! 😬😢) I left this bit of airtightness to be fixed from the other side. I’m now at the other side. Luckily I remembered!


Viewed from underneath. Needs a bit more thought…

A few days ago @sallyhinch asked about settlement of the insulation over time. Hard to see here but this woodfibre insulation was put in a few months ago, in the living room and looking at it under a partition. Still up against airtightness membrane, so no settlement here so far.

Got another bit of airtightness membrane down, prepped some battens for raising the floorboards (we’re running electric cables & hot water under there), prepped tricky airtightness detail around partition for tomorrow and fluffed up some more insulation, with a bit of help 😀


Worked out a detail for this massive hole. Had previously rejected this as worried about air leaking along length of join between two horizontal bits of timber, sorted that by taping along whole joint! Working out what I would do at external wall helped realise this would work.


Quite a bit of progress today. Getting there. Hopefully get to putting floorboards back this week.


Big shift this afternoon/evening with @RobbieBellshaw. Plumber came earlier and sorted waste pipes from sinks, washing machine and MVHR unit (for condensate). Finished an edge detail and extended almost all the remaining joists ready for membrane and insulation. Time for 🍵 & 😴


Only managed a short stint tonight before parent duties. Mouse proofing the hole where the heating pipes came through the wall from the oil boiler, so I can use it to add a bit more sub-floor ventilation.

Son usually cycles to beavers 🦫 on Thursday, which is a mile away. Tonight it’s in Spean bridge, 13 miles away, but he absolutely insisted he wanted to cycle it. We’ll see how this ends up…

News just in. Lovely cycle there, was torn but decided to ask for a lift back. Probably wise, fall out tomorrow morning could’ve been messy otherwise!
#plumbing question. Plumbers installed this sink waste pipe on Wed. Shortly afterwards (few hrs) I did membrane & edge detail. Absent mindedly twisted it out of way before joint glue had set. Then twisted back into position. It’s now set, will it be ok or do I need to redo?

Is there a robust way to test it? Just pour water down it and see whether it leaks?
Mostly mouse proofing vents tonight. Gonna be some fiddly membrane installations tomorrow…

Good morning!

Good bit of progress this morning, and prepped for some more. Time for a 5 year olds birthday party and perhaps a bit of ski mountaineering with the 10 year old. Back at this later.


Good bit of kick turn practice. Quite firm!


From delicate kick turns to delicate membraning. Really fiddly around these irregular joists.


Some fiddly wind tightness around this soil pipe. Airtightness on top should be simpler as flat.

Another bitty day. Bit of membraning this morning, kids bike race, back at it now. Big load of bays ready for insulation, sink pipework tested with hose, last few bays ready for battening but have run out of screws. Time to get whisking insulation. .


That’ll do for now. End of utility room floor insulated. Just these few bays by rear door to do. Then airtightness membrane, some decisions about hot and cold water pipework, and floorboards.
Almost all the remaining bays membraned after work today. Two more really fiddly ones to do and then I’ll (hopefully) never see the subfloor of my house again!


One more bay done, but spotted that soil pipe is still leaking a little. I think it’s just from temporary fix (for when new soil pipe fitted above), but not sure. Needs a bit more investigation and thinking 🤔


All but one small bit more membraned and insulated. Need to work out what to do with soil pipe before finishing last one.

Fantastic 9 day 🚲 tour with my two eldest; down to Oban then the Hebridean way along the length of the outer Hebrides. Back to the insulation this morning, big push before builders start in two weeks. Topping up bays before putting airtight membrane down.


These really long floorboards are awkward. Keep wondering about just cutting them in half to allow me to put them in another room. In the way at the moment but nice to have long bits!

Been putting off doing this final bay for ages. Going to be fiddly af. Also need to establish whether the leak in the soil pipe (🤢) is above or below where the floor will be. If it’s above can fix later, if below big headache.

Ugh. Not sure exactly where leak is. Will get plumbers back in and do what I can before filling this. 😑
Got enough membrane down to lay floorboards down as temporary platform and to get them out of the way.

That’s all the membrane down on the floor. Nice to make progress that is so visual! Only just enough airtightness membrane left to finish it, 😮💨


Podcast with me waffling on about my EnerPHit project with @JNaturalBuilder here:
https://twitter.com/EsTresidder/status/1516434218422784000?s=20
Not much time this evening, but time for a bit of airtightness taping. Membrane to partition sole plate.

Some fiddly airtightness taping this evening.


Going to pause this thread for a couple of weeks until I’ve got the floorboards back down. Need to do that by end of April (when builders start) so need every spare minute. Will update then.

Thread still mostly on pause as still totally full on here, will update properly in a week when on holiday. But for now this view is too exciting not to share. This will be my view from bed (minus the black plastic sheet and scaffolding). Rainy version. #EnerPHit #Passivhaus

Have been putting off restarting my #Passivhaus #EnerPHit thread as I was daunted by writing a update of everything I’ve missed. So I’ve decided I’ll just start again and tell the story of the missing three months another time.

This weekend, and this evening, has mostly been spent taping joist penetrations.
Joist penetrations are notoriously time consuming to make airtight, and it’s a bigger job than normal on my house since the base for the new first floor walls means I have joists on all four sides.
Joist penetrations are notoriously time consuming to make airtight, and it’s a bigger job than normal on my house since the base for the new first floor walls means I have joists on all four sides.


On the first floor the airtight line is an airtight board (Finsa vapourstop from @ecologicalbuild), on the ground floor it’ll be a membrane. So the builders can re-lay the first floor I need to make the connection between the two.

This has been made more tricky by the ground floor walls still not being finished (long story), so I had to account for 40mm of insulation that will come up between the joists by using some temporary timber packers.

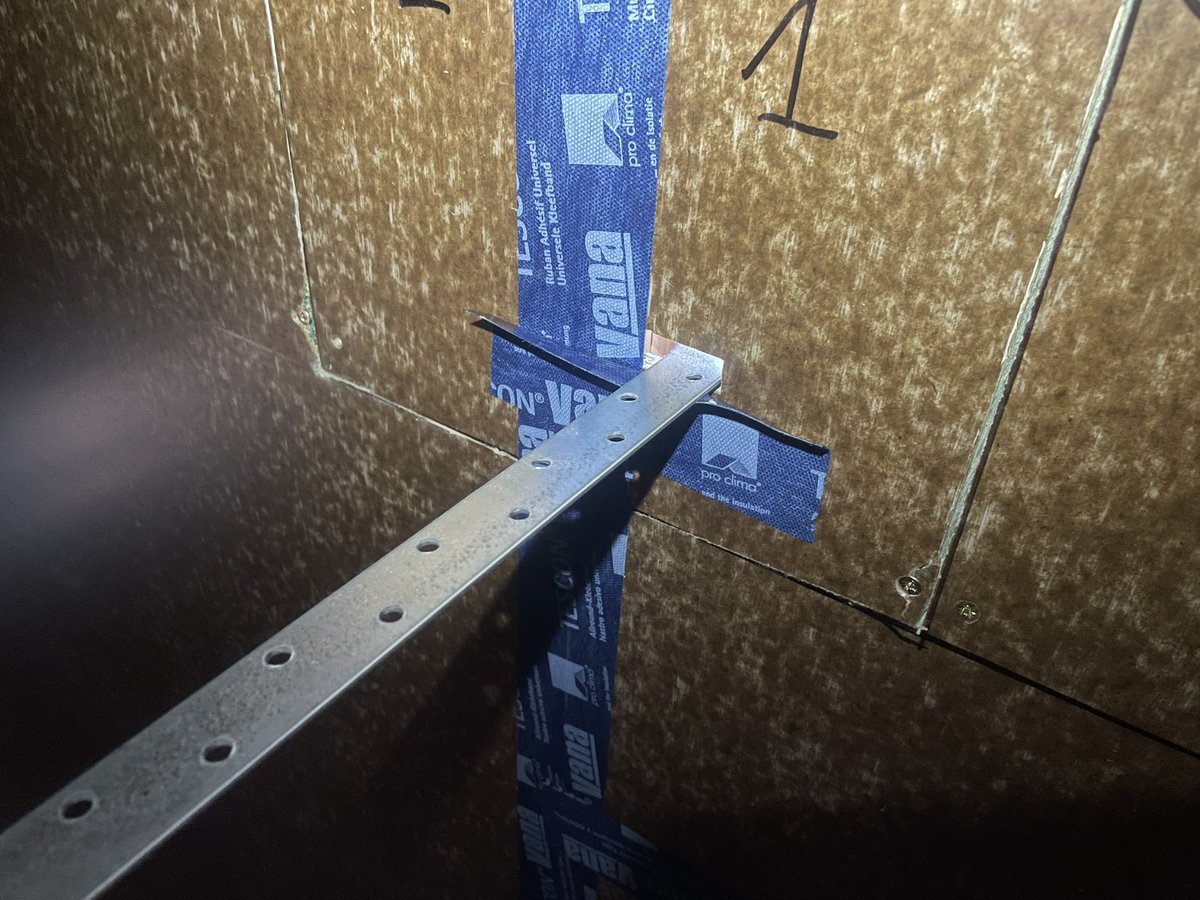
Tricky bodge number 1. Metal strap not airtight to joist so simply wrapping joist will leave small air path. Taping along length and squeezing tape into gaps to try and block path. If I’d spotted this earlier I could’ve done something better but hopefully this will be enough.


Another tricky bodge. Joist ends here had rotted so builders spliced new ones in. Again if I’d spotted this at the time I could’ve done something better, but as it is taping along full length of joint between the two, and over notches in old joist, should work ok.

The straps on the joists were one of several things the structural engineer specified that have been a bit of a headache for airtightness and thermal bridging (calculated the latter and they look ok, underestimates how much of a pain they’d be for the former).

I would’ve loved to discuss these with the SE & see if we could find something that met the structural requirements with simpler airtightness, but I was paying them per hr & couldn’t afford it. More #Passivhaus structural engineers please! Ht @BethWilliamsSE
Two gables and most of a long side done. Need to get the long side finished tonight so builders can start and do most the floor tomorrow.
Some tricky detailing at the corner. Packer in there representing GF insulation which will come up through joists.
Some tricky detailing at the corner. Packer in there representing GF insulation which will come up through joists.


Done. Time for bed. Last remaining side can be done at a more relaxed pace and with a floor to work off.


Just realised there might’ve been a better way to do junction to airtight board that would be quicker and neater (=>easier/more likely to be airtight). Will try that on last side.
This looks like it should be a much better way of doing it - fixing whole length along too first. Previously I was doing it piece by piece and it was really fiddly.

How do you solve a problem like a doubled up joist that you didn’t spot early enough and is too long and complicated to tape around the joint?

This may be my proudest moment! 🤣
Here’s the sequence. Wasn’t at all sure this would work.


Bit of scaffolding time with the kids.

That’s enough for tonight. Hopefully will be able to get this side finished tomorrow. Need a bit of time to chill and sleep though.


Builders started putting down the flooring today. Will be nice to have a floor again to make working up here easier. Lots of tricky taping to do above this floor!


Eldest kid was really useful tonight. Did some taping of joints in the airtight board and pre-cut 38 pieces of Vana for the sides of joists. Not to mention pulling the release paper taped to release paper from above in this cool move!
https://twitter.com/estresidder/status/1554893421994713090?s=21&t=i86_VNdsbmjF3qStQJv2Fg


Ground floor windows going in to kitchen and toilet. Builders very impressed with quality. These are Ultra windows from @G_B_Store


And we’ve nearly got a first floor back.


Nearly done with the airtightness detail through the ceiling joists. Might not finish tonight but I’ll get close at least.

Site rainbow. 🌈


Window to living room went in today. Gonna be amazing!


This window used to be a sliding door onto decking. We rarely used the door, the mullion spoiled the view of Ben Nevis & there was often too much solar gain. We’ve made it a single fixed window to improve the view and raised the cill to reduce solar gain and give seat below.

Some more views from our new windows, some better than others (bedroom windows still have membrane outside).


Some tricky taping to finish the day. Need some sleep, lots of late nights recently so as not to hold builders up.


This is by no means the final wall finish, but it looks a lot neater than it did!

We have a tiled roof! Ridge not finished yet as wrong ridge tiles were in box.

Always knew this project would be partly an expensive, very long CPD session. One massive learning point so far: never put insulation in until you’re sure it’s ☔️ tight.
This is the junction between old ground floor and the new first floor. 🤢 removing this soaking insulation.
This is the junction between old ground floor and the new first floor. 🤢 removing this soaking insulation.

Reinsulating this from below is tricky. Was much easier to do from above first time around! 🤦♂️

Done one side. More tomorrow.

Park run and a bit of mountain biking with the two oldest kids. Lunch then more insulation.

Another structural engineering thing that I would’ve liked to simplify. Fiddly to insulate underside of the base of the first floor. Lots of complex shapes to fill.


One long side of the house done and ready for builders to finish detail. Need to get the other 2 done tomorrow before the 🌧 arrives. Managed to only work in shade so far. Hottest day of the year so far here I think, but nothing like what’s going on down south, only 26° I think.

It’s a common misconception that insulation will make houses less comfortable in summer. New 1st floor in my #EnerPHit project is a stark reminder that that is false; no insulation (yet) and even with very little solar gain (windows covered over) it’s too hot to work up there.

More on summer performance in super insulated buildings here: highlandpassive.com/index.php/do-l…
Also related to summer performance, important to make sure your windows actually vent effectively in tilt mode (cos you aren’t going to leave them overnight in turn mode). I’m planning to add another 40mm of insulation then a service cavity and plasterboard inside current wall.

That will almost completely block the top of window opening in tilt mode, meaning it’s much less effective for night purge ventilation during hot weather. Need to speak to builder about feasibility of chamfering insulation and service cavity here to make this work much better.

This wasn’t my idea. I was switched on to this by @ecominimalnick, but I’d previously discounted it as not worth the hassle of doing yet more stuff differently to normal. Seeing the windows operate in the flesh today has made me realise how important it’ll be.
St Lawrence’s tears peak night coincided with great weather in 🏴. Didn’t have the energy to get to the top of a hill after a big day in☀️ but thought the scaffolding might be high enough for a breeze to keep the midges away. It was, loads of shooting stars and an amazing 🌝!


Finished 3/4 of another long side up to bay window. 1/4 of this side left then another short side. Will I make it before the rains arrive? 😬


That’s it for outdoor jobs today. 3.5/4 sides done. Indoor jobs next.

This may take some time. 😩


Might stick to the bolt head side for now, much easier, may take an angle grinder to the bits of bolt sticking clear of nut to make life easier on the ‘hard’ side (last pic).


Enough for now. 8/14 ‘easy’ sides done on one side of the room. I’ll not do the maths on how much more that means I’ve got to do! Getting quicker as process gets dialled.

Bit of ground floor wall insulation (some gaps still to fill) then came up with a potentially better way of doing my airtightness around these metal ties.


Builders took up the floorboards today, ruined by water. About to take up membrane and see how much of insulation is going to need replacing. Painful after the months and months of work (me with some help from a few friends). 😢

Diagnostic on first section I’ve lifted membrane on: joists damp at top where screw and nail holes through membrane let water in but dry on sides, should dry out ok. Insulation for top 260mm pretty dry. Bottom 20mm ranging from saturated to damp.

Not sure how to deal with this. Dehumidifiers and heater for now but think it’ll take ages to dry out bottom 20mm. Ideally would remove dry for reuse, bin the wet and let membrane dry out, but volumes involved astronomical. 🤔🤨
Unsure whether to reuse membrane (and tape holes) or start again from scratch with a new one.

Réassurance on state of joists for you (and me) @MarkSiddallRIBA.


Liquid water sat on membrane at bottom of insulation. My understanding is that liquid water won’t get through Solitex Plus, only water vapour, so this would take *a long* time to dry if I’d left it. Is that right @ecologicalbuild?

End of joists and ply extensions very wet but not rotten yet (phew!). Will dry as well as I can then make sure insulation in these parts is brand new and bone dry.


Sorting the wet insulation from the dry, this is painful.


Dehumidifiers plus diesel heater. This should speed the drying process out a wee bit!

Most of the flooring and membrane up now. Most of 3 (out of 20) bays emptied of insulation and mostly dried out. Long way to go still!

I think the structure holding the membrane under the insulation has failed with the weight of water in one or two of these bays. Major headache, but essential, to fix.

Am leaving floor for now as builders want me to finish airtightness upstairs so they can move on. Cordless angle grinder sorted out this to make making it airtight a bit less tricky.


Putting some fresh insulation in. Plan is to put bone dry new insulation on bottom to absorb any residual moisture, then the old stuff that wasn’t too damp back on top of that, then keep membrane off and heat+dehumidification to keep that drying out.

Change of plan. At best I reckon I can only save half the insulation. Will be much quicker and more robust to take all out, allow to dry, and replace with new, and only ~£450 more than saving and reusing half. Gonna get the builders to take it all out over next few days.
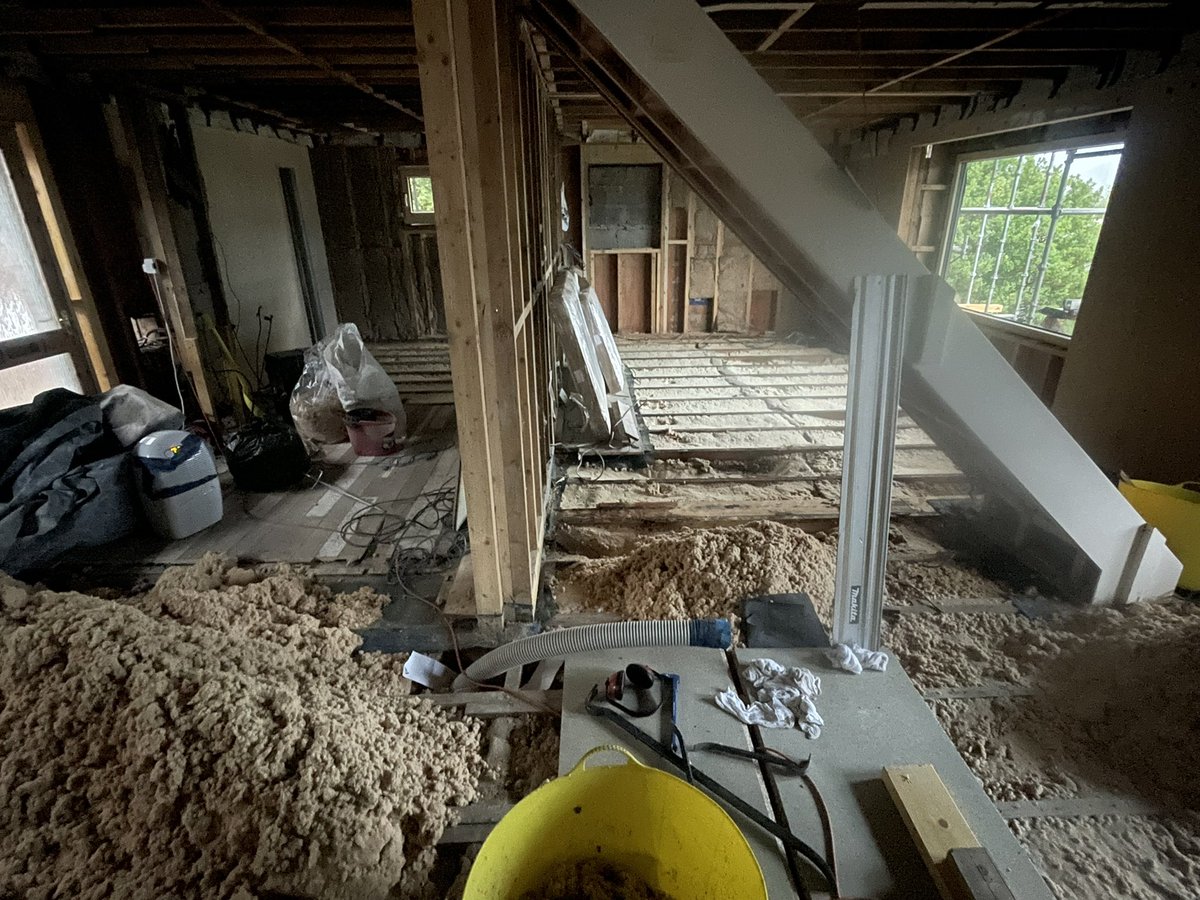
Anyone got experience of this from @ecologicalbuild ? ecologicalbuildingsystems.com/product/solite…
Could have put over 1st floor before taking roof off. Would have to be pretty tough to take months of site traffic, but if it worked would’ve saved me a big head/heartache.
Could have put over 1st floor before taking roof off. Would have to be pretty tough to take months of site traffic, but if it worked would’ve saved me a big head/heartache.
Bit of airtightness taping in the loft instead of thinking about the floor. Nearly done up here, tight space but worth keeping it inside insulated envelope - should be useful as storage for outdoor kit.

This evening’s origami. Three-way corner junction at the ridge-gable junction in the loft.


Finished up for tonight. Loft done. Window frame taping tomorrow maybe.


Pretty stuffy up here now. Sunny afternoon, no insulation in roof yet, increasingly airtight as more tape was added. Wonder what CO2 levels got to in there? Will be ventilated at low rate from MVHR in due course.

Taping outside to start today. Moving inside in a bit.

Done one window indoors. Quite fiddly, lots of notes to self about how to improve installation detail for future projects to make it easier for installers.


Realised I’d taped to the wrong bit of bottom of window frame. Neater on second window.

Neater at the top too. Shoulda built a test rig instead of first window being first go. Ho hum, first one will be ok but was slow.

Two more window left to tape upstairs, might get them both done tonight 🤞🏼
View from bed coming on nicely.
View from bed coming on nicely.

Nice sunset!


Last two upstairs windows taped. One fixed window up here (in a room with two openers), slightly easier to tape that one. Wonder if I’ll regret making that fixed when it comes to cleaning it. 🤔


Only brainwork on the house today, trying to figure out a tricky external reveal detail. Did take my daughter on a tour though. Here she’s enjoying the view from her bedroom window.

Inversion right now. Going to be a beautiful morning. I’ll be spending it doing some site training on insulation and membrane taping on my house.


Proud of this.

External cill weather proofing. Getting better at this. @ecologicalbuild


Two windows done. Still need to finalise what’s happening to the membrane at the window head.


A bit of insulation re-done this morning now time to go and run up this hill! #BenNevisRace


Race went surprisingly well given the lack of proper training recently. Started super cautiously and pick my way through the field steadily to end up 16th. A lot slower than my best time but only 2 minutes slower than my previous worst. Time for more insulation. Quick with help.


First test of my external reveal sealing. Looks good so far.

Nearly done for day. Lots of balancing on joists!


Couple of fiddly bits to finish off. Was hoping to get enough done that builders could start putting floor back down tomorrow but not sure I have. Ho hum, done me best. Thanks for help @BenThompsonIS, wouldn’t have got nearly so far without it.


Just realised it’s a year since I started this thread. Definitely not about to move back in, maybe by Christmas (Grand Designs vibe 😬). Looking very different though, and despite the stress I’m still psyched for how great it’ll be when done.
https://twitter.com/EsTresidder/status/1433825249615880199


Radically improved comfort and air quality, better daylight, better views, more space and storage, extended lifetime of building. Massive project, more than I imagined, but also massive rewards. Just got to hold course for the next few months.


Lag four (of 7) external reveals done upstairs. So close to getting finished before rain arrived, just one release-tape width of extoseal to stick down, but would currently mean standing in a waterfall! Can wait till tomorrow.


Nice to finally be able to see out of all the upstairs windows. From left to right; son’s bedroom, bathroom window, master bedroom corner office window, master bedroom side window.

Thanks to @RobbieBellshaw for the help!
Early start this morning. Helping the builders get the floor finished.

Getting there. Hopeful can finish this this weekend.

Careful people!

Enough for today. Time to go for a run. 🏃♂️


Moon, Jupiter and Ben Nevis.

Looking forward to enjoying f the autumnal morning light in here this time next year! Bit more insulation this morning then taking the kids biking.


Patching up a hole in the membrane that holds the insulation. This was where I ducted a dehumidifier into the solum to try and dry out the insulation. Woefully inadequate infortunately. 😔

2 bays where I’d used tape to join 2 offcuts of membrane as was running low, then got inundated with 💦 & the tape wasn’t strong enough. Replacing with new membrane. Nearly done but finishing up as wife going up Ben Nevis with the boys for sunset & moon. Cracking evening for it.


Compared to my neighbour’s windows, mine are much harder to see into from the outside at a distance (possibly a good thing for privacy). Is that due to the triple glazing, the low-e coating, or something else? #Passivhaus

Got myself an assistant for a few hours. Bays all prepped for insulation now, then film.


Trying to get enough airtightness membrane down to lay a temporary floor for blown insulation installers to get upstairs and then the builders to lay a proper floor next week.

Bit of fiddliness joining new airtightness membrane to remnants of old one.

Got a fair bit of membrane finished but still a good chunk to do. Ran out of tape and energy so builders will have to be on outside jobs tomorrow. Blown insulation all ready to go in upstairs and the team set up.


Two close together I joists that were missed by the builders when putting holes in for the blown insulation. Easily done. I checked when frame went up that studs were far enough apart to allow blown insulation, but would’ve maybe been a good idea to drill as boards were added.

Hopefully getting some gutters this week.
Redoing fiddly floor airtightness, blown insulation mostly done for the walls. For all those that offered advice about patching holes, preferred approach seemed to be reuse disk and tape over, as many of you suggested. 👍


Minor drama, there is one corner of upstairs where the external strapping isn’t yet complete. I hadn’t clocked this. When they blew the insulation in from inside it popped the external woodfibre insulation board off (only held on with temporary fixings). Tomorrows problem to fix.

Had to redo airtightness at most tricky set of service penetrations - didn’t survive the soaking. Fiddly and messy but I think effective. Half the house ready for flooring tomorrow but needs a hoover first!


Got the rest of the floor airtightness done last night. Builders got most of the floor down today. Nice progress!


Finishing last bit of floor insulation at bay window so floor can be finished tomorrow. Insulation much shallower here so using batts to avoid settlement.

Done.

Builders have got the floor down today 👏 Onwards!
View from future sofa, view from future bed.
View from future sofa, view from future bed.


Insulating last ground floor walls this morning. Easy to see how this often gets done poorly. Care needed to ensure no gaps. #PerformanceGap ##Passivhaus
New window going in here where there was one once upon a time (before we had the house). Taken out for wood stove I think.
New window going in here where there was one once upon a time (before we had the house). Taken out for wood stove I think.


Done. Nae gaps here (apart from those still to be filled around the windows). Satisfying work. Hemp-jute insulation batts from @ecologicalbuild nice to work with.
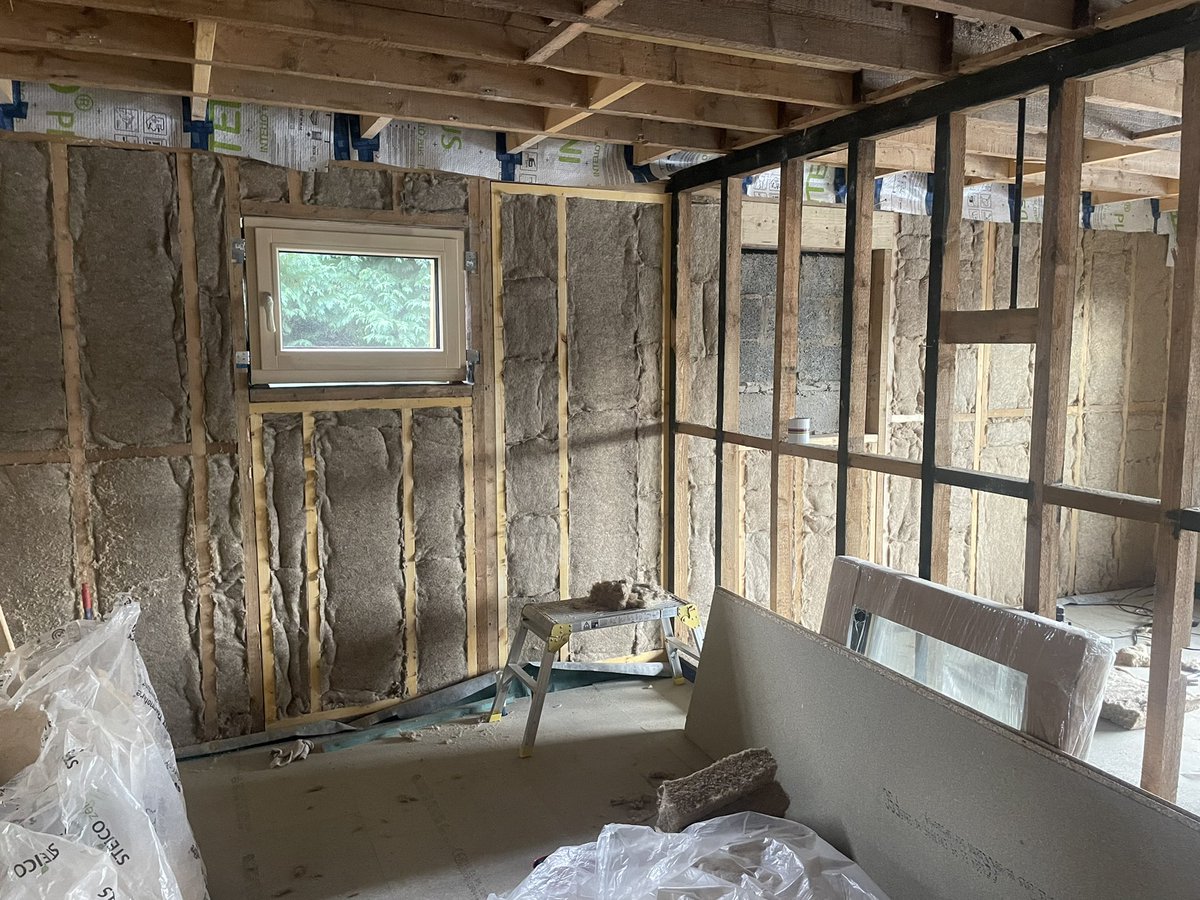

Checking out next jobs. Insulating this small bit of new roof (used to be covered by old roof eaves) above the bay window is going to be tricky.


These cheek walls on the bay window are a bit of a mess. Need to maintain some vent to outside so don’t get condensation on cold blockwork. Plan is to batten a breather membrane to leave a 20mm space that can be vented into each bay.
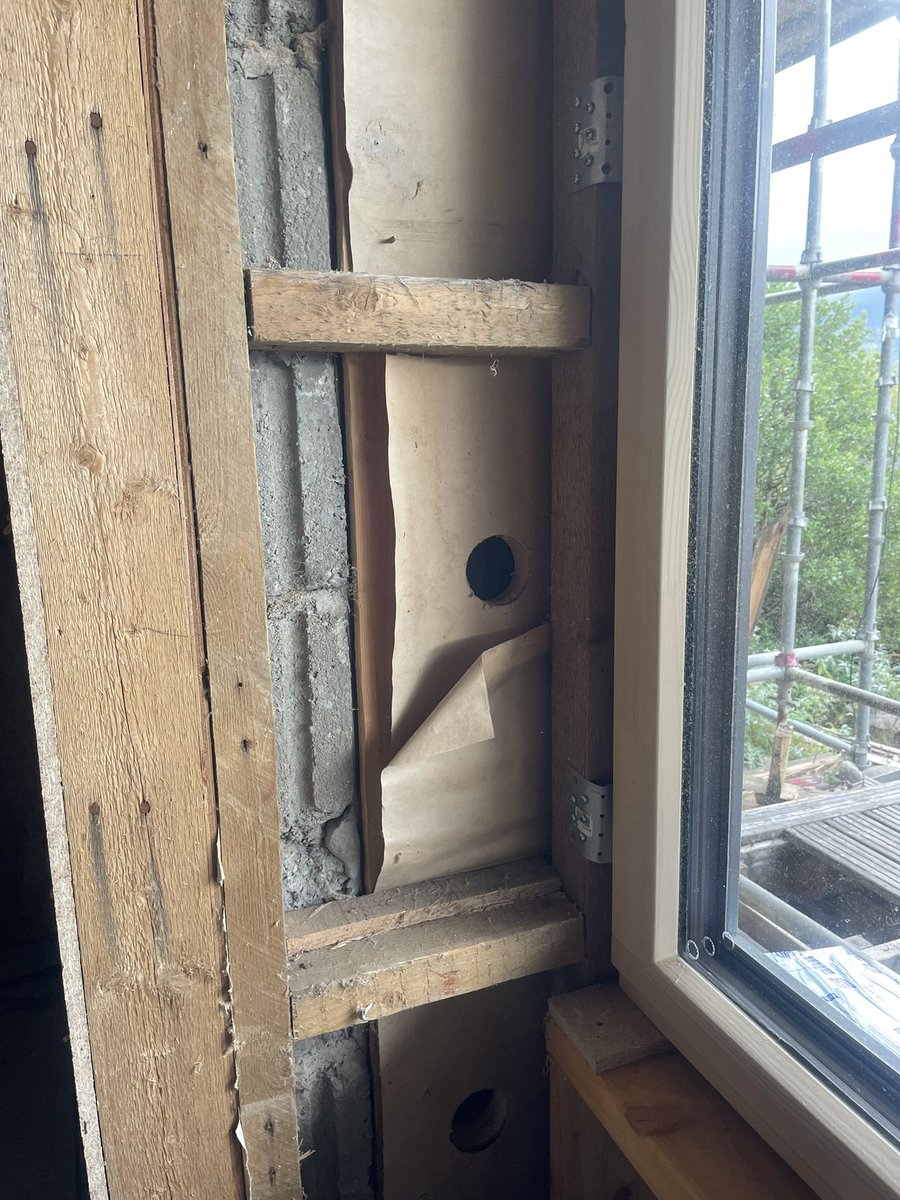
New window gone in to living room since I last posted, improves it quite dramatically. Interestingly there was one here originally but was taken out by previous owner in order to put a wood burner in. Nice to get a bit of help with the membrane from @JurajMikurcik!


Bit more added yesterday too. Still a fair bit to do though, and we ran out of the 40mm insulation board 🤦♂️


Enough for tonight. Bit baggy but should be ok when service battens go on. Tricky to do it well on your own.

Some fiddly airtightness joining up membrane in floor with membrane in walls behind soil pipe tight to wall.


Now moving on to insulate cheeks of bay window. Need to keep insulation clear of blockwork and maintain ventilation on cold side to avoid moisture problems. Battening it ~30mm clear of blockwork with solitex plus breather membrane.


Ugh. Floor airtightness membrane has got buried under floor at this corner by the door. Not sure how I’ll sort this. Need to speak to builders about whether can lift floor up to fish it back out.

Getting membrane in above the windows.


Meant to do this when I did the external reveals a few weeks ago. Adding a small bit of Tescon Vana (dark blue tape) to cover edge of cill in case of rain water trickling down the edge of the reveal (will be behind cladding).

Steam train going past, windows open versus windows closed. Looking forward to having this level of sound proofing. Requires airtightness and super insulation. Note that it should be even better than this when the downstairs is also airtight & fully insulated. #sleep #Passivhaus
Some pretty serious gutters arrived today!

Bit of insulating the cheeks of the bay windows to finish off for the day.


These cheek walls will be the least well insulated part of the whole build. ~75mm in there at moment. Plan is airtightness membrane then insulated service void to bring total insulation thickness to ~100mm while staying within the 1/3 airtightness rule.
Woke early and couldn’t get back to sleep so am up doing some dawn insulation on the living room bay window.


Really fiddly trying to properly fill a complex 3D shape above my head!

Nice little mouse house in the old insulation.

Making progress. This would be impossible to do well with rigid insulation I think. Lots of irregular shaped spaces to fill.


Definitely some more air and wind tightness work to be done here!
Nice break biking with the boys before some bad weather comes in this afternoon. Back on the insulation after lunch.
Nearly done with the roof of this bay window. Really time consuming to do well, but will be worth it for a thermally comfortable window seat from which to watch winter storms rolling up loch Linhe.
Noticeable air leakage at corner, need to make sure breather membrane wraps well.
Noticeable air leakage at corner, need to make sure breather membrane wraps well.


Done with roof of bay window. Adding a leftover bit of 22mm wood fibre insulation board, should make airtightness taping of window much easier, and add a bit of insulation to cheek walls.


Very windy just now. Interesting that can feel air ingress at this corner despite being taped well externally. Wind must be taking a convoluted path from the side of the bay window, under the membrane and in at the corner.


There’s enough insulation in the mini roof here so I think we’ll use this little nook to hide blinds and possibly a projector screen.

Tricky detail maintaining airtightness line through partition wall.


Ready for adding membrane when have put holes through wall for MVHR ducts.


Satisfyingly neat.


Late one tonight getting membrane finished so builders can put in service void for electricians to do first fix tomorrow. Nearly there.


Team has done well getting the strapping on for the walls today. Electrics first fix on ground floor tomorrow, they did upstairs today.


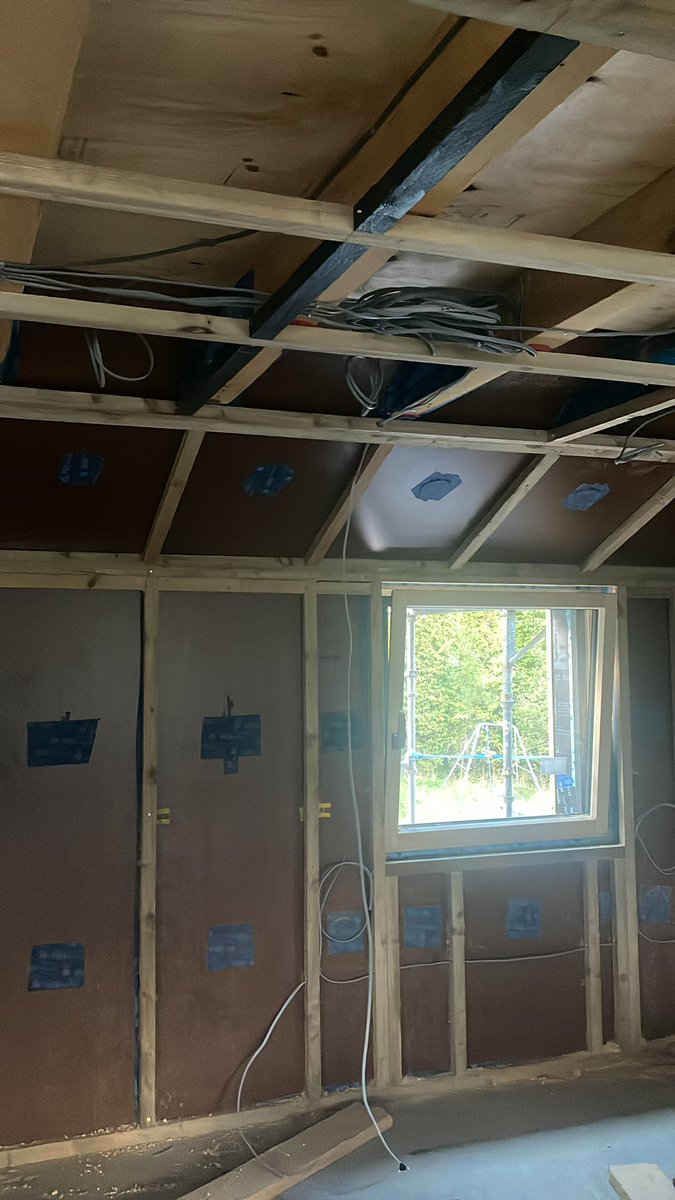
Electricians have been really good about airtightness, careful to check with me where airtightness line was, and letting me know when it was accidentally damaged so I could fix it.
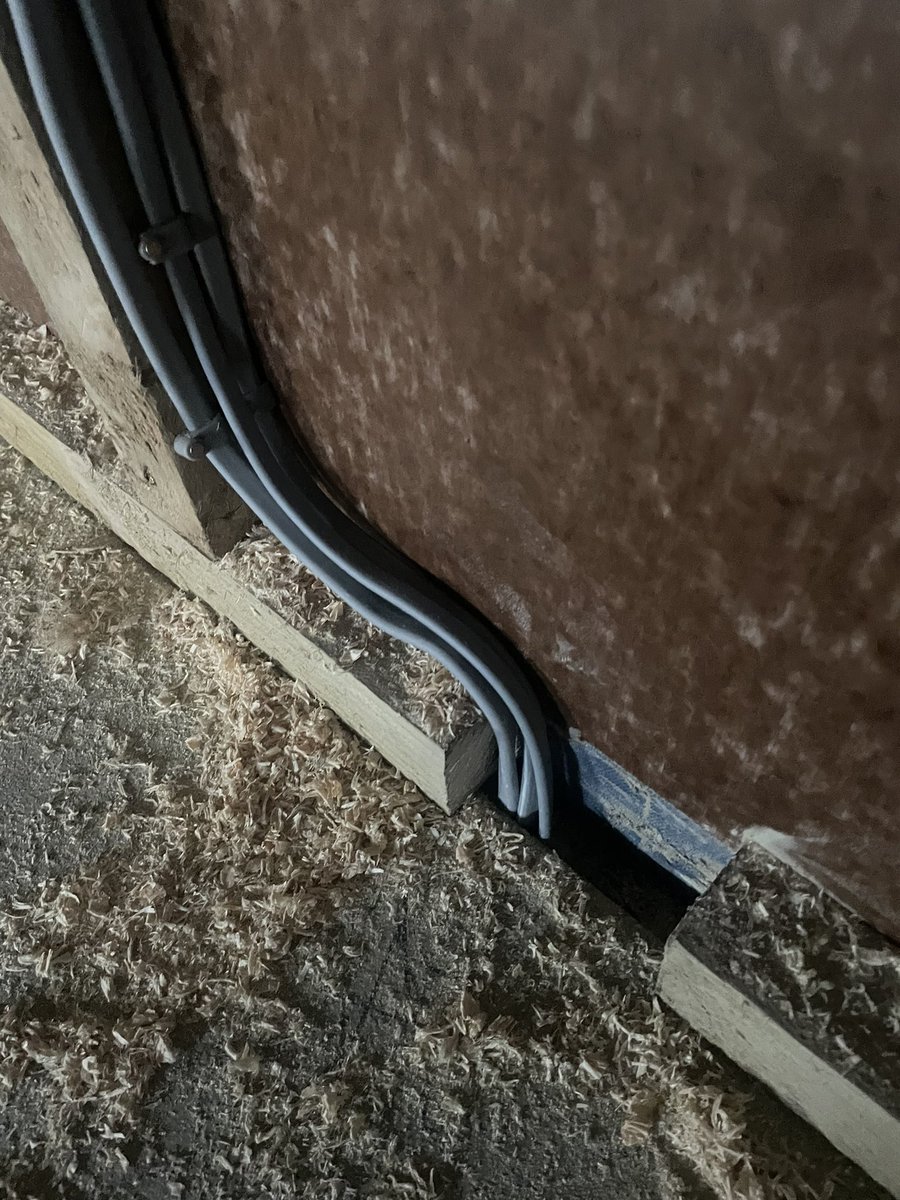

Was going to do nothing tonight and have a break but decided to do a bit of external wind tightness on the downstairs windows.


My low-energy retrofit has left me pretty low on energy today (the cat waking us every morning at 4am probably doesn’t help). Hoping a bit of reveal insulation will perk me up. Then a big sleep.


Easier window airtightness detail than I had upstairs.


Important to check the tape will be hidden by 12mm plasterboard!

Also (even more!) important to check that the window will be able to open!

Looks ok.
Jambs both done, method getting tweaked (faster and better). Head and cill need a conversation with builder. Enough for tonight.

Jobs for the weekend: apply for mortgage 😬, do calcs & decide on hot water system (heat pump water heater v Sunamp, with or without WWHR), do GF window reveal insulation and airtightness. Unfortunately I’m stuck in an indoor climbing wall all of today for a kids comp. 😩😳🤦♂️
Definitely have decision-fatigue by now. Need to fight it and make sure I make the right choices for last few big items.
I’m judging at today’s comp (my kids are climbing). This is my boulder problem to judge, yurple holds up gently overhanging wall. 🧗♀️
I’m judging at today’s comp (my kids are climbing). This is my boulder problem to judge, yurple holds up gently overhanging wall. 🧗♀️


Ok, sub thread on my hot water choices and current thinking as requested by @massivechange1. Should be a good way of organising my thoughts too.
Option 1: Sunamp heat battery (stored heat in phase change material rather than water, water passes through it to pick up heat).
Option 1: Sunamp heat battery (stored heat in phase change material rather than water, water passes through it to pick up heat).
Sunamp advantages:
- takes up much less space than ‘proper’ cylinder, and we’re quite tight for space (100m2 TFA, family of 5).
- standing heat loss very low due to low surface area
- can respond quickly to use time-of-use tariff and PV.
- takes up much less space than ‘proper’ cylinder, and we’re quite tight for space (100m2 TFA, family of 5).
- standing heat loss very low due to low surface area
- can respond quickly to use time-of-use tariff and PV.
Sunamp disadvantages:
- Coefficient of performance of 1, so poor compared to heat pump.
- Coefficient of performance of 1, so poor compared to heat pump.
Hot water heat pump advantages:
- coefficient of performance of 2-3 (? Need to do calcs). So 2-3 times more efficient at heating water than direct electricity (Sunamp)
Disadvantages:
- cost (quick look looks more expensive than Sunamp)
- coefficient of performance of 2-3 (? Need to do calcs). So 2-3 times more efficient at heating water than direct electricity (Sunamp)
Disadvantages:
- cost (quick look looks more expensive than Sunamp)
HWHP disadvantages continued:
- extra penetrations through external wall (cost, have to seal)
- higher heat losses from tank, from supply and exhaust duct while operating, and possibly to cold components while functioning
- bigger
- extra penetrations through external wall (cost, have to seal)
- higher heat losses from tank, from supply and exhaust duct while operating, and possibly to cold components while functioning
- bigger
Advantage I forgot for HPWH:
- can drop storage temperature of water, thus reducing losses (can’t for Sunamp)
- can drop storage temperature of water, thus reducing losses (can’t for Sunamp)
There is option of not ducting it to outside, in which case heat comes from house heating system, some useful cooling in summer. Initial calcs on this option left me worried that room too small & would get cold. Would avoid duct & cold component losses mentioned earlier.
HWHP disadvantages continued:
- longer heat up time may make it harder to utilise time of use/dynamic tariff and PV (won’t have at first but might in future).
- longer heat up time may make it harder to utilise time of use/dynamic tariff and PV (won’t have at first but might in future).
Layered on top of both of these is option of waste water heat recovery (@shower_save). Can reduce hot water usage significantly, possibly meaning smaller tank and lower running costs, but obvs has its own costs.
Back on the window reveals. First window head I’ve done. Cill next.


Not sure what to do at cill here. Builder recommending 33mm timber cill, but that would leave no space for insulation. 🤔

Filling in gaps in the insulation boards around window reveals to avoid thermal bypass. Read this from @MarkSiddallRIBA for why
https://twitter.com/marksiddallriba/status/1575767983494148096?s=46&t=9eVf2KUTWHzG9Eby5dSG3w


Fiddly airtightness detail around door threshold. 🤔

More thermal-bypass slaying.

I think it was @keithalexander who asked me months ago about whether #Passivhaus buildings were reliant on tape and membranes and what happens if they fail with age. Part of the answer to that is high quality materials, but also the underlying fabric design.

I reckon this installation is already more airtight than what I took out, and many new builds. Membrane and tape will finish the job! N.b. Cill not done yet, definitely not airtight!

We have a problem. Saw a wet patch on window cill upstairs. Opened it up, insulation under window soaking. Needs more investigation.

Time to do DHW calcs limited by discovering window leak problem (see above), but I've done some crude calcs that I think allow me to make a decision...
First option: Dimplex Edel 200l heat pump water heater. Assume 45° tank and forward flow temp, 5 people, 20l/p/shower, 9l/p other uses. 10mm Cu single pipes for distribution. Gives:
2910 kWh hot water demand
721 kWh distribution losses
329 kWh storage losses
2910 kWh hot water demand
721 kWh distribution losses
329 kWh storage losses
Second option: Sunamp ePV 210. This has much lower heat losses per K (less than half, 0.71 W/K versus 1.5 W/K) but... you can't drop the storage temperature because it's phase change. I couldn't find what temp it is stored at, I think I was told 75° on the phone. I've assumed 65°
I assumed that with a tempering valve I could drop the forward flow temp to 45°. With those assumptions the use and distribution losses are the same, and the storage losses are only a bit less (because of the higher storage temperature) at 280 kWh.
So total hot water demand slightly lower with the Sunamp, but because the COP is only 1 total energy use will be much higher than with the Edel (cos it's a heat pump). Think that decides it for me. I hope I'll still be able to do most of the water heating at cheap times.
Also, I'd previously assumed that the Sunamp would be cheaper than the HPWH, but it looks like the Edel is the cheaper of the two. Possibly evens out when factor in possible duct installation.
I'll probably also add waste water heat recovery on top of this. If this allows me to go for 200l rather than 270l tank then that's a £245 saving on the Edels, then assuming a COP of 2.5 and electricity at 15p/kWh (off peak) that's about £60 a year. They're £760 to buy.
So decision that still needs to be made is whether to duct the HPWH to outside or not. That can wait for another day.
As guessed the Extoseal (waterproof external tape) got damaged when the builders fitted the metal window cills. Should be able to fix this & refit cills after trimming them slightly.
Unfortunately means we’ve lost daylight upstairs, on plus side we’ve got the start of a ceiling!
Unfortunately means we’ve lost daylight upstairs, on plus side we’ve got the start of a ceiling!


Think this should do it.

Some more sheeting going on, and an airtightness penetration that needs sorting…


Damage to the Extoseal here was worse than anything I fixed last night (and leak much worse too). Bit messy but should work, so long as can replace without damaging again.

SVP airtightness done. Fiddly cos so close to batten but managed to get some Vana wiggled in there first and pressed down with a blade before finishing off with spare Extoseal.

This is the most damaged corner. Getting better at fixing them, hopefully won’t have to use these skills again though!


Hmm, mysterious. When the insulation was pumped into the walls the installers said this junction leaked. Got the builders to remove the batten that was hiding it but looks absolutely fine.

#Passivhaus people who have installed @G_B_Store doors before (Ultra in this case), how do you get the airtightness round this corner after taping to the metal threshold? Or does this only work well if you’re taping to the groove on the side of the frame?

For clarity it’s this corner I’m wondering about.

Tricky getting round this corner into door reveal. Should’ve left more floor membrane poking up at edges.


Some exciting progress by the builders and plumbers on site today. Some tidy 10mm radial pipework, the new en-suite shower room and home office to the right.


Airtightness alternative to those funky multi-hole grommets for when you’ve forgotten to order them and your builders want to get cracking with the plasterboard.


Lots of airtightness work feels a bit like ‘is this really going to be a problem’ and I have to remind myself that air will find a way under pressure (air test or windy weather). Here though I could feel a cold breeze through the hole. Satisfying to get it sorted!
Bit wet on site tonight! Doing a couple of corner details at a doorway. Will be much happier in this weather when the cladding is on! twitter.com/i/web/status/1…
Back on the house after lovely holiday to Paris and Fontainebleau 🧗♂️
Adding insulation and airtightness to the cill. First of the ground floor windows finished and ready for builders to do plasterboard and cill.
Adding insulation and airtightness to the cill. First of the ground floor windows finished and ready for builders to do plasterboard and cill.


In my absence the builders have been busy putting up internal walls and plasterboard.


Hmm. Some damage to membranes around my windows, I’m guessing while plasterboard was being installed. Not sure why, but should be able to fix it. Will discuss with builders tomorrow.


Sometimes self builders do their own airtightness and pay contractors to do everything else. That’s what I’ve done. Gives a big sequencing headache though - hard to keep up with the pros and stuff gets done in the wrong order. Like here - taping 🪟 after plasterboard on.


Also means that I can’t do airtightness test while airtightness still visible and fixable, which is definitely a good idea. Will have to hope I’ve done a good enough job at final (only) airtest! Hopefully there isn’t damage that I’ve not seen. 😬


Pleased with neatness on this reveal so far. Quick break to cook tea and help kids get out to halloween 👻 school disco, hopefully can get membrane taping finished tonight.


Done.

Another window done. Only one big one on ground floor to finish now. Today’s was fiddly as builders have started putting partitions up.


Gonna try and make a bit more progress on this window tonight. Sick of living in a small cabin (pictured through the window) in this weather. Nearly a year now 😳


Pleased with this detail so far. There’s some damage to membrane at edge where I’d asked builders to cut the flooring a bit shorter to give some slack in membrane. Gonna have to cut back a bit more to patch it.


Done the wall below the big living room window and the cill.


Finishing the airtightness around the head of the window is going to be a lot more fiddly. Job for the weekend!


Airtightness is super important for energy efficiency and comfort, but wind tightness is also important. The external membrane taping is not yet complete around the bay window, if you watch carefully you can see that getting in and making the membrane move on the inside. twitter.com/i/web/status/1…
Even with perfect airtightness on the inside this air movement through the insulation would steal heat. Pretty windy 🌬 today!
Cool moon rising over Ben Nevis. Once the #Passivhaus #EnerPHit is done I’ll enjoy cold weather being something to enjoy then escape from, dry kit easily and relax before the next time.

Redoing the insulation and airtightness under the upstairs windows after fixing leaking cill problems.


This bit of taping around the windows is really fiddly and the amount of tape in contact is minimal and had come off leaving a small hole. Good to get a chance to fix it (second photo).


The builders have started making the cills. Looking nice, and a good match to the windows.


Away from home tonight & musing on retrofit project. I know this, and I tried quite hard already to get someone to install. Should prob try some more before scaffolding goes down. Limited energy for endless decisions, work & chasing (PV installers too busy to be doing chasing).
https://twitter.com/solar_chase/status/1583811355421069313
Not really followed all the Musk shenanigans but if #Passivhaus and #EnergyTransition Twitter end up moving to Mastodon or elsewhere I’ll be gutted to lose this thread.
Finishing the insulation and airtightness to the top of the bay window today. Winter solar gain in this room (living room) is going to be lovely.


Using some insulation offcuts to provide a smooth surface for fixing the membrane to. This bit is not doing any useful insulation (lintel is sitting in room) but will make the membraning much easier.


Ready for getting the membrane round this funny space above the window (which will be useful for hiding a roller blind/projector screen in).

Remembered I needed to finish off getting the insulation in around the window frame.

Fiddly but seem to be getting this ok.


Lots of corners today! Big window in the living room done.


This will get finished when the builders add more battens for a service cavity. Will allow me to fix stuff in here (blinds, for a start) without damaging the membrane.

Repaired the last three window cill airtightness upstairs, previously opened it up to remove wet insulation after cills leaked. Think I’ve fixed that now. Let’s hope so! 🤞🏼


@threadreaderapp unroll please.
Builders want to go fast, and I want them to go fast, but it means the plasterboard has gone up before I’ve had a chance to put the MVHR (heat recovery ventilation) ductwork in. Keen to hear other peoples experiences of retrofitting with plasterboard in place. 😬 #Passivhaus

Very fiddly airtightness detail floor to door threshold, been putting it off for a while. Membrane tight as went around corner in flooring, solved with a Stanley knife and tape (first pic), then tricky join to underside of timber door frame then metal threshold. 1 corner done.


There’s a small leak in the other corner that I’ll have to fix and allow to dry out before I do that side. Only spotted that today. In some ways the bad weather is a blessing. Good to test the house while it’s still relatively easy to fix stuff.


It’s going to be a holey day.

Not feeling at all daunted.


This would’ve been easier before the plasterboard was up #1: first two holes in floor useless as blocked by joists.
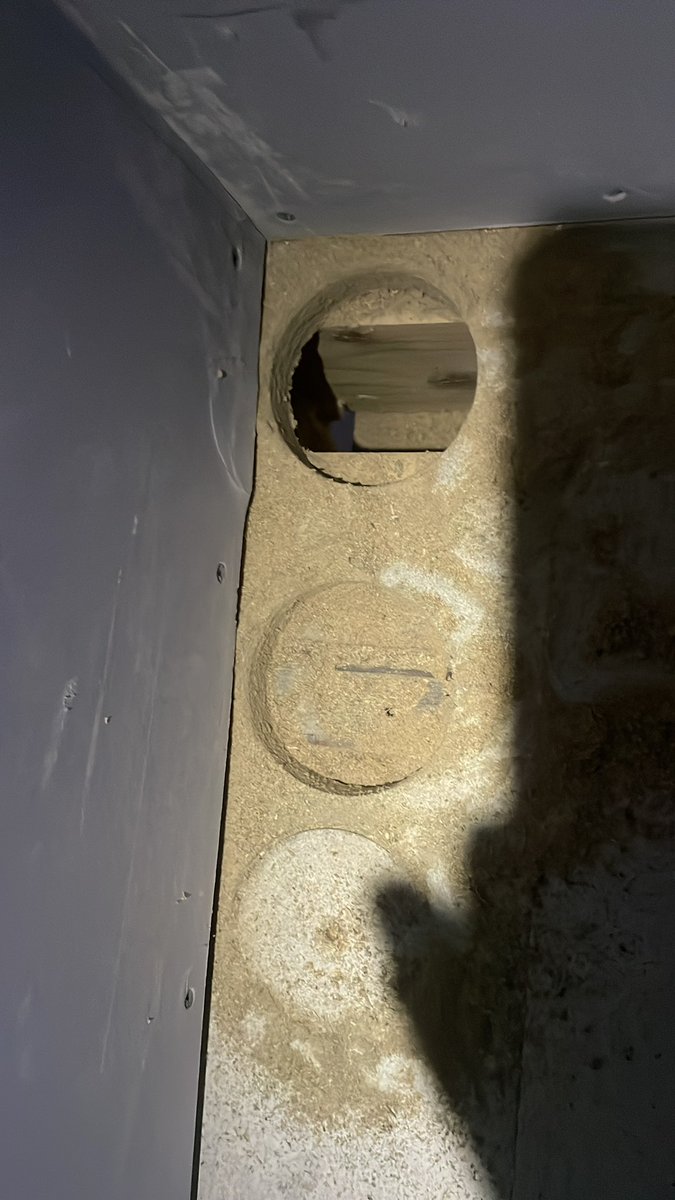
Subsequent holes more successful. Room for 5 ducts coming up from ground floor here. Will have to jiggle around the design as plan was 7 here.

Top tip for drilling holes in plasterboard with a small drill: do whole thing anticlockwise, kick back too powerful otherwise and easy to make a bad mess.

Oops. First hole in wrong place despite checking and double checking. Hopefully plasterer will be able to tidy it up.


Most the holes done, duct runs to main bedroom done, should be faster tomorrow as worked out what I’m doing.


Just a normal late night trip to Aldi.
Me to cashier: ‘not often you sell fifteen pairs of marigolds, I imagine.’
Cashier: ‘you’d be surprised’.
Me to cashier: ‘not often you sell fifteen pairs of marigolds, I imagine.’
Cashier: ‘you’d be surprised’.


Beautiful morning here. Hoping to get the rest of the ducts in today, but lacking a second pair of hands (wife and kids all heading to 🏖) so might have to find other jobs.

Design says kitchen extract ‘as close to 500mm in front of hob as possible’, #Passivhaus course notes say away from hob, so I’m guessing it should say ‘at least 500mm’. Does that sound right? Will have recirc hood with grease filter.

Thanks to the good people of Fort William not getting sick I have help (friend who is on call doctor). Found some damaged bits that had to remove. Worth rounding off any sharp timber edges, and watching out for nails! 6/11 upstairs ducts in.


Moments of tangled chaos today, but all the upstairs ducts are now in. Tidying up after family walk to see/listen to bats 🦇 and dinner. Fewer and shorter ducts downstairs, 🤞🏼 I’ve got enough ducting left.


Here’s Mr Tickle again!
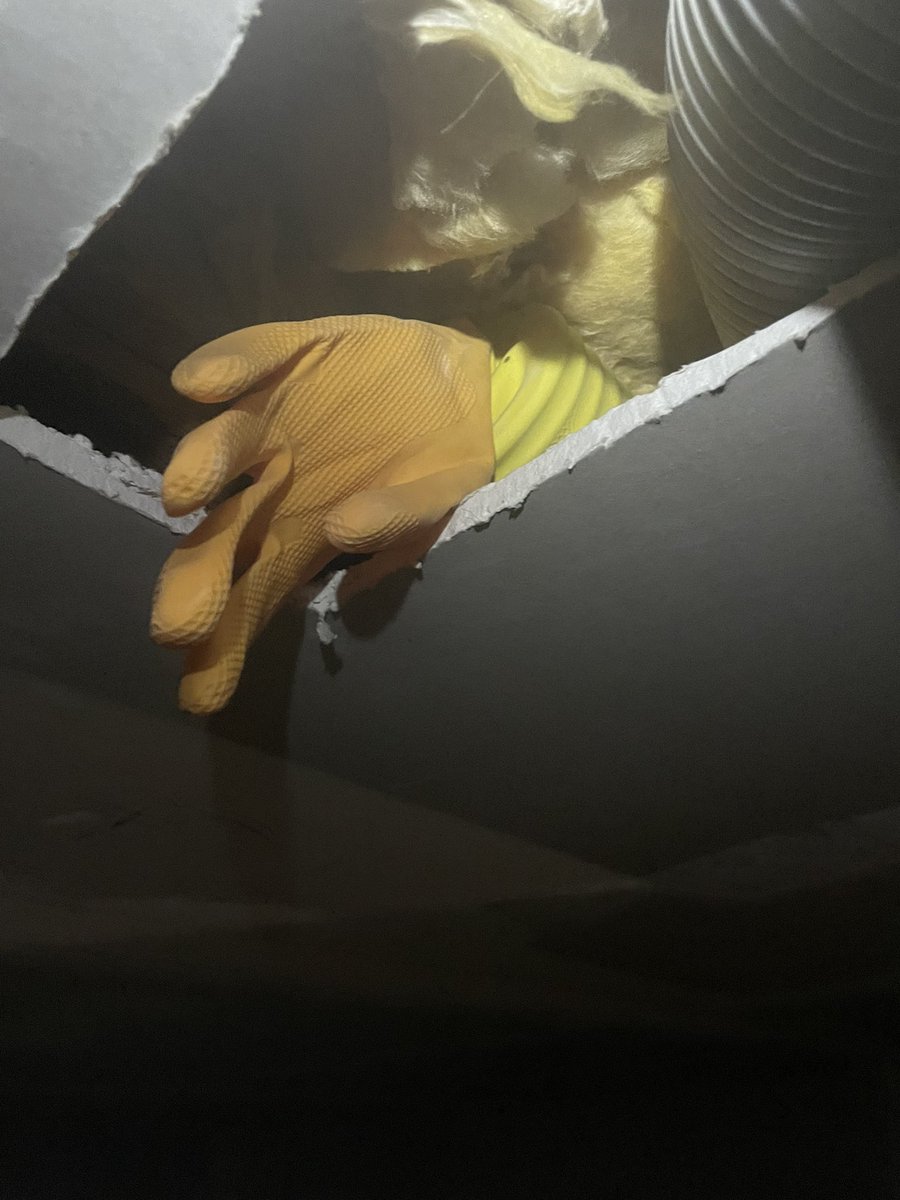
Not exactly what was on the design, but actually better (shorter runs and fewer bends).
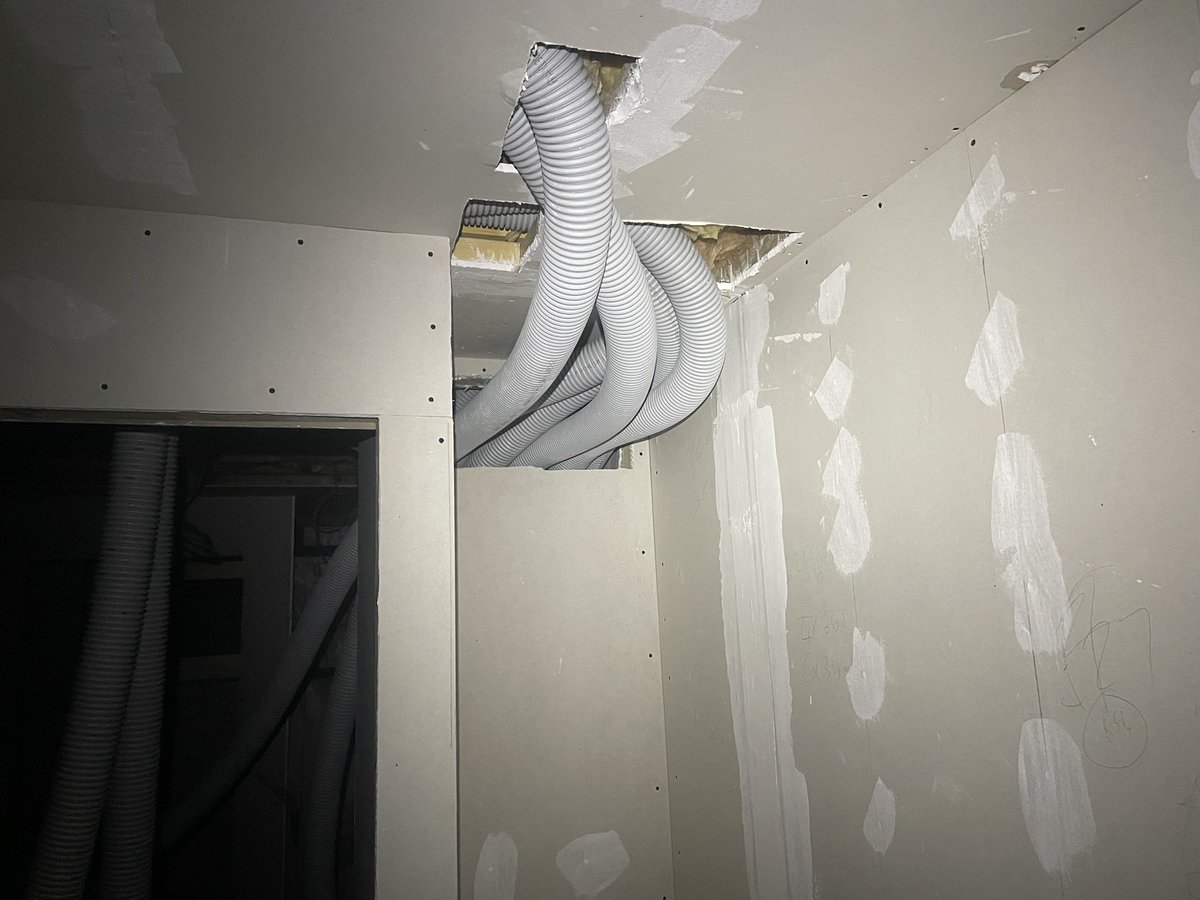
@threadreaderapp unroll please
Been away for a few days of work with @johngilbertarch, exciting to see almost all the internal cills and reveals done. Looking 👌


I was a bit worried that this window (second one in tweet above) wouldn’t open once the plasterboard was on, it was slightly tighter in the opening than the other windows so when I added insulation into the reveal it didn’t leave much space for plasterboard. Works, just! 😮💨
Window seat being made for this window. Exciting!


Arrgggh, was planning to take bits of plasterboard down so I could put MVHR ducts in but can’t do that without damaging other boards. Will have to speak to builder about whether we can cut a hole in them and patch it later. Yes I know I should’ve done the ducting earlier…


A lot of frustrating learning by doing today. I put this hole as close to the shower as possible, but hadn’t factored in the size of connection to ducts (right hand pic). Anyone with experience of installing these Zehnder ducts, am I meant to cut black connection pipe to size?


With the help of @ArchTesta I’ve worked out what I need to do next. In the meantime this door/window is looking great with the cill. I need to dry out a bit of timber bottom right and improve the waterproofing then finish the airtightness.
More learning by doing. Nice swept bends for low resistance. Keen to do all I can to minimise risk of noise! Will secure black plenum to joist in due course…


Anyone who knows anything about plastering, will the taper&filler be able to make this patch of mine look neat, or will that board need redoing? Might need to do two more patches like this…

Adventures in getting MVHR ducts through when the plasterboard is already up. Get it done before the plasterboarding!

Made it. twitter.com/i/web/status/1…


My boys used to share a room with trickle vents directly above the neighbours oil boiler flue. Their new rooms will be in the exact same place but wit radically better air quality (airtight and with MVHR intake on other side of 🏠).
All duct runs in (and labelled!).

All the ducts into 1st floor rooms in and connected to plenums, need to fix plenums and clip ducts to keep them out of the way, and fix the supply and extract to loft, and a tidy up and hoover then this can be the guest bedroom! 🤣

Sun-optimal location for shower extract due to 1.75 storey. Plenum will sit at 90° when I’ve fixed it, but it’s further from shower than I would’ve liked due to slopey bit of roof getting in the way. Ho hum.


Window seat coming along nicely, dusting of snow on the hills. 👌


Window seat all done (not by me!) and looking great. I’ve been sealing the edge of the window cills. Keen to get these as water tight as possible before cladding goes on, after experience of cills leaking previously.


Chilly night tonight. Finished cill edge water proofing.

Back on my own house this evening after a few days away. Finishing off this tricky door airtightness taping. Planning to pre-tape the final door before installation to make this process easier, after today’s discussion on another thread.
https://twitter.com/estresidder/status/1598032290101465088?s=46&t=qQwGVfteDix64Qnljdxeqw


Not much time tonight but got the living room plenum fitted. How important is it to get these perfectly 90° to ceiling @ArchTesta ?


Getting the last few MVHR plenums in on the ground floor tonight. Last one in the wc required some creative use of airtightness tape - not able to fix to floor above cos pipes in the way. Secure but sitting low and not sure it’ll allow me to fit valve close enough to ceiling.


Will have a think on this over the weekend. Not sure how else we can do it.
Bit of mould starting in corner here. Will leave window tilted till vent gets switched on.
Bit of mould starting in corner here. Will leave window tilted till vent gets switched on.

Getting the insulation (and subsequently wind tightness) in on the remaining ground floor windows. Done biggest two several weeks ago, three smaller ones to do.

First photos shows evidence of previously bodged window installation (relatively new, Google street view is older than it). Mounted in the ventilated cavity and ‘filled’ with expanding foam. Obsessional job being done this time around! #Passivhaus #buildingperformance


Trying to make sure that the existing building paper laps to outside of tape at head of door/window, for any water running down sheathing board.


Window and door done. Smaller windows tomorrow.

Nice video from @Houseplanhelp to start an afternoon of work on the house after a morning of muddy bike racing with the kids. Cracking, cold day here.
https://twitter.com/Houseplanhelp/status/1599394913090666496


Nice bit of winter sun. Sorting out wind tightness around bay window.


Pretty excited by this impromptu test. Plasterboard taper&filler was in yesterday and had this small heater running upstairs. I turned it off ~6pm. Today is one of the coldest days of the year, there is still no door on downstair but it’s still warm upstairs. 😀😳 #Passivhaus

For reference I wrote this 10h after the heating was last on, those 10h were some of the coldest of the year so far and there was no solar gain since the upstairs windows are still covered.
This afternoon’s work. Bay window now wind tight and ready for cladding. Other windows half done. Cladding hopefully going on this week. 🤞🏼


Builders started putting the cladding up today. Gonna look mega!


More cladding on today. Decision needed on places boards don’t quite line up with 🪟edges. Design intention was lighter section above and below, black to either side. I think this was derailed by switch from open cladding to T&G. Leave as is or paint so line up exactly? 🤔


Tonight’s work: insulation and wind tightness done on small WC window. One window head still to do - needs a small job for the builder to do before I can finish. Then back inside on last few airtightness things and MVHR on the weekend.

Midday sun in each of the four bedrooms. Looking forward to getting rid of the scaffolding!


Top layer of scaffold gone so finally get to see how this bedroom window will frame the view, except there’s cloud above 700m on Ben Nevis. This will be view from bed.

Builders have done a bit more cladding while I was away. Time to get back on last few airtightness details.


This is gonna be tricky!

If you need to cut plasterboard with an airtightness membrane behind make sure you protect tip of saw, and make sure protection stays on…
Wonder if this tweet will get flagged as unsuitable for u18s like a previous one? 🤣
Wonder if this tweet will get flagged as unsuitable for u18s like a previous one? 🤣
https://twitter.com/moreourselves/status/1601116255523868674?s=46&t=k6n-vOjLyUyOsELeihQ4MA


I love winter sunshine.
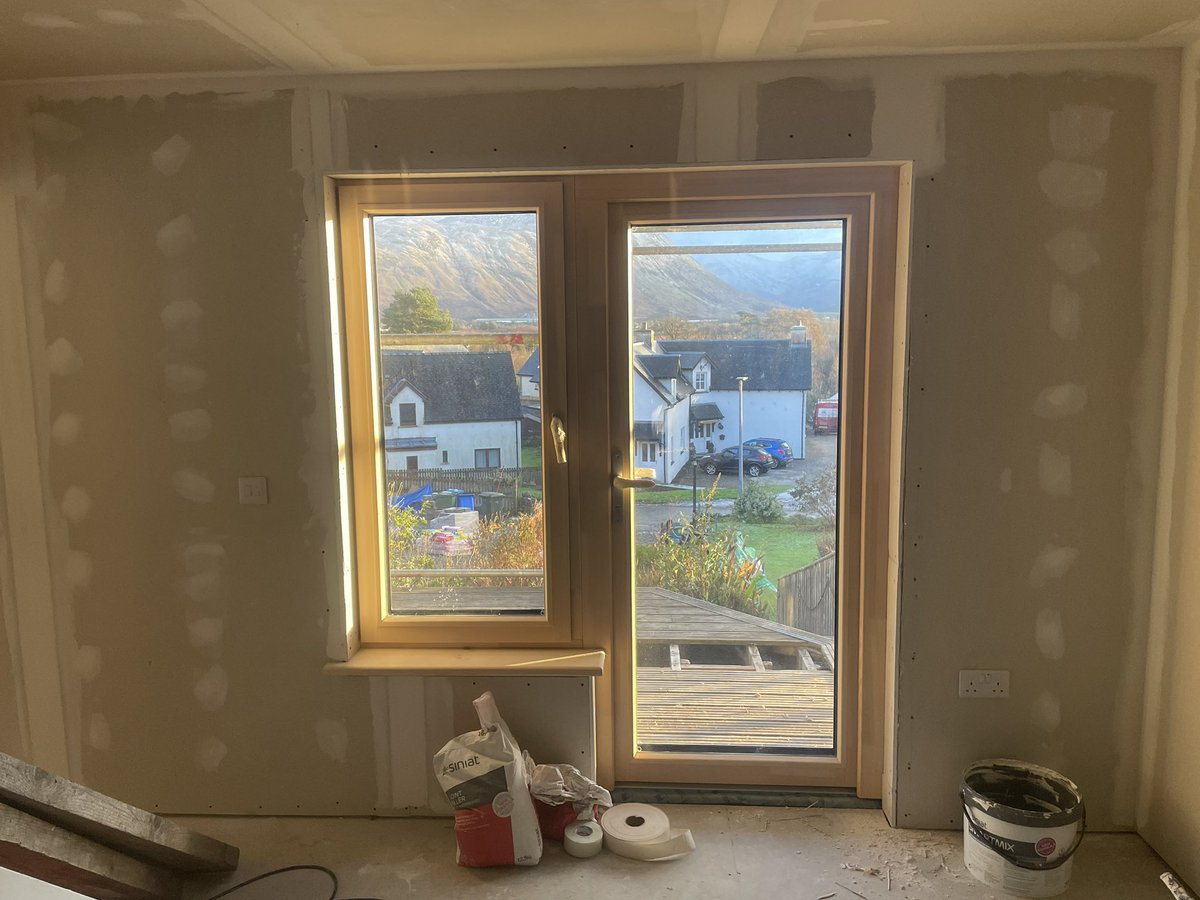


Insulation and wind tightness around conduit.


Sun hits us at 10am mid winter. Hoping that in future days like this will need no heating despite it being sub zero outside.


Are soil pipes a significant source of moisture? Wondering why the WC is only room I’m getting mould in. It is furthest from open door, so could be that, but maybe also that soil pipe was open until just now and adding moisture to room?


Pretty sure the ‘dirt factor’ on these windows (amount dirt reduces solar gain) is higher than the 5% allowed for in PHPP! 🤓🤣

Fixing airtightness on last penetration (pipe to outdoor tap).


Some weather today.
In order: view from future bed; view from future sofa 1; view from future sofa 2; view from window seat. 😍😍😍
In order: view from future bed; view from future sofa 1; view from future sofa 2; view from window seat. 😍😍😍


Sons went up a hill with their mum this morning. Brought some ice back down for their sister and for smashing! twitter.com/i/web/status/1…

Gable cladding completed today. 👌


Builders working out how to make reveal cladding work with hidden Progression frames. Looking good!


Reveals looking awesome. Only half an hour to work on house before school nativity, but managed to finish insulation and airtightness to last window head. One door left to do when that goes in.


Scaffolding off on two sides of 🏡 now, affording a proper view of cladding. 🥰
Feeling a little ropey so having a night off the house. Snow has turned to rain though so better go and direct rain pipe away from #EV charger! 😬
Pretty psyched about this!
Feeling a little ropey so having a night off the house. Snow has turned to rain though so better go and direct rain pipe away from #EV charger! 😬
Pretty psyched about this!
https://twitter.com/estresidder/status/1603796191262785543?s=46&t=qMij05VPwyvvKOXjbozF5Q


Should do the job!

Not working on house this weekend as a little under the weather, but popped up to get a look at reveals from inside in daylight. Looking lovely!


@threadreaderapp unroll please.
• • •
Missing some Tweet in this thread? You can try to
force a refresh


