If you’re an academic you need a website so that people can easily find info about your research and publications. Here’s how to make your own website for free in an under an hour using the blogdown package in #Rstats [THREAD]
So why use blogdown? Sure, there are several free options available to start your own blog (e.g., Medium). However, you generally can’t list your publications or other information easily on these services. Also, who knows where these services will be in a few years?
There are also some great point-and-click services available (e.g., Squarespace). However, you need to pay about $10 a month for these services, and they’re generally not well suited for academic webpages.
Alternatively, R + blogdown is free and can integrate with the Hugo framework, which provides a ton of templates. It also uses Markdown, which is a straightforward markup language.
Install blogdown in R using this command:
install.packages("blogdown”)
Then start a new project, entering “gcushen/hugo-academic” as the Hugo theme. Keep the other options ticked. This will download all the necessary files.
install.packages("blogdown”)
Then start a new project, entering “gcushen/hugo-academic” as the Hugo theme. Keep the other options ticked. This will download all the necessary files.
This website theme has been specifically designed for academics, as there are sections for info on publications, teaching, and upcoming talks etc...
To build and view your site, run these two commands:
blogdown::build_site()
blogdown::serve_site()
The viewer window will render a mobile version of your site, but you can also see a desktop version in your browser
blogdown::build_site()
blogdown::serve_site()
The viewer window will render a mobile version of your site, but you can also see a desktop version in your browser
So now you can see what your website will look like. All you have to do is to change the information in your scripts. Let’s start with basic configuration in the config.toml file. You’ll want to change the website title, name details, and organisation info
In the config file you can also change the colour theme and font style of your website, so have a play around with these options.
Your main homepage is made up of a set of widgets, which you can customise or remove entirely. For example, let’s say we want to remove the big header image, called the “hero” widget. Go to the Files tab, and then navigate to content > home > "hero"
Just change the “true” command after “active”, to “false”. Once you save the updated "hero" script, your website will automatically update, with the hero widget removed.
Let’s now update the profile photo. Just save your profile in the “img” folder, calling the file portrait.jpg. This will automatically update your profile picture.
The home folder contains scripts for all your home page widgets. Edit the “about” file to edit your education and biography details. Have a look through the other widgets and edit or remove.
Not sure what something does? Just edit your script and see what happens!
Not sure what something does? Just edit your script and see what happens!
If your website isn’t updating, this could mean that one of your files has an error. Unfortunately, blogdown sometimes won’t reveal the source of the error. You can get more info by accessing Hugo in Terminal.
In RStudio, select the Terminal tab, then run the following command
hugo -v
If there’s an error, this command will reveal which file is the cause of the problem. If there are no problems, you’ll get info about your webpage
hugo -v
If there’s an error, this command will reveal which file is the cause of the problem. If there are no problems, you’ll get info about your webpage
Here’s an example of an error. Looks there’s an error with the author names in the ‘wallaby’ file. Once you address this, run the “hugo -v” command again in Terminal. 


To edit your publications, go to the files found in the content > publication folder. Select the “clothing-search” file for editing. Edit your publication’s details accordingly, then save it with a useful name. It should appear in your publications
To change what appears in your header menu, edit the [params.menus] section of your config file. Just edit or delete sections as you wish.
So now that you’ve done all your edits and your happy with your page, it’s time to put it online. Set up a free account at Netlify netlify.com
One common way to upload your website and keep it updated is by hosting your files on Github. But if you want to get set up quickly, just drag the ‘public’ folder from your blogdown project into Netlify.
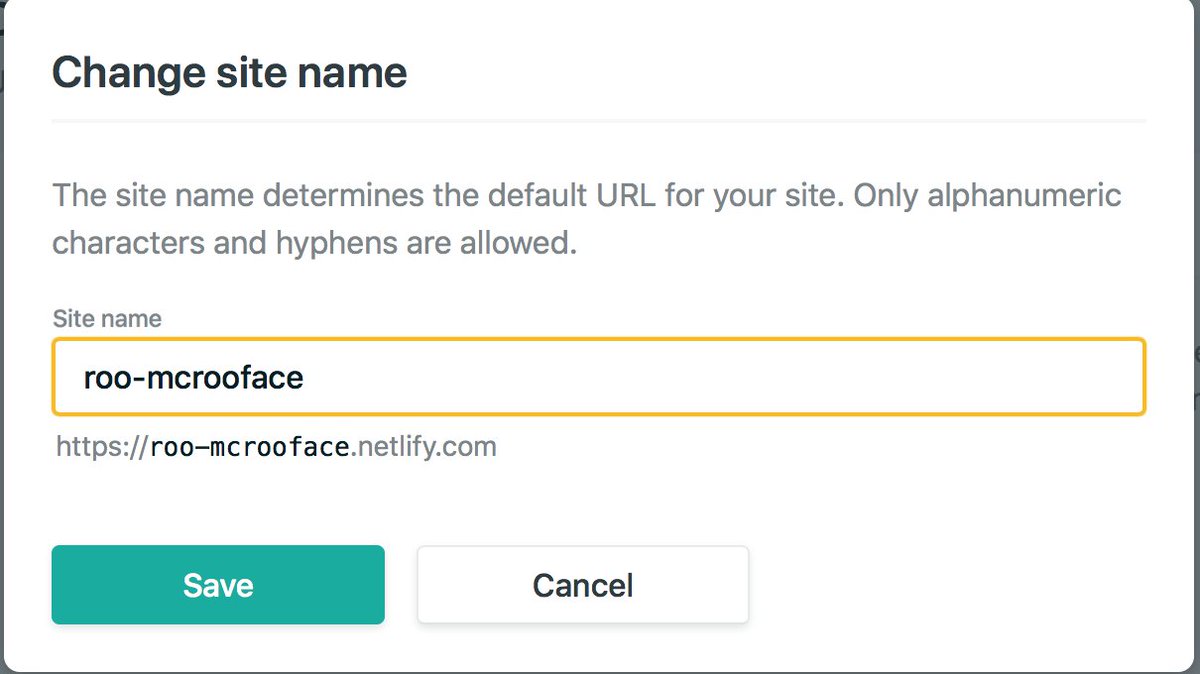
You can edit the domain name, which will include “netlify.com” at the end of your address. If you would like a cleaner domain name, you’ll can purchase one for about $10 USD per year (just do some googling, there are many options available for domain name purchase)
For more info about the excellent blogdown package from @xieyihui and team, check out the online blogdown textbook bookdown.org/yihui/blogdown/
Here's the website we just made roo-mcrooface.netlify.com For a completed website, here's mine with a custom domain name dsquintana.com
If you’ve made your own website using this tweetorial, give me a shout!
If you’ve made your own website using this tweetorial, give me a shout!