,
38 tweets,
13 min read
Read on Twitter
Do you sand your 3D prints? Do you want to but it takes too damn long? Do you want to do it more efficiently? A thread!
Meet Menace’s staff’s carousel. The brighter white part is completely unsanded and fresh off the printer. Let’s catch it up with its sister. 

The #1 reason why bodyshopping can take so long is that you aren’t starting with a high enough grit to remove print lines. We start at 100-150. Shearing off print lines takes a fraction of the time with a grittier sandpaper, so we start there. And 150 is fast.
This is 5 seconds of sanding with 150. This is PLA plastic — the one people complain is hard to sand compared to harder to print filaments like ABS or more expensive filaments like PETG. 5 seconds, my friends.

“But Jenn,” you cry. “Sanding is physically taxing. It adds up!”
Hello! I’m Jenn. I have chronic wrist/nerve issues. I’ve had surgery for nerve issues! Let me introduce you to two friends: the sanding block and the clamps.
Hello! I’m Jenn. I have chronic wrist/nerve issues. I’ve had surgery for nerve issues! Let me introduce you to two friends: the sanding block and the clamps.


The sanding block makes it easier to apply pressure with one hand and the clamps mean you don’t have to resist the sanding motion with your other hand.
Not every piece can be clamped. Some pieces have fine details that you can’t shear a block over. That’s fine: doing it on pieces you can will still eliminate the largest amount of surface area possible so you can reserve energy for smaller pieces.
Now sand. Notice something here?
The print steps run around the round part. Let’s call that the “grain.” We want to sand ACROSS that — perpendicular to those lines. Imagine the red lines as the path of your sandpaper.


You can also do circular motions, but try to avoid sanding with the grain — it’s slower.
Sand until you can’t (or barely) see the print lines. Then switch down to a finer grit — 220 or 320. 150 on left, 320 on right.


For finer details, you can fold sandpaper into a sharp crease and run through the smaller bits, or you can use a sanding needle — these are small metal rasps. Be careful because they can be sharp and start gouging.

On tools:
Use AUTOMOTIVE sandpaper. You can use it wet or dry, and it lasts longer. Wet sanding (using a bucket of water and a bit of dish soap) keeps your paper from clogging and wipes away dust. Change water between grits.
Use AUTOMOTIVE sandpaper. You can use it wet or dry, and it lasts longer. Wet sanding (using a bucket of water and a bit of dish soap) keeps your paper from clogging and wipes away dust. Change water between grits.
Clamps: PLASTIC grips. Metal can dent the print, especially if too tight.
Change out sandpaper regularly. Sandpaper wears over time and you’ll slow yourself down trying to make 50 cents worth of sandpaper last twice as long. (I used one 5”x3” piece of 150 for this.)
You can also use FILLER PRIMER between sanding layers to fill in deeper lines; this is a higher-density automotive primer that fills in scratches. I like Duplicolor. (Rustoleum will do if you can’t find Duplicolor.)
I didn’t use filler primer on these because it’s not bad. If your printer isn’t so fine tuned, a layer of filler primer after the initial sand might save you a bit of time.
I sanded that piece down in the 40 min period between changing my laundry over, and in that time I managed to document this and make lunch. You might not be so fast to start, but you’ll get there!! I’m going to eat lunch now but I’ll be back with SPOT PUTTY in a bit :)
So: you’ve got scratches. Sanding down to their level would take forever. Filler primer can take layers. Wanna obliterate them? Welcome to spot filler.
There are many brands — Bondo’s spot filler is probably the most common, but my favorite is 3M’s acryl-green. (Fellow Canadians: find an American friend to smuggle you some because it’s not sold here that I’ve found. I like that it dries fast and hard.

(Its also one of my favorite colours, while Bondo’s version is reddy-brown.)
One of my favorite tools is a craft knife; I use them daily and have 6+ so they’re always in reach. I keep dull blades to use as filler spreaders — I spread it on and wait to dry. It sands well so I don’t care if it’s not perfectly smooth, but I try to avoid the creases.

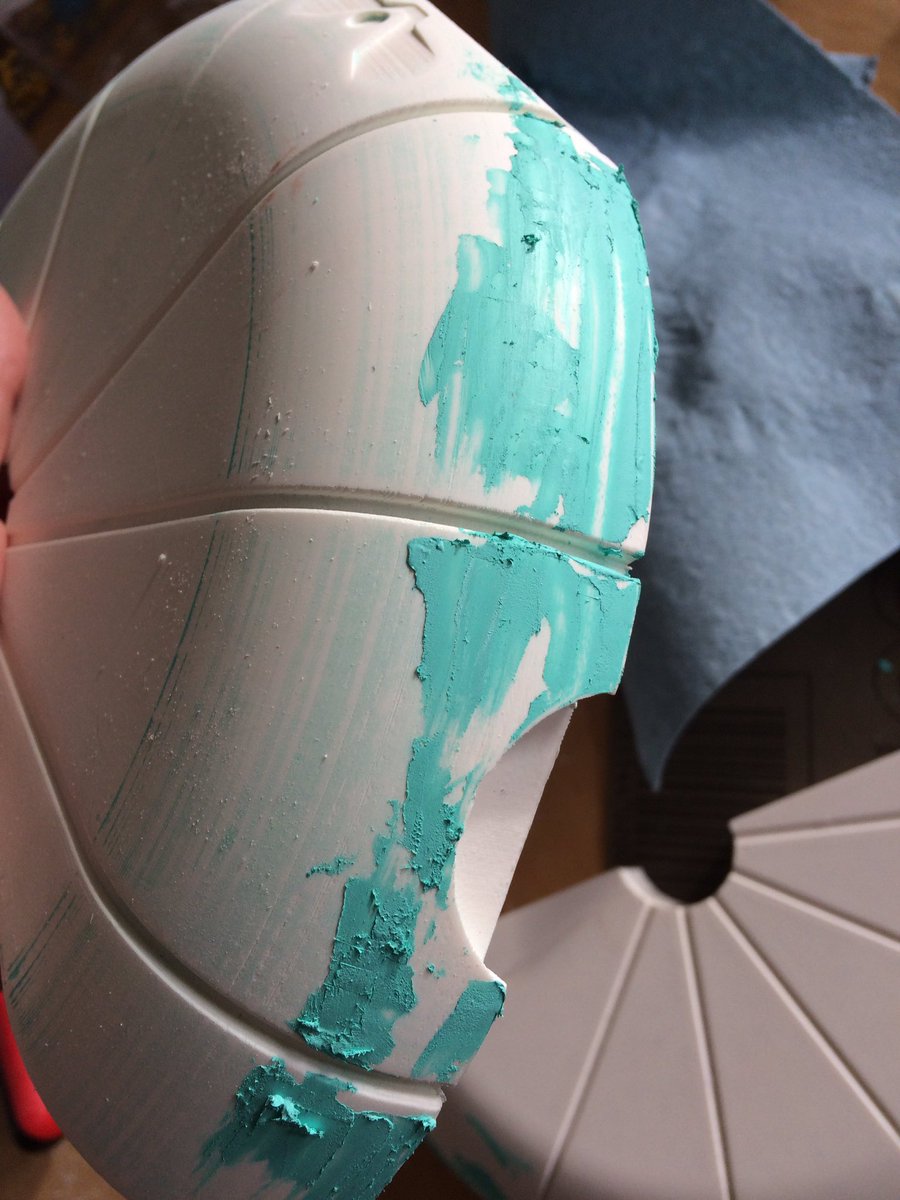

Start sanding. I’m using 320, which is pretty optimal for acrylgreen. I’m wet sanding so I’m leaving a green mess that obscures what I’m looking at, so I wipe it down periodically. (Some people just sand directly in/over a water bucket. I do sometimes. 🤷♀️)


See this smudge? It’s a mark I haven’t sanded there enough. A few seconds later, it’s gone. You should only see the filled lines.


This is why you rinse your sandpaper. One is clogged, the other is much less so. (A bit of soap can loosen the rest there.)


Now: our pieces are in pretty good shape. Let’s join them and do the seam.
First, I use my knife to cut scratches in the edges that will meet, as this gives the glue more to bite into. Putting the blade on a 45 degree angle means you get better scratches.

Usually I use superglue but this is a big piece so I’d like more than 20 seconds working time. Two-part 5 min epoxy it is! Thank you, dollar store hardware section. I mix it up on wax paper (it won’t seep in, wasting glue.)


Time to handle this seam. You’ll notice a few things:
- I have modeled it in an easy to reach place rather than hiding it in a groove
- I have made this model with keys so I don’t have alignment struggles.
- A TIGHT ALIGNED SEAM IS AN EASY SEAM TO PATCH.
- I have modeled it in an easy to reach place rather than hiding it in a groove
- I have made this model with keys so I don’t have alignment struggles.
- A TIGHT ALIGNED SEAM IS AN EASY SEAM TO PATCH.


I switch back to 150 to scrub down the seam a bit, just to soften the lip. I’m sanding perpendicular to the seam — across it, not along it, and thinking that I’m trying to go against the groove. Since I have a lip/groove still here still, I’m gonna throw in some filler.


(I didn’t go all the way to the middle because that part will be covered by another piece, so I’m not going to waste time removing hidden seams.)
This isn’t the worlds tightest seam — tiny variations in the prints can throw off your seams — but if your printing is fine tuned enough you can get seams that largely vanish without filler at all.
Once sanded down, I wash it to clear out all that dust, and dry it off thoroughly. Huh! Because of the colours, I can’t see how smooth it is — it looks smooth, but IS IT? So let’s prime it to make it one colour so I can see what’s what. Looks like I’ve got another round of putty.


(Sorry for the lull, waiting for primer to dry in freezing weather is a pain 🤷♀️🤷♀️🤷♀️🤷♀️)
I’m moulding some things right now. All KDA stuff.

Okay, we’re back. More filler! (The nice thing about props is that you can rotate what piece you’re working on to save curing time, or you can go do other things, eat dinner, watch TV or whatever and take a break!)

Cool. Smooth. Time to do another layer of primer just to be sure. (Your level of nitpicking is up to you, but even one pass is better than none.)


Can you see it? Just barely! Only tiny touch ups left and this piece is done.